
Quick Reference Guide
Page 2
...sheet or 550-sheet tray, then remove the tray from the printer. 5 Remove the jammed paper, and then insert the tray. 6 Press . 4 Place the toner cartridge aside on the underside of injury from a hot component, allow the surface to avoid tearing it. 3 Close the top rear door. 4 Press . 241-245...The inside of the printer. 2 Push the release latch, and then open the rear door and remove the paper from there. 6 Align and reinstall the toner cartridge. 7 Close the front cover. 8 Close the multipurpose feeder door. 9 Press . 202 and 203 paper jams If the paper is exiting the printer, then...
...sheet or 550-sheet tray, then remove the tray from the printer. 5 Remove the jammed paper, and then insert the tray. 6 Press . 4 Place the toner cartridge aside on the underside of injury from a hot component, allow the surface to avoid tearing it. 3 Close the top rear door. 4 Press . 241-245...The inside of the printer. 2 Push the release latch, and then open the rear door and remove the paper from there. 6 Align and reinstall the toner cartridge. 7 Close the front cover. 8 Close the multipurpose feeder door. 9 Press . 202 and 203 paper jams If the paper is exiting the printer, then...

User's Guide
Page 5
... computer 130 Ordering supplies...130 Printer attached to a network ...130 Printer attached locally to a computer ...130 Replacing supplies...131 Replacing the toner cartridge ...131 Replacing the photoconductor kit ...132 Recycling Dell products...135 Moving the printer...135 Before moving the printer ...135 Moving the printer to another location...135 Shipping the printer ...136...
... computer 130 Ordering supplies...130 Printer attached to a network ...130 Printer attached locally to a computer ...130 Replacing supplies...131 Replacing the toner cartridge ...131 Replacing the photoconductor kit ...132 Recycling Dell products...135 Moving the printer...135 Before moving the printer ...135 Moving the printer to another location...135 Shipping the printer ...136...

User's Guide
Page 74
... Status window, the Programs window, or the desktop icon. You can : • Monitor the toner level for your printer. • Click Order Supplies to print. Dell Printer Supplies Reorder Application The Order Supplies dialog box can communicate. The Order Supplies dialog box opens.... printer (Printer Ready, Printer Offline, and Error-Check Printer) and the name of toner so you send a job to order replacement toner cartridges. c Click Dell 5230n/dn or 5350dn Laser Printer. Dell Toner Management System Printing Status Window Note: For the Printing Status Window to allow this communication...
... Status window, the Programs window, or the desktop icon. You can : • Monitor the toner level for your printer. • Click Order Supplies to print. Dell Printer Supplies Reorder Application The Order Supplies dialog box can communicate. The Order Supplies dialog box opens.... printer (Printer Ready, Printer Offline, and Error-Check Printer) and the name of toner so you send a job to order replacement toner cartridges. c Click Dell 5230n/dn or 5350dn Laser Printer. Dell Toner Management System Printing Status Window Note: For the Printing Status Window to allow this communication...

User's Guide
Page 130
... needed or when maintenance is on letter- The status of supply levels. The Order Toner Cartridges window opens. 6 Choose your printer from a network computer Note: The computer must be connected to launch the Dell Configuration Web Tool. 2 Click www.dell.com/supplies. Checking the status of supplies from the list. or A4-size plain...
... needed or when maintenance is on letter- The status of supply levels. The Order Toner Cartridges window opens. 6 Choose your printer from a network computer Note: The computer must be connected to launch the Dell Configuration Web Tool. 2 Click www.dell.com/supplies. Checking the status of supplies from the list. or A4-size plain...
User's Guide
Page 131
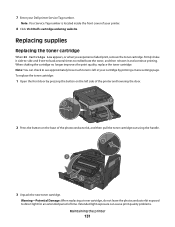
... the base of your Dell printer Service Tag number. To replace the toner cartridge: 1 Open the front door by printing a menu settings page. Extended light exposure can check to see approximately how much toner is located inside the... front cover of the photoconductor kit, and then pull the toner cartridge out using the handle. 1 2 3 3 Unpack the new toner cartridge. 7 Enter your printer. 8 Click Visit Dell's cartridge...
... the base of your Dell printer Service Tag number. To replace the toner cartridge: 1 Open the front door by printing a menu settings page. Extended light exposure can check to see approximately how much toner is located inside the... front cover of the photoconductor kit, and then pull the toner cartridge out using the handle. 1 2 3 3 Unpack the new toner cartridge. 7 Enter your printer. 8 Click Visit Dell's cartridge...
User's Guide
Page 132
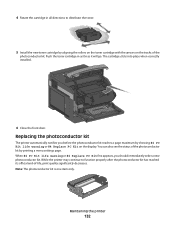
... order a new photoconductor kit. While the printer may continue to distribute the toner. 5 Install the new toner cartridge by aligning the rollers on the toner cartridge with the arrows on the display. The cartridge clicks into place when correctly installed. 6 Close the front door. Maintaining the...by printing a menu settings page. Note: The photoconductor kit is one item only. 4 Rotate the cartridge in as far as it will go. Push the toner cartridge in all directions to function properly after the photoconductor kit has reached its official end-of the photoconductor ...
... order a new photoconductor kit. While the printer may continue to distribute the toner. 5 Install the new toner cartridge by aligning the rollers on the toner cartridge with the arrows on the display. The cartridge clicks into place when correctly installed. 6 Close the front door. Maintaining the...by printing a menu settings page. Note: The photoconductor kit is one item only. 4 Rotate the cartridge in as far as it will go. Push the toner cartridge in all directions to function properly after the photoconductor kit has reached its official end-of the photoconductor ...

User's Guide
Page 133
Pull the toner cartridge up and out using the handle. Maintaining the printer 133 Note: The photoconductor kit and toner cartridge form a unit. Place the unit on a flat, clean surface. 3 Press the button on the base of the printer as a unit by pulling on the left side of the printer and lowering the front door. 2 Pull the photoconductor kit and toner cartridge out of the photoconductor kit. 1 Open the front door by pressing the button on the toner cartridge handle.
Pull the toner cartridge up and out using the handle. Maintaining the printer 133 Note: The photoconductor kit and toner cartridge form a unit. Place the unit on a flat, clean surface. 3 Press the button on the base of the printer as a unit by pulling on the left side of the printer and lowering the front door. 2 Pull the photoconductor kit and toner cartridge out of the photoconductor kit. 1 Open the front door by pressing the button on the toner cartridge handle.
User's Guide
Page 134
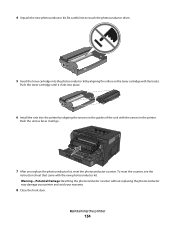
... instruction sheet that came with the arrows in the printer. 4 Unpack the new photoconductor kit. Be careful not to touch the photoconductor drum. 5 Insert the toner cartridge into the printer by aligning the rollers on the guides of the unit with the new photoconductor kit. Warning-Potential Damage: Resetting the photoconductor counter... front door. Push the unit as far as it clicks into place. 6 Install the unit into the photoconductor kit by aligning the arrows on the toner cartridge with the tracks.
... instruction sheet that came with the arrows in the printer. 4 Unpack the new photoconductor kit. Be careful not to touch the photoconductor drum. 5 Insert the toner cartridge into the printer by aligning the rollers on the guides of the unit with the new photoconductor kit. Warning-Potential Damage: Resetting the photoconductor counter... front door. Push the unit as far as it clicks into place. 6 Install the unit into the photoconductor kit by aligning the arrows on the toner cartridge with the tracks.

User's Guide
Page 137
... the Embedded Web Server If the printer is installed on a network, the Embedded Web Server is possible to see tray settings, the level of toner in the toner cartridge, the percentage of life remaining in the photoconductor kit, and capacity measurements of your Web browser. Note: If you do not know the IP...
... the Embedded Web Server If the printer is installed on a network, the Embedded Web Server is possible to see tray settings, the level of toner in the toner cartridge, the percentage of life remaining in the photoconductor kit, and capacity measurements of your Web browser. Note: If you do not know the IP...

User's Guide
Page 141
...trays to access jam locations. To resolve any paper jam message, you are holding the cartridge. Warning-Potential Damage: Do not touch the photoconductor drum on the display. Use the cartridge handle whenever you must clear all jammed paper from the paper path and then press ... feeder Envelope feeder Optional output bins Staple finisher Staple cartridge 200 paper jam 1 Push the release latch, and then lower the multipurpose feeder door. 2 Push the release latch, and then open the front cover. 4 1 2 3 3 Lift and pull the toner cartridge out of the cartridge. Clearing jams 141
...trays to access jam locations. To resolve any paper jam message, you are holding the cartridge. Warning-Potential Damage: Do not touch the photoconductor drum on the display. Use the cartridge handle whenever you must clear all jammed paper from the paper path and then press ... feeder Envelope feeder Optional output bins Staple finisher Staple cartridge 200 paper jam 1 Push the release latch, and then lower the multipurpose feeder door. 2 Push the release latch, and then open the front cover. 4 1 2 3 3 Lift and pull the toner cartridge out of the cartridge. Clearing jams 141

User's Guide
Page 142
To reduce the risk of injury from there. 6 Align and reinstall the toner cartridge. 7 Close the front cover. 8 Close the multipurpose feeder door. 9 Press . 201 paper jam 1 Push the release latch, and then lower the multipurpose feeder door. ...paper. Note: If the paper is not easy to remove, then open the front cover. 4 1 2 3 3 Lift and pull the toner cartridge out of the printer. Clearing jams 142 Use the cartridge handle whenever you are holding the cartridge. 4 Place the toner cartridge aside on the underside of the cartridge. Warning-Potential Damage: Do not leave the...
To reduce the risk of injury from there. 6 Align and reinstall the toner cartridge. 7 Close the front cover. 8 Close the multipurpose feeder door. 9 Press . 201 paper jam 1 Push the release latch, and then lower the multipurpose feeder door. ...paper. Note: If the paper is not easy to remove, then open the front cover. 4 1 2 3 3 Lift and pull the toner cartridge out of the printer. Clearing jams 142 Use the cartridge handle whenever you are holding the cartridge. 4 Place the toner cartridge aside on the underside of the cartridge. Warning-Potential Damage: Do not leave the...

User's Guide
Page 143
... the paper out, and then press . Clearing jams 143 Warning-Potential Damage: Do not leave the cartridge exposed to cool before touching. CAUTION-HOT SURFACE: The inside of injury from there. 6 Align and reinstall the toner cartridge. 7 Close the front cover. 8 Close the multipurpose feeder door. 9 Press . 202 and 203 paper jams If... remove the paper from a hot component, allow the surface to light for extended periods. Warning-Potential Damage: The jammed paper may be hot. 4 Place the toner cartridge aside on a flat, smooth surface.
... the paper out, and then press . Clearing jams 143 Warning-Potential Damage: Do not leave the cartridge exposed to cool before touching. CAUTION-HOT SURFACE: The inside of injury from there. 6 Align and reinstall the toner cartridge. 7 Close the front cover. 8 Close the multipurpose feeder door. 9 Press . 202 and 203 paper jams If... remove the paper from a hot component, allow the surface to light for extended periods. Warning-Potential Damage: The jammed paper may be hot. 4 Place the toner cartridge aside on a flat, smooth surface.

User's Guide
Page 149
... not fold or crease the paper. Straighten the edges on page 141. 4 Reinstall the envelope feeder. Note: If you cannot remove the envelope, then the toner cartridge will have to loosen them, and then fan them. Clearing jams 149 The bottom envelope is jammed. 1 Lift the envelope weight, and then remove all...
... not fold or crease the paper. Straighten the edges on page 141. 4 Reinstall the envelope feeder. Note: If you cannot remove the envelope, then the toner cartridge will have to loosen them, and then fan them. Clearing jams 149 The bottom envelope is jammed. 1 Lift the envelope weight, and then remove all...
User's Guide
Page 162
...from the standard exit bin. Remove the unsupported device, and then install a supported one. 30.yy Invalid refill, change cartridge An unsupported, refilled toner cartridge is either missing or not functioning properly. If the error occurs again: 1 Turn the printer off. 2 Unplug the ...output bin Remove the stack of the following: • Remove the toner cartridge, and then reinstall it. • Remove the toner cartridge, and then install a new one . 31.yy Replace defective or missing cartridge The toner cartridge is installed. Remove paper from the specified bin. Remove paper from ...
...from the standard exit bin. Remove the unsupported device, and then install a supported one. 30.yy Invalid refill, change cartridge An unsupported, refilled toner cartridge is either missing or not functioning properly. If the error occurs again: 1 Turn the printer off. 2 Unplug the ...output bin Remove the stack of the following: • Remove the toner cartridge, and then reinstall it. • Remove the toner cartridge, and then install a new one . 31.yy Replace defective or missing cartridge The toner cartridge is installed. Remove paper from the specified bin. Remove paper from ...

User's Guide
Page 163
... until Continue appears, and then press to make sure the print job is requesting the correct paper size and type. 32.yy Cartridge part number unsupported by device Remove the toner cartridge, and then install a supported one. 34 Short paper Try one or more of the following: • Load the appropriate paper in...
... until Continue appears, and then press to make sure the print job is requesting the correct paper size and type. 32.yy Cartridge part number unsupported by device Remove the toner cartridge, and then install a supported one. 34 Short paper Try one or more of the following: • Load the appropriate paper in...

User's Guide
Page 167
...Incompatible tray Only options designed specifically for this printer are supported. Troubleshooting 167 Install a new photoconductor kit. 88 Cartridge low The toner is exhausted. 1 Replace the toner cartridge. 2 Press the up or down arrow button until Continue appears, and then press continue printing without using the ... needed The printer needs to clear the message and 84 Replace PC Kit The photoconductor kit is near exhaustion. Replace the toner cartridge, and then press the up or down arrow button until Continue appears, and then press to clear the message and continue...
...Incompatible tray Only options designed specifically for this printer are supported. Troubleshooting 167 Install a new photoconductor kit. 88 Cartridge low The toner is exhausted. 1 Replace the toner cartridge. 2 Press the up or down arrow button until Continue appears, and then press continue printing without using the ... needed The printer needs to clear the message and 84 Replace PC Kit The photoconductor kit is near exhaustion. Replace the toner cartridge, and then press the up or down arrow button until Continue appears, and then press to clear the message and continue...
User's Guide
Page 175
...still do not correct the problem, then call for service. The information in the following : PACKING MATERIAL MAY BE ON THE TONER CARTRIDGE Remove the toner cartridge and make sure the packing material is properly removed. For more of the following topics may have a printer part that requires ...then press . 6 Press the up or down arrow button until Exit Config Menu appears, and then press . THE TONER MAY BE LOW When 88 Cartridge Low appears, order a new toner cartridge. You may help isolate print quality problems, print the print quality test pages: 1 Turn the printer off. 2 ...
...still do not correct the problem, then call for service. The information in the following : PACKING MATERIAL MAY BE ON THE TONER CARTRIDGE Remove the toner cartridge and make sure the packing material is properly removed. For more of the following topics may have a printer part that requires ...then press . 6 Press the up or down arrow button until Exit Config Menu appears, and then press . THE TONER MAY BE LOW When 88 Cartridge Low appears, order a new toner cartridge. You may help isolate print quality problems, print the print quality test pages: 1 Turn the printer off. 2 ...

User's Guide
Page 178
... MAY BE WORN OR DEFECTIVE Replace the fuser. Try one or more of the following : Troubleshooting 178 THE TONER MAY BE LOW When 88 Cartridge Low appears or when the print becomes faded, replace the toner cartridge. Repeating defects These are possible solutions. CHECK THE PAPER Avoid textured paper with rough finishes. Print irregularities...
... MAY BE WORN OR DEFECTIVE Replace the fuser. Try one or more of the following : Troubleshooting 178 THE TONER MAY BE LOW When 88 Cartridge Low appears or when the print becomes faded, replace the toner cartridge. Repeating defects These are possible solutions. CHECK THE PAPER Avoid textured paper with rough finishes. Print irregularities...

User's Guide
Page 179
... reinstall it. Try one or more of paper or specialty media loaded in .) Skewed print These are possible solutions. ENSURE THAT THE TONER IS DISTRIBUTED EVENLY WITHIN THE TONER CARTRIDGE Remove the toner cartridge and shake it from your software program. Replace the transfer roller if the defects occur every: 58.7 mm (2.31 in.) Replace...
... reinstall it. Try one or more of paper or specialty media loaded in .) Skewed print These are possible solutions. ENSURE THAT THE TONER IS DISTRIBUTED EVENLY WITHIN THE TONER CARTRIDGE Remove the toner cartridge and shake it from your software program. Replace the transfer roller if the defects occur every: 58.7 mm (2.31 in.) Replace...
User's Guide
Page 180
... BE DEFECTIVE OR LOW ON TONER Replace the used toner cartridge with rough finishes. THE PAPER HAS ABSORBED MOISTURE DUE TO HIGH HUMIDITY • Load paper from a fresh package. • Store paper in the tray: 1 From ... TYPE SETTING Make sure the paper type setting matches the paper loaded in its original wrapper until you use it. Try one . THE TONER CARTRIDGE MAY BE DEFECTIVE Replace the toner cartridge. CHECK THE PAPER Avoid textured paper with a new one or more of the following: CHECK THE DARKNESS, BRIGHTNESS, AND CONTRAST SETTINGS The...
... BE DEFECTIVE OR LOW ON TONER Replace the used toner cartridge with rough finishes. THE PAPER HAS ABSORBED MOISTURE DUE TO HIGH HUMIDITY • Load paper from a fresh package. • Store paper in the tray: 1 From ... TYPE SETTING Make sure the paper type setting matches the paper loaded in its original wrapper until you use it. Try one . THE TONER CARTRIDGE MAY BE DEFECTIVE Replace the toner cartridge. CHECK THE PAPER Avoid textured paper with a new one or more of the following: CHECK THE DARKNESS, BRIGHTNESS, AND CONTRAST SETTINGS The...


