User's Guide
Page 15
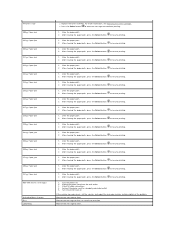
..., the Auto setting does not guarantee the page will be able to avoid most paper jams. For more information on avoiding paper jams, see Avoiding Jams. If jams do * 1 27x Paper Jam Check Bin x Open the output bin rear doors, and then remove the jam. 2 202 Paper Jam Open Rear Door Open the rear door on the printer, and then remove...
..., the Auto setting does not guarantee the page will be able to avoid most paper jams. For more information on avoiding paper jams, see Avoiding Jams. If jams do * 1 27x Paper Jam Check Bin x Open the output bin rear doors, and then remove the jam. 2 202 Paper Jam Open Rear Door Open the rear door on the printer, and then remove...
User's Guide
Page 16
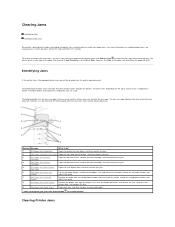
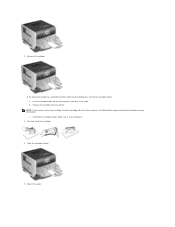
...the printer may seem out of the print cartridge. NOTE: The following clearing jam instructions may be hot. NOTE: Do not leave the cartridge exposed to a specific jam, see Identifying Jams. 200 and 201 Paper Jam Remove Cartridge 1. Jams in two locations and require the removal of numerical sequence. To go to light.... 3. Place the print cartridge aside. Although there are holding the cartridge. 4. Pull on the notch on the underside of the printer. Paper jams can occur in three areas: the front of the printer, inside of the printer occur in one of the output options.
...the printer may seem out of the print cartridge. NOTE: The following clearing jam instructions may be hot. NOTE: Do not leave the cartridge exposed to a specific jam, see Identifying Jams. 200 and 201 Paper Jam Remove Cartridge 1. Jams in two locations and require the removal of numerical sequence. To go to light.... 3. Place the print cartridge aside. Although there are holding the cartridge. 4. Pull on the notch on the underside of the printer. Paper jams can occur in three areas: the front of the printer, inside of the printer occur in one of the output options.

User's Guide
Page 18
This could cause personal injury or damage to remove the paper. Allow the printer to cool before touching any pointed objects to the printer. 4. Otherwise, continue with step 2. 2. Remove the jammed media. 9. CAUTION: Do not use any internal components. 3. Press the Select button . If the paper is exiting the printer, pull the media straight out, and press the Select button . Press the Select button . 202 Paper Jam Open Rear Door 1. Open the printer rear door. Close the rear door. 5. CAUTION: The inside of the printer may be hot.
This could cause personal injury or damage to remove the paper. Allow the printer to cool before touching any pointed objects to the printer. 4. Otherwise, continue with step 2. 2. Remove the jammed media. 9. CAUTION: Do not use any internal components. 3. Press the Select button . If the paper is exiting the printer, pull the media straight out, and press the Select button . Press the Select button . 202 Paper Jam Open Rear Door 1. Open the printer rear door. Close the rear door. 5. CAUTION: The inside of the printer may be hot.

User's Guide
Page 19
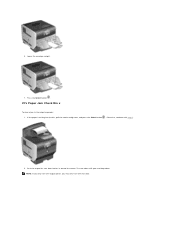
Press the Select button . 23x and 24x Jams Paper jams in these areas: 1. To clear these areas can occur on the media location, pull the media either up or down. 3. Close the duplex rear door. Open the duplex rear door. 2. Depending on the incline surface of a tray or across more than one tray. Open the printer paper tray, and remove any jammed media. 23x Paper Jam Open Duplex Rear Door 1. Remove the jammed media. Make sure it snaps into place. 4.
Press the Select button . 23x and 24x Jams Paper jams in these areas: 1. To clear these areas can occur on the media location, pull the media either up or down. 3. Close the duplex rear door. Open the duplex rear door. 2. Depending on the incline surface of a tray or across more than one tray. Open the printer paper tray, and remove any jammed media. 23x Paper Jam Open Duplex Rear Door 1. Remove the jammed media. Make sure it snaps into place. 4.
User's Guide
Page 20
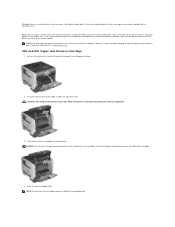
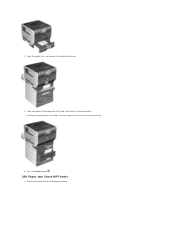
Open the duplex tray, and remove the media by pulling up or down. Press the Select button . 250 Paper Jam Check MP Feeder 1. Remove the paper from the multipurpose feeder. If it does not pull easily one way, try the other way. 4. Pull the print media either up . 3. 2. Open any optional trays beginning at the top, and remove any jammed media.
Open the duplex tray, and remove the media by pulling up or down. Press the Select button . 250 Paper Jam Check MP Feeder 1. Remove the paper from the multipurpose feeder. If it does not pull easily one way, try the other way. 4. Pull the print media either up . 3. 2. Open any optional trays beginning at the top, and remove any jammed media.
User's Guide
Page 21
Flex, fan, and restack the media. 3. Slide the side guide toward the inside of the tray until it lightly rests against the edge of the stack; Load the print media. 4. Lift the envelope weight. Press the Select button . 260 Paper Jam Check Env Feeder The envelope feeder feeds envelopes from the bottom of the media. 5. the bottom envelope will be the one that is jammed. 1. 2.
Flex, fan, and restack the media. 3. Slide the side guide toward the inside of the tray until it lightly rests against the edge of the stack; Load the print media. 4. Lift the envelope weight. Press the Select button . 260 Paper Jam Check Env Feeder The envelope feeder feeds envelopes from the bottom of the media. 5. the bottom envelope will be the one that is jammed. 1. 2.
User's Guide
Page 22
Remove all envelopes. b. See 200 and 201 Paper Jam Remove Cartridge for more information. Flex and stack the envelopes. 4. Remove the envelope from the printer. c. 2. Reinstall the envelope feeder. Lift the envelope feeder up out of the printer, and then set it snaps into place. 3. Make sure it aside. Load the envelope feeder. 5. Adjust the guide. If the jammed envelope has entered the printer and cannot be removed. a. NOTE: If you cannot remove the envelope, the print cartridge will have to be pulled out, remove the envelope feeder.
Remove all envelopes. b. See 200 and 201 Paper Jam Remove Cartridge for more information. Flex and stack the envelopes. 4. Remove the envelope from the printer. c. 2. Reinstall the envelope feeder. Lift the envelope feeder up out of the printer, and then set it snaps into place. 3. Make sure it aside. Load the envelope feeder. 5. Adjust the guide. If the jammed envelope has entered the printer and cannot be removed. a. NOTE: If you cannot remove the envelope, the print cartridge will have to be pulled out, remove the envelope feeder.
User's Guide
Page 23
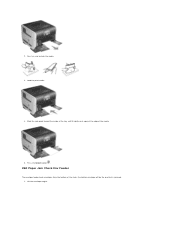
NOTE: If you only have one output option, you may only have one rear door. Push the output bin rear door latches in the output expander: 1. If the paper is exiting into the bin, pull the media straight out, and press the Select button . Lower the envelope weight. 7. Otherwise, continue with step 2. 2. The rear doors will open and drop down. Press the Select button . 27x Paper Jam Check Bin x To clear a jam in toward the center. 6.
NOTE: If you only have one output option, you may only have one rear door. Push the output bin rear door latches in the output expander: 1. If the paper is exiting into the bin, pull the media straight out, and press the Select button . Lower the envelope weight. 7. Otherwise, continue with step 2. 2. The rear doors will open and drop down. Press the Select button . 27x Paper Jam Check Bin x To clear a jam in toward the center. 6.

User's Guide
Page 44
... 8.5 x 14 in. (140 x 210 mm to 229 x 356 mm) 5.83 x 7.17 in . (148 x 210 mm) Understanding Paper and Specialty Media Guidelines Supported Print Media Selecting Print Media Storing Print Media Avoiding Jams Print media is paper, card stock, transparencies, labels, and envelopes. to 9.01 x 14 in. (70 x 127 mm to 216 x 356 mm...
... 8.5 x 14 in. (140 x 210 mm to 229 x 356 mm) 5.83 x 7.17 in . (148 x 210 mm) Understanding Paper and Specialty Media Guidelines Supported Print Media Selecting Print Media Storing Print Media Avoiding Jams Print media is paper, card stock, transparencies, labels, and envelopes. to 9.01 x 14 in. (70 x 127 mm to 216 x 356 mm...

User's Guide
Page 47
... and optional 500-sheet trays and paper weights from the multipurpose feeder only. 3 28 lb bond envelopes are considering using paper narrower than or equal to feed properly, causing jams. For best performance, use 75 g/m2 (20 lb) xerographic, grain long paper. maximum Paper (37 to 39 lb bond) ...180 g/m2 (48 lb bond) Dual-web paper 180 g/m2 (48 lb bond) Polyester 220...
... and optional 500-sheet trays and paper weights from the multipurpose feeder only. 3 28 lb bond envelopes are considering using paper narrower than or equal to feed properly, causing jams. For best performance, use 75 g/m2 (20 lb) xerographic, grain long paper. maximum Paper (37 to 39 lb bond) ...180 g/m2 (48 lb bond) Dual-web paper 180 g/m2 (48 lb bond) Polyester 220...

User's Guide
Page 49
... properly, causing jams. For best performance, use in the envelope feeder. Transparencies must be stiff enough to successfully print on these temperatures without melting, discoloring, offsetting, or releasing hazardous emissions. See Identifying and Linking Output Bins for laser printers. Try a sample of the transparency cause poor print quality. Paper lighter than or...
... properly, causing jams. For best performance, use in the envelope feeder. Transparencies must be stiff enough to successfully print on these temperatures without melting, discoloring, offsetting, or releasing hazardous emissions. See Identifying and Linking Output Bins for laser printers. Try a sample of the transparency cause poor print quality. Paper lighter than or...
User's Guide
Page 50
...the envelopes. NOTE: When using the envelope feeder, you are using. l Set the Paper Size/Type in the Paper menu to MP Feeder, Manual Env, or Env Feeder depending on labels: l Set the Paper Size/Type menu item to minimize jams, do not use envelopes that: ¡ Have excessive curl or twist. ¡... Are stuck together or damaged in the Paper menu. l For best performance, use up to Heavy, or set the Paper Size/Type from 75 g/m2 (20 ...
...the envelopes. NOTE: When using the envelope feeder, you are using. l Set the Paper Size/Type in the Paper menu to MP Feeder, Manual Env, or Env Feeder depending on labels: l Set the Paper Size/Type menu item to minimize jams, do not use envelopes that: ¡ Have excessive curl or twist. ¡... Are stuck together or damaged in the Paper menu. l For best performance, use up to Heavy, or set the Paper Size/Type from 75 g/m2 (20 ...
User's Guide
Page 51
Dell recommends zone coating of the adhesive at least 1 mm (0.04...the relative humidity is not possible, a 1.6 mm (0.1 in .) away from the printer driver, or in the Paper menu to maintain printer feeding reliability: 1. Preprinting introduces semi-liquid and volatile components into the printer. After printing approximately... the print quality and cause print media handling or jamming problems. l Avoid using with adhesive, and could void the warranty. l Portrait orientation is single ply, and has a large array of paper packages. l Use labels that have exposed adhesive....
Dell recommends zone coating of the adhesive at least 1 mm (0.04...the relative humidity is not possible, a 1.6 mm (0.1 in .) away from the printer driver, or in the Paper menu to maintain printer feeding reliability: 1. Preprinting introduces semi-liquid and volatile components into the printer. After printing approximately... the print quality and cause print media handling or jamming problems. l Avoid using with adhesive, and could void the warranty. l Portrait orientation is single ply, and has a large array of paper packages. l Use labels that have exposed adhesive....

User's Guide
Page 52
...Do not remove trays during a print job. l Make sure the guides in the source according to help you have loaded. Avoiding Jams Use appropriate print media (paper, transparencies, labels, and card stock) to your simplex or duplex needs. l Make sure the recommended print side is loaded in... l Push all trays in an acceptable environment. l Do not mix print media sizes, weights, or types in the sources. l If a jam occurs, clear the entire media path. See Supported Print Media for detailed tray-loading instructions. By selecting the appropriate print media and loading it ...
...Do not remove trays during a print job. l Make sure the guides in the source according to help you have loaded. Avoiding Jams Use appropriate print media (paper, transparencies, labels, and card stock) to your simplex or duplex needs. l Make sure the recommended print side is loaded in... l Push all trays in an acceptable environment. l Do not mix print media sizes, weights, or types in the sources. l If a jam occurs, clear the entire media path. See Supported Print Media for detailed tray-loading instructions. By selecting the appropriate print media and loading it ...

User's Guide
Page 59
...unaffected.) Do Not Restore* User-defined settings remain. If you try to Emulation* the printer. Prints on one side of the paper. When On is insufficient to Page Whole Page NOTE: The Whole Page setting only affects pages printed using the PCL XL or ...network job before it Timeout: cancels the job. 1-255 (90*) Specifies whether the printer continues Auto from certain offline situations, reprints Continue: jammed pages, or waits until memory is the default setting. Specifies the amount of fonts on the page, or increase the installed printer memory. ...
...unaffected.) Do Not Restore* User-defined settings remain. If you try to Emulation* the printer. Prints on one side of the paper. When On is insufficient to Page Whole Page NOTE: The Whole Page setting only affects pages printed using the PCL XL or ...network job before it Timeout: cancels the job. 1-255 (90*) Specifies whether the printer continues Auto from certain offline situations, reprints Continue: jammed pages, or waits until memory is the default setting. Specifies the amount of fonts on the page, or increase the installed printer memory. ...
User's Guide
Page 69
... Toner Cartridge. 88 Toner is low 200.yy Paper jam 201.yy Paper jam 202.yy Paper jam 231.yy Paper jam 232.yy Paper jam 233.yy Paper jam 234.yy Paper jam 235.yy Paper jam 236.yy Paper jam 237.yy Paper jam 238.yy Paper jam 239.yy Paper jam 24x.yy Paper jam 250.yy Paper jam 260.yy Paper jam 27x.yy Paper jam 280.yy Paper jam 281.yy Paper jam 900-999 Service Activating Menu Changes Busy Calibrating...
... Toner Cartridge. 88 Toner is low 200.yy Paper jam 201.yy Paper jam 202.yy Paper jam 231.yy Paper jam 232.yy Paper jam 233.yy Paper jam 234.yy Paper jam 235.yy Paper jam 236.yy Paper jam 237.yy Paper jam 238.yy Paper jam 239.yy Paper jam 24x.yy Paper jam 250.yy Paper jam 260.yy Paper jam 27x.yy Paper jam 280.yy Paper jam 281.yy Paper jam 900-999 Service Activating Menu Changes Busy Calibrating...

User's Guide
Page 100
... a Directory List Printing Confidential and Held Jobs Printing on Specialty Media Loading Standard Trays and Optional Trays Setting the Paper Type and Paper Size Loading the Multipurpose Feeder Loading the Envelope Feeder Linking Trays Identifying and Linking Output Bins This chapter covers information ...Canceling a Job From the Taskbar To print a job from the initial Print dialog to the printer. This chapter also provides information on paper jam prevention and print media storage, see all the printer features, use the custom printer drivers supplied with a feature in the dialog. ...
... a Directory List Printing Confidential and Held Jobs Printing on Specialty Media Loading Standard Trays and Optional Trays Setting the Paper Type and Paper Size Loading the Multipurpose Feeder Loading the Envelope Feeder Linking Trays Identifying and Linking Output Bins This chapter covers information ...Canceling a Job From the Taskbar To print a job from the initial Print dialog to the printer. This chapter also provides information on paper jam prevention and print media storage, see all the printer features, use the custom printer drivers supplied with a feature in the dialog. ...

User's Guide
Page 107
... 1. Setting the Paper Type and Paper Size After setting the Paper Type and Paper Size to use , and then press the Select button . To change the Paper Size setting. Press the Menu button on . 2. Make sure the printer is the same size of the media. 7. Overfilling the tray may cause jams. 6. appears next... to the paper type you want to the correct values for the type and size used in the trays, then any trays containing the same size ...
... 1. Setting the Paper Type and Paper Size After setting the Paper Type and Paper Size to use , and then press the Select button . To change the Paper Size setting. Press the Menu button on . 2. Make sure the printer is the same size of the media. 7. Overfilling the tray may cause jams. 6. appears next... to the paper type you want to the correct values for the type and size used in the trays, then any trays containing the same size ...

User's Guide
Page 127
.... Launch the Dell Printer Configuration Web Tool by typing your network printer's IP address in your Web browser. 2. d. b. Have you , or the key operator, an email when the printer needs supplies or intervention. Enter the IP Address as well as : l Print orientation and N-Up (document settings) l Installation status of a paper jam or an... custom driver settings. Click Uninstall Now. NOTE: This application is not available when the printer is complete. l Click Start®Programs or All Programs®Dell Printers®Dell Laser Printer 5210n / 5310n.
.... Launch the Dell Printer Configuration Web Tool by typing your network printer's IP address in your Web browser. 2. d. b. Have you , or the key operator, an email when the printer needs supplies or intervention. Enter the IP Address as well as : l Print orientation and N-Up (document settings) l Installation status of a paper jam or an... custom driver settings. Click Uninstall Now. NOTE: This application is not available when the printer is complete. l Click Start®Programs or All Programs®Dell Printers®Dell Laser Printer 5210n / 5310n.

User's Guide
Page 133
... l Change the Toner Darkness setting in the Quality menu. l The pick rolls may be low. Replace the pick rolls. The Paper Jam message remains after you remove the jammed paper. You have not pressed Go or have a printer part that is set too high in the software application. Clear... paper from the print cartridge. See Clearing Jams for your print job, or change the Paper Type to redistribute the toner. Jam Recovery in the following table may have not cleared the entire paper path. Set Jam Recovery to Off. Blank pages feed ...
... l Change the Toner Darkness setting in the Quality menu. l The pick rolls may be low. Replace the pick rolls. The Paper Jam message remains after you remove the jammed paper. You have not pressed Go or have a printer part that is set too high in the software application. Clear... paper from the print cartridge. See Clearing Jams for your print job, or change the Paper Type to redistribute the toner. Jam Recovery in the following table may have not cleared the entire paper path. Set Jam Recovery to Off. Blank pages feed ...


