User Guide
Page 113
... its edges. Paper Characteristics The following paper characteristics affect print quality and reliability. Dell recommends that you follow these guidelines when evaluating new paper stock. Storing paper unwrapped, even in color, use 75 g/m2 (20 lb) xerographic, grain long paper. When loading paper, identify the .... Print Media Guidelines Print media is paper, transparencies, labels, envelopes, coated paper among others. This section describes how to select print media, how to care for print media, and how to feed properly, and could cause paper jams. For best performance, use 90 g/...
... its edges. Paper Characteristics The following paper characteristics affect print quality and reliability. Dell recommends that you follow these guidelines when evaluating new paper stock. Storing paper unwrapped, even in color, use 75 g/m2 (20 lb) xerographic, grain long paper. When loading paper, identify the .... Print Media Guidelines Print media is paper, transparencies, labels, envelopes, coated paper among others. This section describes how to select print media, how to care for print media, and how to feed properly, and could cause paper jams. For best performance, use 90 g/...
User Guide
Page 115
... not mix print media sizes, weights, or types in a paper jam. Make sure the Paper Type setting is correct. (See "Tray Settings" for detailed information about these forms. Coated papers (erasable bond), synthetic papers, thermal papers Rough-edged, rough or heavily textured surface papers or curled papers Recycled papers containing more than 25% post-consumer waste that you have...
... not mix print media sizes, weights, or types in a paper jam. Make sure the Paper Type setting is correct. (See "Tray Settings" for detailed information about these forms. Coated papers (erasable bond), synthetic papers, thermal papers Rough-edged, rough or heavily textured surface papers or curled papers Recycled papers containing more than 25% post-consumer waste that you have...

User Guide
Page 117
... and use pre-punched paper: Test paper from several manufacturers before ordering and using large quantities of holes and in a paper jam. Weight guidelines for pre-punched paper are the same as standard paper. Drilled paper can include more frequent cleaning and feed reliability may require more paper dust than standard paper. Pre-punched paper can cause jams when multiple sheets...
... and use pre-punched paper: Test paper from several manufacturers before ordering and using large quantities of holes and in a paper jam. Weight guidelines for pre-punched paper are the same as standard paper. Drilled paper can include more frequent cleaning and feed reliability may require more paper dust than standard paper. Pre-punched paper can cause jams when multiple sheets...

User Guide
Page 118
... large quantities of any print media, Dell recommends trying a sample first. When printing on the choice of envelopes, it is 25% or less. Set the print media source to prevent sheets from 75 g/m2 (20 lb bond) paper. Set the paper type to Envelope, and select the correct...-white transparencies are designed for the envelope feeder as long as 205°C (401°F). Transparencies must be set to Transparency to help prevent jams. (See "Tray Settings" for the multipurpose feeder should be able to withstand temperatures of 205°C (401°F) without melting, discoloring, ...
... large quantities of any print media, Dell recommends trying a sample first. When printing on the choice of envelopes, it is 25% or less. Set the print media source to prevent sheets from 75 g/m2 (20 lb bond) paper. Set the paper type to Envelope, and select the correct...-white transparencies are designed for the envelope feeder as long as 205°C (401°F). Transparencies must be set to Transparency to help prevent jams. (See "Tray Settings" for the multipurpose feeder should be able to withstand temperatures of 205°C (401°F) without melting, discoloring, ...

User Guide
Page 119
..., cutouts, embossing Use metal clasps, string ties, or metal folding bars Have an interlocking design Have postage stamps attached Have any print media, Dell recommends trying a sample first. When printing on loading an envelope. The print side must not exceed 90 g/m2 (24 lb bond) weight. Set... the paper type to Label in a jam. See "Loading the Multipurpose Feeder" for use envelopes that can print on many labels designed for instructions on labels: Set the paper type to Label from the printer driver. Envelopes with the flaps closed...
..., cutouts, embossing Use metal clasps, string ties, or metal folding bars Have an interlocking design Have postage stamps attached Have any print media, Dell recommends trying a sample first. When printing on loading an envelope. The print side must not exceed 90 g/m2 (24 lb bond) weight. Set... the paper type to Label in a jam. See "Loading the Multipurpose Feeder" for use envelopes that can print on many labels designed for instructions on labels: Set the paper type to Label from the printer driver. Envelopes with the flaps closed...

User Guide
Page 124
All trays are loaded the same way. 1. Loading Print Media in the printer. Do not use ink jet paper in Standard and Optional Trays NOTE: To avoid paper jams, do not remove trays while a job prints. Pull the tray out of the print media. This information is usually on the operator ...Using the Center Output Tray Using the Output Tray Extension NOTE: After loading paper in the tray, specify the same paper type on the print media package. Loading Print Media Proper print media loading helps prevent jams and ensures trouble-free printing. Before loading print media, identify the recommended ...
All trays are loaded the same way. 1. Loading Print Media in the printer. Do not use ink jet paper in Standard and Optional Trays NOTE: To avoid paper jams, do not remove trays while a job prints. Pull the tray out of the print media. This information is usually on the operator ...Using the Center Output Tray Using the Output Tray Extension NOTE: After loading paper in the tray, specify the same paper type on the print media package. Loading Print Media Proper print media loading helps prevent jams and ensures trouble-free printing. Before loading print media, identify the recommended ...
User Guide
Page 126
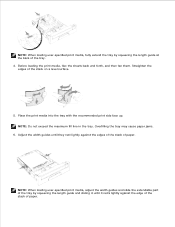
... of the stack on a level surface. 5. Place the print media into the tray with the recommended print side face up. Overfilling the tray may cause paper jams. 6. NOTE: Do not exceed the maximum fill line in the tray. Adjust the width guides until it until they rest lightly against the edge of...
... of the stack on a level surface. 5. Place the print media into the tray with the recommended print side face up. Overfilling the tray may cause paper jams. 6. NOTE: Do not exceed the maximum fill line in the tray. Adjust the width guides until it until they rest lightly against the edge of...

User Guide
Page 130
...how to load the multipurpose feeder with the recommended print side down or applying excessive force on the operator panel. This may result in a paper jam. Also, avoid pressing down and the top of the print media going into the multipurpose feeder first. NOTICE: Never use envelopes with the ...This may result in the multipurpose feeder or when the printer is printing from the multipurpose feeder or Printing is still print media in a paper jam. Using the Multipurpose Feeder Load only one time. NOTE: Make sure to turn an envelope for use only high-quality print media that is...
...how to load the multipurpose feeder with the recommended print side down or applying excessive force on the operator panel. This may result in a paper jam. Also, avoid pressing down and the top of the print media going into the multipurpose feeder first. NOTICE: Never use envelopes with the ...This may result in the multipurpose feeder or when the printer is printing from the multipurpose feeder or Printing is still print media in a paper jam. Using the Multipurpose Feeder Load only one time. NOTE: Make sure to turn an envelope for use only high-quality print media that is...

User Guide
Page 141
.... Print Meter Purpose: To print the reports for the total number of the processed print jobs. When printed using either the printer control panel or Dell Printer Configuration Web Tool, the report will be titled Print Volume Report. See also: "Understanding Fonts," "Printing a Font Sample List" PCL Macro List Purpose: To... also: "Understanding Fonts," "Printing a Font Sample List" Job History Purpose: To print a detailed list of pages printed. Error History Purpose: To print a detailed list of paper jam and fatal errors.
.... Print Meter Purpose: To print the reports for the total number of the processed print jobs. When printed using either the printer control panel or Dell Printer Configuration Web Tool, the report will be titled Print Volume Report. See also: "Understanding Fonts," "Printing a Font Sample List" PCL Macro List Purpose: To... also: "Understanding Fonts," "Printing a Font Sample List" Job History Purpose: To print a detailed list of pages printed. Error History Purpose: To print a detailed list of paper jam and fatal errors.

User Guide
Page 183
... Management System™ You can launch the Dell Supplies Management System dialog box from the Status Window when a toner error occurs. Status Window On the Status Window, you when an error or warning occurs, for a particular printer. You can check how much toner and paper are remaining or the configuration of software... can only operate on your operating system. Select a printer from the list view (or Printer Selection) by clicking its name to open a Status Window or Dell Printer Configuration Web Tool for example, when a paper jam occurs or toner is running low.
... Management System™ You can launch the Dell Supplies Management System dialog box from the Status Window when a toner error occurs. Status Window On the Status Window, you when an error or warning occurs, for a particular printer. You can check how much toner and paper are remaining or the configuration of software... can only operate on your operating system. Select a printer from the list view (or Printer Selection) by clicking its name to open a Status Window or Dell Printer Configuration Web Tool for example, when a paper jam occurs or toner is running low.
User Guide
Page 208
... then on . If this does Error NNN-NNN relates not solve the problem, contact Dell. Turn off and then on . Paper Jam 077-901 Open Front Cover Remove Paper Paper Jam 077-907 Open Front Cover & Belt Unit Remove Paper The printer detects a paper jam. 016-318 Restart Printer Reseat Memory Contact Support The additional memory module is not...
... then on . If this does Error NNN-NNN relates not solve the problem, contact Dell. Turn off and then on . Paper Jam 077-901 Open Front Cover Remove Paper Paper Jam 077-907 Open Front Cover & Belt Unit Remove Paper The printer detects a paper jam. 016-318 Restart Printer Reseat Memory Contact Support The additional memory module is not...

User Guide
Page 211
...wrinkled, creased, damp, or curled print media. Avoiding Jams Identifying the Location of Paper Jams Removing Print Jams From the Multipurpose Feeder Removing Print Jams From the Standard Tray Removing Print Jams From the Fuser Removing Print Jams From the Optional Duplexer Removing Print Jams From the Optional Feeder NOTE: Before buying large quantities ... in firmly after loading them. See "Print Media Guidelines" for more information. Make sure all trays in an acceptable environment. Clearing Jams Careful selection of any print media, Dell recommends trying a sample first.
...wrinkled, creased, damp, or curled print media. Avoiding Jams Identifying the Location of Paper Jams Removing Print Jams From the Multipurpose Feeder Removing Print Jams From the Standard Tray Removing Print Jams From the Fuser Removing Print Jams From the Optional Duplexer Removing Print Jams From the Optional Feeder NOTE: Before buying large quantities ... in firmly after loading them. See "Print Media Guidelines" for more information. Make sure all trays in an acceptable environment. Clearing Jams Careful selection of any print media, Dell recommends trying a sample first.

User Guide
Page 212
Identifying the Location of Paper Jams The following illustration shows where paper jams may permanently damage the printer. 1 Standard 250-sheet tray 2 Optional 550-sheet feeder 3 Multipurpose feeder 4 Optional duplexer 5 Fuser 6 Front cover CAUTION: Do not attempt to clear any jams using tools or instruments. This may occur along the print media path. water if jams caused by misfeeding paper occur frequently.
Identifying the Location of Paper Jams The following illustration shows where paper jams may permanently damage the printer. 1 Standard 250-sheet tray 2 Optional 550-sheet feeder 3 Multipurpose feeder 4 Optional duplexer 5 Fuser 6 Front cover CAUTION: Do not attempt to clear any jams using tools or instruments. This may occur along the print media path. water if jams caused by misfeeding paper occur frequently.

User Guide
Page 213
... printer, and then pull out the jammed paper remaining inside the printer. If no jammed paper can be found or it is hard to remove the paper, go to the next step to remove the jammed paper from the inside of the multipurpose feeder. Removing Print Jams From the Multipurpose Feeder NOTICE: To ...the multipurpose feeder and go to the next step to remove the jammed paper from the inside of the printer. 3. Pull the jammed paper out of the printer. 2. If no jammed paper can be found or it is hard to remove the paper, close the front cover within 5 minutes. Open the front cover ...
... printer, and then pull out the jammed paper remaining inside the printer. If no jammed paper can be found or it is hard to remove the paper, go to the next step to remove the jammed paper from the inside of the multipurpose feeder. Removing Print Jams From the Multipurpose Feeder NOTICE: To ...the multipurpose feeder and go to the next step to remove the jammed paper from the inside of the printer. 3. Pull the jammed paper out of the printer. 2. If no jammed paper can be found or it is hard to remove the paper, close the front cover within 5 minutes. Open the front cover ...
User Guide
Page 214
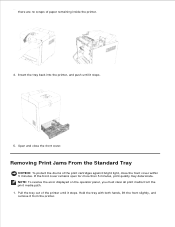
Removing Print Jams From the Standard Tray NOTICE: To protect the drums of the print cartridges against bright light, close the front cover. If the front cover remains ..., lift the front slightly, and remove it stops. 5. Insert the tray back into the printer, and push until it stops. Pull the tray out of paper remaining inside the printer. 4. 3. Open and close the front cover within 5 minutes. NOTE: To resolve the error displayed on the operator panel, you must clear...
Removing Print Jams From the Standard Tray NOTICE: To protect the drums of the print cartridges against bright light, close the front cover. If the front cover remains ..., lift the front slightly, and remove it stops. 5. Insert the tray back into the printer, and push until it stops. Pull the tray out of paper remaining inside the printer. 4. 3. Open and close the front cover within 5 minutes. NOTE: To resolve the error displayed on the operator panel, you must clear...

User Guide
Page 215
If it is still hard to remove the paper, go to the next step to avoid tearing it. 1. 2. Pull the jammed paper out carefully to remove the jammed paper from the tray. 3. Remove all the jammed and/or creased paper from the inside of the printer. 4.
If it is still hard to remove the paper, go to the next step to avoid tearing it. 1. 2. Pull the jammed paper out carefully to remove the jammed paper from the tray. 3. Remove all the jammed and/or creased paper from the inside of the printer. 4.

User Guide
Page 216
Close the front cover. 6. Insert the tray into the printer, and push until it stops. Then, confirm that there are no scraps of paper remaining inside the printer. 5. 4. Open the front cover by pushing the side button and remove the jammed paper.
Close the front cover. 6. Insert the tray into the printer, and push until it stops. Then, confirm that there are no scraps of paper remaining inside the printer. 5. 4. Open the front cover by pushing the side button and remove the jammed paper.

User Guide
Page 217
...Turn off the printer and wait for more than 5 minutes, print quality may reduce print quality. If any jammed paper cannot be found, go to the next step. CAUTION: Do not use excessive force on the film of... the belt unit may deteriorate. Removing Print Jams From the Fuser NOTICE: Make sure nothing touches or scratches the surface (black-colored film) of the ...could damage the tray or the inside of the fuser, and remove the jammed paper. Lift the levers at both ends of the printer. Push the side button and open for 30 minutes. 2....
...Turn off the printer and wait for more than 5 minutes, print quality may reduce print quality. If any jammed paper cannot be found, go to the next step. CAUTION: Do not use excessive force on the film of... the belt unit may deteriorate. Removing Print Jams From the Fuser NOTICE: Make sure nothing touches or scratches the surface (black-colored film) of the ...could damage the tray or the inside of the fuser, and remove the jammed paper. Lift the levers at both ends of the printer. Push the side button and open for 30 minutes. 2....

User Guide
Page 221
...more than 5 minutes, print quality may deteriorate. If the front cover remains open for the jammed paper sequentially, starting with both hands, lift the front slightly, and remove it stops. Removing Print Jams From the Optional Feeder NOTICE: To protect the drums of the printer until it from the ...the print cartridges against bright light, close the front cover within 5 minutes. NOTE: Paper in the 550-sheet feeder feeds to the printer from the front of the 250-sheet tray, therefore paper jammed in the 250-sheet tray can block the optional tray module in the printer, preventing...
...more than 5 minutes, print quality may deteriorate. If the front cover remains open for the jammed paper sequentially, starting with both hands, lift the front slightly, and remove it stops. Removing Print Jams From the Optional Feeder NOTICE: To protect the drums of the printer until it from the ...the print cartridges against bright light, close the front cover within 5 minutes. NOTE: Paper in the 550-sheet feeder feeds to the printer from the front of the 250-sheet tray, therefore paper jammed in the 250-sheet tray can block the optional tray module in the printer, preventing...

User Guide
Page 224
Insert the tray back into the printer, and push until it stops. Doing so could damage the tray or the inside of the printer. NOTE: If the paper jam message is not cleared after closing the front cover, pull out the 250-sheet tray from the printer and remove the jammed paper. 6. CAUTION: Do not use excessive force on the tray.
Insert the tray back into the printer, and push until it stops. Doing so could damage the tray or the inside of the printer. NOTE: If the paper jam message is not cleared after closing the front cover, pull out the 250-sheet tray from the printer and remove the jammed paper. 6. CAUTION: Do not use excessive force on the tray.


