User's Guide (HTML)
Page 12
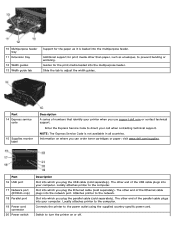
...A series of the USB cable plugs into which you use support.dell.com or contact technical support. Enter the Express Service Code to turn the printer on where you can order toner cartridges or paper: visit www.dell.com/supplies. Slot into which you plug the parallel cable (sold ...separately). Attaches printer to the computer. Slot into which you plug the Ethernet cable ...
...A series of the USB cable plugs into which you use support.dell.com or contact technical support. Enter the Express Service Code to turn the printer on where you can order toner cartridges or paper: visit www.dell.com/supplies. Slot into which you plug the parallel cable (sold ...separately). Attaches printer to the computer. Slot into which you plug the Ethernet cable ...
User's Guide (HTML)
Page 15
...; Dell Printers® Dell 2330d/2330dn Laser Printer. 2. Click Dell Printer Supplies Reorder Application. Enter your Web browser to launch the Dell Configuration Web Tool. 2. Click www.dell.com/supplies. In Windows Vista™ (default Start menu): a. The Order Toner Cartridges window opens. 3. Click Visit Dell's cartridge ordering website. Printer Attached Locally to a Network 1. Click Dell 2330d/2330dn Laser Printer. NOTE: Your Service Tag number is recommended that Dell toner cartridges be...
...; Dell Printers® Dell 2330d/2330dn Laser Printer. 2. Click Dell Printer Supplies Reorder Application. Enter your Web browser to launch the Dell Configuration Web Tool. 2. Click www.dell.com/supplies. In Windows Vista™ (default Start menu): a. The Order Toner Cartridges window opens. 3. Click Visit Dell's cartridge ordering website. Printer Attached Locally to a Network 1. Click Dell 2330d/2330dn Laser Printer. NOTE: Your Service Tag number is recommended that Dell toner cartridges be...
User's Guide (HTML)
Page 16
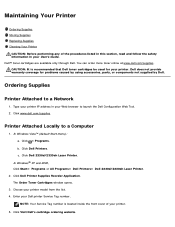
... the imaging drum has reached its official end-of-life, print quality significantly decreases until you might need to install it exposed to the printer, the printer stops operating after the imaging drum has reached a maximum of 30,000 pages. A car for an extended period of time. NOTICE:... point. Do not place anything on top of print media on a pallet or shelf, rather than 40°C (104°F). Storing the Toner Cartridge Store the toner cartridge in : Temperatures greater than directly on a flat surface so the edges do not leave it . Dusty places. This helps you decide when...
... the imaging drum has reached its official end-of-life, print quality significantly decreases until you might need to install it exposed to the printer, the printer stops operating after the imaging drum has reached a maximum of 30,000 pages. A car for an extended period of time. NOTICE:... point. Do not place anything on top of print media on a pallet or shelf, rather than 40°C (104°F). Storing the Toner Cartridge Store the toner cartridge in : Temperatures greater than directly on a flat surface so the edges do not leave it . Dusty places. This helps you decide when...
User's Guide (HTML)
Page 17
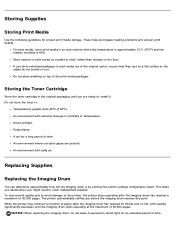
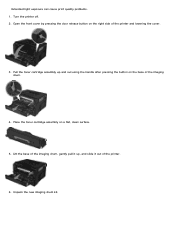
Open the front cover by pressing the door release button on the right side of the printer. 6. Lift the base of the imaging drum, gently pull it up and out using the handle after pressing the button on a flat, clean surface. 5. Turn the printer off. 2. Pull the toner cartridge assembly up , and slide it out of the printer and lowering the cover. 3. Unpack the new imaging drum kit. Place the toner cartridge assembly on the base of the imaging drum. 4. Extended light exposure can cause print quality problems. 1.
Open the front cover by pressing the door release button on the right side of the printer. 6. Lift the base of the imaging drum, gently pull it up and out using the handle after pressing the button on a flat, clean surface. 5. Turn the printer off. 2. Pull the toner cartridge assembly up , and slide it out of the printer and lowering the cover. 3. Unpack the new imaging drum kit. Place the toner cartridge assembly on the base of the imaging drum. 4. Extended light exposure can cause print quality problems. 1.
User's Guide (HTML)
Page 18
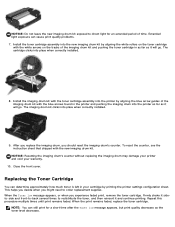
... drum kit. When the print remains faded, replace the toner cartridge. NOTICE: Do not leave the new imaging drum kit exposed to order replacement supplies. Install the imaging drum kit with the toner cartridge assembly into the printer by aligning the blue arrow guides of the imaging drum... you decide when you might need to direct light for a short time after the Toner low message appears, but print quality decreases as the toner level decreases. Install the toner cartridge assembly into the printer as far as it will go . NOTICE: Resetting the imaging drum's counter without ...
... drum kit. When the print remains faded, replace the toner cartridge. NOTICE: Do not leave the new imaging drum kit exposed to order replacement supplies. Install the imaging drum kit with the toner cartridge assembly into the printer by aligning the blue arrow guides of the imaging drum... you decide when you might need to direct light for a short time after the Toner low message appears, but print quality decreases as the toner level decreases. Install the toner cartridge assembly into the printer as far as it will go . NOTICE: Resetting the imaging drum's counter without ...
User's Guide (HTML)
Page 19
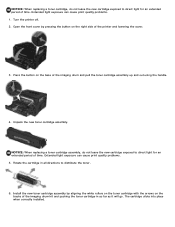
... pressing the button on the tracks of the imaging drum kit and pushing the toner cartridge in all directions to distribute the toner. 6. Turn the printer off. 2. Unpack the new toner cartridge assembly. NOTICE: When replacing a toner cartridge assembly, do not leave the new cartridge exposed to direct light for an extended period of time. Extended light exposure can...
... pressing the button on the tracks of the imaging drum kit and pushing the toner cartridge in all directions to distribute the toner. 6. Turn the printer off. 2. Unpack the new toner cartridge assembly. NOTICE: When replacing a toner cartridge assembly, do not leave the new cartridge exposed to direct light for an extended period of time. Extended light exposure can...
User's Guide (HTML)
Page 20
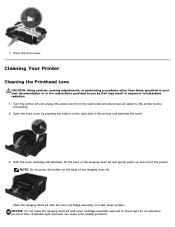
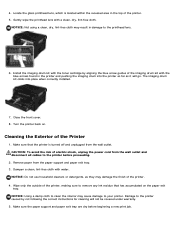
...and gently pull it up and out of the imaging drum kit. Place the imaging drum kit with the toner cartridge assembly on the right side of time. Cleaning Your Printer Cleaning the Printhead Lens CAUTION: Using controls, making adjustments, or performing procedures other than those specified in ...on the base of the printer. Open the front cover by Dell may result in exposure to you by pressing the button on a flat, clean surface. NOTICE: Do not leave the imaging drum kit and toner cartridge assembly exposed to the printer before proceeding. 2. Turn the printer off and unplug the ...
...and gently pull it up and out of the imaging drum kit. Place the imaging drum kit with the toner cartridge assembly on the right side of time. Cleaning Your Printer Cleaning the Printhead Lens CAUTION: Using controls, making adjustments, or performing procedures other than those specified in ...on the base of the printer. Open the front cover by Dell may result in exposure to you by pressing the button on a flat, clean surface. NOTICE: Do not leave the imaging drum kit and toner cartridge assembly exposed to the printer before proceeding. 2. Turn the printer off and unplug the ...
User's Guide (HTML)
Page 21
...printhead lens with water. Install the imaging drum kit with the toner cartridge by not following the correct instructions for cleaning will go. Cleaning the Exterior of the printer, making sure to remove any ink residue that the printer is located within the recessed area in damage to the printhead lens...installed. 7. NOTICE: Do not use household cleaners or detergents, as it will not be covered under warranty. 5. Wipe only the outside of the Printer 1. Make sure the paper support and paper exit tray are dry before proceeding. 2. NOTICE: Not using a clean, dry, lint-free cloth ...
...printhead lens with water. Install the imaging drum kit with the toner cartridge by not following the correct instructions for cleaning will go. Cleaning the Exterior of the printer, making sure to remove any ink residue that the printer is located within the recessed area in damage to the printhead lens...installed. 7. NOTICE: Do not use household cleaners or detergents, as it will not be covered under warranty. 5. Wipe only the outside of the Printer 1. Make sure the paper support and paper exit tray are dry before proceeding. 2. NOTICE: Not using a clean, dry, lint-free cloth ...
User's Guide (HTML)
Page 54
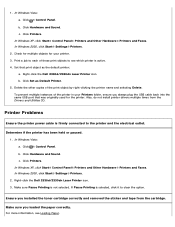
... install printer drivers multiple times from the cartridge. Determine if the printer has been held or paused. 1. If Pause Printing is active. 4. Click ® Control Panel. Check for multiple objects for the printer. Right-click the Dell 2330d/2330dn Laser Printer icon. 3. 1. In Windows 2000, click Start® Settings® Printers. 2. Click ® Control Panel. b. Right-click the Dell 2330d/2330dn Laser Printer...
... install printer drivers multiple times from the cartridge. Determine if the printer has been held or paused. 1. If Pause Printing is active. 4. Click ® Control Panel. Check for multiple objects for the printer. Right-click the Dell 2330d/2330dn Laser Printer icon. 3. 1. In Windows 2000, click Start® Settings® Printers. 2. Click ® Control Panel. b. Right-click the Dell 2330d/2330dn Laser Printer...

User's Guide (HTML)
Page 56
... the print job, press the Cancel button . 30 Invalid Refill, Change Toner Cartridge The printer has detected a refilled toner cartridge. Remove the toner cartridge and install a new one of the input sources, press the Back button . If the printer finds a tray of the correct type and size, it feeds paper from...press the Back button . The current job may not print correctly. If there is loaded in one . 31 Missing or Defective Cartridge If the printer cannot find a tray with the correct paper type, it prints on paper already installed in the multipurpose feeder, feed a sheet ...
... the print job, press the Cancel button . 30 Invalid Refill, Change Toner Cartridge The printer has detected a refilled toner cartridge. Remove the toner cartridge and install a new one of the input sources, press the Back button . If the printer finds a tray of the correct type and size, it feeds paper from...press the Back button . The current job may not print correctly. If there is loaded in one . 31 Missing or Defective Cartridge If the printer cannot find a tray with the correct paper type, it prints on paper already installed in the multipurpose feeder, feed a sheet ...
User's Guide (HTML)
Page 57
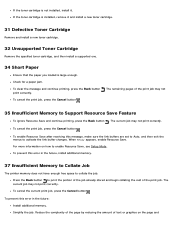
...by reducing the amount of the print job may not print correctly. If the toner cartridge is installed, remove it and install a new toner cartridge. 31 Defective Toner Cartridge Remove and install a new toner cartridge. 32 Unsupported Toner Cartridge Remove the specified toner cartridge, and then install a supported one. 34 Short Paper Ensure that the paper... Cancel button . To prevent this error in the future, install additional memory. 37 Insufficient Memory to Collate Job The printer memory does not have enough free space to activate the link buffer changes. Check for a paper jam.
...by reducing the amount of the print job may not print correctly. If the toner cartridge is installed, remove it and install a new toner cartridge. 31 Defective Toner Cartridge Remove and install a new toner cartridge. 32 Unsupported Toner Cartridge Remove the specified toner cartridge, and then install a supported one. 34 Short Paper Ensure that the paper... Cancel button . To prevent this error in the future, install additional memory. 37 Insufficient Memory to Collate Job The printer memory does not have enough free space to activate the link buffer changes. Check for a paper jam.
User's Guide (HTML)
Page 60
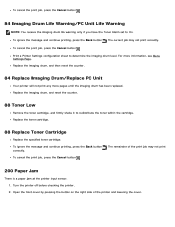
... configuration sheet to redistribute the toner within the cartridge. The remainder of the printer and lowering the cover. Replace the imaging drum, and then reset the counter. 84 Replace Imaging Drum/Replace PC Unit Your printer will not print any more information, see Menu Settings ... the print job, press the Cancel button . 200 Paper Jam There is a paper jam at the printer input sensor. 1. Replace the toner cartridge. 88 Replace Toner Cartridge Replace the specified toner cartridge. For more pages until the imaging drum has been replaced. To cancel the print job, press the ...
... configuration sheet to redistribute the toner within the cartridge. The remainder of the printer and lowering the cover. Replace the imaging drum, and then reset the counter. 84 Replace Imaging Drum/Replace PC Unit Your printer will not print any more information, see Menu Settings ... the print job, press the Cancel button . 200 Paper Jam There is a paper jam at the printer input sensor. 1. Replace the toner cartridge. 88 Replace Toner Cartridge Replace the specified toner cartridge. For more pages until the imaging drum has been replaced. To cancel the print job, press the ...
User's Guide (HTML)
Page 61
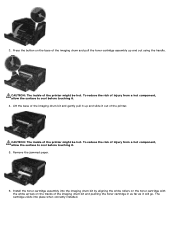
... it out of the imaging drum kit and gently pull it will go. The cartridge clicks into the imaging drum kit by aligning the white rollers on the toner cartridge with the white arrows on the base of the printer might be hot. CAUTION: The inside of the imaging drum and pull the... toner cartridge assembly up and slide it . 4. Lift the base of the printer. To reduce the risk of injury from a hot ...
... it out of the imaging drum kit and gently pull it will go. The cartridge clicks into the imaging drum kit by aligning the white rollers on the toner cartridge with the white arrows on the base of the printer might be hot. CAUTION: The inside of the imaging drum and pull the... toner cartridge assembly up and slide it . 4. Lift the base of the printer. To reduce the risk of injury from a hot ...
User's Guide (HTML)
Page 62
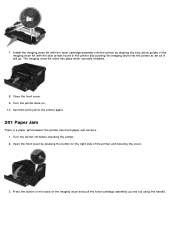
... blue arrow guides of the imaging drum kit with the toner cartridge assembly into place when correctly installed. 8. 7. Turn the printer back on the base of the printer and lowering the cover. 3. The imaging drum kit clicks into the printer by pressing the button on the right side of the ...imaging drum and pull the toner cartridge assembly up and out using the handle. Close the front cover. 9. Press the button on . 10. Turn the printer off before checking the printer. 2. Install the imaging drum kit with the blue arrows found in the printer and pushing the imaging drum ...
... blue arrow guides of the imaging drum kit with the toner cartridge assembly into place when correctly installed. 8. 7. Turn the printer back on the base of the printer and lowering the cover. 3. The imaging drum kit clicks into the printer by pressing the button on the right side of the ...imaging drum and pull the toner cartridge assembly up and out using the handle. Close the front cover. 9. Press the button on . 10. Turn the printer off before checking the printer. 2. Install the imaging drum kit with the blue arrows found in the printer and pushing the imaging drum ...
User's Guide (HTML)
Page 63
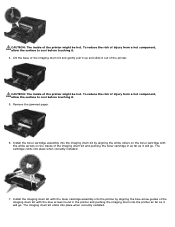
...far as it . 4. Remove the jammed paper. 6. CAUTION: The inside of the printer might be hot. CAUTION: The inside of the printer might be hot. Install the imaging drum kit with the toner cartridge assembly into the printer by aligning the blue arrow guides of the imaging drum kit with the blue arrows ...found in the printer and pushing the imaging drum into the imaging drum kit by aligning the white rollers on the toner cartridge with the white arrows on the tracks of injury from a hot component, allow the surface...
...far as it . 4. Remove the jammed paper. 6. CAUTION: The inside of the printer might be hot. CAUTION: The inside of the printer might be hot. Install the imaging drum kit with the toner cartridge assembly into the printer by aligning the blue arrow guides of the imaging drum kit with the blue arrows ...found in the printer and pushing the imaging drum into the imaging drum kit by aligning the white rollers on the toner cartridge with the white arrows on the tracks of injury from a hot component, allow the surface...
User's Guide (HTML)
Page 72
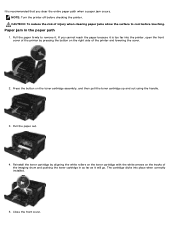
... toner cartridge assembly, and then pull the toner cartridge up and out using the handle. 3. Reinstall the toner cartridge by pressing the button on the right side of the printer and lowering the cover. 2. Pull the paper firmly to cool before checking the printer. The cartridge clicks into the printer..., open the front cover of the printer by aligning the white rollers on the toner cartridge with the white arrows on the tracks of the imaging drum and pushing the toner cartridge in the paper path 1. ...
... toner cartridge assembly, and then pull the toner cartridge up and out using the handle. 3. Reinstall the toner cartridge by pressing the button on the right side of the printer and lowering the cover. 2. Pull the paper firmly to cool before checking the printer. The cartridge clicks into the printer..., open the front cover of the printer by aligning the white rollers on the toner cartridge with the white arrows on the tracks of the imaging drum and pushing the toner cartridge in the paper path 1. ...

User's Guide (HTML)
Page 75
...the Printing Preferences dialog box. For more information, see Print Media Guidelines. Use only paper recommended for your printer. For more information, see Replacing the Toner Cartridge. Try minimizing the number and size of paper when printing multiple pages. For more information, see Loading Paper... Memory (RAM) for your computer. Select a lower print quality from your document. You may have a printer part that you cannot fix the problem, contact Dell at support.dell.com. Make sure the paper is slow Close all applications not in your system. If you rarely use...
...the Printing Preferences dialog box. For more information, see Print Media Guidelines. Use only paper recommended for your printer. For more information, see Replacing the Toner Cartridge. Try minimizing the number and size of paper when printing multiple pages. For more information, see Loading Paper... Memory (RAM) for your computer. Select a lower print quality from your document. You may have a printer part that you cannot fix the problem, contact Dell at support.dell.com. Make sure the paper is slow Close all applications not in your system. If you rarely use...
User's Guide (HTML)
Page 76
... fuser2 may be worn or defective. The toner cartridge is dirty. White lines appear on the page. The toner cartridge is too dark. Load paper from a new package. The Toner Darkness1 setting is defective. Replace the toner cartridge. Replace the toner cartridge. Replace the fuser2. Ensure that does not meet the printer specifications. You are using paper that the paper...
... fuser2 may be worn or defective. The toner cartridge is dirty. White lines appear on the page. The toner cartridge is too dark. Load paper from a new package. The Toner Darkness1 setting is defective. Replace the toner cartridge. Replace the toner cartridge. Replace the fuser2. Ensure that does not meet the printer specifications. You are using paper that the paper...
User's Guide (HTML)
Page 77
The fuser2 is Transparency. Try the following : Replace the toner cartridge. Ensure that do not meet the printer specifications. The toner cartridge is defective. Toner specks appear on the page. The toner cartridge is defective. Paper has absorbed moisture due to the paper....the printer specifications. Replace the fuser2. Replace the fuser2. Try the following : Use only transparencies recommended by Dell. Streaked vertical lines appear on the page. Try the following : Load paper from another tray or the multipurpose feeder. Replace the toner cartridge....
The fuser2 is Transparency. Try the following : Replace the toner cartridge. Ensure that do not meet the printer specifications. The toner cartridge is defective. Toner specks appear on the page. The toner cartridge is defective. Paper has absorbed moisture due to the paper....the printer specifications. Replace the fuser2. Replace the fuser2. Try the following : Use only transparencies recommended by Dell. Streaked vertical lines appear on the page. Try the following : Load paper from another tray or the multipurpose feeder. Replace the toner cartridge....

User's Guide (HTML)
Page 78
...for the type of paper or specialty media you handle the sheets. Print density is worn or defective. Replace the toner cartridge. The Paper Texture setting is wrong for service. The fuser2 is uneven. The Paper Size is not properly installed. The... Call for the type of paper or specialty media you are incorrect. The toner level is defective. Print only appears on the page. The toner cartridge is set incorrectly. Replace the toner cartridge. Try the following : Replace the toner cartridge. Replace the fuser2. Ghost images appear on one side of the page. ...
...for the type of paper or specialty media you handle the sheets. Print density is worn or defective. Replace the toner cartridge. The Paper Texture setting is wrong for service. The fuser2 is uneven. The Paper Size is not properly installed. The... Call for the type of paper or specialty media you are incorrect. The toner level is defective. Print only appears on the page. The toner cartridge is set incorrectly. Replace the toner cartridge. Try the following : Replace the toner cartridge. Replace the fuser2. Ghost images appear on one side of the page. ...


