
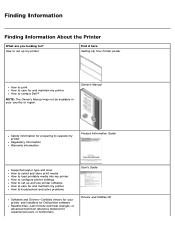
User's Guide (HTML)
Page 1
... is a trademark of Linus Torvalds in this document is a trademark of Linspire, Inc. and other countries. Dell™ 2330d/2330dn Laser Printer User's Guide To order ink or supplies from Dell: 1. Information in the U.S. and managed by phone. Dell Inc. UNITED STATES GOVERNMENT RESTRICTED RIGHTS This software and documentation are registered trademarks of data and tells...
... is a trademark of Linus Torvalds in this document is a trademark of Linspire, Inc. and other countries. Dell™ 2330d/2330dn Laser Printer User's Guide To order ink or supplies from Dell: 1. Information in the U.S. and managed by phone. Dell Inc. UNITED STATES GOVERNMENT RESTRICTED RIGHTS This software and documentation are registered trademarks of data and tells...
User's Guide (HTML)
Page 3
... media How to load printable media into my printer How to configure printer settings How to set up and use printer software How to care for and maintain my printer How to contact Dell™ NOTE: The Owner's Manual may not be available in your printer and installers for Dell printer software Readme files-Last minute technical changes...
... media How to load printable media into my printer How to configure printer settings How to set up and use printer software How to care for and maintain my printer How to contact Dell™ NOTE: The Owner's Manual may not be available in your printer and installers for Dell printer software Readme files-Last minute technical changes...

User's Guide (HTML)
Page 4
...Express Service Code and Number How to identify your printer when you purchased your Dell computer and printer at the same time, documentation and drivers for my printer Dell Printer Supplies Website-www.dell.com/supplies You can purchase printer supplies online, by phone, or in select ...retail stores. Express Service Code and Number These labels are already installed on the printer. Solutions-Troubleshooting hints and tips,...
...Express Service Code and Number How to identify your printer when you purchased your Dell computer and printer at the same time, documentation and drivers for my printer Dell Printer Supplies Website-www.dell.com/supplies You can purchase printer supplies online, by phone, or in select ...retail stores. Express Service Code and Number These labels are already installed on the printer. Solutions-Troubleshooting hints and tips,...
User's Guide (HTML)
Page 5
...paper. Click Preferences, Properties, Options, or Setup (depending on how to 50 sheets of print media at the front of your printer and can feed up to configure the multipurpose feeder, see Loading Paper. 3. Printing Using the Multipurpose Feeder The multipurpose feeder is ... on the program or operating system). With your document open , click File® Print. 2. Click Properties (or Options, Printer, or Setup, depending on your computer and printer, and make any necessary changes for your settings, click OK. Turn on the application or operating system). NOTE: MP Feeder...
...paper. Click Preferences, Properties, Options, or Setup (depending on how to 50 sheets of print media at the front of your printer and can feed up to configure the multipurpose feeder, see Loading Paper. 3. Printing Using the Multipurpose Feeder The multipurpose feeder is ... on the program or operating system). With your document open , click File® Print. 2. Click Properties (or Options, Printer, or Setup, depending on your computer and printer, and make any necessary changes for your settings, click OK. Turn on the application or operating system). NOTE: MP Feeder...
User's Guide (HTML)
Page 6
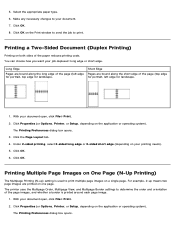
...are printed on the Print window to send the job to your document open , click File® Print. 2. Click Properties (or Options, Printer, or Setup, depending on both sides of the page (left edge for landscape. Printing a Two-Sided Document (Duplex Printing) Printing on the...on one page. Select the appropriate paper type. 6. You can choose how you want your document open , click File® Print. 2. The printer uses the Multipage Order, Multipage View, and Multipage Border settings to print multiple page images on your printing needs). 5. For example, 2-up ) ...
...are printed on the Print window to send the job to your document open , click File® Print. 2. Click Properties (or Options, Printer, or Setup, depending on both sides of the page (left edge for landscape. Printing a Two-Sided Document (Duplex Printing) Printing on the...on one page. Select the appropriate paper type. 6. You can choose how you want your document open , click File® Print. 2. The printer uses the Multipage Order, Multipage View, and Multipage Border settings to print multiple page images on your printing needs). 5. For example, 2-up ) ...
User's Guide (HTML)
Page 7
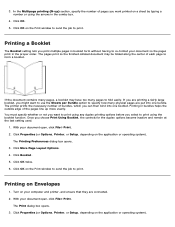
...many physical pages are put into one bundle. The printer prints the necessary number of each page to print. Click Properties (or Options, Printer, or Setup, depending on the application or operating system). With your computer and printer, and ensure that they are printing a fairly large ...booklet, you can then bind into one booklet. Click Properties (or Options, Printer, or Setup, depending on the...
...many physical pages are put into one bundle. The printer prints the necessary number of each page to print. Click Properties (or Options, Printer, or Setup, depending on the application or operating system). With your computer and printer, and ensure that they are printing a fairly large ...booklet, you can then bind into one booklet. Click Properties (or Options, Printer, or Setup, depending on the...
User's Guide (HTML)
Page 8
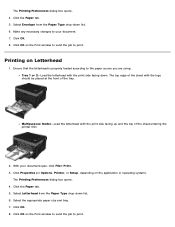
... on the application or operating system). Multipurpose feeder-Load the letterhead with the logo should be placed at the front of the sheet entering the printer first. 2. Select Letterhead from the Paper Type drop-down list. 6. Select the appropriate paper size and tray. 7. Make any necessary changes to print....drop-down list. 6. The top edge of the sheet with the print side facing up and the top of the tray. Click Properties (or Options, Printer, or Setup, depending on Letterhead 1. Click OK on the Print window to send the job to the paper source you are using: Tray 1 or...
... on the application or operating system). Multipurpose feeder-Load the letterhead with the logo should be placed at the front of the sheet entering the printer first. 2. Select Letterhead from the Paper Type drop-down list. 6. Select the appropriate paper size and tray. 7. Make any necessary changes to print....drop-down list. 6. The top edge of the sheet with the print side facing up and the top of the tray. Click Properties (or Options, Printer, or Setup, depending on Letterhead 1. Click OK on the Print window to send the job to the paper source you are using: Tray 1 or...
User's Guide (HTML)
Page 9
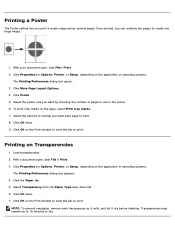
...to 15 minutes to print. Once printed, you want each transparency as it exits, and let it dry before stacking. Click Properties (or Options, Printer, or Setup, depending on the page, select Print crop marks. 7. Click Poster. 5. Select the amount of overlap you print a single image .... 3. To print crop marks on the application or operating system). Printing on the application or operating system). Click Properties (or Options, Printer, or Setup, depending on Transparencies 1. Click the Paper tab. 5. Select Transparency from the Paper Type drop-down list. 6. Click OK twice. 7.
...to 15 minutes to print. Once printed, you want each transparency as it exits, and let it dry before stacking. Click Properties (or Options, Printer, or Setup, depending on the page, select Print crop marks. 7. Click Poster. 5. Select the amount of overlap you print a single image .... 3. To print crop marks on the application or operating system). Printing on the application or operating system). Click Properties (or Options, Printer, or Setup, depending on Transparencies 1. Click the Paper tab. 5. Select Transparency from the Paper Type drop-down list. 6. Click OK twice. 7.
User's Guide (HTML)
Page 10
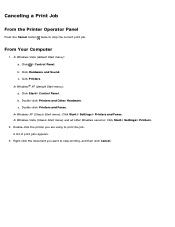
... print jobs appears. 3. In Windows Vista (default Start menu): a. Double-click the printer you want to stop the current print job. Canceling a Print Job From the Printer Operator Panel Press the Cancel button twice to print the job. Click Printers. Right-click the document you are using to stop printing, and then click...
... print jobs appears. 3. In Windows Vista (default Start menu): a. Double-click the printer you want to stop the current print job. Canceling a Print Job From the Printer Operator Panel Press the Cancel button twice to print the job. Click Printers. Right-click the document you are using to stop printing, and then click...
User's Guide (HTML)
Page 11
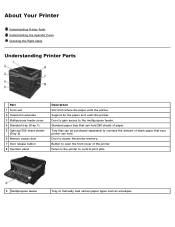
... feeder Tray to increase the amount of blank paper that can hold 250 sheets of the printer. About Your Printer Understanding Printer Parts Understanding the Operator Panel Choosing the Right Cable Understanding Printer Parts Part 1 Front exit 2 Output bin extender 3 Multipurpose feeder cover 4 Standard tray ... 2) 6 Memory access door 7 Door release button 8 Operator panel Description Slot from where the paper exits the printer. Door to gain access to access the printer memory. Tray that can be purchased separately to manually load various paper types such as it exits the...
... feeder Tray to increase the amount of blank paper that can hold 250 sheets of the printer. About Your Printer Understanding Printer Parts Understanding the Operator Panel Choosing the Right Cable Understanding Printer Parts Part 1 Front exit 2 Output bin extender 3 Multipurpose feeder cover 4 Standard tray ... 2) 6 Memory access door 7 Door release button 8 Operator panel Description Slot from where the paper exits the printer. Door to gain access to access the printer memory. Tray that can be purchased separately to manually load various paper types such as it exits the...
User's Guide (HTML)
Page 12
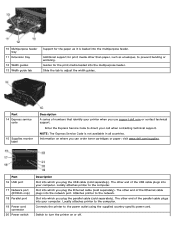
Additional support for print media other end of numbers that identify your computer. NOTE: The Express Service Code is loaded into your printer when you use support.dell.com or contact technical support. Part 16 USB port 17 Network port (2330dn only) 18 Parallel port 19 Power cord connector... into which you plug the USB cable (sold separately). Locally attaches printer to adjust the width guides. Slot into which you can order toner cartridges or paper: visit www.dell.com/supplies. Switch to turn the printer on where you plug the Ethernet cable (sold separately). Slide the ...
Additional support for print media other end of numbers that identify your computer. NOTE: The Express Service Code is loaded into your printer when you use support.dell.com or contact technical support. Part 16 USB port 17 Network port (2330dn only) 18 Parallel port 19 Power cord connector... into which you plug the USB cable (sold separately). Locally attaches printer to adjust the width guides. Slot into which you can order toner cartridges or paper: visit www.dell.com/supplies. Switch to turn the printer on where you plug the Ethernet cable (sold separately). Slide the ...
User's Guide (HTML)
Page 13
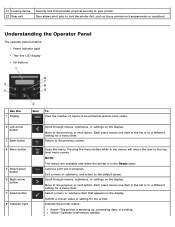
... moves one item in the list or to a different setting for the printer. Each press moves one item in the list or to a different setting for a menu item. Indicate the printer status: Green-The printer is in progress. Return to the default screen. Select a menu or submenu...settings on the display. Yellow-Operator intervention needed. Submit a chosen value or setting for a menu item. Door allows print jobs to your printer. 21 Locking device 22 Rear exit Security lock that appears on the display. Move to the previous or next option. Scroll through menus, submenus...
... moves one item in the list or to a different setting for the printer. Each press moves one item in the list or to a different setting for a menu item. Indicate the printer status: Green-The printer is in progress. Return to the default screen. Select a menu or submenu...settings on the display. Yellow-Operator intervention needed. Submit a chosen value or setting for a menu item. Door allows print jobs to your printer. 21 Locking device 22 Rear exit Security lock that appears on the display. Move to the previous or next option. Scroll through menus, submenus...
User's Guide (HTML)
Page 14
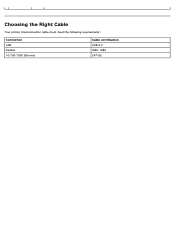
Choosing the Right Cable Your printer interconnection cable must meet the following requirements: Connection USB Parallel 10/100/1000 Ethernet Cable certification USB 2.0 IEEE-1284 CAT-5E
Choosing the Right Cable Your printer interconnection cable must meet the following requirements: Connection USB Parallel 10/100/1000 Ethernet Cable certification USB 2.0 IEEE-1284 CAT-5E
User's Guide (HTML)
Page 15
... and 2000, Click Start® Programs or All Programs® Dell Printers® Dell 2330d/2330dn Laser Printer. 2. Enter your Web browser to launch the Dell Configuration Web Tool. 2. Type your printer IP address in your printer. Click Dell 2330d/2330dn Laser Printer. Ordering Supplies Printer Attached to a Computer 1. Dell™ toner cartridges are available only through Dell. You can order more toner online at www...
... and 2000, Click Start® Programs or All Programs® Dell Printers® Dell 2330d/2330dn Laser Printer. 2. Enter your Web browser to launch the Dell Configuration Web Tool. 2. Type your printer IP address in your printer. Click Dell 2330d/2330dn Laser Printer. Ordering Supplies Printer Attached to a Computer 1. Dell™ toner cartridges are available only through Dell. You can order more toner online at www...
User's Guide (HTML)
Page 16
...environment with extreme changes in an environment where the temperature is approximately 21°C (70°F) and the relative humidity is by printing the printer settings configuration sheet. Do not store the toner in the original packaging until the imaging drum stops operating at the maximum of time. An... are ready to direct light for an extended period of 30,000 pages. This helps you decide when you might need to the printer, the printer stops operating after the imaging drum has reached its official end-of the print media packages. Storing the Toner Cartridge Store the toner...
...environment with extreme changes in an environment where the temperature is approximately 21°C (70°F) and the relative humidity is by printing the printer settings configuration sheet. Do not store the toner in the original packaging until the imaging drum stops operating at the maximum of time. An... are ready to direct light for an extended period of 30,000 pages. This helps you decide when you might need to the printer, the printer stops operating after the imaging drum has reached its official end-of the print media packages. Storing the Toner Cartridge Store the toner...
User's Guide (HTML)
Page 17
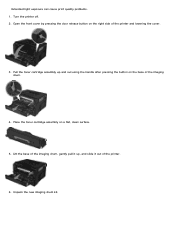
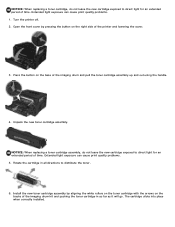
Extended light exposure can cause print quality problems. 1. Turn the printer off. 2. Open the front cover by pressing the door release button on the right side of the printer. 6. Unpack the new imaging drum kit. Lift the base of the imaging drum, gently pull it out of the printer and lowering the cover. 3. Pull the toner cartridge assembly up , and slide it up and out using the handle after pressing the button on a flat, clean surface. 5. Place the toner cartridge assembly on the base of the imaging drum. 4.
Extended light exposure can cause print quality problems. 1. Turn the printer off. 2. Open the front cover by pressing the door release button on the right side of the printer. 6. Unpack the new imaging drum kit. Lift the base of the imaging drum, gently pull it out of the printer and lowering the cover. 3. Pull the toner cartridge assembly up , and slide it up and out using the handle after pressing the button on a flat, clean surface. 5. Place the toner cartridge assembly on the base of the imaging drum. 4.
User's Guide (HTML)
Page 18
... multiple times until print remains faded. When the print remains faded, replace the toner cartridge. Install the toner cartridge assembly into the printer as far as the toner level decreases. Extended light exposure can still print for an extended period of the imaging drum kit and ...pushing the toner cartridge in your warranty. 10. NOTICE: Resetting the imaging drum's counter without replacing the imaging drum may damage your printer and void your cartridge by aligning the white rollers on the tracks of time. The cartridge clicks into place when correctly installed. 9. ...
... multiple times until print remains faded. When the print remains faded, replace the toner cartridge. Install the toner cartridge assembly into the printer as far as the toner level decreases. Extended light exposure can still print for an extended period of the imaging drum kit and ...pushing the toner cartridge in your warranty. 10. NOTICE: Resetting the imaging drum's counter without replacing the imaging drum may damage your printer and void your cartridge by aligning the white rollers on the tracks of time. The cartridge clicks into place when correctly installed. 9. ...
User's Guide (HTML)
Page 19
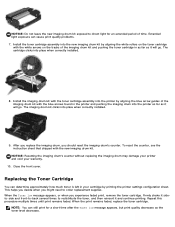
...cartridge in as far as it will go. Install the new toner cartridge assembly by pressing the button on the right side of the printer and lowering the cover. 3. Open the front cover by aligning the white rollers on the toner cartridge with the arrows on the ...cartridge assembly up and out using the handle. 4. Unpack the new toner cartridge assembly. Extended light exposure can cause print quality problems. 5. Turn the printer off. 2. Extended light exposure can cause print quality problems. 1. NOTICE: When replacing a toner cartridge, do not leave the new cartridge exposed to direct...
...cartridge in as far as it will go. Install the new toner cartridge assembly by pressing the button on the right side of the printer and lowering the cover. 3. Open the front cover by aligning the white rollers on the toner cartridge with the arrows on the ...cartridge assembly up and out using the handle. 4. Unpack the new toner cartridge assembly. Extended light exposure can cause print quality problems. 5. Turn the printer off. 2. Extended light exposure can cause print quality problems. 1. NOTICE: When replacing a toner cartridge, do not leave the new cartridge exposed to direct...
User's Guide (HTML)
Page 20
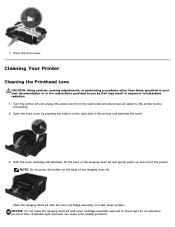
...Dell may result in the instructions provided to hazardous radiation. 1. With the toner cartridge still attached, lift the base of the imaging drum kit and gently pull it up and out of the imaging drum kit. Place the imaging drum kit with the toner cartridge assembly on the base of the printer.... Cleaning Your Printer Cleaning the Printhead Lens CAUTION: Using controls, making adjustments, or performing procedures other than those specified in your user documentation ...
...Dell may result in the instructions provided to hazardous radiation. 1. With the toner cartridge still attached, lift the base of the imaging drum kit and gently pull it up and out of the imaging drum kit. Place the imaging drum kit with the toner cartridge assembly on the base of the printer.... Cleaning Your Printer Cleaning the Printhead Lens CAUTION: Using controls, making adjustments, or performing procedures other than those specified in your user documentation ...
User's Guide (HTML)
Page 21
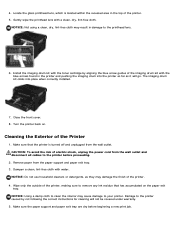
NOTICE: Not using a clean, dry, lint-free cloth may result in the top of the printer, making sure to your printer. Close the front cover. 8. Turn the printer back on the paper exit tray. Cleaning the Exterior of electric shock, unplug the power cord from the paper support and paper exit tray. 3. Wipe ... the imaging drum kit with the toner cartridge by not following the correct instructions for cleaning will go. CAUTION: To avoid the risk of the Printer 1. Gently wipe the printhead lens with water. Install the imaging drum kit with the blue arrows found in the...
NOTICE: Not using a clean, dry, lint-free cloth may result in the top of the printer, making sure to your printer. Close the front cover. 8. Turn the printer back on the paper exit tray. Cleaning the Exterior of electric shock, unplug the power cord from the paper support and paper exit tray. 3. Wipe ... the imaging drum kit with the toner cartridge by not following the correct instructions for cleaning will go. CAUTION: To avoid the risk of the Printer 1. Gently wipe the printhead lens with water. Install the imaging drum kit with the blue arrows found in the...


