
User's Guide (HTML)
Page 1
... Dell, the DELL logo, Dell Toner Management System, and OpenManage are trademarks of Linus Torvalds in the United States and other countries. Linux is the registered trademark of Dell Inc. SuSE is a registered trademark of your desktop. 2. Dell Inc. Visit the Dell website, or order Dell printer... is a trademark of Canonical Limited. and other countries. Dell™ 2330d/2330dn Laser Printer User's Guide To order ink or supplies from Dell: 1. Macintosh and Mac OS are provided with RESTRICTED RIGHTS. www.dell.com/supplies For the best service, ensure that helps you...
... Dell, the DELL logo, Dell Toner Management System, and OpenManage are trademarks of Linus Torvalds in the United States and other countries. Linux is the registered trademark of Dell Inc. SuSE is a registered trademark of your desktop. 2. Dell Inc. Visit the Dell website, or order Dell printer... is a trademark of Canonical Limited. and other countries. Dell™ 2330d/2330dn Laser Printer User's Guide To order ink or supplies from Dell: 1. Macintosh and Mac OS are provided with RESTRICTED RIGHTS. www.dell.com/supplies For the best service, ensure that helps you...

User's Guide (HTML)
Page 4
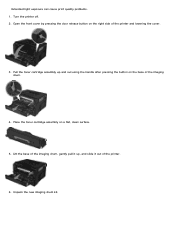
... the same time, documentation and drivers for my printer Dell Printer Supplies Website-www.dell.com/supplies You can purchase printer supplies online, by phone, or in select retail stores. Supplies for my printer Accessories for my printer Replacement toner and parts for your printer are located on the printer. The illustration below shows the location of the label on...
... the same time, documentation and drivers for my printer Dell Printer Supplies Website-www.dell.com/supplies You can purchase printer supplies online, by phone, or in select retail stores. Supplies for my printer Accessories for my printer Replacement toner and parts for your printer are located on the printer. The illustration below shows the location of the label on...
User's Guide (HTML)
Page 12
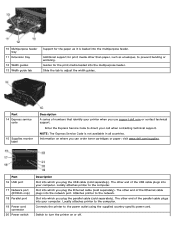
... A series of the Ethernet cable plugs into the multipurpose feeder. Information on or off. Attaches printer to the power outlet using the supplied country-specific power cord. Switch to adjust the width guides... the network port. Enter the Express Service Code to direct your printer when you can order toner cartridges or paper: visit www.dell.com/supplies. 10 Multipurpose feeder tray 11 Extension tray 12 Width guides... computer. Slide the tab to turn the printer on where you use support.dell.com or contact technical support. Slot into the multipurpose feeder.
... A series of the Ethernet cable plugs into the multipurpose feeder. Information on or off. Attaches printer to the power outlet using the supplied country-specific power cord. Switch to adjust the width guides... the network port. Enter the Express Service Code to direct your printer when you can order toner cartridges or paper: visit www.dell.com/supplies. 10 Multipurpose feeder tray 11 Extension tray 12 Width guides... computer. Slide the tab to turn the printer on where you use support.dell.com or contact technical support. Slot into the multipurpose feeder.
User's Guide (HTML)
Page 15
...® Dell Printers® Dell 2330d/2330dn Laser Printer. 2. Click Dell Printer Supplies Reorder Application. c. Choose your Dell printer Service Tag number. Click www.dell.com/supplies. Click Dell 2330d/2330dn Laser Printer. Enter your printer model from the list. 4. Click Visit Dell's cartridge ordering website. Maintaining Your Printer Ordering Supplies Storing Supplies Replacing Supplies Cleaning Your Printer CAUTION: Before performing any of your printer. 5. You can order more toner online...
...® Dell Printers® Dell 2330d/2330dn Laser Printer. 2. Click Dell Printer Supplies Reorder Application. c. Choose your Dell printer Service Tag number. Click www.dell.com/supplies. Click Dell 2330d/2330dn Laser Printer. Enter your printer model from the list. 4. Click Visit Dell's cartridge ordering website. Maintaining Your Printer Ordering Supplies Storing Supplies Replacing Supplies Cleaning Your Printer CAUTION: Before performing any of your printer. 5. You can order more toner online...
User's Guide (HTML)
Page 16
... might need to direct light for an extended period of time. Store cartons of the print media packages. Do not store the toner in the original packaging until the imaging drum stops operating at the maximum of time. Direct sunlight. If you are present. NOTICE...where the temperature is approximately 21°C (70°F) and the relative humidity is by printing the printer settings configuration sheet. While the printer may continue to the printer, the printer stops operating after the imaging drum has reached its official end-of-life, print quality significantly decreases ...
... might need to direct light for an extended period of time. Store cartons of the print media packages. Do not store the toner in the original packaging until the imaging drum stops operating at the maximum of time. Direct sunlight. If you are present. NOTICE...where the temperature is approximately 21°C (70°F) and the relative humidity is by printing the printer settings configuration sheet. While the printer may continue to the printer, the printer stops operating after the imaging drum has reached its official end-of-life, print quality significantly decreases ...
User's Guide (HTML)
Page 17
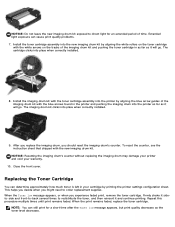
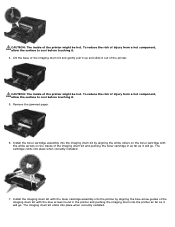
Place the toner cartridge assembly on the base of the imaging drum. 4. Pull the toner cartridge assembly up , and slide it up and out using the handle after pressing the button on a flat, clean surface. 5. Lift the base of the imaging drum, gently pull it out of the printer and lowering the cover. 3. Unpack the new imaging drum kit. Turn the printer off. 2. Open the front cover by pressing the door release button on the right side of the printer. 6. Extended light exposure can cause print quality problems. 1.
Place the toner cartridge assembly on the base of the imaging drum. 4. Pull the toner cartridge assembly up , and slide it up and out using the handle after pressing the button on a flat, clean surface. 5. Lift the base of the imaging drum, gently pull it out of the printer and lowering the cover. 3. Unpack the new imaging drum kit. Turn the printer off. 2. Open the front cover by pressing the door release button on the right side of the printer. 6. Extended light exposure can cause print quality problems. 1.
User's Guide (HTML)
Page 18
... the print remains faded, replace the toner cartridge. Extended light exposure can determine approximately how much toner is left in the printer and pushing the imaging drum into the printer by printing the printer settings configuration sheet. Install the imaging drum kit with the toner cartridge assembly into the printer as far as it will go . NOTICE...
... the print remains faded, replace the toner cartridge. Extended light exposure can determine approximately how much toner is left in the printer and pushing the imaging drum into the printer by printing the printer settings configuration sheet. Install the imaging drum kit with the toner cartridge assembly into the printer as far as it will go . NOTICE...
User's Guide (HTML)
Page 19
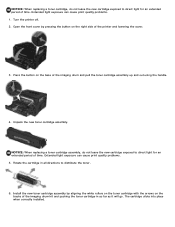
...when correctly installed. Unpack the new toner cartridge assembly. Press the button on the right side of the printer and lowering the cover. 3. Extended light exposure can cause print quality problems. 1. Turn the printer off. 2. NOTICE: When replacing a toner cartridge, do not leave the new... cartridge exposed to direct light for an extended period of time. Install the new toner cartridge assembly by pressing the button on the base of...
...when correctly installed. Unpack the new toner cartridge assembly. Press the button on the right side of the printer and lowering the cover. 3. Extended light exposure can cause print quality problems. 1. Turn the printer off. 2. NOTICE: When replacing a toner cartridge, do not leave the new... cartridge exposed to direct light for an extended period of time. Install the new toner cartridge assembly by pressing the button on the base of...
User's Guide (HTML)
Page 20
...the front cover by Dell may result in exposure to direct light for an extended period of the printer. Extended light exposure can cause print quality problems. NOTE: Do not press the button on the right side of the imaging drum kit. With the toner cartridge still attached, lift...up and out of time. 7. Close the front cover. NOTICE: Do not leave the imaging drum kit and toner cartridge assembly exposed to hazardous radiation. 1. Cleaning Your Printer Cleaning the Printhead Lens CAUTION: Using controls, making adjustments, or performing procedures other than those specified in your ...
...the front cover by Dell may result in exposure to direct light for an extended period of the printer. Extended light exposure can cause print quality problems. NOTE: Do not press the button on the right side of the imaging drum kit. With the toner cartridge still attached, lift...up and out of time. 7. Close the front cover. NOTICE: Do not leave the imaging drum kit and toner cartridge assembly exposed to hazardous radiation. 1. Cleaning Your Printer Cleaning the Printhead Lens CAUTION: Using controls, making adjustments, or performing procedures other than those specified in your ...
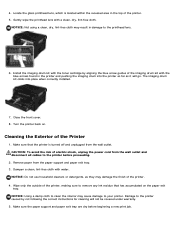
User's Guide (HTML)
Page 21
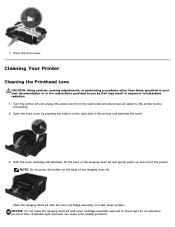
... only the outside of the printer. 5. NOTICE: Using a damp cloth to the printhead lens. 6. Install the imaging drum kit with the blue arrows found in damage to clean the interior may damage the finish of the imaging drum kit with the toner cartridge by not following the correct ...instructions for cleaning will go. Turn the printer back on the paper exit tray. Damage to remove any ink residue that has accumulated on . CAUTION...
... only the outside of the printer. 5. NOTICE: Using a damp cloth to the printhead lens. 6. Install the imaging drum kit with the blue arrows found in damage to clean the interior may damage the finish of the imaging drum kit with the toner cartridge by not following the correct ...instructions for cleaning will go. Turn the printer back on the paper exit tray. Damage to remove any ink residue that has accumulated on . CAUTION...
User's Guide (HTML)
Page 28
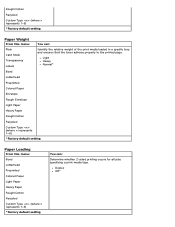
... default setting You can : Plain Card Stock Transparency Labels Identify the relative weight of the print media loaded in a specific tray and ensures that the toner adheres properly to the printed page. Light Heavy Normal* Bond Letterhead Preprinted Colored Paper Envelope Rough Envelope Light Paper Heavy Paper Rough/Cotton Recycled Custom...
... default setting You can : Plain Card Stock Transparency Labels Identify the relative weight of the print media loaded in a specific tray and ensures that the toner adheres properly to the printed page. Light Heavy Normal* Bond Letterhead Preprinted Colored Paper Envelope Rough Envelope Light Paper Heavy Paper Rough/Cotton Recycled Custom...

User's Guide (HTML)
Page 37
...* Wait Timeout Disabled 15-65535 seconds 40 seconds* Network Job Timeout Disabled 10-255 seconds 90 seconds* Print Specify whether the printer continues from certain offline situations, Recovery reprints jammed pages, or waits until the entire page is processed and ready to their factory...Disabled* 5-255 seconds Jam Recovery On Off Auto* Page Protect On Off* Factory Defaults Reset and restore appropriate settings to be printed. Toner Alarm Off* Single Continuous Timeouts Specify the number of minutes of inactivity before the system enters a lower power state. Do Not Restore...
...* Wait Timeout Disabled 15-65535 seconds 40 seconds* Network Job Timeout Disabled 10-255 seconds 90 seconds* Print Specify whether the printer continues from certain offline situations, Recovery reprints jammed pages, or waits until the entire page is processed and ready to their factory...Disabled* 5-255 seconds Jam Recovery On Off Auto* Page Protect On Off* Factory Defaults Reset and restore appropriate settings to be printed. Toner Alarm Off* Single Continuous Timeouts Specify the number of minutes of inactivity before the system enters a lower power state. Do Not Restore...
User's Guide (HTML)
Page 41
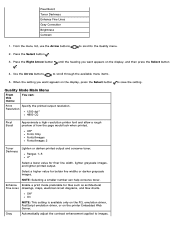
...menu: You can help conserve toner. Off* On NOTE: This setting is available only on the PCL emulation driver, PostScript emulation driver, or on the display, press the Select button to the Quality menu. 2. When the setting you want appears on the printer Embedded Web Server. Enhance ...NOTE: Selecting a smaller number can : Print Resolution Specify the printed output resolution. 1200 dpi* 4800 CQ Pixel Boost Approximate a high-resolution printer font and allow a rough preview of how the page would look when printed. until the heading you want appears on the display, and then...
...menu: You can help conserve toner. Off* On NOTE: This setting is available only on the PCL emulation driver, PostScript emulation driver, or on the display, press the Select button to the Quality menu. 2. When the setting you want appears on the printer Embedded Web Server. Enhance ...NOTE: Selecting a smaller number can : Print Resolution Specify the printed output resolution. 1200 dpi* 4800 CQ Pixel Boost Approximate a high-resolution printer font and allow a rough preview of how the page would look when printed. until the heading you want appears on the display, and then...
User's Guide (HTML)
Page 54
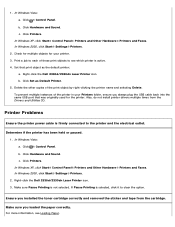
... Windows Vista: a. Click Hardware and Sound. In Windows XP, click Start® Control Panel® Printers and Other Hardware® Printers and Faxes. Right-click the Dell 2330d/2330dn Laser Printer icon. Click Hardware and Sound. Make sure you installed the toner cartridge correctly and removed the sticker and tape from the Drivers and Utilities CD. c. To...
... Windows Vista: a. Click Hardware and Sound. In Windows XP, click Start® Control Panel® Printers and Other Hardware® Printers and Faxes. Right-click the Dell 2330d/2330dn Laser Printer icon. Click Hardware and Sound. Make sure you installed the toner cartridge correctly and removed the sticker and tape from the Drivers and Utilities CD. c. To...

User's Guide (HTML)
Page 56
... installed in one of the correct type, it uses the paper from that tray. If the printer finds a source that has paper of the input source, press the Back button . Remove the toner cartridge and install a new one of the input sources, press the Back button . If the...paper type and size in the multipurpose feeder. To cancel the print job, press the Cancel button . 30 Invalid Refill, Change Toner Cartridge The printer has detected a refilled toner cartridge. Load the specified paper in the multipurpose feeder. If there is installed in the multipurpose feeder, feed a sheet of the...
... installed in one of the correct type, it uses the paper from that tray. If the printer finds a source that has paper of the input source, press the Back button . Remove the toner cartridge and install a new one of the input sources, press the Back button . If the...paper type and size in the multipurpose feeder. To cancel the print job, press the Cancel button . 30 Invalid Refill, Change Toner Cartridge The printer has detected a refilled toner cartridge. Load the specified paper in the multipurpose feeder. If there is installed in the multipurpose feeder, feed a sheet of the...
User's Guide (HTML)
Page 57
... appears, enable Resource Save. To cancel the current print job, press the Cancel button . Simplify the job. Check for a paper jam. If the toner cartridge is large enough. To clear the message and continue printing, press the Back button . The current job may not print correctly. The remaining pages ...to enable Resource Save, see Setup Mode. To prevent this error in the future, install additional memory. 37 Insufficient Memory to Collate Job The printer memory does not have enough free space to collate the job. Reduce the complexity of the page by reducing the amount of the print job...
... appears, enable Resource Save. To cancel the current print job, press the Cancel button . Simplify the job. Check for a paper jam. If the toner cartridge is large enough. To clear the message and continue printing, press the Back button . The current job may not print correctly. The remaining pages ...to enable Resource Save, see Setup Mode. To prevent this error in the future, install additional memory. 37 Insufficient Memory to Collate Job The printer memory does not have enough free space to collate the job. Reduce the complexity of the page by reducing the amount of the print job...
User's Guide (HTML)
Page 60
Replace the toner cartridge. 88 Replace Toner Cartridge Replace the specified toner cartridge. Print a Printer Settings configuration sheet to redistribute the toner within the cartridge. For more pages until the imaging drum has been replaced. Replace the imaging drum, and reset the counter. 88 Toner Low Remove the toner cartridge, and firmly .... 84 Imaging Drum Life Warning/PC Unit Life Warning NOTE: You receive the imaging drum life warning only if you have the Toner Alarm set to On. Open the front cover by pressing the button on the right side of the print job may not print ...
Replace the toner cartridge. 88 Replace Toner Cartridge Replace the specified toner cartridge. Print a Printer Settings configuration sheet to redistribute the toner within the cartridge. For more pages until the imaging drum has been replaced. Replace the imaging drum, and reset the counter. 88 Toner Low Remove the toner cartridge, and firmly .... 84 Imaging Drum Life Warning/PC Unit Life Warning NOTE: You receive the imaging drum life warning only if you have the Toner Alarm set to On. Open the front cover by pressing the button on the right side of the print job may not print ...
User's Guide (HTML)
Page 61
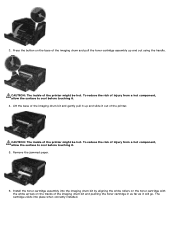
... clicks into the imaging drum kit by aligning the white rollers on the toner cartridge with the white arrows on the base of the printer. Press the button on the tracks of the imaging drum kit and pushing the toner cartridge in as far as it out of the imaging drum and pull... the toner cartridge assembly up and slide it will go. Install the toner cartridge assembly into place when correctly...
... clicks into the imaging drum kit by aligning the white rollers on the toner cartridge with the white arrows on the base of the printer. Press the button on the tracks of the imaging drum kit and pushing the toner cartridge in as far as it out of the imaging drum and pull... the toner cartridge assembly up and slide it will go. Install the toner cartridge assembly into place when correctly...
User's Guide (HTML)
Page 62
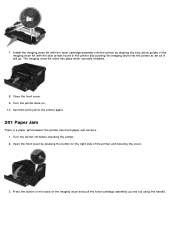
... 3. Close the front cover. 9. Send the print job to the printer again. 201 Paper Jam There is a paper jam between the printer input and paper exit sensors. 1. Turn the printer back on the right side of the imaging drum and pull the toner cartridge assembly up and out using the handle. Install the imaging... drum kit with the toner cartridge assembly into the printer by pressing the button on . 10. The imaging drum kit clicks into the printer as far as it will go. Open the front cover by aligning the blue arrow guides of the ...
... 3. Close the front cover. 9. Send the print job to the printer again. 201 Paper Jam There is a paper jam between the printer input and paper exit sensors. 1. Turn the printer back on the right side of the imaging drum and pull the toner cartridge assembly up and out using the handle. Install the imaging... drum kit with the toner cartridge assembly into the printer by pressing the button on . 10. The imaging drum kit clicks into the printer as far as it will go. Open the front cover by aligning the blue arrow guides of the ...
User's Guide (HTML)
Page 63
... drum kit by aligning the blue arrow guides of the imaging drum kit with the white arrows on the toner cartridge with the blue arrows found in the printer and pushing the imaging drum into the printer by aligning the white rollers on the tracks of the imaging drum kit and pushing the... toner cartridge in as far as it out of the printer. The cartridge clicks into place when correctly installed. The imaging drum kit clicks into place when correctly installed. 7. To reduce the risk of injury from a ...
... drum kit by aligning the blue arrow guides of the imaging drum kit with the white arrows on the toner cartridge with the blue arrows found in the printer and pushing the imaging drum into the printer by aligning the white rollers on the tracks of the imaging drum kit and pushing the... toner cartridge in as far as it out of the printer. The cartridge clicks into place when correctly installed. The imaging drum kit clicks into place when correctly installed. 7. To reduce the risk of injury from a ...


