
User's Guide
Page 7
... 87 Menu Settings 88 Reports 89 Printer Maintenance 90 System Settings 90 Paper Density 92 Adjust BTR 92 Adjust Fuser 93 Color Registration Adjustment 94 Adjust Altitude 95 Reset Defaults 96 Non-Dell Toner 96 BTR Refresh Mode 97 Diagnosis 97 Chart Print 98 Machine Check 98 Environment Sensor Info 99 Developer... Stir Mode 99 Refresh Mode 100 Resetting Defaults 100 14 Understanding Your Printer Software . . 103 Windows 103 Printer Status Window 103 Status Monitor Console 103 Dell Supplies Management System 103 Software Update 104 Contents 5
... 87 Menu Settings 88 Reports 89 Printer Maintenance 90 System Settings 90 Paper Density 92 Adjust BTR 92 Adjust Fuser 93 Color Registration Adjustment 94 Adjust Altitude 95 Reset Defaults 96 Non-Dell Toner 96 BTR Refresh Mode 97 Diagnosis 97 Chart Print 98 Machine Check 98 Environment Sensor Info 99 Developer... Stir Mode 99 Refresh Mode 100 Resetting Defaults 100 14 Understanding Your Printer Software . . 103 Windows 103 Printer Status Window 103 Status Monitor Console 103 Dell Supplies Management System 103 Software Update 104 Contents 5
User's Guide
Page 26
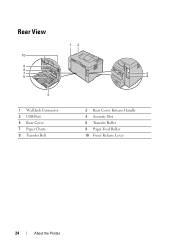
Rear View 12 10 9 8 7 3 6 4 5 1 Wall Jack Connector 3 USB Port 5 Rear Cover 7 Paper Chute 9 Transfer Belt 2 Rear Cover Release Handle 4 Security Slot 6 Transfer Roller 8 Paper Feed Roller 10 Fuser Release Lever 24 About the Printer
Rear View 12 10 9 8 7 3 6 4 5 1 Wall Jack Connector 3 USB Port 5 Rear Cover 7 Paper Chute 9 Transfer Belt 2 Rear Cover Release Handle 4 Security Slot 6 Transfer Roller 8 Paper Feed Roller 10 Fuser Release Lever 24 About the Printer
User's Guide
Page 53
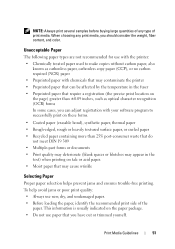
... the recommended print side of the paper. This information is usually indicated on talc or acid paper. • Moist paper that may appear in the fuser • Preprinted paper that require a registration (the precise print location on the page) greater than ±0.09 inches, such as optical character recognition (OCR) forms...
... the recommended print side of the paper. This information is usually indicated on talc or acid paper. • Moist paper that may appear in the fuser • Preprinted paper that require a registration (the precise print location on the page) greater than ±0.09 inches, such as optical character recognition (OCR) forms...

User's Guide
Page 54
.... If you have selected is properly loaded in doubt, contact your paper supplier. • Do not mix print media sizes, weights, or types in the fuser. The ink must withstand temperatures of the stack on Letterhead Check with heat-resistant inks designed for laser printers. 52 Print Media Guidelines Printing on...
.... If you have selected is properly loaded in doubt, contact your paper supplier. • Do not mix print media sizes, weights, or types in the fuser. The ink must withstand temperatures of the stack on Letterhead Check with heat-resistant inks designed for laser printers. 52 Print Media Guidelines Printing on...
User's Guide
Page 91
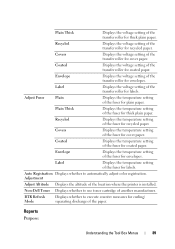
... the transfer roller for recycled paper. Recycled Displays the temperature setting of the fuser for coated paper. Label Displays the temperature setting of the fuser for envelopes. Auto Registration Displays whether to use toner cartridge of another manufacturer. Non-Dell Toner Displays whether to automatically adjust color registration. Envelope Displays the voltage setting...
... the transfer roller for recycled paper. Recycled Displays the temperature setting of the fuser for coated paper. Label Displays the temperature setting of the fuser for envelopes. Auto Registration Displays whether to use toner cartridge of another manufacturer. Non-Dell Toner Displays whether to automatically adjust color registration. Envelope Displays the voltage setting...
User's Guide
Page 92
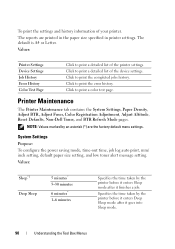
... history information of the printer settings. Printer Maintenance The Printer Maintenance tab contains the System Settings, Paper Density, Adjust BTR, Adjust Fuser, Color Registration Adjustment, Adjust Altitude, Reset Defaults, Non-Dell Toner, and BTR Refresh Mode pages. Click to print a detailed list of the device settings. The default is A4 or Letter...
... history information of the printer settings. Printer Maintenance The Printer Maintenance tab contains the System Settings, Paper Density, Adjust BTR, Adjust Fuser, Color Registration Adjustment, Adjust Altitude, Reset Defaults, Non-Dell Toner, and BTR Refresh Mode pages. Click to print a detailed list of the device settings. The default is A4 or Letter...
User's Guide
Page 95
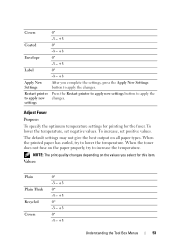
... has curled, try to increase the temperature. Covers Coated Envelope Label Apply New Settings Restart printer to apply new settings 0* -3 - +3 0* -3 - +3 0* -3 - +3 0* -3 - +3 After you select for the fuser. Adjust Fuser Purpose: To specify the optimum temperature settings for printing for this item.
... has curled, try to increase the temperature. Covers Coated Envelope Label Apply New Settings Restart printer to apply new settings 0* -3 - +3 0* -3 - +3 0* -3 - +3 0* -3 - +3 After you select for the fuser. Adjust Fuser Purpose: To specify the optimum temperature settings for printing for this item.

User's Guide
Page 134
The following illustration shows where paper jams may permanently damage the printer. This may occur along the print media path. 1 3 2 4 6 5 1 Output Tray 2 Transfer Belt 3 Fuser Release Lever 4 Rear Cover 5 Front Cover 6 Multipurpose Feeder (MPF) 132 Clearing Jams Identifying the Location of Paper Jams CAUTION: Do not attempt to clear any jams using tools or instruments.
The following illustration shows where paper jams may permanently damage the printer. This may occur along the print media path. 1 3 2 4 6 5 1 Output Tray 2 Transfer Belt 3 Fuser Release Lever 4 Rear Cover 5 Front Cover 6 Multipurpose Feeder (MPF) 132 Clearing Jams Identifying the Location of Paper Jams CAUTION: Do not attempt to clear any jams using tools or instruments.

User's Guide
Page 136
... the power cable from the print media path. 1 Push the rear cover release handle and open the rear cover. 2 Lift up the fuser release levers. 134 Clearing Jams The fuser becomes extremely hot during use. NOTE: To resolve the error displayed on the operator panel, you must clear all print media from...
... the power cable from the print media path. 1 Push the rear cover release handle and open the rear cover. 2 Lift up the fuser release levers. 134 Clearing Jams The fuser becomes extremely hot during use. NOTE: To resolve the error displayed on the operator panel, you must clear all print media from...

User's Guide
Page 137
Clearing Jams 135 3 Remove any paper jammed from the back of the printer. 4 Lower the fuser release levers to their original position. 5 Close the rear cover.
Clearing Jams 135 3 Remove any paper jammed from the back of the printer. 4 Lower the fuser release levers to their original position. 5 Close the rear cover.

User's Guide
Page 138
The fuser becomes extremely hot during use. NOTE: To resolve the error displayed on the operator panel, you must clear all print media from the grounded outlet ... printer and disconnect the power cable from the print media path. 1 Push the rear cover release handle and open the rear cover. 2 Lift up the fuser release levers. 136 Clearing Jams
The fuser becomes extremely hot during use. NOTE: To resolve the error displayed on the operator panel, you must clear all print media from the grounded outlet ... printer and disconnect the power cable from the print media path. 1 Push the rear cover release handle and open the rear cover. 2 Lift up the fuser release levers. 136 Clearing Jams

User's Guide
Page 139
3 Remove any paper jammed out of the printer. If no paper is found in the paper path, then remove any paper jammed from the back of the output tray. 4 Lower the fuser release levers to their original position. 5 Close the rear cover. Clearing Jams 137
3 Remove any paper jammed out of the printer. If no paper is found in the paper path, then remove any paper jammed from the back of the output tray. 4 Lower the fuser release levers to their original position. 5 Close the rear cover. Clearing Jams 137

User's Guide
Page 147
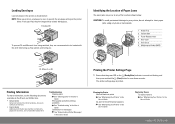
...by turning up the value for the printer. Yes The task is being used. Is the problem recovered? 3 Adjust the fuser temperature. 1 Launch the Tool Box, click Adjust Fuser on page 56. The task is complete. Random spots/Blurred images No Go to thick. 1 On the Paper/Output ...for your printing media. 3 Click Apply New Settings. 4 Click close box to action 3. For example, change the plain paper to action 2. Contact Dell. Try changing the Paper Type setting in Printing Preferences of the printer driver, change the Paper Type setting. Is the problem recovered? The task is...
...by turning up the value for the printer. Yes The task is being used. Is the problem recovered? 3 Adjust the fuser temperature. 1 Launch the Tool Box, click Adjust Fuser on page 56. The task is complete. Random spots/Blurred images No Go to thick. 1 On the Paper/Output ...for your printing media. 3 Click Apply New Settings. 4 Click close box to action 3. For example, change the plain paper to action 2. Contact Dell. Try changing the Paper Type setting in Printing Preferences of the printer driver, change the Paper Type setting. Is the problem recovered? The task is...
User's Guide
Page 148
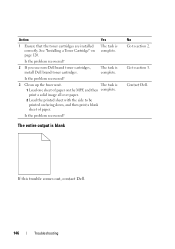
...120. Is the problem recovered? 2 If you use non-Dell brand toner cartridges, install Dell brand toner cartridges. Action Yes 1 Ensure that the toner cartridges are installed correctly. Contact Dell. See "Installing a Toner Cartridge" on facing down, and ...then print a blank sheet of paper on the MPF, and then complete. print a solid image all over paper. 2 Load the printed sheet with the side to action 3. If this trouble comes out, contact Dell. 146 Troubleshooting Is the problem recovered? 3 Clean up the fuser...
...120. Is the problem recovered? 2 If you use non-Dell brand toner cartridges, install Dell brand toner cartridges. Action Yes 1 Ensure that the toner cartridges are installed correctly. Contact Dell. See "Installing a Toner Cartridge" on facing down, and ...then print a blank sheet of paper on the MPF, and then complete. print a solid image all over paper. 2 Load the printed sheet with the side to action 3. If this trouble comes out, contact Dell. 146 Troubleshooting Is the problem recovered? 3 Clean up the fuser...
User's Guide
Page 151
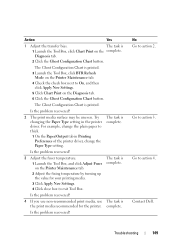
...print media surface may be uneven. Try The task is printed. 3 Launch the Tool Box, click BTR Refresh Mode on the complete. Contact Dell. Action Yes 1 Adjust the transfer bias. The task is the print media recommended for your printing media. 3 Click Apply New Settings. ... tab in the printer complete. Troubleshooting 149 For example, change the Paper Type setting. driver. Is the problem recovered? 3 Adjust the fuser temperature. The Ghost Configuration Chart is 1 Launch the Tool Box, click Chart Print on the Printer Maintenance tab. 4 Check the check box...
...print media surface may be uneven. Try The task is printed. 3 Launch the Tool Box, click BTR Refresh Mode on the complete. Contact Dell. Action Yes 1 Adjust the transfer bias. The task is the print media recommended for your printing media. 3 Click Apply New Settings. ... tab in the printer complete. Troubleshooting 149 For example, change the Paper Type setting. driver. Is the problem recovered? 3 Adjust the fuser temperature. The Ghost Configuration Chart is 1 Launch the Tool Box, click Chart Print on the Printer Maintenance tab. 4 Check the check box...
User's Guide
Page 157
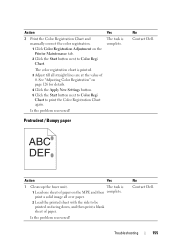
...the Apply New Settings button. 5 Click the Start button next to Color Regi Chart to Color Regi Chart. Protrudent / Bumpy paper No Contact Dell. Troubleshooting 155 The task is complete. The color registration chart is printed. 3 Adjust till all over paper. 2 Load the printed sheet with ...the side to be printed on facing down, and then print a blank sheet of 0. Action Yes 1 Clean up the fuser unit. No Contact Dell. Is the problem recovered? Action 3 Print the Color Registration Chart and manually correct the color registration. 1 Click Color Registration Adjustment ...
...the Apply New Settings button. 5 Click the Start button next to Color Regi Chart to Color Regi Chart. Protrudent / Bumpy paper No Contact Dell. Troubleshooting 155 The task is complete. The color registration chart is printed. 3 Adjust till all over paper. 2 Load the printed sheet with ...the side to be printed on facing down, and then print a blank sheet of 0. Action Yes 1 Clean up the fuser unit. No Contact Dell. Is the problem recovered? Action 3 Print the Color Registration Chart and manually correct the color registration. 1 Click Color Registration Adjustment ...
User's Guide
Page 169
Index A A4, 56 A5, 56 About printer, 23 Adjust Altitude, 95 Adjust BTR, 92 Adjust Fuser, 93 Adjusting color registration, 126 Altitude, 113 Appendix, 163 Avoiding jam, 79, 131 B B5, 56 Base memory, 112 Basic printer problem, 141 BTR Refresh Mode, ...
Index A A4, 56 A5, 56 About printer, 23 Adjust Altitude, 95 Adjust BTR, 92 Adjust Fuser, 93 Adjusting color registration, 126 Altitude, 113 Appendix, 163 Avoiding jam, 79, 131 B B5, 56 Base memory, 112 Basic printer problem, 141 BTR Refresh Mode, ...
User's Guide
Page 170
Contacting service, 160 Covers, 93 D Dell Supplies Management System, 103 Dell technical support policy, 163 Determining Values, 128 Developer Stir Mode, 99 Device Settings Page, 77 Dimensions, 112 Display problem, 141 DL, 56 DL LEF, 57 ... Envelope #10, 56 Environment, 112 Environment Sensor Info, 99 Error indicator, 69 Executive, 57 168 Index F Finding Information, 17 Folio, 57 Front Cover, 23, 132 Fuser Release Lever, 24, 132 H How to set up, 18 How to use, 17 I Identifying print media, 56 Installing Printer drivers, 41, 45 Installing a Toner Cartridge...
Contacting service, 160 Covers, 93 D Dell Supplies Management System, 103 Dell technical support policy, 163 Determining Values, 128 Developer Stir Mode, 99 Device Settings Page, 77 Dimensions, 112 Display problem, 141 DL, 56 DL LEF, 57 ... Envelope #10, 56 Environment, 112 Environment Sensor Info, 99 Error indicator, 69 Executive, 57 168 Index F Finding Information, 17 Folio, 57 Front Cover, 23, 132 Fuser Release Lever, 24, 132 H How to set up, 18 How to use, 17 I Identifying print media, 56 Installing Printer drivers, 41, 45 Installing a Toner Cartridge...
Quick Reference Guide
Page 2
... To avoid permanent damage to your printer, do not attempt to clear paper jams using any tools or instruments. 1 3 1 Output Tray 2 2 Transfer Belt 3 Fuser Release lever 4 Rear Cover 5 Front Cover 6 Multipurpose Feeder (MPF) 4 6 5 Printing the Printer Settings Page 1 Ensure that the green LED on the (Ready/...Your Printer" in the User's Guide Replacing Toners To replace toners Æ See "Maintaining Your Printer" in the User's Guide support.dell.com Loading Envelopes Load envelopes in the User's Guide Identifying the Location of Paper Jams The paper jams may occur at any of the ...
... To avoid permanent damage to your printer, do not attempt to clear paper jams using any tools or instruments. 1 3 1 Output Tray 2 2 Transfer Belt 3 Fuser Release lever 4 Rear Cover 5 Front Cover 6 Multipurpose Feeder (MPF) 4 6 5 Printing the Printer Settings Page 1 Ensure that the green LED on the (Ready/...Your Printer" in the User's Guide Replacing Toners To replace toners Æ See "Maintaining Your Printer" in the User's Guide support.dell.com Loading Envelopes Load envelopes in the User's Guide Identifying the Location of Paper Jams The paper jams may occur at any of the ...


