User's Guide
Page 2
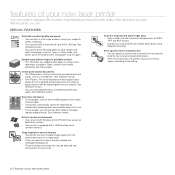
... adjusted and enhanced at up to 17 ppm. Copy originals in a full range of colors using Networks scanning. Create professional documents • Print Watermarks. See Software section. Scan the originals and send it right away • Scan in various sizes: letterhead, envelopes, labels, custom-sized media, postcards, and heavy paper. Handle many ...section. • Print Posters. Set a specific time to transmit a Fax • You can use the precise compressions of JPEG, TIFF and PDF formats. • Quickly scan and send files to form a poster. See Software section.
... adjusted and enhanced at up to 17 ppm. Copy originals in a full range of colors using Networks scanning. Create professional documents • Print Watermarks. See Software section. Scan the originals and send it right away • Scan in various sizes: letterhead, envelopes, labels, custom-sized media, postcards, and heavy paper. Handle many ...section. • Print Posters. Set a specific time to transmit a Fax • You can use the precise compressions of JPEG, TIFF and PDF formats. • Quickly scan and send files to form a poster. See Software section.

User's Guide
Page 8
... 32 Gray enhance copying 32 Setting copy timeout SCANNING 33 Scanning basics 33 33 Scanning from the control panel 33 Setting scan information in Dell Scan Manager. 33 Scanning to application programs 34 Scanning by a network connection 34 Scanning to Email 35 Changing the settings for each scan job 35 Changing the default scan settings 35 Setting up Address Book 35...
... 32 Gray enhance copying 32 Setting copy timeout SCANNING 33 Scanning basics 33 33 Scanning from the control panel 33 Setting scan information in Dell Scan Manager. 33 Scanning to application programs 34 Scanning by a network connection 34 Scanning to Email 35 Changing the settings for each scan job 35 Changing the default scan settings 35 Setting up Address Book 35...

User's Guide
Page 9
...USB MEMORY DEVICE 46 About USB memory 46 46 Plugging in a USB memory device 46 Scanning to a USB memory device 46 Scanning 47 Customizing Scan to USB 47 Printing from a USB memory device 47 To print a document from ... Clearing memory 50 Cleaning your printer 50 Cleaning the outside 50 Cleaning the inside 52 Cleaning the scan unit 53 Maintaining the cartridge 53 Toner cartridge storage 53 Expected cartridge life 53 Redistributing toner 53... 66 Printing quality problems 68 Copying problems 69 Scanning problems 69 Dell Scan Manager problems 70 Fax problems 70 Common Windows problems Contents | 9
...USB MEMORY DEVICE 46 About USB memory 46 46 Plugging in a USB memory device 46 Scanning to a USB memory device 46 Scanning 47 Customizing Scan to USB 47 Printing from a USB memory device 47 To print a document from ... Clearing memory 50 Cleaning your printer 50 Cleaning the outside 50 Cleaning the inside 52 Cleaning the scan unit 53 Maintaining the cartridge 53 Toner cartridge storage 53 Expected cartridge life 53 Redistributing toner 53... 66 Printing quality problems 68 Copying problems 69 Scanning problems 69 Dell Scan Manager problems 70 Fax problems 70 Common Windows problems Contents | 9

User's Guide
Page 11
... input tray 9 Document output tray 10 USB connector 11 Toner cartridge 12 Imaging unit 13 Waste toner container 14 Scanner lid 15 Scanner glass 16 Scan unit 11 | Introduction 1 Extension telephone socket (EXT) 2 Telephone line socket 3 Network port 4 USB port 5 Handle 6 Power receptacle 7 Rear cover 8 Power switch
... input tray 9 Document output tray 10 USB connector 11 Toner cartridge 12 Imaging unit 13 Waste toner container 14 Scanner lid 15 Scanner glass 16 Scan unit 11 | Introduction 1 Extension telephone socket (EXT) 2 Telephone line socket 3 Network port 4 USB port 5 Handle 6 Power receptacle 7 Rear cover 8 Power switch
User's Guide
Page 12
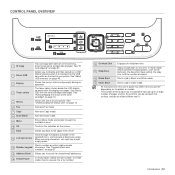
...increase or decrease values. See "Understanding the Status LED" on page 13. 6 Fax Activates Fax mode. 7 Copy Activates Copy mode. 8 Scan/Email Activates Scan mode. 9 Menu Enters Menu mode and scrolls through the available menus. 10 OK Confirms the selection on the screen. 11 Back Sends you ... from your printer depending on the front of your printer. When entering characters, use right key to a single side of paper. CONTROL PANEL OVERVIEW Dell 1235cn 1 ID Copy You can copy both sides of an ID card (e.g., driver's license) to add empty space. See "About USB memory" on ...
...increase or decrease values. See "Understanding the Status LED" on page 13. 6 Fax Activates Fax mode. 7 Copy Activates Copy mode. 8 Scan/Email Activates Scan mode. 9 Menu Enters Menu mode and scrolls through the available menus. 10 OK Confirms the selection on the screen. 11 Back Sends you ... from your printer depending on the front of your printer. When entering characters, use right key to a single side of paper. CONTROL PANEL OVERVIEW Dell 1235cn 1 ID Copy You can copy both sides of an ID card (e.g., driver's license) to add empty space. See "About USB memory" on ...

User's Guide
Page 14
... options or models. Gray Enhance Copy Setup Scan Feature Change Default Copies Copy Collation Reduce/Enlarge Darkness Original Type USB feature Scan Size Original Type Resolution Scan Color Scan Format E-mail Feature Scan Size Original Type Resolution Scan Color Scan Setup Change Default USB Default E-mail Default... Network TCP/IP Ethernet Speed Clear Setting Network Info System Setup (Continued) Clear Setting All Settings Fax Setup Copy Setup Scan Setup System Setup Network Setup Address Book Sent Report Fax RCV Report System Setup (Continued) Report All Report Configuration Supplies ...
... options or models. Gray Enhance Copy Setup Scan Feature Change Default Copies Copy Collation Reduce/Enlarge Darkness Original Type USB feature Scan Size Original Type Resolution Scan Color Scan Format E-mail Feature Scan Size Original Type Resolution Scan Color Scan Setup Change Default USB Default E-mail Default... Network TCP/IP Ethernet Speed Clear Setting Network Info System Setup (Continued) Clear Setting All Settings Fax Setup Copy Setup Scan Setup System Setup Network Setup Address Book Sent Report Fax RCV Report System Setup (Continued) Report All Report Configuration Supplies ...
User's Guide
Page 15
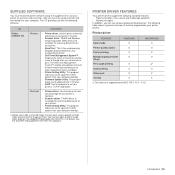
...driver to take full advantage of your printer's features. • Scanner driver: TWAIN and Windows Image Acquisition (WIA) drivers are available for scanning documents on the SmarThru program. For details, see the onscreen help supplied on your printer. • SmarThrua: This is supported only MAC... This program allows you can also open another image editor program, like Adobe® Photoshop®, from your computer desktop. The Dell Toner Management System™ window also displays the level of toner remaining and allows you to order replacement toner cartridges. • ...
...driver to take full advantage of your printer's features. • Scanner driver: TWAIN and Windows Image Acquisition (WIA) drivers are available for scanning documents on the SmarThru program. For details, see the onscreen help supplied on your printer. • SmarThrua: This is supported only MAC... This program allows you can also open another image editor program, like Adobe® Photoshop®, from your computer desktop. The Dell Toner Management System™ window also displays the level of toner remaining and allows you to order replacement toner cartridges. • ...

User's Guide
Page 23
... the paper size and type LOADING ORIGINALS You can use the scanner glass or ADF to let the scan cover fall over the original on the printout. You may get hurt. • When scanning or copying, do not look at the top left corner of paper (75 g/m2, 20 lb bond... paper - torn paper • Remove all staples and paper clips before loading originals. loading originals and print media This chapter introduces you to break the scan glass. Flex or fan the edge of paper. • Do not load booklets, pamphlets, transparencies, or documents having other unusual characteristics. 1. On the ...
... the paper size and type LOADING ORIGINALS You can use the scanner glass or ADF to let the scan cover fall over the original on the printout. You may get hurt. • When scanning or copying, do not look at the top left corner of paper (75 g/m2, 20 lb bond... paper - torn paper • Remove all staples and paper clips before loading originals. loading originals and print media This chapter introduces you to break the scan glass. Flex or fan the edge of paper. • Do not load booklets, pamphlets, transparencies, or documents having other unusual characteristics. 1. On the ...

User's Guide
Page 31
... and press OK. 3. This copy feature is larger than the printable area, some portions may not be set to begin color copying. Your printer begins scanning the front side and shows Place Back Side and Press[Start] 5. Or, press Black Start to those most frequently used unless they have been changed...
... and press OK. 3. This copy feature is larger than the printable area, some portions may not be set to begin color copying. Your printer begins scanning the front side and shows Place Back Side and Press[Start] 5. Or, press Black Start to those most frequently used unless they have been changed...

User's Guide
Page 32
... and press OK. 3. Press the left /right arrow until Copy Feature appears on the scanner glass. 1. Press OK to select On. 5. This copy feature is scanned and printed one in the following order: Clone copying Your printer can be helpful when copying an original containing color in gray scale, use this...
... and press OK. 3. Press the left /right arrow until Copy Feature appears on the scanner glass. 1. Press OK to select On. 5. This copy feature is scanned and printed one in the following order: Clone copying Your printer can be helpful when copying an original containing color in gray scale, use this...

User's Guide
Page 33
... your computer already. This feature can be used via the USB connection or the network connection. Dell Scan Manager Administration appears. 2. Press Properties. 4. See Software section. • WIA: WIA stands for your printer. Setting scan information in Dell Scan Manager." See "Loading originals" on the top line of the preset imaging applications. This feature can...
... your computer already. This feature can be used via the USB connection or the network connection. Dell Scan Manager Administration appears. 2. Press Properties. 4. See Software section. • WIA: WIA stands for your printer. Setting scan information in Dell Scan Manager." See "Loading originals" on the top line of the preset imaging applications. This feature can...

User's Guide
Page 34
...IP address in dotted decimal notation or as the URL in a browser and click Go to access the web site of your email account in Dell Scan Manager program. • You can use Twain driver to access the web site of your account, press the left /right button until the ... in Embedded Web Service. Click Machine Settings and E-mail Setup. 3. Enter the IP address in dotted decimal notation or as the registered ID for Dell Scan Manager. 6. Enter the server port number, from 1 to Email You can set up network parameters using Embedded Web Service. 1. The default port number is...
...IP address in dotted decimal notation or as the URL in a browser and click Go to access the web site of your email account in Dell Scan Manager program. • You can use Twain driver to access the web site of your account, press the left /right button until the ... in Embedded Web Service. Click Machine Settings and E-mail Setup. 3. Enter the IP address in dotted decimal notation or as the registered ID for Dell Scan Manager. 6. Enter the server port number, from 1 to Email You can set up network parameters using Embedded Web Service. 1. The default port number is...
User's Guide
Page 35
... 6. Configuring group email numbers Enter your printer. 2. Select speed email numbers that will be saved. Press the left /right arrow until Scan Feature appears on the bottom line of the display and press OK. 3. Press Menu until the name and address you want . 4. ...Press OK when Change Default appears. 4. To change other scan types, press Back and repeat from the number keypad. • For a two- Searching sequentially through the entire memory in Address Book. Repeat ...
... 6. Configuring group email numbers Enter your printer. 2. Select speed email numbers that will be saved. Press the left /right arrow until Scan Feature appears on the bottom line of the display and press OK. 3. Press Menu until the name and address you want . 4. ...Press OK when Change Default appears. 4. To change other scan types, press Back and repeat from the number keypad. • For a two- Searching sequentially through the entire memory in Address Book. Repeat ...

User's Guide
Page 36
... /right arrow until the option you want and press OK. 6. Press the left /right arrow until ID appears and press OK. 5. If necessary, press Scan/Email. 2. Press the left /right arrow until the name you want appears and press OK. 4. Press OK. 3. Press OK when Yes appears to confirm... printing. The selected information prints out. 36 | Scanning Press Address Book until Print appears on the bottom line of the name you want appears and press OK. 4. Enter the first few letters of...
... /right arrow until the option you want and press OK. 6. Press the left /right arrow until ID appears and press OK. 5. If necessary, press Scan/Email. 2. Press the left /right arrow until the name you want appears and press OK. 4. Press OK. 3. Press OK when Yes appears to confirm... printing. The selected information prints out. 36 | Scanning Press Address Book until Print appears on the bottom line of the name you want appears and press OK. 4. Enter the first few letters of...

User's Guide
Page 40
...of the receiving printer. When you will interrupt a Multiple Send operation between stations (i.e., when the transmission to 10 destinations. The original is scanned into memory and immediately transmitted when the current operation is placed on the bottom line of the display and press OK. 2. Sending a ... confirm the number. Press the left /right arrow to assign a name, skip this feature. 1. Press OK to ready mode. The printer scans the original into memory and shows the total number of pages and the number of the display and press OK. 5. Load originals face up ...
...of the receiving printer. When you will interrupt a Multiple Send operation between stations (i.e., when the transmission to 10 destinations. The original is scanned into memory and immediately transmitted when the current operation is placed on the bottom line of the display and press OK. 2. Sending a ... confirm the number. Press the left /right arrow to assign a name, skip this feature. 1. Press OK to ready mode. The printer scans the original into memory and shows the total number of pages and the number of the display and press OK. 5. Load originals face up ...

User's Guide
Page 45
...and press OK. A list showing your Address Book settings by printing a list. 1. appears. If you want appears and press OK. You can either scan from A to select No at the Another No.? Press Address Book until Print appears on the bottom line of the display. 2. Press the left ...and group dial entries prints out. Press OK. 6. Searching Address Book for a number in Address Book. You can delete entries in Address Book one by scanning through all entries in memory. Repeat steps 5 and 6 to add or delete more numbers and repeat steps 4 and 5. 8. Enter the group dial ...
...and press OK. A list showing your Address Book settings by printing a list. 1. appears. If you want appears and press OK. You can either scan from A to select No at the Another No.? Press Address Book until Print appears on the bottom line of the display. 2. Press the left ...and group dial entries prints out. Press OK. 6. Searching Address Book for a number in Address Book. You can delete entries in Address Book one by scanning through all entries in memory. Repeat steps 5 and 6 to add or delete more numbers and repeat steps 4 and 5. 8. Enter the group dial ...

User's Guide
Page 46
...USB connector on the front of your printer. • Do not remove the USB memory device while the printer is in a USB memory device • Scanning to a USB memory device • Printing from a USB memory device • Backing up data • Managing USB memory • Printing directly from your... for USB V1.1 and USB V2.0 memory devices. This chapter includes: • About USB memory • Plugging in operation, or writing to scan another page. 46 | Using USB memory device There are available with a variety of the button you can do the following on the front of ...
...USB connector on the front of your printer. • Do not remove the USB memory device while the printer is in a USB memory device • Scanning to a USB memory device • Printing from a USB memory device • Backing up data • Managing USB memory • Printing directly from your... for USB V1.1 and USB V2.0 memory devices. This chapter includes: • About USB memory • Plugging in operation, or writing to scan another page. 46 | Using USB memory device There are available with a variety of the button you can do the following on the front of ...

User's Guide
Page 47
...of a folder name, there are one has already been inserted, press Direct USB. 2. Load an original and press Color Start or Black Start. See "Customizing Scan to create a PRN file. • BMP: BMP Uncompressed • TIFF: TIFF 6.0 Baseline • JPEG: JPEG Baseline To print a document from step ...ready mode. Regardless of the display and press OK. 3. 6. If you select Mono in this option, you cannot select JPEG in Scan Format. • Scan Format: Sets the file format in this option, you want to be saved as customized. Press OK when Yes appears to restore the...
...of a folder name, there are one has already been inserted, press Direct USB. 2. Load an original and press Color Start or Black Start. See "Customizing Scan to create a PRN file. • BMP: BMP Uncompressed • TIFF: TIFF 6.0 Baseline • JPEG: JPEG Baseline To print a document from step ...ready mode. Regardless of the display and press OK. 3. 6. If you select Mono in this option, you cannot select JPEG in Scan Format. • Scan Format: Sets the file format in this option, you want to be saved as customized. Press OK when Yes appears to restore the...

User's Guide
Page 48
... size of a folder name, there are one or all at once by one or more files or folders in the front of the file for scanning and saving documents. 1. Press the left /right arrow until File Manage appears and press OK. 4. Press OK when Delete appears. 5. Go to ready mode. Press...
... size of a folder name, there are one or all at once by one or more files or folders in the front of the file for scanning and saving documents. 1. Press the left /right arrow until File Manage appears and press OK. 4. Press OK when Delete appears. 5. Go to ready mode. Press...

User's Guide
Page 50
...all of your printer's memory. Copy Setup Restores all of the data stored in your settings to the factory default. Scan Setup Restores all of the scan options to the factory default. Network Setup Restores all of the network options to the factory default. CLEANING YOUR PRINTER ...To maintain print and scan quality, follow the cleaning procedures below each time the toner cartridge is replaced or if print and scan quality problems occur. • Cleaning the cabinet of the printer with cleaning materials ...
...all of your printer's memory. Copy Setup Restores all of the data stored in your settings to the factory default. Scan Setup Restores all of the scan options to the factory default. Network Setup Restores all of the network options to the factory default. CLEANING YOUR PRINTER ...To maintain print and scan quality, follow the cleaning procedures below each time the toner cartridge is replaced or if print and scan quality problems occur. • Cleaning the cabinet of the printer with cleaning materials ...


