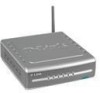
Product Manual
Page 2
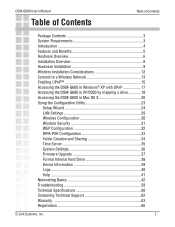
... Accessing the DSM-G600 in XP/2000 by mapping a drive 18 Accessing the DSM-G600 in Mac OS X 20 Using the Configuration Utility 23 Setup Wizard 24 LAN Settings 29 Wireless Configuration 30 Wireless Security 31 WEP Configuration 32 WPA-PSK Configuration 33 Folder Creation and Sharing 34 Time Server 35 System Settings 36 Firmware Upgrade 37 Format Internal Hard Drive 38 Device Information 39 Logs 40 Help 41 Networking Basics 42 Troubleshooting...
... Accessing the DSM-G600 in XP/2000 by mapping a drive 18 Accessing the DSM-G600 in Mac OS X 20 Using the Configuration Utility 23 Setup Wizard 24 LAN Settings 29 Wireless Configuration 30 Wireless Security 31 WEP Configuration 32 WPA-PSK Configuration 33 Folder Creation and Sharing 34 Time Server 35 System Settings 36 Firmware Upgrade 37 Format Internal Hard Drive 38 Device Information 39 Logs 40 Help 41 Networking Basics 42 Troubleshooting...
Product Manual
Page 3
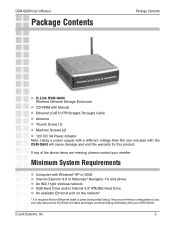
... is used during initial setup. DSM-G600 User's Manual Package Contents Package Contents D-Link DSM-G600 Wireless Network Storage Enclosure CD-ROM with Manual Ethernet (CAT5 UTP/Straight-Through) Cable Antenna Thumb Screw (1) Machine Screws (2) 12V DC 3A Power Adapter Note: Using a power supply with a different voltage than the one included with your DSM-G600. Minimum System Requirements Computer with Windows® XP or 2000 Internet Explorer...
... is used during initial setup. DSM-G600 User's Manual Package Contents Package Contents D-Link DSM-G600 Wireless Network Storage Enclosure CD-ROM with Manual Ethernet (CAT5 UTP/Straight-Through) Cable Antenna Thumb Screw (1) Machine Screws (2) 12V DC 3A Power Adapter Note: Using a power supply with a different voltage than the one included with your DSM-G600. Minimum System Requirements Computer with Windows® XP or 2000 Internet Explorer...

Product Manual
Page 4
... time and get to your existing hard drives* to your wired router. Free up disk space on the computer and organize data on projects. Actual data throughput will automatically recognize the DSM-G600 and add it to share files or collaborate on your own external USB drives*. DSM-G600 User's Manual Introduction Introduction D-Link, an industry leader in networking, introduces the DSM-G600 Wireless Network Storage Enclosure. Maximum wireless signal rate based on the network, you attach the DSM-G600...
... time and get to your existing hard drives* to your wired router. Free up disk space on the computer and organize data on projects. Actual data throughput will automatically recognize the DSM-G600 and add it to share files or collaborate on your own external USB drives*. DSM-G600 User's Manual Introduction Introduction D-Link, an industry leader in networking, introduces the DSM-G600 Wireless Network Storage Enclosure. Maximum wireless signal rate based on the network, you attach the DSM-G600...
Product Manual
Page 5
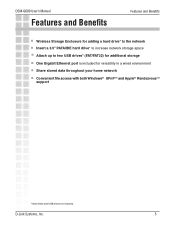
.... 5 DSM-G600 User's Manual Features and Benefits Features and Benefits Wireless Storage Enclosure for adding a hard drive* to the network Insert a 3.5" PATA/IDE hard drive* to increase network storage space Attach up to two USB drives* (FAT/FAT32) for additional storage One Gigabit Ethernet port is included for versatility in a wired environment Share stored data throughout your home network Convenient file access with both Windows®...
.... 5 DSM-G600 User's Manual Features and Benefits Features and Benefits Wireless Storage Enclosure for adding a hard drive* to the network Insert a 3.5" PATA/IDE hard drive* to increase network storage space Attach up to two USB drives* (FAT/FAT32) for additional storage One Gigabit Ethernet port is included for versatility in a wired environment Share stored data throughout your home network Convenient file access with both Windows®...
Product Manual
Page 7
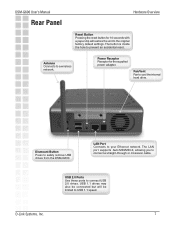
... the hole to connect a straight-through or crossover cable. Power Receptor Receptor for 10 seconds with a paper clip will be limited to USB 1.1 speed. The LAN port supports Auto MDI/MDI-X, allowing you to prevent an accidental reset. LAN Port Connects to your Ethernet network. USB 1.1 drives may also be connected but will restore the unit to the original factory default settings. DSM-G600 User's Manual Rear Panel Hardware Overview Reset Button Pressing the reset button for the supplied power adapter.
... the hole to connect a straight-through or crossover cable. Power Receptor Receptor for 10 seconds with a paper clip will be limited to USB 1.1 speed. The LAN port supports Auto MDI/MDI-X, allowing you to prevent an accidental reset. LAN Port Connects to your Ethernet network. USB 1.1 drives may also be connected but will restore the unit to the original factory default settings. DSM-G600 User's Manual Rear Panel Hardware Overview Reset Button Pressing the reset button for the supplied power adapter.
Product Manual
Page 10
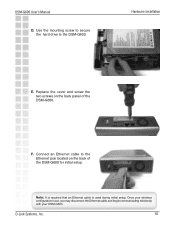
Once your DSM-G600. D-Link Systems, Inc. 10 Use the mounting screw to secure the hard drive to the Ethernet jack located on the back panel of the DSM-G600 for initial setup. Note: It is required that an Ethernet cable is set, you may disconnect the Ethernet cable and begin communicating wirelessly with your wireless configuration is used during initial setup. F. Connect an Ethernet cable to the DSM-G600. Hardware Installation E. Replace the cover and screw the two screws on the back of the DSM-G600. DSM-G600 User's Manual D.
Once your DSM-G600. D-Link Systems, Inc. 10 Use the mounting screw to secure the hard drive to the Ethernet jack located on the back panel of the DSM-G600 for initial setup. Note: It is required that an Ethernet cable is set, you may disconnect the Ethernet cable and begin communicating wirelessly with your wireless configuration is used during initial setup. F. Connect an Ethernet cable to the DSM-G600. Hardware Installation E. Replace the cover and screw the two screws on the back of the DSM-G600. DSM-G600 User's Manual D.
Product Manual
Page 13
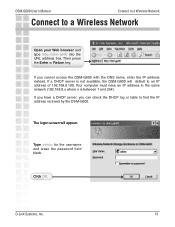
... cannot access the DSM-G600 with the DNS name, enter the IP address instead. If you have an IP address in the same network (192.168.0.x where x is not available, the DSM-G600 will appear. D-Link Systems, Inc. 13 If a DHCP server is between 1 and 254). Type admin for the username and leave the password field blank. Then press the Enter or Return key. DSM-G600 User's Manual Connect to a Wireless Network Connect to...
... cannot access the DSM-G600 with the DNS name, enter the IP address instead. If you have an IP address in the same network (192.168.0.x where x is not available, the DSM-G600 will appear. D-Link Systems, Inc. 13 If a DHCP server is between 1 and 254). Type admin for the username and leave the password field blank. Then press the Enter or Return key. DSM-G600 User's Manual Connect to a Wireless Network Connect to...
Product Manual
Page 14
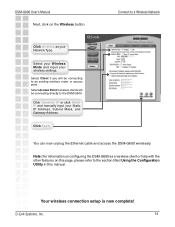
... Ethernet cable and access the DSM-G600 wirelessly. Select your Wireless Mode and input your Static IP Address, Subnet Mask, and Gateway Address. Click Apply. D-Link Systems, Inc. 14 Connect to a Wireless Network Click Wireless as a wireless client or help with the other features on the Wireless button. Select Client if you will be connecting to the section titled Using the Configuration Utility in this manual. Click Dynamic IP or click Static IP and manually...
... Ethernet cable and access the DSM-G600 wirelessly. Select your Wireless Mode and input your Static IP Address, Subnet Mask, and Gateway Address. Click Apply. D-Link Systems, Inc. 14 Connect to a Wireless Network Click Wireless as a wireless client or help with the other features on the Wireless button. Select Client if you will be connecting to the section titled Using the Configuration Utility in this manual. Click Dynamic IP or click Static IP and manually...
Product Manual
Page 18
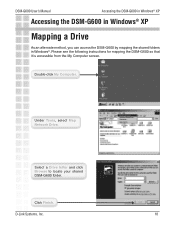
Select a Drive letter and click Browse to locate your shared DSM-G600 folder. Please see the following instructions for mapping the DSM-G600 so that it is accessible from the My Computer screen. Under Tools, select Map Network Drive. Double-click My Computer. D-Link Systems, Inc. 18 Click Finish. DSM-G600 User's Manual Accessing the DSM-G600 in Windows® XP Accessing the DSM-G600 in Windows® XP Mapping a Drive As an alternate method, you can access the DSM-G600 by mapping the shared folders in Windows®.
Select a Drive letter and click Browse to locate your shared DSM-G600 folder. Please see the following instructions for mapping the DSM-G600 so that it is accessible from the My Computer screen. Under Tools, select Map Network Drive. Double-click My Computer. D-Link Systems, Inc. 18 Click Finish. DSM-G600 User's Manual Accessing the DSM-G600 in Windows® XP Accessing the DSM-G600 in Windows® XP Mapping a Drive As an alternate method, you can access the DSM-G600 by mapping the shared folders in Windows®.
Product Manual
Page 23
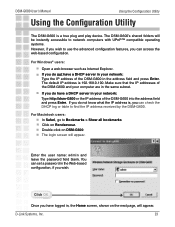
...: admin and leave the password field blank. For Windows® users: Open a web browser such as Internet Explorer. If you can access the web-based configuration. The DSM-G600's shared folders will appear. You can check the DHCP log or table to Bookmarks > Show all bookmarks Click on Rendezvouz. Double-click on the next page, will appear. The default IP address...
...: admin and leave the password field blank. For Windows® users: Open a web browser such as Internet Explorer. If you can access the web-based configuration. The DSM-G600's shared folders will appear. You can check the DHCP log or table to Bookmarks > Show all bookmarks Click on Rendezvouz. Double-click on the next page, will appear. The default IP address...
Product Manual
Page 25
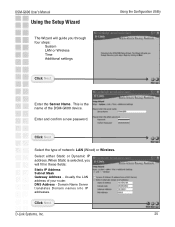
.... Domain Name Server translates Domain names into IP addresses. DSM-G600 User's Manual Using the Setup Wizard The Wizard will guide you will fill in these fields: Static IP Address Subnet Mask Gateway Address - Using the Configuration Utility Enter the Server Name. Select either Static or Dynamic IP address. When Static is the name of the DSM-G600 device. Click Next. Usually the LAN address of network: LAN (Wired) or Wireless. Click Next. D-Link Systems...
.... Domain Name Server translates Domain names into IP addresses. DSM-G600 User's Manual Using the Setup Wizard The Wizard will guide you will fill in these fields: Static IP Address Subnet Mask Gateway Address - Using the Configuration Utility Enter the Server Name. Select either Static or Dynamic IP address. When Static is the name of the DSM-G600 device. Click Next. Usually the LAN address of network: LAN (Wired) or Wireless. Click Next. D-Link Systems...
Product Manual
Page 26
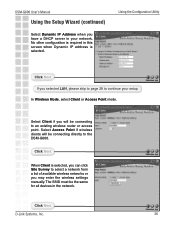
... page 28 to continue your network. Using the Configuration Utility Click Next. Select Client if you have a DHCP server in your setup. DSM-G600 User's Manual Using the Setup Wizard (continued) Select Dynamic IP Address when you will be the same for all devices in this screen when Dynamic IP address is selected. Select Access Point if wireless clients will be connecting to the DSM-G600. D-Link Systems, Inc. 26 The SSID...
... page 28 to continue your network. Using the Configuration Utility Click Next. Select Client if you have a DHCP server in your setup. DSM-G600 User's Manual Using the Setup Wizard (continued) Select Dynamic IP Address when you will be the same for all devices in this screen when Dynamic IP address is selected. Select Access Point if wireless clients will be connecting to the DSM-G600. D-Link Systems, Inc. 26 The SSID...
Product Manual
Page 31
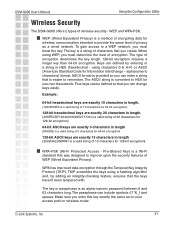
... Code for 64-bit encryption) 128-bit hexadecimal keys are exactly 26 characters in length. (456FBCDF123400122225271730 is an alpha-numeric password between 8 and 63 characters long. D-Link Systems, Inc. 31 Example: 64-bit hexadecimal keys are exactly 10 characters in length. (12345678FA is a valid string of 10 characters for Information Interchange - DSM-G600 User's Manual Using the Configuration Utility Wireless Security...
... Code for 64-bit encryption) 128-bit hexadecimal keys are exactly 26 characters in length. (456FBCDF123400122225271730 is an alpha-numeric password between 8 and 63 characters long. D-Link Systems, Inc. 31 Example: 64-bit hexadecimal keys are exactly 10 characters in length. (12345678FA is a valid string of 10 characters for Information Interchange - DSM-G600 User's Manual Using the Configuration Utility Wireless Security...
Product Manual
Page 37
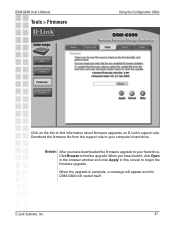
... Open in the browser window and click Apply in this screen to your hard drive. Download the firmware file from the support site to begin the firmware upgrade. Browse: After you have downloaded the firmware upgrade to find information about firmware upgrades on the link to your computer's hard drive. DSM-G600 User's Manual Tools > Firmware Using the Configuration Utility Click on D-Link's support...
... Open in the browser window and click Apply in this screen to your hard drive. Download the firmware file from the support site to begin the firmware upgrade. Browse: After you have downloaded the firmware upgrade to find information about firmware upgrades on the link to your computer's hard drive. DSM-G600 User's Manual Tools > Firmware Using the Configuration Utility Click on D-Link's support...
Product Manual
Page 42
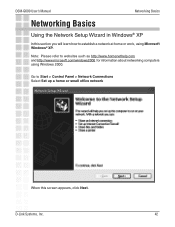
Note: Please refer to establish a network at home or work, using Windows 2000. Go to Start > Control Panel > Network Connections Select Set up a home or small office network When this section you will learn how to websites such as http://www.homenethelp.com and http://www.microsoft.com/windows2000 for information about networking computers using Microsoft Windows® XP. D-Link Systems, Inc. 42 DSM-G600 User's Manual Networking Basics Networking Basics Using the Network Setup Wizard in Windows® XP In this screen appears, click Next.
Note: Please refer to establish a network at home or work, using Windows 2000. Go to Start > Control Panel > Network Connections Select Set up a home or small office network When this section you will learn how to websites such as http://www.homenethelp.com and http://www.microsoft.com/windows2000 for information about networking computers using Microsoft Windows® XP. D-Link Systems, Inc. 42 DSM-G600 User's Manual Networking Basics Networking Basics Using the Network Setup Wizard in Windows® XP In this screen appears, click Next.
Product Manual
Page 46
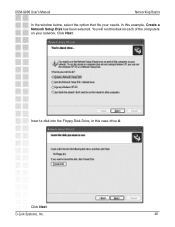
In this case drive A. D-Link Systems, Inc. 46 Insert a disk into the Floppy Disk Drive, in this example, Create a Network Setup Disk has been selected. DSM-G600 User's Manual Networking Basics In the window below, select the option that fits your network. You will run this disk on each of the computers on your needs. Click Next. Click Next.
In this case drive A. D-Link Systems, Inc. 46 Insert a disk into the Floppy Disk Drive, in this example, Create a Network Setup Disk has been selected. DSM-G600 User's Manual Networking Basics In the window below, select the option that fits your network. You will run this disk on each of the computers on your needs. Click Next. Click Next.

Product Manual
Page 47
D-Link Systems, Inc. 47 To continue click Next. After you complete the Network Setup Wizard you will use the Network Setup Disk to run the Network Setup Wizard once on each of the computers on your network. DSM-G600 User's Manual Networking Basics Please read the information under Here's how in the screen below.
D-Link Systems, Inc. 47 To continue click Next. After you complete the Network Setup Wizard you will use the Network Setup Disk to run the Network Setup Wizard once on each of the computers on your network. DSM-G600 User's Manual Networking Basics Please read the information under Here's how in the screen below.
Product Manual
Page 48
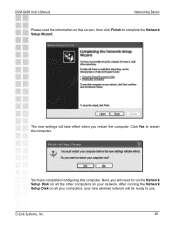
Click Yes to use. After running the Network Setup Disk on your new wireless network will be ready to restart the computer. D-Link Systems, Inc. 48 Next, you will take effect when you restart the computer. DSM-G600 User's Manual Networking Basics Please read the information on this computer. You have completed configuring this screen, then click Finish to run the Network Setup Disk on all the other computers on all your computers, your network. The new settings will need to complete the Network Setup Wizard.
Click Yes to use. After running the Network Setup Disk on your new wireless network will be ready to restart the computer. D-Link Systems, Inc. 48 Next, you will take effect when you restart the computer. DSM-G600 User's Manual Networking Basics Please read the information on this computer. You have completed configuring this screen, then click Finish to run the Network Setup Disk on all the other computers on all your computers, your network. The new settings will need to complete the Network Setup Wizard.
Product Manual
Page 51
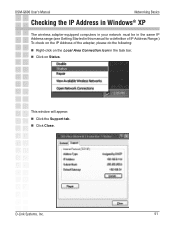
D-Link Systems, Inc. 51 This window will appear: Click the Support tab. Click Close. DSM-G600 User's Manual Networking Basics Checking the IP Address in Windows® XP The wireless adapter-equipped computers in your network must be in the same IP Address range (see Getting Started in this manual for a definition of IP Address Range.) To check on the IP Address of the adapter, please do the following: Right-click on the Local Area Connection icon in the task bar. Click on Status.
D-Link Systems, Inc. 51 This window will appear: Click the Support tab. Click Close. DSM-G600 User's Manual Networking Basics Checking the IP Address in Windows® XP The wireless adapter-equipped computers in your network must be in the same IP Address range (see Getting Started in this manual for a definition of IP Address Range.) To check on the IP Address of the adapter, please do the following: Right-click on the Local Area Connection icon in the task bar. Click on Status.
Product Manual
Page 54
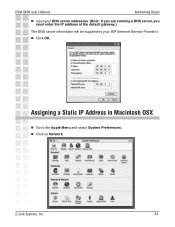
Assigning a Static IP Address in Macintosh OSX Go to the Apple Menu and select System Preferences. Click on Network. DSM-G600 User's Manual Networking Basics Input your DNS server addresses. (Note: If you are entering a DNS server, you must enter the IP address of the default gateway.) The DNS server information will be supplied by your ISP (Internet Service Provider.) Click OK. D-Link Systems, Inc. 54
Assigning a Static IP Address in Macintosh OSX Go to the Apple Menu and select System Preferences. Click on Network. DSM-G600 User's Manual Networking Basics Input your DNS server addresses. (Note: If you are entering a DNS server, you must enter the IP address of the default gateway.) The DNS server information will be supplied by your ISP (Internet Service Provider.) Click OK. D-Link Systems, Inc. 54


