Manual
Page 2
Contents Package Contents iv Contents of Package iv System Requirements iv Introduction 1 External Features 3 Port Connectors 3 Rear Panel...4 Network Cable Connector 4 USB Port Connector 4 Parallel Port Connector 4 DC Power Connector 4 Front Panel ...5 LED Indicators 5 Setting up the DP-300U 6 Installing the Print Server 6 Power ON Self-Test 6 Getting Started 8 Using PS-Wizard 9 Auto-Run Installation 9 PS-Wizard 10 Installing PS-Wizard 10 Using PS-Wizard 14 Using the Web Configuration 20 Home...20 SETUP > Print Server Setup 22 i
Contents Package Contents iv Contents of Package iv System Requirements iv Introduction 1 External Features 3 Port Connectors 3 Rear Panel...4 Network Cable Connector 4 USB Port Connector 4 Parallel Port Connector 4 DC Power Connector 4 Front Panel ...5 LED Indicators 5 Setting up the DP-300U 6 Installing the Print Server 6 Power ON Self-Test 6 Getting Started 8 Using PS-Wizard 9 Auto-Run Installation 9 PS-Wizard 10 Installing PS-Wizard 10 Using PS-Wizard 14 Using the Web Configuration 20 Home...20 SETUP > Print Server Setup 22 i
Manual
Page 8
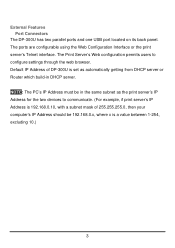
... automatically getting from DHCP server or Router which build-in DHCP server. The Print Server's Web configuration permits users to communicate. (For example, if print server's IP Address is set as the print server's IP Address for the two devices to configure settings through the web browser. External Features Port Connectors The DP-300U has two parallel ports and one USB port located on its back...
... automatically getting from DHCP server or Router which build-in DHCP server. The Print Server's Web configuration permits users to communicate. (For example, if print server's IP Address is set as the print server's IP Address for the two devices to configure settings through the web browser. External Features Port Connectors The DP-300U has two parallel ports and one USB port located on its back...
Manual
Page 11
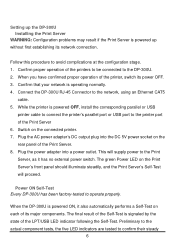
...Test Every DP-300U has been factory-tested to confirm their steady 6 When the DP-300U is powered OFF, install the corresponding parallel or USB printer cable to connect the printer's parallel port or USB port to the printer port of its major components. Setting up ...Print Server's front panel should illuminate steadily, and the Print Server's Self-Test will supply power to the DP-300U. 2. The final result of the Self-Test is powered up the DP-300U Installing the Print Server WARNING: Configuration problems may result if the Print Server is signaled by the state of the Print Server...
...Test Every DP-300U has been factory-tested to confirm their steady 6 When the DP-300U is powered OFF, install the corresponding parallel or USB printer cable to connect the printer's parallel port or USB port to the printer port of its major components. Setting up ...Print Server's front panel should illuminate steadily, and the Print Server's Self-Test will supply power to the DP-300U. 2. The final result of the Self-Test is powered up the DP-300U Installing the Print Server WARNING: Configuration problems may result if the Print Server is signaled by the state of the Print Server...
Manual
Page 21
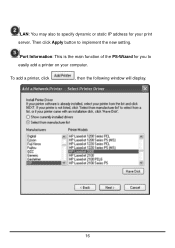
LAN: You may also to specify dynamic or static IP address for you to implement the new setting. Port Information: This is the main function of the PS-Wizard for your computer. To add a printer, click , then the following window will display. 16 Then click Apply button to easily add a printer on your print server.
LAN: You may also to specify dynamic or static IP address for you to implement the new setting. Port Information: This is the main function of the PS-Wizard for your computer. To add a printer, click , then the following window will display. 16 Then click Apply button to easily add a printer on your print server.
Manual
Page 27
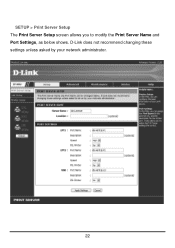
SETUP > Print Server Setup The Print Server Setup screen allows you to modify the Print Server Name and Port Settings, as below shows. D-Link does not recommend changing these settings unless asked by your network administrator. 22
SETUP > Print Server Setup The Print Server Setup screen allows you to modify the Print Server Name and Port Settings, as below shows. D-Link does not recommend changing these settings unless asked by your network administrator. 22

Manual
Page 28
... information of the print server, assigned in Server Name box, and a location for the Printer port. It also allows you have changed the settings in Location (optional) box. Port Settings In this field, you can assign the Port Name for the print server, and the description for the print server, assigned in each option, click Apply Settings to store the settings, or Cancel to...
... information of the print server, assigned in Server Name box, and a location for the Printer port. It also allows you have changed the settings in Location (optional) box. Port Settings In this field, you can assign the Port Name for the print server, and the description for the print server, assigned in each option, click Apply Settings to store the settings, or Cancel to...
Manual
Page 39
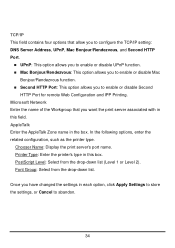
... this box. Microsoft Network Enter the name of the Workgroup that allow you to configure the TCP/IP setting: DNS Server Address, UPnP, Mac Bonjour/Rendezvous, and Second HTTP Port. „ UPnP: This option allows you to enable or disable UPnP function. „ Mac Bonjour/Rendezvous... and IPP Printing. Once you have changed the settings in this field. PostScript Level: Select from the drop-down list (Level 1 or Level 2). TCP/IP This field contains four options that you want the print server associated with in the box. Chooser Name: Display the print server's port name. Font...
... this box. Microsoft Network Enter the name of the Workgroup that allow you to configure the TCP/IP setting: DNS Server Address, UPnP, Mac Bonjour/Rendezvous, and Second HTTP Port. „ UPnP: This option allows you to enable or disable UPnP function. „ Mac Bonjour/Rendezvous... and IPP Printing. Once you have changed the settings in this field. PostScript Level: Select from the drop-down list (Level 1 or Level 2). TCP/IP This field contains four options that you want the print server associated with in the box. Chooser Name: Display the print server's port name. Font...

Manual
Page 42
... in the Print Server E-mail Address box. To enable this function, click Yes in the Incoming E-mail (POP3) Server Address box. After done the configuration, click Apply Settings to restore the new configuration, or Cancel to the mail server. For Outgoing E-mail (SMTP) Server Address field, enter the server address that your e-mail. E-mail Printing (To LPT1 Port) This...
... in the Print Server E-mail Address box. To enable this function, click Yes in the Incoming E-mail (POP3) Server Address box. After done the configuration, click Apply Settings to restore the new configuration, or Cancel to the mail server. For Outgoing E-mail (SMTP) Server Address field, enter the server address that your e-mail. E-mail Printing (To LPT1 Port) This...
Manual
Page 118
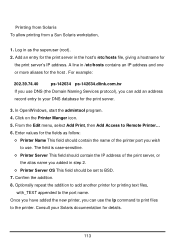
...the IP address of the printer port you can add an address record entry to the port name. Log in the host's /etc/hosts file, giving a hostname for details. 113 Add an entry for the print server in as follow: ◊ Printer Name This field should be set to use the lp command to... print files to Remote Printer... 6. For example: 202...
...the IP address of the printer port you can add an address record entry to the port name. Log in the host's /etc/hosts file, giving a hostname for details. 113 Add an entry for the print server in as follow: ◊ Printer Name This field should be set to use the lp command to... print files to Remote Printer... 6. For example: 202...

Manual
Page 135
Enter the IP address of printer model in Address field. 2. Click Add button after done the section of the print server to which the printer is attached in the Print Using drop-down menu. 130 Type the port name in queue field. For set up LPD Printing: 1.
Enter the IP address of printer model in Address field. 2. Click Add button after done the section of the print server to which the printer is attached in the Print Using drop-down menu. 130 Type the port name in queue field. For set up LPD Printing: 1.
Manual
Page 136
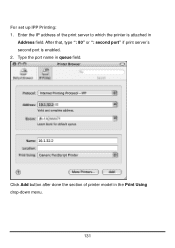
For set up IPP Printing: 1. Type the port name in Address field. Enter the IP address of printer model in the Print Using drop-down menu. 131 After that, type ": 80" or ": second port" if print server's second port is attached in queue field. Click Add button after done the section of the print server to which the printer is enabled. 2.
For set up IPP Printing: 1. Type the port name in Address field. Enter the IP address of printer model in the Print Using drop-down menu. 131 After that, type ": 80" or ": second port" if print server's second port is attached in queue field. Click Add button after done the section of the print server to which the printer is enabled. 2.

Manual
Page 137
After that, type ": 9100" for port 1, ": 9101" for port 2 or ": 9102" for port 3. 2. Click Add button after done the section of the print server to which the printer is attached in Address field. Keep the blank in the Print Using 132 For set up Socket Printing: 1. Enter the IP address of printer model in queue field.
After that, type ": 9100" for port 1, ": 9101" for port 2 or ": 9102" for port 3. 2. Click Add button after done the section of the print server to which the printer is attached in Address field. Keep the blank in the Print Using 132 For set up Socket Printing: 1. Enter the IP address of printer model in queue field.

Manual
Page 145
... shown in this manual are using an EtherTalk connection, or indirectly through a LocalTalk-to-EtherTalk router. Setting up print server so that every Port Name is divided into AppleTalk zones, you are examples only. It can print from any MacOS computer connected to your Macintosh. „ Make sure the PC's IP Address must correspond with...
... shown in this manual are using an EtherTalk connection, or indirectly through a LocalTalk-to-EtherTalk router. Setting up print server so that every Port Name is divided into AppleTalk zones, you are examples only. It can print from any MacOS computer connected to your Macintosh. „ Make sure the PC's IP Address must correspond with...

Manual
Page 146
For each Printer Port that will be used for AppleTalk printing, you may need to change the AppleTalk Port Settings in the Advanced LAN screen, shown as most of the users who will be in the same zone as below. 141 You should locate the Print Server in . If your network is not divided into zones, the AppleTalk Zone field should contain a single asterisk (*). which zone the Print Server should be using it.
For each Printer Port that will be used for AppleTalk printing, you may need to change the AppleTalk Port Settings in the Advanced LAN screen, shown as most of the users who will be in the same zone as below. 141 You should locate the Print Server in . If your network is not divided into zones, the AppleTalk Zone field should contain a single asterisk (*). which zone the Print Server should be using it.

Manual
Page 148
... the Apple menu. Make sure that AppleTalk is set to print server may vary slightly, depending on the left. A list of the Printer Port you are using the LaserWriter 8. The Printer Ports shown are using . Chooser Name: Display the print server's port name. The procedure described below assumes you are ...Printer Type: Enter the printer's type in the box. Select the LaserWriter 8 icon on what printer driver version you wish to print server as your MacOS workstation's default printer, open the Chooser by selecting Chooser from the pull-down menu. Font Group: Select from...
... the Apple menu. Make sure that AppleTalk is set to print server may vary slightly, depending on the left. A list of the Printer Port you are using the LaserWriter 8. The Printer Ports shown are using . Chooser Name: Display the print server's port name. The procedure described below assumes you are ...Printer Type: Enter the printer's type in the box. Select the LaserWriter 8 icon on what printer driver version you wish to print server as your MacOS workstation's default printer, open the Chooser by selecting Chooser from the pull-down menu. Font Group: Select from...

