Product Manual
Page 2
...Hard Drives 8 Power and Device Selection 10 Admin password 11 Network Setup 12 Dynamic DNS 13 DDNS Account and System Time 14 E-mail Settings and Volume Information 15 RAID Configuration and Drive Mapping 16 Configuration Summary and Drive Formatting.......17 Format Complete and Add-on Packages 18 D-Link ...43 Quotas 47 Network Shares 48 Adding New Network Shares Wizard 49 Adding New ISO Mount Shares Wizard 55 Admin Password 59 Network Management 60 LAN Setup 60 Dynamic DNS 62 Application Management 63 FTP Server 63 UPnP AV Server 64 D-Link ShareCenter DNS-325 User Manual ...
...Hard Drives 8 Power and Device Selection 10 Admin password 11 Network Setup 12 Dynamic DNS 13 DDNS Account and System Time 14 E-mail Settings and Volume Information 15 RAID Configuration and Drive Mapping 16 Configuration Summary and Drive Formatting.......17 Format Complete and Add-on Packages 18 D-Link ...43 Quotas 47 Network Shares 48 Adding New Network Shares Wizard 49 Adding New ISO Mount Shares Wizard 55 Admin Password 59 Network Management 60 LAN Setup 60 Dynamic DNS 62 Application Management 63 FTP Server 63 UPnP AV Server 64 D-Link ShareCenter DNS-325 User Manual ...
Product Manual
Page 15
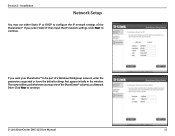
If you want your ShareCenter® to configure the IP network settings of the ShareCenter®. D-Link ShareCenter DNS-325 User Manual 12 Section 3 - Installation Network Setup You may use either Static IP or DHCP to be used whenever you select Static IP then input the IP network settings. The name will be part of the ShareCenter® volumes as a Network Drive. Click Next to continue. Click Next to continue. If you map one of a Windows Workgroup network, enter the parameters requested or leave the default settings that appear initially in the window.
If you want your ShareCenter® to configure the IP network settings of the ShareCenter®. D-Link ShareCenter DNS-325 User Manual 12 Section 3 - Installation Network Setup You may use either Static IP or DHCP to be used whenever you select Static IP then input the IP network settings. The name will be part of the ShareCenter® volumes as a Network Drive. Click Next to continue. Click Next to continue. If you map one of a Windows Workgroup network, enter the parameters requested or leave the default settings that appear initially in the window.
Product Manual
Page 19
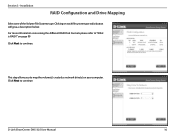
Installation RAID Configuration and Drive Mapping Select one of the Volume File Systems type. D-Link ShareCenter DNS-325 User Manual 16 For more information concerning the different RAID Disk Formats please refer to map the volume(s) created as network drive(s) on your computer. This step allows you to "What is RAID?" on each file system type radio button will give a description below. Click Next to continue. Clicking on page 99 Click Next to continue. Section 3 -
Installation RAID Configuration and Drive Mapping Select one of the Volume File Systems type. D-Link ShareCenter DNS-325 User Manual 16 For more information concerning the different RAID Disk Formats please refer to map the volume(s) created as network drive(s) on your computer. This step allows you to "What is RAID?" on each file system type radio button will give a description below. Click Next to continue. Clicking on page 99 Click Next to continue. Section 3 -
Product Manual
Page 23
D-Link ShareCenter DNS-325 User Manual 20 Installation The final window of the installation wizard shows successful completion. Your drives are network mapped from using the wizard so you will be able to access them under you My Computer icon. Section 3 - Your device is now installed and ready for use.
D-Link ShareCenter DNS-325 User Manual 20 Installation The final window of the installation wizard shows successful completion. Your drives are network mapped from using the wizard so you will be able to access them under you My Computer icon. Section 3 - Your device is now installed and ready for use.
Product Manual
Page 24
Section 2 - Drive Mapping: Volumes available for the ShareCenter here. D-Link ShareCenter DNS-325 User Manual 21 Apply: Click Apply to save and activate the changes to disconnect the selected mapped volume. Letters: Click Disconnect to the LAN Settings. Exit: Click Exit to map the selected volume. Network Storage The D-Link Storage Utility displays any needed changes. LAN: Configure the LAN...
Section 2 - Drive Mapping: Volumes available for the ShareCenter here. D-Link ShareCenter DNS-325 User Manual 21 Apply: Click Apply to save and activate the changes to disconnect the selected mapped volume. Letters: Click Disconnect to the LAN Settings. Exit: Click Exit to map the selected volume. Network Storage The D-Link Storage Utility displays any needed changes. LAN: Configure the LAN...

Product Manual
Page 103
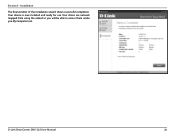
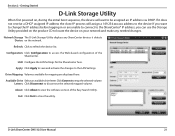
D-Link ShareCenter DNS-325 User Manual 100 Section 5 - Click D-Link Storage Utility The Storage Utility will load and detect any ShareCenter® devices that are on the local network. Insert the ShareCenter® CD into your computer. Knowledge Base Mapping a Drive You can use the D-Link Storage Utility to map drives to your CD-ROM drive.
D-Link ShareCenter DNS-325 User Manual 100 Section 5 - Click D-Link Storage Utility The Storage Utility will load and detect any ShareCenter® devices that are on the local network. Insert the ShareCenter® CD into your computer. Knowledge Base Mapping a Drive You can use the D-Link Storage Utility to map drives to your CD-ROM drive.
Product Manual
Page 106
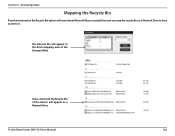
D-Link ShareCenter DNS-325 User Manual 103 The Recycle Bin will appear as a Network Drive to have access to it. Knowledge Base Mapping the Recycle Bin If you can map the recycle bin as a Network Drive. Once connected the Recycle Bin of the device will appear in the drive mapping area of your Network Shares created, then you have turned on the Recycle Bin option with any of the Storage Utility. Section 5 -
D-Link ShareCenter DNS-325 User Manual 103 The Recycle Bin will appear as a Network Drive to have access to it. Knowledge Base Mapping the Recycle Bin If you can map the recycle bin as a Network Drive. Once connected the Recycle Bin of the device will appear in the drive mapping area of your Network Shares created, then you have turned on the Recycle Bin option with any of the Storage Utility. Section 5 -


