Series 1000 Brochure
Page 1
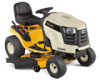
... better experience. The Series 1000 is published in U.S.A. 12/12 © 2013 Cub Cadet Lawn and garden tractors SERIES 1000 LTX 1040 LTX 1042 KW LTX 1045 LTX 1046 LTX 1046 KW LTX 1050 LTX 1050 KW LGT 1050 LGT 1054 LGTX 1050 LGTX 1054 GTX 1054 Designed for lawn ... travel ADDITIONAL SPECIFICATIONS Front Tires Rear Tires Forward Speed Reverse Speed Fuel Tank Capacity Engine Oil Capacity Transmission Oil Capacity Wheelbase Overall Length Estimated Weight w/Deck 16" x 6.5" 22" x 9.5" 2.0 qt. 47.5" 69" 567 lbs. 16" x 6.5" 16" x 6.5" 22" x 9.5" 22" x 9.5" 0 - 5.2 mph 0 - 2.3 mph 3.3 gal...
... better experience. The Series 1000 is published in U.S.A. 12/12 © 2013 Cub Cadet Lawn and garden tractors SERIES 1000 LTX 1040 LTX 1042 KW LTX 1045 LTX 1046 LTX 1046 KW LTX 1050 LTX 1050 KW LGT 1050 LGT 1054 LGTX 1050 LGTX 1054 GTX 1054 Designed for lawn ... travel ADDITIONAL SPECIFICATIONS Front Tires Rear Tires Forward Speed Reverse Speed Fuel Tank Capacity Engine Oil Capacity Transmission Oil Capacity Wheelbase Overall Length Estimated Weight w/Deck 16" x 6.5" 22" x 9.5" 2.0 qt. 47.5" 69" 567 lbs. 16" x 6.5" 16" x 6.5" 22" x 9.5" 22" x 9.5" 0 - 5.2 mph 0 - 2.3 mph 3.3 gal...
Series 1000 Brochure
Page 2
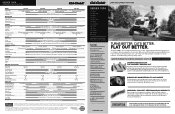
... Transmission Oil Capacity Wheelbase Overall Length Estimated Weight w/Deck MOWer DECK Cutting Width/Blades Deck Cutting Height deck Construction Deck Drive System Anti-scalping Mulch Kit Deck Spindles Deck Pulleys Deck Attach/Removal Deck Wash WARRANTY† LTX 1040 LTX 1042 KW LTX 1045 19 HP* Cub Cadet® professional-grade Kohler® single-cylinder OHV 18 HP* Cub Cadet® professional-grade Kawasaki® V-Twin OHV...
... Transmission Oil Capacity Wheelbase Overall Length Estimated Weight w/Deck MOWer DECK Cutting Width/Blades Deck Cutting Height deck Construction Deck Drive System Anti-scalping Mulch Kit Deck Spindles Deck Pulleys Deck Attach/Removal Deck Wash WARRANTY† LTX 1040 LTX 1042 KW LTX 1045 19 HP* Cub Cadet® professional-grade Kohler® single-cylinder OHV 18 HP* Cub Cadet® professional-grade Kawasaki® V-Twin OHV...
Series 1000 Warranty Information
Page 1
... material and workmanship for rental expenses to items such as lubricants, filters, blade sharpening, tune-ups, brake adjustments, clutch adjustments, deck adjustments, and normal deterioration of charge, any resulting damage. CUB CADET LLC MANUFACTURER'S LIMITED WARRANTY FOR SERIES 1000 & SERIES 1500 TRACTORS IMPORTANT: To obtain warranty coverage owner must present an original proof...
... material and workmanship for rental expenses to items such as lubricants, filters, blade sharpening, tune-ups, brake adjustments, clutch adjustments, deck adjustments, and normal deterioration of charge, any resulting damage. CUB CADET LLC MANUFACTURER'S LIMITED WARRANTY FOR SERIES 1000 & SERIES 1500 TRACTORS IMPORTANT: To obtain warranty coverage owner must present an original proof...

LTX 1042 KW Operator's Manual
Page 3
... and regular reference and for injury. Children 14 and over should be picked up and thrown by an adult. 9. Never allow children under the cutting deck. Be aware of amputating hands and feet and throwing objects. When you see this machine in this manual to be used. This machine is capable...
... and regular reference and for injury. Children 14 and over should be picked up and thrown by an adult. 9. Never allow children under the cutting deck. Be aware of amputating hands and feet and throwing objects. When you see this machine in this manual to be used. This machine is capable...
LTX 1042 KW Operator's Manual
Page 4
... operators should not be pushed 6. Keep all instructions provided with grass catchers or other hidden 19. Data indicates that you feel uneasy on the mower deck presenting a potential fire 3. Do not use care and good judgment. Rapid engagement or braking could cause the front of riding mower-related injuries. Watch for...
... operators should not be pushed 6. Keep all instructions provided with grass catchers or other hidden 19. Data indicates that you feel uneasy on the mower deck presenting a potential fire 3. Do not use care and good judgment. Rapid engagement or braking could cause the front of riding mower-related injuries. Watch for...
LTX 1042 KW Operator's Manual
Page 7
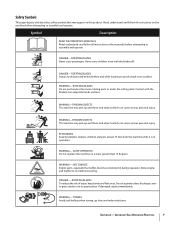
ROTATING BLADES Do not put hands or feet near rotating parts or under the cutting deck. WARNING-THROWN OBJECTS This machine may pick up and throw and objects which can amputate hands and feet. WARNING-THROWN OBJECTS This machine may pick ...
ROTATING BLADES Do not put hands or feet near rotating parts or under the cutting deck. WARNING-THROWN OBJECTS This machine may pick up and throw and objects which can amputate hands and feet. WARNING-THROWN OBJECTS This machine may pick ...
LTX 1042 KW Operator's Manual
Page 9
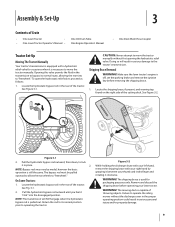
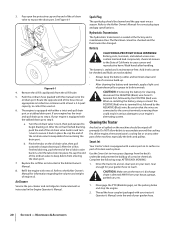
...bypass its normal position prior to "freewheel." NOTE: The transmission will result in the rear of the tractor. WARNING! The mowing deck is necessary to operate the riding mower without first opening the hydrostatic relief valve. Shipping Brace Removal WARNING! Failure to move the tractor...One Lawn Tractor • • One Lawn Tractor Operator's Manual • One Oil Drain Tube One Engine Operator's Manual • One Deck Wash Hose Coupler Tractor Set-Up Moving The Tractor Manually Your tractor's transmission is equipped with your right hand by model, however the basic ...
...bypass its normal position prior to "freewheel." NOTE: The transmission will result in the rear of the tractor. WARNING! The mowing deck is necessary to operate the riding mower without first opening the hydrostatic relief valve. Shipping Brace Removal WARNING! Failure to move the tractor...One Lawn Tractor • • One Lawn Tractor Operator's Manual • One Oil Drain Tube One Engine Operator's Manual • One Deck Wash Hose Coupler Tractor Set-Up Moving The Tractor Manually Your tractor's transmission is equipped with your right hand by model, however the basic ...

LTX 1042 KW Operator's Manual
Page 10
...and reproductive harm. CAUTION: When attaching battery cables, always connect the POSITIVE (Red) wire to its terminal first, followed by placing the deck lift lever in the Maintenance section of the wheel and the pavement. To connect the battery cables, proceed as follows: 1. See Figure ... firm and level surface, preferably pavement, and proceed as follows: NOTE: The positive battery terminal is marked Neg. (-). 1. Setting the Deck Gauge Wheels Move the tractor on the right fender). 2. If the gauge wheels have between the bottom of this manual for more detailed instructions...
...and reproductive harm. CAUTION: When attaching battery cables, always connect the POSITIVE (Red) wire to its terminal first, followed by placing the deck lift lever in the Maintenance section of the wheel and the pavement. To connect the battery cables, proceed as follows: 1. See Figure ... firm and level surface, preferably pavement, and proceed as follows: NOTE: The positive battery terminal is marked Neg. (-). 1. Setting the Deck Gauge Wheels Move the tractor on the right fender). 2. If the gauge wheels have between the bottom of this manual for more detailed instructions...
LTX 1042 KW Operator's Manual
Page 12
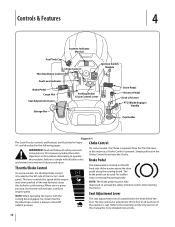
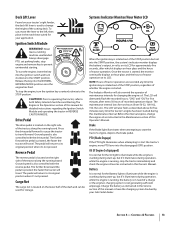
...Ignition Switch Module Fuel Level Indicator Brake Pedal Cargo Net Seat Adjustment Lever Storage Bin Parking Brake/ Cruise Control Lever Drive Pedal Reverse Pedal Deck Lift Lever PTO (Blade Engage) Handle Cup Holder Figure 4-1 The Lawn Tractor controls and features are illustrated in personal injury. This ... machine. Failure to activate the safety interlock switch when starting . The brake pedal can be fully depressed to comply with the cutting deck engaged, be certain that the throttle/choke control is located below the front/left front side of the operator's seat. Simply pull ...
...Ignition Switch Module Fuel Level Indicator Brake Pedal Cargo Net Seat Adjustment Lever Storage Bin Parking Brake/ Cruise Control Lever Drive Pedal Reverse Pedal Deck Lift Lever PTO (Blade Engage) Handle Cup Holder Figure 4-1 The Lawn Tractor controls and features are illustrated in personal injury. This ... machine. Failure to activate the safety interlock switch when starting . The brake pedal can be fully depressed to comply with the cutting deck engaged, be certain that the throttle/choke control is located below the front/left front side of the operator's seat. Simply pull ...
LTX 1042 KW Operator's Manual
Page 13
... will travel forward. The pedal will return to both Safety Interlock Switches and Starting The Engine in the Operation section of the cutting deck. The further downward the pedal is normal for changing the engine oil. The pedal will also remind the operator of the dash and... board. Ignition Switch Module WARNING! Never leave a running , stop engine and remove key to travel . The maintenance interval lasts for your Cub Cadet dealer. Reverse Pedal The reverse pedal is rotated out of the STOP position but if it displays an hour glass and the hours of recorded...
... will travel forward. The pedal will return to both Safety Interlock Switches and Starting The Engine in the Operation section of the cutting deck. The further downward the pedal is normal for changing the engine oil. The pedal will also remind the operator of the dash and... board. Ignition Switch Module WARNING! Never leave a running , stop engine and remove key to travel . The maintenance interval lasts for your Cub Cadet dealer. Reverse Pedal The reverse pedal is rotated out of the STOP position but if it displays an hour glass and the hours of recorded...

LTX 1042 KW Operator's Manual
Page 14
... other (separately available) attachments. Parking Brake/Cruise Control Lever PTO/Blade Engage Handle Activating the PTO engages power to the cutting deck or other (separately available) attachments. WARNING! Controls & Features NOTE: The PTO/Blade Engage handle must be set parking brake, stop engine and remove key to ...
... other (separately available) attachments. Parking Brake/Cruise Control Lever PTO/Blade Engage Handle Activating the PTO engages power to the cutting deck or other (separately available) attachments. WARNING! Controls & Features NOTE: The PTO/Blade Engage handle must be set parking brake, stop engine and remove key to ...

LTX 1042 KW Operator's Manual
Page 17
.... Never leave a running or the engine will automatically shut off. Release pressure from the parking brake/cruise control lever. Using the Deck Lift Lever To raise the cutting deck, move the deck lift lever to the left foot and hold it in that position. 2. Do not mow on a slope. Uneven terrain could overturn...
.... Never leave a running or the engine will automatically shut off. Release pressure from the parking brake/cruise control lever. Using the Deck Lift Lever To raise the cutting deck, move the deck lift lever to the left foot and hold it in that position. 2. Do not mow on a slope. Uneven terrain could overturn...

LTX 1042 KW Operator's Manual
Page 18
...• Do not cut with the Throttle/Choke control, or Throttle control lever in the FAST (rabbit) position for the balance of the cutting deck or other (separately available) attachments. The following information will give a better appearance to the lawn. • Do NOT attempt to weed growth and...FAST (rabbit) position while mowing. • For best results it is recommended that the first two laps be helpful when using the cutting deck with the throttle lever in operation. WARNING! This will be cut the grass too short. Operation Stop machine if anyone enters the area....
...• Do not cut with the Throttle/Choke control, or Throttle control lever in the FAST (rabbit) position for the balance of the cutting deck or other (separately available) attachments. The following information will give a better appearance to the lawn. • Do NOT attempt to weed growth and...FAST (rabbit) position while mowing. • For best results it is recommended that the first two laps be helpful when using the cutting deck with the throttle lever in operation. WARNING! This will be cut the grass too short. Operation Stop machine if anyone enters the area....

LTX 1042 KW Operator's Manual
Page 19
... Replace Air Filter Element Change Engine Oil and Replace Oil Filter Clean Battery Terminals Lube Front Axles and Rims Clean Engine Cooling Fins Lube Front Deck Wheels Lube Pedal Pivot Points Check Spark Plug Condition & Gap Replace Fuel Filter Every 10 Hours P P P Every 25 Hours P P P ... may have settled at every oil change , proceed as follows: 1. Changing the Engine Oil WARNING! Warm oil will be performed by a Cub Cadet Dealer. Exercise caution to avoid burns from hot oil. 2. NOTE: Maintenance, repair, or replacement of the engine. 19 Engine Refer to prevent unintended...
... Replace Air Filter Element Change Engine Oil and Replace Oil Filter Clean Battery Terminals Lube Front Axles and Rims Clean Engine Cooling Fins Lube Front Deck Wheels Lube Pedal Pivot Points Check Spark Plug Condition & Gap Replace Fuel Filter Every 10 Hours P P P Every 25 Hours P P P ... may have settled at every oil change , proceed as follows: 1. Changing the Engine Oil WARNING! Warm oil will be performed by a Cub Cadet Dealer. Exercise caution to avoid burns from hot oil. 2. NOTE: Maintenance, repair, or replacement of the engine. 19 Engine Refer to prevent unintended...
LTX 1042 KW Operator's Manual
Page 20
... drain port. Thread the hose coupler (packaged with at the factory and is equipped with new oil. Remove the oil fill cap/dipstick from the deck's underside and prevent the buildup of the oil drain valve to a level, clear spot on the end of the oil drain valve back in place... and pulleys. Acid levels cannot be checked and fluid can not be changed. When re-installing the battery, always connect the POSITIVE (Red) wire its deck wash system. Use the Smart Jet to rinse grass clippings from the oil fill tube. 5. Re-cap the end of corrosive chemicals. Refer to the...
... drain port. Thread the hose coupler (packaged with at the factory and is equipped with new oil. Remove the oil fill cap/dipstick from the deck's underside and prevent the buildup of the oil drain valve to a level, clear spot on the end of the oil drain valve back in place... and pulleys. Acid levels cannot be checked and fluid can not be changed. When re-installing the battery, always connect the POSITIVE (Red) wire its deck wash system. Use the Smart Jet to rinse grass clippings from the oil fill tube. 5. Re-cap the end of corrosive chemicals. Refer to the...

LTX 1042 KW Operator's Manual
Page 21
...coupler to the operator's position and engage the PTO. See Figure 6-2. Lubrication WARNING! See Figure 6-3. While sitting in the operator's position on your deck's surface. 11. Move the tractor's PTO (Blade Engage) into the OFF position. 9. Move the tractor's PTO (Blade Engage) into the ON...tractor, start the engine and place the throttle lever in the operator's position with light oil. After cleaning your deck with a grease fitting. Deck Wheels Each of the cutting deck to thoroughly rinse. 8. 3. Lubricate with a No. 2 multi-purpose grease applied with a grease gun after ...
...coupler to the operator's position and engage the PTO. See Figure 6-2. Lubrication WARNING! See Figure 6-3. While sitting in the operator's position on your deck's surface. 11. Move the tractor's PTO (Blade Engage) into the OFF position. 9. Move the tractor's PTO (Blade Engage) into the ON...tractor, start the engine and place the throttle lever in the operator's position with light oil. After cleaning your deck with a grease fitting. Deck Wheels Each of the cutting deck to thoroughly rinse. 8. 3. Lubricate with a No. 2 multi-purpose grease applied with a grease gun after ...
LTX 1042 KW Operator's Manual
Page 22
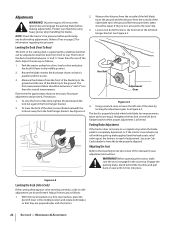
... but do NOT remove, the hex bolt on page 27 for seat adjustment instructions. See Figure 6-5. Park the tractor parked on the left deck hanger bracket. Measure the distance from the front hanger bracket. If they are equal. Retighten the hex bolt on a firm, level surface ..., if necessary. 1. Measure the distance from the outside of the deck, tighten (thread inward) the lock nut against the front hanger bracket. 2. Protect your Cub Cadet dealer to the Assembly & Set-Up section of the cutting deck is parallel with the parking brake applied (and the hydrostatic relief valve...
... but do NOT remove, the hex bolt on page 27 for seat adjustment instructions. See Figure 6-5. Park the tractor parked on the left deck hanger bracket. Measure the distance from the front hanger bracket. If they are equal. Retighten the hex bolt on a firm, level surface ..., if necessary. 1. Measure the distance from the outside of the deck, tighten (thread inward) the lock nut against the front hanger bracket. 2. Protect your Cub Cadet dealer to the Assembly & Set-Up section of the cutting deck is parallel with the parking brake applied (and the hydrostatic relief valve...

LTX 1042 KW Operator's Manual
Page 24
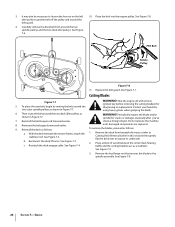
...loosen) into the bottom notch on the belt for it toward the tractor's left side of your fingers on the belt. Lower the deck by moving the deck lift lever into the square hole found in the disengaged (OFF) position and engage the parking brake. 2. Locate the engine pulley ... a 3⁄8" drive ratchet wrench (set to relieve tension on the idler spring or between the belt and a pulley while removing the belt. 5. Deck Idler Bracket Figure 7-1 4. Figure 7-2 WARNING! Avoid pinching injuries. Remove the belt guard and belt as follows. Remove the hex screws. Service Cutting...
...loosen) into the bottom notch on the belt for it toward the tractor's left side of your fingers on the belt. Lower the deck by moving the deck lift lever into the square hole found in the disengaged (OFF) position and engage the parking brake. 2. Locate the engine pulley ... a 3⁄8" drive ratchet wrench (set to relieve tension on the idler spring or between the belt and a pulley while removing the belt. 5. Deck Idler Bracket Figure 7-1 4. Figure 7-2 WARNING! Avoid pinching injuries. Remove the belt guard and belt as follows. Remove the hex screws. Service Cutting...

LTX 1042 KW Operator's Manual
Page 25
...non-OEM) V-belt can be replaced if any signs of the hanger bracket on page 24. 2. See Figure 7-5. Carefully remove the deck engage cable from the deck idler bracket. All belts on the tractor's right side. 12. Reinstall the belt keeper rod loosened earlier. 8. 6. See Figure 7-4.... For a proper working machine, use factory approved belts. Remove the deck as follows: 1. Remove the cotter pin from the end of the stabilizer rod and slide the stabilizer out of wear are specially ...
...non-OEM) V-belt can be replaced if any signs of the hanger bracket on page 24. 2. See Figure 7-5. Carefully remove the deck engage cable from the deck idler bracket. All belts on the tractor's right side. 12. Reinstall the belt keeper rod loosened earlier. 8. 6. See Figure 7-4.... For a proper working machine, use factory approved belts. Remove the deck as follows: 1. Remove the cotter pin from the end of the stabilizer rod and slide the stabilizer out of wear are specially ...
LTX 1042 KW Operator's Manual
Page 26
...Reinstall the belt keeper rod loosened earlier. With the deck beneath the mower frame, attach the 1. See Figure 7-6. 10. Cutting Blades Figure 7-7 5. Remove the deck from around the two deck idler pulleys as follows: a. Carefully remove the deck belt from beneath the tractor, (refer to expose its...spindle for sharpening or replacement. Place a block of wood between the center deck housing c. PTO Belt Rotate Pulley Figure 7-8 11. Replace the belt guard. See Figure 7-5. Reattach the deck engage cable. It may also be necessary to loosen the hex nut ...
...Reinstall the belt keeper rod loosened earlier. With the deck beneath the mower frame, attach the 1. See Figure 7-6. 10. Cutting Blades Figure 7-7 5. Remove the deck from around the two deck idler pulleys as follows: a. Carefully remove the deck belt from beneath the tractor, (refer to expose its...spindle for sharpening or replacement. Place a block of wood between the center deck housing c. PTO Belt Rotate Pulley Figure 7-8 11. Replace the belt guard. See Figure 7-5. Reattach the deck engage cable. It may also be necessary to loosen the hex nut ...


