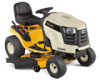
Series 1000 Brochure
Page 1
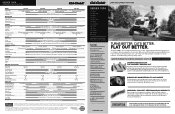
... blade overlap and floating deck for your local Cub Cadet Independent Dealer for warranty details. 773-05145 Printed in U.S.A. 12/12 © 2013 Cub Cadet Lawn and garden tractors SERIES 1000 LTX 1040 LTX 1042 KW LTX 1045 LTX 1046 LTX 1046 KW LTX 1050 LTX 1050 KW LGT 1050 LGT 1054 LGTX 1050... Cruise Control Transmission Housing Automatic w/heavy-duty hydrostatic pump Heavy-duty belt Standard Die-cast aluminum STEERING Steering Assist Front Axle Spindles Ball Joints Rear Axle Diameter Turning Radius Manual sector and pinion 3/4" diameter with dual steel wheel drive hubs 12" Electronic ...
... blade overlap and floating deck for your local Cub Cadet Independent Dealer for warranty details. 773-05145 Printed in U.S.A. 12/12 © 2013 Cub Cadet Lawn and garden tractors SERIES 1000 LTX 1040 LTX 1042 KW LTX 1045 LTX 1046 LTX 1046 KW LTX 1050 LTX 1050 KW LGT 1050 LGT 1054 LGTX 1050... Cruise Control Transmission Housing Automatic w/heavy-duty hydrostatic pump Heavy-duty belt Standard Die-cast aluminum STEERING Steering Assist Front Axle Spindles Ball Joints Rear Axle Diameter Turning Radius Manual sector and pinion 3/4" diameter with dual steel wheel drive hubs 12" Electronic ...
Series 1000 Brochure
Page 2
... Construction Deck Drive System Anti-scalping Mulch Kit Deck Spindles Deck Pulleys Deck Attach/Removal Deck Wash WARRANTY† LTX 1040 LTX 1042 KW LTX 1045 19 HP* Cub Cadet® professional-grade Kohler® single-cylinder OHV 18 HP* Cub Cadet® professional-grade Kawasaki® V-Twin OHV 20 HP* Cub Cadet® professional-grade Kohler® single-cylinder OHV...
... Construction Deck Drive System Anti-scalping Mulch Kit Deck Spindles Deck Pulleys Deck Attach/Removal Deck Wash WARRANTY† LTX 1040 LTX 1042 KW LTX 1045 19 HP* Cub Cadet® professional-grade Kohler® single-cylinder OHV 18 HP* Cub Cadet® professional-grade Kawasaki® V-Twin OHV 20 HP* Cub Cadet® professional-grade Kohler® single-cylinder OHV...

LTX 1042 KW Operator's Manual
Page 25
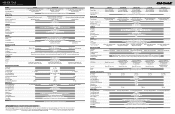
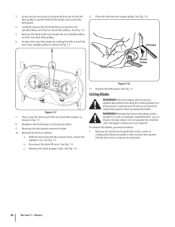
... engage and disengage safely. 6. Remove the cotter pin from the deck lift arm. Deck Lift Arm Deck Support Pin Figure 7-5 Figure 7-3 11. Hex Washer Screws Spindle Pulley Belt Cover Belt Guard Deck Idler Pulley Figure 7-6 Section 7 - Reinstall the belt keeper rod loosened earlier. 8. Remove the spring from underneath the tractor. 7. Pull...
... engage and disengage safely. 6. Remove the cotter pin from the deck lift arm. Deck Lift Arm Deck Support Pin Figure 7-5 Figure 7-3 11. Hex Washer Screws Spindle Pulley Belt Cover Belt Guard Deck Idler Pulley Figure 7-6 Section 7 - Reinstall the belt keeper rod loosened earlier. 8. Remove the spring from underneath the tractor. 7. Pull...
LTX 1042 KW Operator's Manual
Page 26
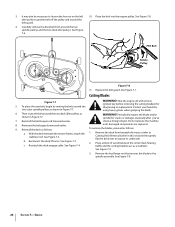
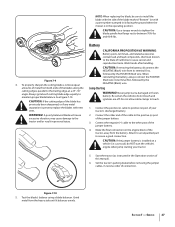
... your hands by routing the belt around the two deck idler pulleys as shown in Figure 7-7. Then route the belt around the two outer spindle pulleys as shown in this section) then gently flip the deck over to expose its underside. struck a foreign object. See Figure 7-6. 10...to stabilizer rod. Place the belt into the engine pulley. Reconnect the deck lift arms. See Figure 7-3. 2. Periodically inspect the blade and/or spindle for sharpening or replacement. Cutting Deck Removal earlier in Figure 7-7. To place the new belt, begin by using heavy gloves when grasping the blade...
... your hands by routing the belt around the two deck idler pulleys as shown in Figure 7-7. Then route the belt around the two outer spindle pulleys as shown in this section) then gently flip the deck over to expose its underside. struck a foreign object. See Figure 7-6. 10...to stabilizer rod. Place the belt into the engine pulley. Reconnect the deck lift arms. See Figure 7-3. 2. Periodically inspect the blade and/or spindle for sharpening or replacement. Cutting Deck Removal earlier in Figure 7-7. To place the new belt, begin by using heavy gloves when grasping the blade...
LTX 1042 KW Operator's Manual
Page 27
CAUTION: Use a torque wrench to tighten the blade spindle hex flange nut to the positive (+) post of the jumper battery. 3. To properly sharpen the cutting blades, remove equal amounts of metal from the heavy ...
CAUTION: Use a torque wrench to tighten the blade spindle hex flange nut to the positive (+) post of the jumper battery. 3. To properly sharpen the cutting blades, remove equal amounts of metal from the heavy ...

LTX 1042 KW Operator's Manual
Page 29
... position. 10. Clean fuel line and replace fuel filter. 8. Clean fuel line; Remove spark plug(s) and reset the gap. 1. Set plug gap. 2. Tighten blade and spindle. 2. Place Throttle/Choke Control, or Throttle control, into the Choke position. 6. Choke not activated 6. Fuse(s) blown. 1. Dirty air cleaner. Spark plug(s) gap too close. 1. Damaged...
... position. 10. Clean fuel line and replace fuel filter. 8. Clean fuel line; Remove spark plug(s) and reset the gap. 1. Set plug gap. 2. Tighten blade and spindle. 2. Place Throttle/Choke Control, or Throttle control, into the Choke position. 6. Choke not activated 6. Fuse(s) blown. 1. Dirty air cleaner. Spark plug(s) gap too close. 1. Damaged...
LTX 1042 KW Operator's Manual
Page 30
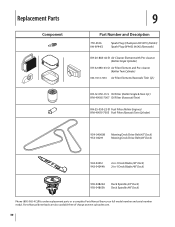
... Drive Belt (46" Deck) 942-04312 942-04244A 2-in-1 Deck Blade (42" Deck) 2-in-1 Deck Blade (46" Deck) 918-04822A 918-04865A Deck Spindle (42" Deck) Deck Spindle (46" Deck) Phone (800) 965-4CUB to order replacement parts or a complete Parts Manual (have your full model number and serial number ready). Parts...
... Drive Belt (46" Deck) 942-04312 942-04244A 2-in-1 Deck Blade (42" Deck) 2-in-1 Deck Blade (46" Deck) 918-04822A 918-04865A Deck Spindle (42" Deck) Deck Spindle (46" Deck) Phone (800) 965-4CUB to order replacement parts or a complete Parts Manual (have your full model number and serial number ready). Parts...

Operation Manual
Page 19
... Wheels V/ V/ Lube Deck Spindles _ Lube Pedal Pivot Points _" _" Check Spark Plug Condition & Gap _" _" Replace Fuel Filter _" Maintenance Changingthe Engine Oil WARNING! Open the tractor's hood and locate the oil drain port on the left side of the emission control devices and systems which may be performed by a Cub Cadet Dealer. engine, muffler and...
... Wheels V/ V/ Lube Deck Spindles _ Lube Pedal Pivot Points _" _" Check Spark Plug Condition & Gap _" _" Replace Fuel Filter _" Maintenance Changingthe Engine Oil WARNING! Open the tractor's hood and locate the oil drain port on the left side of the emission control devices and systems which may be performed by a Cub Cadet Dealer. engine, muffler and...

Operation Manual
Page 22
...6 -- See Fig. 6-4. See Fig. 6-5. 4. To Iowerthe front of the deck, tighten (thread inward) the inner hex nut against each deck spindle. Levelingthe Deck(Front To Rear) The front of the deck hanger rod. MAINTENANCE & ADJUSTMENTS NOTE: Check the tractor's tire pressure before making adjustments. Refer...lower than the second measurement. DeckSpindle Grease fittings can be adjusted to level the deck from the front of the blade tip to the spindle shaft. J Figure 6-5 2. Rotate the blade nearest the discharge chute so that can be found on a firm, level surface and ...
...6 -- See Fig. 6-4. See Fig. 6-5. 4. To Iowerthe front of the deck, tighten (thread inward) the inner hex nut against each deck spindle. Levelingthe Deck(Front To Rear) The front of the deck hanger rod. MAINTENANCE & ADJUSTMENTS NOTE: Check the tractor's tire pressure before making adjustments. Refer...lower than the second measurement. DeckSpindle Grease fittings can be adjusted to level the deck from the front of the blade tip to the spindle shaft. J Figure 6-5 2. Rotate the blade nearest the discharge chute so that can be found on a firm, level surface and ...

Operation Manual
Page 26
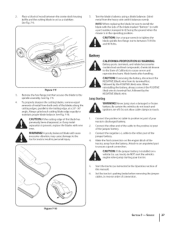
... arms. See Fig. 7-3. c. Reattach the deck engage cable. SERVICE Remove the deck belt from around the two spindle pulleys and the two deck idler pulleys. Replace the belt guard. See Fig. 7-5. See Fig. 7-4. Remove the deck from around the ... pulleys. 6. r 4. See Fig. 7-6. 5. With the deck beneath the mower frame, attach the stabilizer rod. Periodically inspect the blade and/or spindle for _ shaArRpeNnINinGg ! See Fig. 7-8. Cutting fllades Figure 7-7 7. ignition key before removing the cutting blade(s) for cracks or damage, especially after you...
... arms. See Fig. 7-3. c. Reattach the deck engage cable. SERVICE Remove the deck belt from around the two spindle pulleys and the two deck idler pulleys. Replace the belt guard. See Fig. 7-5. See Fig. 7-4. Remove the deck from around the ... pulleys. 6. r 4. See Fig. 7-6. 5. With the deck beneath the mower frame, attach the stabilizer rod. Periodically inspect the blade and/or spindle for _ shaArRpeNnINinGg ! See Fig. 7-8. Cutting fllades Figure 7-7 7. ignition key before removing the cutting blade(s) for cracks or damage, especially after you...
Operation Manual
Page 27
...) facing the ground when the mower is present, replace the blades with the side of the jumper battery. 3. Use a torque wrench to the spindle assembly. To properly sharpen the cutting blades, remove equal amounts of the tractor, away from its terminal first, followed by the POSITIVE (Red) wire.... proper blade balance. Place a block of the blades along the cutting edges, parallel to positive (+) post of connection. See Fig. 7-9. 5. blade spindle hex flange nut to between the center deck housing baffle and the cutting blade to the other end of the cable to install the blade...
...) facing the ground when the mower is present, replace the blades with the side of the jumper battery. 3. Use a torque wrench to the spindle assembly. To properly sharpen the cutting blades, remove equal amounts of the tractor, away from its terminal first, followed by the POSITIVE (Red) wire.... proper blade balance. Place a block of the blades along the cutting edges, parallel to positive (+) post of connection. See Fig. 7-9. 5. blade spindle hex flange nut to between the center deck housing baffle and the cutting blade to the other end of the cable to install the blade...

Operation Manual
Page 29
... 6. Fill tank with Choke activated. 2. Drain fuel tank. Clean grass clippings and debris from around the engine's cooling fins and blower housing. 1. Tighten blade and spindle. 2. Mowonceata high cutting height, then mow again at high RPM Engine Idles rough Excessive vibration Mower will not mulch grass 1. Sharpen or replace blade. 1. Sharpen...
... 6. Fill tank with Choke activated. 2. Drain fuel tank. Clean grass clippings and debris from around the engine's cooling fins and blower housing. 1. Tighten blade and spindle. 2. Mowonceata high cutting height, then mow again at high RPM Engine Idles rough Excessive vibration Mower will not mulch grass 1. Sharpen or replace blade. 1. Sharpen...
Operation Manual
Page 30
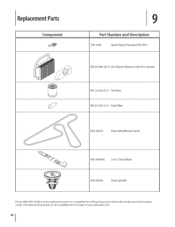
Parts Manual downloads are also available free of charge at www.cubcadet.com. ReplacementParts Component 9 T _ Part Number and Description 759-3336 Spark Plug (Champion RC12YC) KH-20-883-02-$1 Air Cleaner Element with Pre-cleaner KH-12-050-01-S Oil Filter KH-25-050-21-S Fuel Filter 954-04219 Drive Belt (Mower Deck) 942-04244A 2-in-1 Deck Blade 918-04636 Deck Spindle Phone (800) 965-4CUB to order replacement parts or a complete Parts Manual (have your full model number and serial number ready).
Parts Manual downloads are also available free of charge at www.cubcadet.com. ReplacementParts Component 9 T _ Part Number and Description 759-3336 Spark Plug (Champion RC12YC) KH-20-883-02-$1 Air Cleaner Element with Pre-cleaner KH-12-050-01-S Oil Filter KH-25-050-21-S Fuel Filter 954-04219 Drive Belt (Mower Deck) 942-04244A 2-in-1 Deck Blade 918-04636 Deck Spindle Phone (800) 965-4CUB to order replacement parts or a complete Parts Manual (have your full model number and serial number ready).

Operation Manual
Page 91
... Kohler Owner's Manual for all engine maintenance procedures and instructions. NOTE:The oil filter should be performed by a Cub Cadet Dealer. To complete an oil change interval. Before performing any engine repair establishment or individual. caInf thcaeuseengibnuernshatso btheeenskrienc. Run... Terminals y/ y/ Lube Front A×ies and Rims _" _" Clean Engine Cooling Fins _" _" Lube Front Deck Wheels V/ V/ Lube Deck Spindles _ Lube Pedal Pivot Points _" _" Check Spark Plug Condition & Gap _" _" Replace Fuel Filter _" Maintenance Changingthe Engine Oil WARNING! Warm ...
... Kohler Owner's Manual for all engine maintenance procedures and instructions. NOTE:The oil filter should be performed by a Cub Cadet Dealer. To complete an oil change interval. Before performing any engine repair establishment or individual. caInf thcaeuseengibnuernshatso btheeenskrienc. Run... Terminals y/ y/ Lube Front A×ies and Rims _" _" Clean Engine Cooling Fins _" _" Lube Front Deck Wheels V/ V/ Lube Deck Spindles _ Lube Pedal Pivot Points _" _" Check Spark Plug Condition & Gap _" _" Replace Fuel Filter _" Maintenance Changingthe Engine Oil WARNING! Warm ...

Operation Manual
Page 94
... (thread outward) the hex nut, away from the front of the blade tip to the ground and the rear of the blade tip to the spindle shaft. SECTION 6 -- Shut the engine off, remove the ignition key and engage the parking brake before performing any deck leveling adjustments. The front of the... middle position. 2. Loosen (thread outward) the hex lock nut on the end of the deck, tighten (thread inward) the inner hex nut against each deck spindle.
... (thread outward) the hex nut, away from the front of the blade tip to the ground and the rear of the blade tip to the spindle shaft. SECTION 6 -- Shut the engine off, remove the ignition key and engage the parking brake before performing any deck leveling adjustments. The front of the... middle position. 2. Loosen (thread outward) the hex lock nut on the end of the deck, tighten (thread inward) the inner hex nut against each deck spindle.
Operation Manual
Page 98
.... c. To remove the blades, proceed as follows: a. SECTION7-- Reattach the deck engage cable. Remove the deck from around the two outer spindle pulleys as shown in this section) then gently flip the deck over to get the belt off the pulley and a round the belt guard.... around the two deck idler pulleys as shown in Fig. 7-7. b. orShreupt latcheementg.ine Proofftaenctd yoreumr ohvaends by routing the belt around the two spindle pulleys and the two deck idler pulleys. 6. Reconnect the deck lift a rms. See Fig. 7-3. Do not operate the machine until damaged components...
.... c. To remove the blades, proceed as follows: a. SECTION7-- Reattach the deck engage cable. Remove the deck from around the two outer spindle pulleys as shown in this section) then gently flip the deck over to get the belt off the pulley and a round the belt guard.... around the two deck idler pulleys as shown in Fig. 7-7. b. orShreupt latcheementg.ine Proofftaenctd yoreumr ohvaends by routing the belt around the two spindle pulleys and the two deck idler pulleys. 6. Reconnect the deck lift a rms. See Fig. 7-3. Do not operate the machine until damaged components...

Operation Manual
Page 99
...of the blades along the cutting edges, parallel to the other end of metal from the battery. Make the final connection on a 5. blade spindle hex flange nut to assure a good connection. _hL vehicle (i.e. See Fig. 7-9. 4. Jump Starting battery. To properly sharpen the cutting blades,...blade balance. Grind metal from its terminal first, followed by the POSITIVE (Red) wire. Always grind each cutting blade edge equally to the spindle assembly. Connect the positive (+) cable to act as instructed in reverse order of this manual). 6. 2. Place a block of the blade ...
...of the blades along the cutting edges, parallel to the other end of metal from the battery. Make the final connection on a 5. blade spindle hex flange nut to assure a good connection. _hL vehicle (i.e. See Fig. 7-9. 4. Jump Starting battery. To properly sharpen the cutting blades,...blade balance. Grind metal from its terminal first, followed by the POSITIVE (Red) wire. Always grind each cutting blade edge equally to the spindle assembly. Connect the positive (+) cable to act as instructed in reverse order of this manual). 6. 2. Place a block of the blade ...

Operation Manual
Page 101
... fuel. Engine flooded. 1. Air flow restricted. control lever into 6. Clean fuel line and replace fuel filter. 8. Connect and tighten spark plug wires. 3. Tighten blade and spindle. 2. Do not mulch when grass is wet. 3. Spark plug wires loose. 3. Engine overheats 6. Dirty air cleaner. 1. Dull blade. 1. Remedy 1. Place lever in FAST (rabbit) 2. Remove...
... fuel. Engine flooded. 1. Air flow restricted. control lever into 6. Clean fuel line and replace fuel filter. 8. Connect and tighten spark plug wires. 3. Tighten blade and spindle. 2. Do not mulch when grass is wet. 3. Spark plug wires loose. 3. Engine overheats 6. Dirty air cleaner. 1. Dull blade. 1. Remedy 1. Place lever in FAST (rabbit) 2. Remove...

Operation Manual
Page 102
Parts Manual downloads are also available free of charge at www.cubcadet.com. ReplacementParts Component 9 T _ Part Number and Description 759-3336 Spark Plug (Champion RC12YC) KH-20-883-02-$1 Air Cleaner Element with Pre-cleaner KH-12-050-01-S Oil Filter KH-25-050-21-S Fuel Filter 954-04219 Drive Belt (Mower Deck) 942-04244A 2-in-1 Deck Blade 918-04636 Deck Spindle Phone (800) 965-4CUB to order replacement parts or a complete Parts Manual (have your full model number and serial number ready).
Parts Manual downloads are also available free of charge at www.cubcadet.com. ReplacementParts Component 9 T _ Part Number and Description 759-3336 Spark Plug (Champion RC12YC) KH-20-883-02-$1 Air Cleaner Element with Pre-cleaner KH-12-050-01-S Oil Filter KH-25-050-21-S Fuel Filter 954-04219 Drive Belt (Mower Deck) 942-04244A 2-in-1 Deck Blade 918-04636 Deck Spindle Phone (800) 965-4CUB to order replacement parts or a complete Parts Manual (have your full model number and serial number ready).
