
LTX 1042 KW Operator's Manual
Page 20
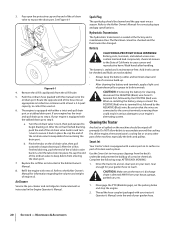
...level, clear spot on any other part of the oil drain valve to reach. Maintenance & Adjustments If your garden hose to keep the battery cables and terminals clean and free of corrosive build-up. • After cleaning the battery and terminals, apply a light coat of the hose into ...back in serious damage to step b. Refer to begin draining oil. Smart Jet Your tractor's deck is maintenance-free. Disengage the PTO (Blade Engage), set the parking brake and stop the engine. 2. Thread the hose coupler (packaged with the tabbed drain go to cause cancer and reproductive ...
...level, clear spot on any other part of the oil drain valve to reach. Maintenance & Adjustments If your garden hose to keep the battery cables and terminals clean and free of corrosive build-up. • After cleaning the battery and terminals, apply a light coat of the hose into ...back in serious damage to step b. Refer to begin draining oil. Smart Jet Your tractor's deck is maintenance-free. Disengage the PTO (Blade Engage), set the parking brake and stop the engine. 2. Thread the hose coupler (packaged with the tabbed drain go to cause cancer and reproductive ...

LTX 1042 KW Operator's Manual
Page 25
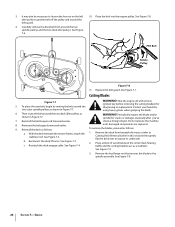
...of the hanger bracket on your tractor are present. See Figure 7-3. Remove the spring from underneath the tractor. 7. Carefully remove the deck engage cable from the deck lift arm. A substitute (non-OEM) V-belt can be replaced if any signs of the cutting deck by not disengaging ... Section 7 - Pull the deck support pin outward to wear and should be dangerous by removing the bow-tie cotter clip that fasten them to engage and disengage safely. Repeat the above steps on page 24. 2. For a proper working machine, use factory approved belts. Remove the deck as ...
...of the hanger bracket on your tractor are present. See Figure 7-3. Remove the spring from underneath the tractor. 7. Carefully remove the deck engage cable from the deck lift arm. A substitute (non-OEM) V-belt can be replaced if any signs of the cutting deck by not disengaging ... Section 7 - Pull the deck support pin outward to wear and should be dangerous by removing the bow-tie cotter clip that fasten them to engage and disengage safely. Repeat the above steps on page 24. 2. For a proper working machine, use factory approved belts. Remove the deck as ...
LTX 1042 KW Operator's Manual
Page 26
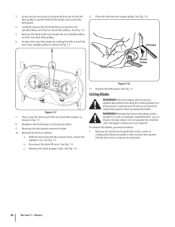
... the blade 6. Protect your hands by routing the belt around the belt guard. 4. With the deck beneath the mower frame, attach the 1. b. Reattach the deck engage cable. See Figure 7-9. 3. WARNING! Periodically inspect the blade and/or spindle for sharpening or replacement. See Figure 7-5. Place a block of wood between the center deck housing...
... the blade 6. Protect your hands by routing the belt around the belt guard. 4. With the deck beneath the mower frame, attach the 1. b. Reattach the deck engage cable. See Figure 7-9. 3. WARNING! Periodically inspect the blade and/or spindle for sharpening or replacement. See Figure 7-5. Place a block of wood between the center deck housing...

Operation Manual
Page 20
...fins of the engine, the transmission's cooling fan or on any other part of the oil drain valve back in place. Disengage the PTO (Blade Engage), set the parking brake and stop the engine. 3. SECTION 6 -- The fluid level cannot be checked and the fluid cannot be added. Battery...SmartJet Your tractor's deck is directed AWAY from entering the drain port. Wash hands after handling. Acid levels cannot Always keep the battery cables and terminals clean and free of the oil drain valve to expose the drain port. Air Cleaner Service the pre-cleaner and cartridge/air ...
...fins of the engine, the transmission's cooling fan or on any other part of the oil drain valve back in place. Disengage the PTO (Blade Engage), set the parking brake and stop the engine. 3. SECTION 6 -- The fluid level cannot be checked and the fluid cannot be added. Battery...SmartJet Your tractor's deck is directed AWAY from entering the drain port. Wash hands after handling. Acid levels cannot Always keep the battery cables and terminals clean and free of the oil drain valve to expose the drain port. Air Cleaner Service the pre-cleaner and cartridge/air ...

Operation Manual
Page 25
... side. See Fig. 7-5. Gently slide the cutting deck (from the right side) out from the deck idler bracket. Carefully remove the deck engage cable from the end of wear are present. See Fig. 7-6. Figure 7-4 Figure 7-6 SECTIO7N-- SERVICE 25 Figure 7-5 8. lift arms upand out ... be replaced if any signs of the stabilizer rod thedeckliftarmS. eeFig7. -3. Move the deck lift lever into the top notch to engage and disengage safely. _ WA AsuRbNsItNituGte! (Tnohne-OVE-bMe)lts V-fobuenltd caonn yboeurdatnragcetroorus areby not disengaging completely. Remove the spring from...
... side. See Fig. 7-5. Gently slide the cutting deck (from the right side) out from the deck idler bracket. Carefully remove the deck engage cable from the end of wear are present. See Fig. 7-6. Figure 7-4 Figure 7-6 SECTIO7N-- SERVICE 25 Figure 7-5 8. lift arms upand out ... be replaced if any signs of the stabilizer rod thedeckliftarmS. eeFig7. -3. Move the deck lift lever into the top notch to engage and disengage safely. _ WA AsuRbNsItNituGte! (Tnohne-OVE-bMe)lts V-fobuenltd caonn yboeurdatnragcetroorus areby not disengaging completely. Remove the spring from...

Operation Manual
Page 26
... Fig. 7-6. 5. See Fig. 7-1. Then route the belt around the two outer spindle pulleys as follows. Reinstall the deck as shown in Fig. 7-7. 8. Reattach the deck engage cable. Periodically inspect the blade and/or spindle for _ shaArRpeNnINinGg ! Place the belt into the engine pulley. PTO Belt Pulley J Figure 7-8 12. Remount the belt guards...
... Fig. 7-6. 5. See Fig. 7-1. Then route the belt around the two outer spindle pulleys as follows. Reinstall the deck as shown in Fig. 7-7. 8. Reattach the deck engage cable. Periodically inspect the blade and/or spindle for _ shaArRpeNnINinGg ! Place the belt into the engine pulley. PTO Belt Pulley J Figure 7-8 12. Remount the belt guards...
Operation Manual
Page 92
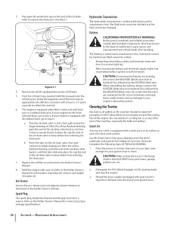
...of the hose into place. Re-cap the end of the oil drain valve to cause cancer and reproductive harm. Disengage the PTO (Blade Engage), set the parking brake and stop the engine. 3. Battery posts, terminals, and related accessories contain lead and lead compounds, chemicals known to... the State of California to keep the battery cables and terminals clean and free of corrosive build-up. and-pull drain, go to rinse grass clippings from the oil fill tube. 5. Refill...
...of the hose into place. Re-cap the end of the oil drain valve to cause cancer and reproductive harm. Disengage the PTO (Blade Engage), set the parking brake and stop the engine. 3. Battery posts, terminals, and related accessories contain lead and lead compounds, chemicals known to... the State of California to keep the battery cables and terminals clean and free of corrosive build-up. and-pull drain, go to rinse grass clippings from the oil fill tube. 5. Refill...

Operation Manual
Page 97
... on the tractor's right side. Remove the deck as follows: 1. See Fig. 7-6. Move the deck lift lever into the top notch to engage and disengage safely. _ WA AsuRbNsItNituGte! (Tnohne-OVE-bMe)lts V-fobuenltd caonn yboeurdatnragcetroorus areby not disengaging completely. For a proper working machine, use ...approved belts. Gently slide the cutting deck (from the right side) out from the deck idler bracket. Carefully remove the deck engage cable from the end of the cutting deck by removing the hex washer screws that secures it. Remove the cotter pin from the rear...
... on the tractor's right side. Remove the deck as follows: 1. See Fig. 7-6. Move the deck lift lever into the top notch to engage and disengage safely. _ WA AsuRbNsItNituGte! (Tnohne-OVE-bMe)lts V-fobuenltd caonn yboeurdatnragcetroorus areby not disengaging completely. For a proper working machine, use ...approved belts. Gently slide the cutting deck (from the right side) out from the deck idler bracket. Carefully remove the deck engage cable from the end of the cutting deck by removing the hex washer screws that secures it. Remove the cotter pin from the rear...
Operation Manual
Page 98
.... 7-6. 5. To place the new belt, begin by using heavy gloves when grasping the blade WARNING! Reinstall the deck as follows. See Fig. 7-5. Reattach the deck engage cable. Do not operate the machine until damaged components are replaced. Place the belt into the engine pulley. Then route the belt around the two outer...
.... 7-6. 5. To place the new belt, begin by using heavy gloves when grasping the blade WARNING! Reinstall the deck as follows. See Fig. 7-5. Reattach the deck engage cable. Do not operate the machine until damaged components are replaced. Place the belt into the engine pulley. Then route the belt around the two outer...


