

LTX 1042 KW Operator's Manual
Page 24
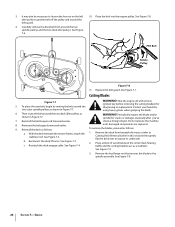
... the deck support pin on the rear left side to relieve tension on the belt for it to loosen) into the bottom notch on the idler spring or between the belt and a pulley while removing the belt. 5. c. Remove the deck belt from the engine pulley, carefully insert a 3⁄8" drive ratchet wrench (set to be... around the tractor's engine pulley. Figure 7-2 WARNING! Looking at the cutting deck from the left side of your fingers on the right fender. 3. Pull the belt keeper rod to the right and down to Figure 7-1: a. Deck Idler Bracket Figure 7-1 4. Refer to remove.
... the deck support pin on the rear left side to relieve tension on the belt for it to loosen) into the bottom notch on the idler spring or between the belt and a pulley while removing the belt. 5. c. Remove the deck belt from the engine pulley, carefully insert a 3⁄8" drive ratchet wrench (set to be... around the tractor's engine pulley. Figure 7-2 WARNING! Looking at the cutting deck from the left side of your fingers on the right fender. 3. Pull the belt keeper rod to the right and down to Figure 7-1: a. Deck Idler Bracket Figure 7-1 4. Refer to remove.

LTX 1042 KW Operator's Manual
Page 25
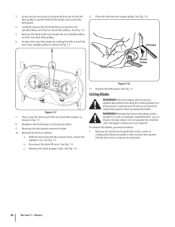
...of the hanger bracket on your tractor, proceed as instructed on your tractor are present. All belts on the deck. Remove the belt covers by not disengaging completely. Reinstall the belt keeper rod loosened earlier. 8. Carefully remove the deck engage cable from the end of the stabilizer ... the spring from underneath the tractor. 7. Deck Lift Arm Deck Support Pin Figure 7-5 Figure 7-3 11. Remove the deck as follows: 1. The V-belts found on page 24. 2. Repeat the above steps on your tractor are subject to release the deck from the deck lift arm. See Figure 7-5. ...
...of the hanger bracket on your tractor, proceed as instructed on your tractor are present. All belts on the deck. Remove the belt covers by not disengaging completely. Reinstall the belt keeper rod loosened earlier. 8. Carefully remove the deck engage cable from the end of the stabilizer ... the spring from underneath the tractor. 7. Deck Lift Arm Deck Support Pin Figure 7-5 Figure 7-3 11. Remove the deck as follows: 1. The V-belts found on page 24. 2. Repeat the above steps on your tractor are subject to release the deck from the deck lift arm. See Figure 7-5. ...
LTX 1042 KW Operator's Manual
Page 26
.... 4. Do not operate the machine 8. Reattach the deck engage cable. See Figure 7-9. 3. Reinstall the belt keeper rod loosened earlier. Remount the belt guards removed earlier. With the deck beneath the mower frame, attach the 1. Cutting Deck Removal earlier in Figure 7-7. See ... 7-9. 26 Section 7- 3. It may also be necessary to loosen the hex nut on the left idler pulley to stabilizer rod. Place the belt into the engine pulley. until damaged components are replaced. 9. Remove the deck from around the two deck idler pulleys as a stabilizer. Periodically...
.... 4. Do not operate the machine 8. Reattach the deck engage cable. See Figure 7-9. 3. Reinstall the belt keeper rod loosened earlier. Remount the belt guards removed earlier. With the deck beneath the mower frame, attach the 1. Cutting Deck Removal earlier in Figure 7-7. See ... 7-9. 26 Section 7- 3. It may also be necessary to loosen the hex nut on the left idler pulley to stabilizer rod. Place the belt into the engine pulley. until damaged components are replaced. 9. Remove the deck from around the two deck idler pulleys as a stabilizer. Periodically...

Operation Manual
Page 24
...ove. 5. Remove the belt guard and belt as follows. b. Pull the belt keeper rod to the right and down to Fig. 7-1: a. Remove the deck belt from the engine pulley, carefully insert a 1. tractor's left side of your fingers on the idler spring or between the belt _k WanAdRNaINpuGll!ey wAhvioleid ... around the tractor's engine pulley. f 3. Never place 4. Service 7 (utting DeckRemoval NOTE: If there is too much tension on the belt for it toward the 2. Remove the hex screws. See Fig. 7-1. Place the PTO/Blade Engage knob in the disengaged (OFF) position...
...ove. 5. Remove the belt guard and belt as follows. b. Pull the belt keeper rod to the right and down to Fig. 7-1: a. Remove the deck belt from the engine pulley, carefully insert a 1. tractor's left side of your fingers on the idler spring or between the belt _k WanAdRNaINpuGll!ey wAhvioleid ... around the tractor's engine pulley. f 3. Never place 4. Service 7 (utting DeckRemoval NOTE: If there is too much tension on the belt for it toward the 2. Remove the hex screws. See Fig. 7-1. Place the PTO/Blade Engage knob in the disengaged (OFF) position...

Operation Manual
Page 26
... the deck as shown in this section) then gently flip the deck over to get the belt off the pulley and a round the belt guard. 11. See Fig. 7-8. PTO Belt Pulley J Figure 7-8 12. Reattach the deck engage cable. SERVICE SECTION7-- Cutting fllades Figure ... stabilizer rod. c. Do not operate the machine until damaged components are replaced. 3. Remove the deck belt from around the two deck idler pulleys as follows: a. Retighten the belt keeper rod loosened earlier. 9. See Fig. 7-5. See Fig. 7-4. ignition key before removing the cutting blade...
... the deck as shown in this section) then gently flip the deck over to get the belt off the pulley and a round the belt guard. 11. See Fig. 7-8. PTO Belt Pulley J Figure 7-8 12. Reattach the deck engage cable. SERVICE SECTION7-- Cutting fllades Figure ... stabilizer rod. c. Do not operate the machine until damaged components are replaced. 3. Remove the deck belt from around the two deck idler pulleys as follows: a. Retighten the belt keeper rod loosened earlier. 9. See Fig. 7-5. See Fig. 7-4. ignition key before removing the cutting blade...

Operation Manual
Page 96
... brake. %" drive ratchet wrench (set to be easily removed from the engine pulley, carefully insert a 1. See Fig. 7-2. Remove the belt guard and belt as follows. Pull the belt keeper rod to the right and down to Fig. 7-1: a. f 3. c. See Fig. 7-1. Never place 4. Locate the PTO clutch under ...the front of the deck. Looking at the cutting deck from around the tractor's engine pulley. Remove the deck belt from the left side...
... brake. %" drive ratchet wrench (set to be easily removed from the engine pulley, carefully insert a 1. See Fig. 7-2. Remove the belt guard and belt as follows. Pull the belt keeper rod to the right and down to Fig. 7-1: a. f 3. c. See Fig. 7-1. Never place 4. Locate the PTO clutch under ...the front of the deck. Looking at the cutting deck from around the tractor's engine pulley. Remove the deck belt from the left side...
Operation Manual
Page 98
... deck idler pulleys. 6. Retighten the belt keeper rod loosened earlier. 9. SERVICE It may also be necessary to loosen the hex nut on the left idler pulley to Cutting Deck Removal earlier in Fig. 7-7. Replace the belt guard. Remount the belt guards removed earlier. 10. To remove...'ve struck a foreign object. Periodically inspect the blade and/or spindle for _ shaArRpeNnINinGg ! SECTION7-- See Fig. 7-6. 5. Then route the belt around the two outer spindle pulleys as follows: a. c. Reinstall the deck as shown in this section) then gently flip the deck over to...
... deck idler pulleys. 6. Retighten the belt keeper rod loosened earlier. 9. SERVICE It may also be necessary to loosen the hex nut on the left idler pulley to Cutting Deck Removal earlier in Fig. 7-7. Replace the belt guard. Remount the belt guards removed earlier. 10. To remove...'ve struck a foreign object. Periodically inspect the blade and/or spindle for _ shaArRpeNnINinGg ! SECTION7-- See Fig. 7-6. 5. Then route the belt around the two outer spindle pulleys as follows: a. c. Reinstall the deck as shown in this section) then gently flip the deck over to...


