
Series 1000 Brochure
Page 1
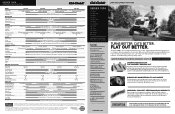
... the Cub Cadet Advantage. LEGENDARY CUB CADET PERFORMANCE AND DURABILITY Enjoy caring for your local Cub Cadet Independent Dealer for warranty details. 773-05145 Printed in U.S.A. 12/12 © 2013 Cub Cadet Lawn and garden tractors SERIES 1000 LTX 1040 LTX 1042 KW LTX 1045 LTX 1046 LTX 1046 KW LTX 1050 LTX 1050 ..., understand and follow all -day comfort. Only Cub Cadet combines features like a fully welded steel frame with dual steel wheel drive hubs 18" CHASSIS Chassis Type Frame Hood & Grill Fender & Bumper Robotically welded frame assembly Heavy-duty 9-gauge steel frame rails - 5-year...
... the Cub Cadet Advantage. LEGENDARY CUB CADET PERFORMANCE AND DURABILITY Enjoy caring for your local Cub Cadet Independent Dealer for warranty details. 773-05145 Printed in U.S.A. 12/12 © 2013 Cub Cadet Lawn and garden tractors SERIES 1000 LTX 1040 LTX 1042 KW LTX 1045 LTX 1046 LTX 1046 KW LTX 1050 LTX 1050 ..., understand and follow all -day comfort. Only Cub Cadet combines features like a fully welded steel frame with dual steel wheel drive hubs 18" CHASSIS Chassis Type Frame Hood & Grill Fender & Bumper Robotically welded frame assembly Heavy-duty 9-gauge steel frame rails - 5-year...
Series 1000 Brochure
Page 2
...assembly Heavy-duty 9-gauge steel frame rails - 5-year limited warranty Corrosion- regulated 12V/H.D. 190 cold crank amp 12V/H.D. 230 cold crank amp 12V/H.D. 190 cold crank amp Flywheel alternator Standard Digital hour meter, change oil service minder, battery voltage monitor, park brake... Deck Attach/Removal Deck Wash WARRANTY† LTX 1040 LTX 1042 KW LTX 1045 19 HP* Cub Cadet® professional-grade Kohler® single-cylinder OHV 18 HP* Cub Cadet® professional-grade Kawasaki® V-Twin OHV 20 HP* Cub Cadet® professional-grade Kohler® single-cylinder...
...assembly Heavy-duty 9-gauge steel frame rails - 5-year limited warranty Corrosion- regulated 12V/H.D. 190 cold crank amp 12V/H.D. 230 cold crank amp 12V/H.D. 190 cold crank amp Flywheel alternator Standard Digital hour meter, change oil service minder, battery voltage monitor, park brake... Deck Attach/Removal Deck Wash WARRANTY† LTX 1040 LTX 1042 KW LTX 1045 19 HP* Cub Cadet® professional-grade Kohler® single-cylinder OHV 18 HP* Cub Cadet® professional-grade Kawasaki® V-Twin OHV 20 HP* Cub Cadet® professional-grade Kohler® single-cylinder...
LTX 1042 KW Operator's Manual
Page 9
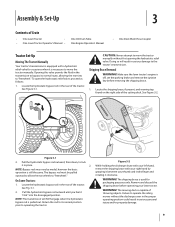
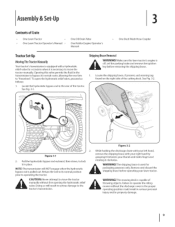
...mowing deck is used for occasions when it is pulled out. See Figure 3-2. Remove and discard the shipping brace before removing the shipping brace. 1. Assembly & Set-Up 3 Contents of Crate • One Lawn Tractor • • One Lawn Tractor Operator's Manual • One Oil Drain ...Moving The Tractor Manually Your tractor's transmission is equipped with your right hand by model, however the basic operation is off, set the parking brake and remove the ignition key before operating your lawn tractor. Pull the hydrostatic bypass rod outward, then down, to "freewheel." See Fig....
...mowing deck is used for occasions when it is pulled out. See Figure 3-2. Remove and discard the shipping brace before removing the shipping brace. 1. Assembly & Set-Up 3 Contents of Crate • One Lawn Tractor • • One Lawn Tractor Operator's Manual • One Oil Drain ...Moving The Tractor Manually Your tractor's transmission is equipped with your right hand by model, however the basic operation is off, set the parking brake and remove the ignition key before operating your lawn tractor. Pull the hydrostatic bypass rod outward, then down, to "freewheel." See Fig....
LTX 1042 KW Operator's Manual
Page 11
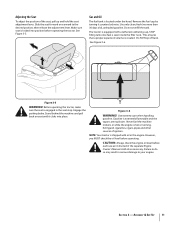
Engage the parking brake. Gasoline is hot or running. However, you MUST check the oil level before each use as necessary. Section 3 - Slide the seat forward or rearward to ... 30 days old), unleaded gasoline. This ensures that a proper expansion volume is engaged in the engine. CAUTION: Always check the engine oil level before operating. Assembly & Set-Up 11 The tractor is seen inside the filler neck. Do NOT top off tank. Before operating the tractor, make sure the seat is...
Engage the parking brake. Gasoline is hot or running. However, you MUST check the oil level before each use as necessary. Section 3 - Slide the seat forward or rearward to ... 30 days old), unleaded gasoline. This ensures that a proper expansion volume is engaged in the engine. CAUTION: Always check the engine oil level before operating. Assembly & Set-Up 11 The tractor is seen inside the filler neck. Do NOT top off tank. Before operating the tractor, make sure the seat is...
LTX 1042 KW Operator's Manual
Page 12
... The brake pedal is located below the front/left front side of this machine. Seat Adjustment Lever The seat adjustment lever is located on the Choke Control to the Assembly and Set-Up section of the tractor above the drive pedal along the running board. The lever allows for more ...detailed instructions. 12 Read and follow all the way forward, closes the choke for sudden stops or setting the parking brake. Failure to operate this ...
... The brake pedal is located below the front/left front side of this machine. Seat Adjustment Lever The seat adjustment lever is located on the Choke Control to the Assembly and Set-Up section of the tractor above the drive pedal along the running board. The lever allows for more ...detailed instructions. 12 Read and follow all the way forward, closes the choke for sudden stops or setting the parking brake. Failure to operate this ...
LTX 1042 KW Operator's Manual
Page 15
... OPERATOR'S POSITION, DISENGAGE BLADE(S), ENGAGE PARKING BRAKE, SHUT OFF AND REMOVE KEY. Contact your engine's electric starter. 6. NOTE: If the engine is malfunctioning. After the engine starts, deactivate the choke. Starting the Engine NOTE: Refer to your Cub Cadet dealer. • The safety interlock system ...key counterclockwise to the START position. Thoroughly inspect the machine for Gasoline and Oil fill-up , it may cause damage to the Assembly & Set-Up section of the operator. Place the throttle control near the SLOW position. 3. If the blades are engaged, place ...
... OPERATOR'S POSITION, DISENGAGE BLADE(S), ENGAGE PARKING BRAKE, SHUT OFF AND REMOVE KEY. Contact your engine's electric starter. 6. NOTE: If the engine is malfunctioning. After the engine starts, deactivate the choke. Starting the Engine NOTE: Refer to your Cub Cadet dealer. • The safety interlock system ...key counterclockwise to the START position. Thoroughly inspect the machine for Gasoline and Oil fill-up , it may cause damage to the Assembly & Set-Up section of the operator. Place the throttle control near the SLOW position. 3. If the blades are engaged, place ...
LTX 1042 KW Operator's Manual
Page 22
... instructions. Measure the distance from the outside of this manual for proper adjustment and proceed, if necessary. 1. Adjusting the Seat Refer to the Assembly & Set-Up section of the right blade tip to Tires on a firm, level surface and place the deck lift lever in the seat-... hex bolt on the left deck hanger bracket. Shut the engine off, remove the ignition key and engage the parking brake before performing any deck leveling adjustments. Protect your Cub Cadet dealer to the next step. 3. Measure the distance from the front hanger bracket. To raise the front of the ...
... instructions. Measure the distance from the outside of this manual for proper adjustment and proceed, if necessary. 1. Adjusting the Seat Refer to the Assembly & Set-Up section of the right blade tip to Tires on a firm, level surface and place the deck lift lever in the seat-... hex bolt on the left deck hanger bracket. Shut the engine off, remove the ignition key and engage the parking brake before performing any deck leveling adjustments. Protect your Cub Cadet dealer to the next step. 3. Measure the distance from the front hanger bracket. To raise the front of the ...
Operation Manual
Page 9
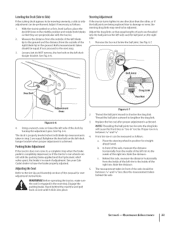
..., if present, and warning tag found on the right side of throwing objects. WARNING! Shipping BraceRem0val off, set the parking brake and remove the ignition _ keAy RbeNfIoNreG!reMmaokveingsutrheethsehilpapwinngtrabcratocre's. Pull the hydrostatic bypass rod outward, then down, to lock it in the ... bypass its normal position _ prior to move the tractor manually. NOTE:The transmission will result in serious damage to "freewheel." Assembl&y Set-Up 3 Contents of Crate One Lawn Tractor One Lawn Tractor Operator's Manual One Oil Drain Tube One Kohler Engine Operator...
..., if present, and warning tag found on the right side of throwing objects. WARNING! Shipping BraceRem0val off, set the parking brake and remove the ignition _ keAy RbeNfIoNreG!reMmaokveingsutrheethsehilpapwinngtrabcratocre's. Pull the hydrostatic bypass rod outward, then down, to lock it in the ... bypass its normal position _ prior to move the tractor manually. NOTE:The transmission will result in serious damage to "freewheel." Assembl&y Set-Up 3 Contents of Crate One Lawn Tractor One Lawn Tractor Operator's Manual One Oil Drain Tube One Kohler Engine Operator...
Operation Manual
Page 11
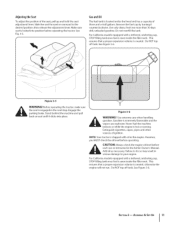
...ensures that a proper expansion volume is created, otherwise the engine will not run. Do NOT top offtank. Engage the parking brake. Gasoline is extremely flammable and the _ WvaApoRrNs INaGr!e expUloseivee.xtreNmeever cfaureel wthen mahcahnidnleing indoors or while the engine is seen ... is locked into place. ,J Figure 3-6 gasoline. Do not overfill the tank. See Figure 3-6. Fs _ k_ j Figure 3-5 WARNING! ASSEMBLY& SET-UP 11 Adjusting the Seat To adjust the position of ignition. Slide the seat forward or rearward to your engine. Extinguish cigarettes, ...
...ensures that a proper expansion volume is created, otherwise the engine will not run. Do NOT top offtank. Engage the parking brake. Gasoline is extremely flammable and the _ WvaApoRrNs INaGr!e expUloseivee.xtreNmeever cfaureel wthen mahcahnidnleing indoors or while the engine is seen ... is locked into place. ,J Figure 3-6 gasoline. Do not overfill the tank. See Figure 3-6. Fs _ k_ j Figure 3-5 WARNING! ASSEMBLY& SET-UP 11 Adjusting the Seat To adjust the position of ignition. Slide the seat forward or rearward to your engine. Extinguish cigarettes, ...

Operation Manual
Page 12
... with the m cutting deck engaged, be fully depressed to the Assembly and Set-Up section of the tractor's dash panel. This lever...(rabbit) position. SLOW Read and follow all safety rules and instructions in this machine. NOTE:The brake pedal must be certain that the SeatAdjustmentLever The seat adjustment lever is located below the front/left front...) Handle Cup Holder Figure 4-1 Lawn Tractor controls and features are illustrated in personal injury. WARNING! The brake pedal can be used for adjustment of the fore to operate this manual, including the entire Operation section...
... with the m cutting deck engaged, be fully depressed to the Assembly and Set-Up section of the tractor's dash panel. This lever...(rabbit) position. SLOW Read and follow all safety rules and instructions in this machine. NOTE:The brake pedal must be certain that the SeatAdjustmentLever The seat adjustment lever is located below the front/left front...) Handle Cup Holder Figure 4-1 Lawn Tractor controls and features are illustrated in personal injury. WARNING! The brake pedal can be used for adjustment of the fore to operate this manual, including the entire Operation section...

Operation Manual
Page 15
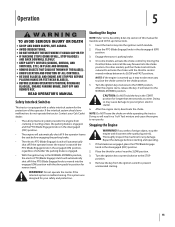
...: Do NOT leave the choke control on while operating the tractor. Contact your Cub Cadet dealer. interlock system is in a "rich" fuel mixture and cause the engine to prevent unintended starting unless the parking brake is engaged, and the PTO (Blade Engage) knob is malfunctioning. Place the throttle... engine and disconnect the spark plug wire(s). _i ThoArRouNgINhlGy ! Operation Startingthe Engine TO AVOID SERIOUS INJURY OR DEATH NOTE: Refer to the Assembly & Set-Up section of this manual for the protection of the operator. Insert the tractor key into the choke position. 5. Place ...
...: Do NOT leave the choke control on while operating the tractor. Contact your Cub Cadet dealer. interlock system is in a "rich" fuel mixture and cause the engine to prevent unintended starting unless the parking brake is engaged, and the PTO (Blade Engage) knob is malfunctioning. Place the throttle... engine and disconnect the spark plug wire(s). _i ThoArRouNgINhlGy ! Operation Startingthe Engine TO AVOID SERIOUS INJURY OR DEATH NOTE: Refer to the Assembly & Set-Up section of this manual for the protection of the operator. Insert the tractor key into the choke position. 5. Place ...

Operation Manual
Page 23
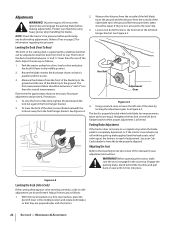
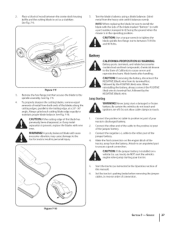
...1. If not, proceed to have the brake properly adjusted. Adjust the drag links so that they are threaded into place. ustment Gear J Figure 6-6 4. See your Cub Cadet dealer to the next step. 3. Adjusting the Seat Refer to the Set-Up and Assembly section of the right blade tip to ...be equal. See Fig. 6-6. The deck is between 1A6"and %6" less than the other, or if the ball joints are equal. Engage the parking brake. SECTION 6 -- Adjust if necessary as follows: a. See Fig. 6-6. ParkingBrakeAdjustment If the tractor does not come to a complete stop . Thread the ball...
...1. If not, proceed to have the brake properly adjusted. Adjust the drag links so that they are threaded into place. ustment Gear J Figure 6-6 4. See your Cub Cadet dealer to the next step. 3. Adjusting the Seat Refer to the Set-Up and Assembly section of the right blade tip to ...be equal. See Fig. 6-6. The deck is between 1A6"and %6" less than the other, or if the ball joints are equal. Engage the parking brake. SECTION 6 -- Adjust if necessary as follows: a. See Fig. 6-6. ParkingBrakeAdjustment If the tractor does not come to a complete stop . Thread the ball...
Operation Manual
Page 27
... Ifjuthmep jumstpaertring bayttoeuryr triascitnosr.talled on the engine block of the jumper battery. 4. Attach to an unpainted part to the spindle assembly. car, truck), do not touch and i_ll WignAiRtioNnIsNG!are oNffe.veDrojunmopt alslotawrt caabdleamaclgaemdps ortofrotozuecnh. 1. NOTE:When replacing the blade, ...chemicals known to the trailing edge, at a 25 °- 30 ° angle. See Fig. 7-9. 5. Set the tractor's parking brake before removing the jumper cables, in the operating position. CAUTION: If the cutting edge of metal from its terminal first, followed by ...
... Ifjuthmep jumstpaertring bayttoeuryr triascitnosr.talled on the engine block of the jumper battery. 4. Attach to an unpainted part to the spindle assembly. car, truck), do not touch and i_ll WignAiRtioNnIsNG!are oNffe.veDrojunmopt alslotawrt caabdleamaclgaemdps ortofrotozuecnh. 1. NOTE:When replacing the blade, ...chemicals known to the trailing edge, at a 25 °- 30 ° angle. See Fig. 7-9. 5. Set the tractor's parking brake before removing the jumper cables, in the operating position. CAUTION: If the cutting edge of metal from its terminal first, followed by ...

Operation Manual
Page 81
...tag found on the right side of the cutting deck. Failure to the tractor's transmission. Shipping BraceRem0val off, set the parking brake and remove the ignition _ keAy RbeNfIoNreG!reMmaokveingsutrheethsehilpapwinngtrabcratocre's. NOTE:The transmission will result in serious damage to operate the riding mower without...follows: 1. Figure 34 2. Pull the hydrostatic bypass rod outward, then down, to lock it in the rear of the tractor. Assembl&y Set-Up 3 Contents of Crate One Lawn Tractor One Lawn Tractor Operator's Manual One Oil Drain Tube One Kohler Engine Operator's Manual...
...tag found on the right side of the cutting deck. Failure to the tractor's transmission. Shipping BraceRem0val off, set the parking brake and remove the ignition _ keAy RbeNfIoNreG!reMmaokveingsutrheethsehilpapwinngtrabcratocre's. NOTE:The transmission will result in serious damage to operate the riding mower without...follows: 1. Figure 34 2. Pull the hydrostatic bypass rod outward, then down, to lock it in the rear of the tractor. Assembl&y Set-Up 3 Contents of Crate One Lawn Tractor One Lawn Tractor Operator's Manual One Oil Drain Tube One Kohler Engine Operator's Manual...

Operation Manual
Page 83
.... 3-5. For California models equipped with oil in the Kohler Owner's Manual. _i AdAdUToIiOl Nas: necAelwssaayrsy. Engage the parking brake. chFeacilkuretheto ednoginseo moaily lerveeslultbeifnore -- For California models equipped with a tethered, ratcheting cap, STOP filling tank once fuel is located...lever. See Figure 3-6. Fs _ k_ j Figure 3-5 WARNING! SECTION3 -- This ensures that a proper expansion volume is created. ASSEMBLY& SET-UP 11 Stand behind the machine and pull back on seat until it counterclockwise. Extinguish cigarettes, cigars, pipes and other...
.... 3-5. For California models equipped with oil in the Kohler Owner's Manual. _i AdAdUToIiOl Nas: necAelwssaayrsy. Engage the parking brake. chFeacilkuretheto ednoginseo moaily lerveeslultbeifnore -- For California models equipped with a tethered, ratcheting cap, STOP filling tank once fuel is located...lever. See Figure 3-6. Fs _ k_ j Figure 3-5 WARNING! SECTION3 -- This ensures that a proper expansion volume is created. ASSEMBLY& SET-UP 11 Stand behind the machine and pull back on seat until it counterclockwise. Extinguish cigarettes, cigars, pipes and other...

Operation Manual
Page 84
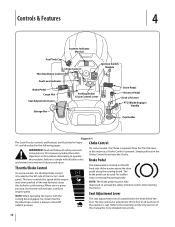
...tractor with all the way forward, closes the choke for sudden stops or setting the parking brake. Failure to comply with the m cutting deck engaged, be fully depressed to the Assembly and Set-Up section of this machine. Controlsand Features 4 Fuel Tank Ca Throttle/ Fuel ...Level indicator Brake Cargo Net Seat Adjustment Lever Storage nition Switch Module Parking Brake/ Cruise Control Lever Drive Pedal Pedal Lift Lever PTO ...
...tractor with all the way forward, closes the choke for sudden stops or setting the parking brake. Failure to comply with the m cutting deck engaged, be fully depressed to the Assembly and Set-Up section of this machine. Controlsand Features 4 Fuel Tank Ca Throttle/ Fuel ...Level indicator Brake Cargo Net Seat Adjustment Lever Storage nition Switch Module Parking Brake/ Cruise Control Lever Drive Pedal Pedal Lift Lever PTO ...

Operation Manual
Page 87
...the engine starts, deactivate the choke control. Contact your Cub Cadet dealer. If the blades are engaged, place the PTO/Blade Engage lever in the disengaged (OFF) • DONOTOPERATETHEUNITWHEREIT COULDSLIPORTIP. Engage the tractor's parking brake. 4. Doing _ CsoAmUaTy IOcaNus:eDdoamNOagTe hotlod ytohuer keenygiinne'tshe...the key. Operation Startingthe Engine TO AVOID SERIOUS INJURY OR DEATH NOTE: Refer to the Assembly & Set-Up section of the operator. inIfspyeocut sthrieke maacfohrineeign forobajencyt, dasmtoapget.he Repair the damage before engaging the parking...
...the engine starts, deactivate the choke control. Contact your Cub Cadet dealer. If the blades are engaged, place the PTO/Blade Engage lever in the disengaged (OFF) • DONOTOPERATETHEUNITWHEREIT COULDSLIPORTIP. Engage the tractor's parking brake. 4. Doing _ CsoAmUaTy IOcaNus:eDdoamNOagTe hotlod ytohuer keenygiinne'tshe...the key. Operation Startingthe Engine TO AVOID SERIOUS INJURY OR DEATH NOTE: Refer to the Assembly & Set-Up section of the operator. inIfspyeocut sthrieke maacfohrineeign forobajencyt, dasmtoapget.he Repair the damage before engaging the parking...
Operation Manual
Page 95
...properly leveled when both blades so that equal lengths of adjustment. See your Cub Cadet dealer to shorten the drag link. Proper toe-in is in the seat-stop when the brake pedal is achieved. Note the distance. Engage the parking brake. Stand behind the axle. SECTION 6 -- Both measurements taken should be...until it clicks into the ball joint on the left side and the ball joint on the left rim to the Set-Up and Assembly section of the deck by turning the adjustment gear. Steering Adjustment If the tractor turns tighter in front of the right blade tip ...
...properly leveled when both blades so that equal lengths of adjustment. See your Cub Cadet dealer to shorten the drag link. Proper toe-in is in the seat-stop when the brake pedal is achieved. Note the distance. Engage the parking brake. Stand behind the axle. SECTION 6 -- Both measurements taken should be...until it clicks into the ball joint on the left side and the ball joint on the left rim to the Set-Up and Assembly section of the deck by turning the adjustment gear. Steering Adjustment If the tractor turns tighter in front of the right blade tip ...

Operation Manual
Page 99
... the battery, always connect the POSITIVE (Red) wire its terminal first, followed by the NEGATIVE (Black) wire. Set the tractor's parking brake before removing the jumper cables, in the Operation section of the blade marked "Bottom" (or with new ones. See Fig. 7-10. Be...jumper battery. 4. Connect the positive (+) cable to install the blade with the side of this manual). 6. Use a torque wrench to the spindle assembly. CAUTION: If removing the battery, disconnect the NEGATIVE (Black) wire from the battery. Make the final connection on a 5. Remove the hex ...
... the battery, always connect the POSITIVE (Red) wire its terminal first, followed by the NEGATIVE (Black) wire. Set the tractor's parking brake before removing the jumper cables, in the Operation section of the blade marked "Bottom" (or with new ones. See Fig. 7-10. Be...jumper battery. 4. Connect the positive (+) cable to install the blade with the side of this manual). 6. Use a torque wrench to the spindle assembly. CAUTION: If removing the battery, disconnect the NEGATIVE (Black) wire from the battery. Make the final connection on a 5. Remove the hex ...


