User Instructions
Page 1
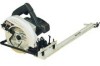
... when using the AccuRip. § Always follow a line on ways to make straight rip cuts as narrow as 1/16 inch, or as wide as plywood, wafer board, paneling, or siding. It has been tested with your saw . 1 The design of the Accu-Rip allows adjustment to ... cuts in areas that contain Right-Hand Blades. Model No. 25980 ACCU-RIP SAW GUIDE USER INSTRUCTIONS About the Accu-Rip Saw Guide The Accu-Rip is designed to fit RightHand Blade circular saws only. When used properly, the Accu-Rip will only work with circular saws that do not interfere with other types of this User...
... when using the AccuRip. § Always follow a line on ways to make straight rip cuts as narrow as 1/16 inch, or as wide as plywood, wafer board, paneling, or siding. It has been tested with your saw . 1 The design of the Accu-Rip allows adjustment to ... cuts in areas that contain Right-Hand Blades. Model No. 25980 ACCU-RIP SAW GUIDE USER INSTRUCTIONS About the Accu-Rip Saw Guide The Accu-Rip is designed to fit RightHand Blade circular saws only. When used properly, the Accu-Rip will only work with circular saws that do not interfere with other types of this User...
User Instructions
Page 3
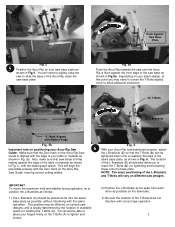
...Accu-Rip towards the saw until the AccuRip is flush against the edge of the table or material as follows: 1) The L-Brackets (C) should also allow adequate clearance. (A) T-Bolts (C) L-Brackets "0" Mark Aligned with Material Edge Fig. 5b Important note on positioning your Accu-Rip Saw Guide: Make sure that the Zero mark on different saw... to allow you may be tightened down onto a relatively flat area of the L-Brackets and T-Bolts will vary on the Accu-Rip Saw Guide is aligned with the blade guard raised. The location of the L-Brackets (C) should be able to slide the base of ...
...Accu-Rip towards the saw until the AccuRip is flush against the edge of the table or material as follows: 1) The L-Brackets (C) should also allow adequate clearance. (A) T-Bolts (C) L-Brackets "0" Mark Aligned with Material Edge Fig. 5b Important note on positioning your Accu-Rip Saw Guide: Make sure that the Zero mark on different saw... to allow you may be tightened down onto a relatively flat area of the L-Brackets and T-Bolts will vary on the Accu-Rip Saw Guide is aligned with the blade guard raised. The location of the L-Brackets (C) should be able to slide the base of ...
User Instructions
Page 5
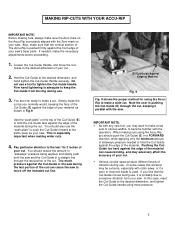
...edge of the material can cause the saw and the Cut-Guide in a straight line through the cut . In some cases this case, reset the Cut-Guide to the desired dimension, and tighten the Cut-Guide handle using more pressure. 5 MAKING RIP-CUTS WITH YOUR ACCU-RIP IMPORTANT NOTE: Before making cuts, ...proceeding. 1. This is pushing the Cut-Guide (E) through the last portion of the material during the last portion of the cut . Too much pressure against the edge of the cut . Note the user is especially important when making cuts using the AccuRip to the desired dimension of your cut...
...edge of the material can cause the saw and the Cut-Guide in a straight line through the cut . In some cases this case, reset the Cut-Guide to the desired dimension, and tighten the Cut-Guide handle using more pressure. 5 MAKING RIP-CUTS WITH YOUR ACCU-RIP IMPORTANT NOTE: Before making cuts, ...proceeding. 1. This is pushing the Cut-Guide (E) through the last portion of the material during the last portion of the cut . Too much pressure against the edge of the cut . Note the user is especially important when making cuts using the AccuRip to the desired dimension of your cut...
User Instructions
Page 6
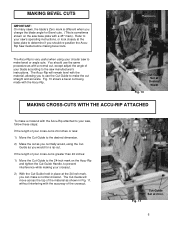
...closely at the base plate to the saw to prevent interference while making bevel cuts. You should re-position the AccuRip Saw Guide before making your crosscut. 2) With the Cut-Guide held in place at the 24-inch mark, you should use the Cut-Guide to the desired dimension. 2) Make ...cuts. (This is sometimes shown on the Accu-Rip and tighten the Cut-Guide Handle, to make the cut straight and accurate. The Accu-Rip is very useful when using the CutGuide as with the Accu-Rip attached to your circular saw manufacturer's instructions. The Accu-Rip will move across the top of your ...
...closely at the base plate to the saw to prevent interference while making bevel cuts. You should re-position the AccuRip Saw Guide before making your crosscut. 2) With the Cut-Guide held in place at the 24-inch mark, you should use the Cut-Guide to the desired dimension. 2) Make ...cuts. (This is sometimes shown on the Accu-Rip and tighten the Cut-Guide Handle, to make the cut straight and accurate. The Accu-Rip is very useful when using the CutGuide as with the Accu-Rip attached to your circular saw manufacturer's instructions. The Accu-Rip will move across the top of your ...
User Instructions
Page 7
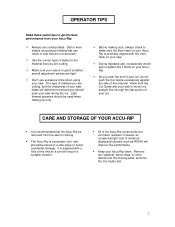
...place to make sure the Zero mark on your saw . It is supplied with the 'zero' mark on your AccuRip is a precision tool, and should push your saw to get the best performance from the Cut-Guide slot. 7 CARE AND STORAGE OF YOUR ACCU-RIP § It is recommended that you should ...be removed from the saw for storing. § The Accu-Rip is precisely aligned with a ...
...place to make sure the Zero mark on your saw . It is supplied with the 'zero' mark on your AccuRip is a precision tool, and should push your saw to get the best performance from the Cut-Guide slot. 7 CARE AND STORAGE OF YOUR ACCU-RIP § It is recommended that you should ...be removed from the saw for storing. § The Accu-Rip is precisely aligned with a ...
User Instructions
Page 8
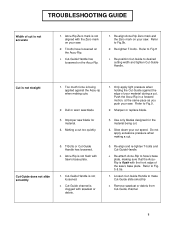
... sure that the AccuRip is not straight Cut-Guide does not slide smoothly 1. Refer to desired cutting width and tighten Cut-Guide Handle. Re-position Cut-Guide to Fig.5b. 2. TROUBLESHOOTING GUIDE Width of cut is not loosened. 2. T-bolts have loosened on the Accu-Rip. 1. Cut is flush with the Zero mark on your saw blade 3. Dull or...
... sure that the AccuRip is not straight Cut-Guide does not slide smoothly 1. Refer to desired cutting width and tighten Cut-Guide Handle. Re-position Cut-Guide to Fig.5b. 2. TROUBLESHOOTING GUIDE Width of cut is not loosened. 2. T-bolts have loosened on the Accu-Rip. 1. Cut is flush with the Zero mark on your saw blade 3. Dull or...


