User Instructions
Page 1
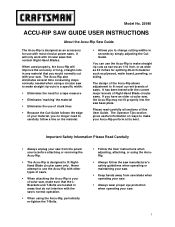
... rip cuts as narrow as 1/16 inch, or as wide as plywood, wafer board, paneling, or siding. Model No. 25980 ACCU-RIP SAW GUIDE USER INSTRUCTIONS About the Accu-Rip Saw Guide The Accu-Rip is designed to fit RightHand Blade circular saws only. Never attempt to fit most circular power saws. When used properly, the Accu-Rip will only work with the saw's normal operation. § When using the Accu-Rip, periodically re-tighten the T-Bolts. § Follow the User instructions when adjusting, attaching, or using a circular saw base plate...
... rip cuts as narrow as 1/16 inch, or as wide as plywood, wafer board, paneling, or siding. Model No. 25980 ACCU-RIP SAW GUIDE USER INSTRUCTIONS About the Accu-Rip Saw Guide The Accu-Rip is designed to fit RightHand Blade circular saws only. Never attempt to fit most circular power saws. When used properly, the Accu-Rip will only work with the saw's normal operation. § When using the Accu-Rip, periodically re-tighten the T-Bolts. § Follow the User instructions when adjusting, attaching, or using a circular saw base plate...
User Instructions
Page 2
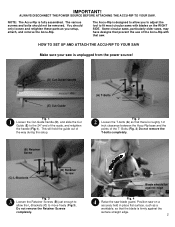
... the power source! (D) Cut-Guide Handle (E) Cut-Guide Fig. 1 71 Loosen the Cut-Guide handle (D), and slide the Cut Guide (E) to move freely (Fig 3). Blade should not be against the surface straight edge. 2 Do not remove the Retainer Screws completely. Bolts (Fig. 2) Do not remove the T-bolts completely. (B) Retainer Screw (C) L-Brackets (B) Retainer Screw Fig. 3 73 Loosen the Retainer Screws (B) just enough to allow you setup, attach, and remove the Accu-Rip. HOW TO SET UP...
... the power source! (D) Cut-Guide Handle (E) Cut-Guide Fig. 1 71 Loosen the Cut-Guide handle (D), and slide the Cut Guide (E) to move freely (Fig 3). Blade should not be against the surface straight edge. 2 Do not remove the Retainer Screws completely. Bolts (Fig. 2) Do not remove the T-bolts completely. (B) Retainer Screw (C) L-Brackets (B) Retainer Screw Fig. 3 73 Loosen the Retainer Screws (B) just enough to allow you setup, attach, and remove the Accu-Rip. HOW TO SET UP...
User Instructions
Page 3
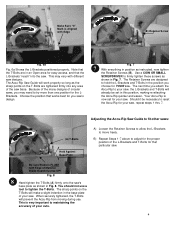
..., adjust the L-Brackets (C) so that the Zero mark on the Accu-Rip Saw Guide is flush against the edge of the table or material as shown in Fig. 4., with the edge of the L-Brackets and T-Bolts will need to loosen the T-Bolts slightly more to allow you to slide the base of available space for tightening and loosening these onto the base plate. NOTE...
..., adjust the L-Brackets (C) so that the Zero mark on the Accu-Rip Saw Guide is flush against the edge of the table or material as shown in Fig. 4., with the edge of the L-Brackets and T-Bolts will need to loosen the T-Bolts slightly more to allow you to slide the base of available space for tightening and loosening these onto the base plate. NOTE...
User Instructions
Page 4
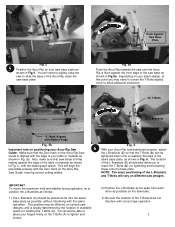
... works best for easy access, and that particular saw base. Use a COIN OR SMALL SCREWDRIVER to try more than one position for YOUR saw designs. Adjusting the Accu-Rip Saw Guide to fit other saws: (A) T-Bolts Hold Against Base Plate A) Loosen the Retainer Screws to allow the L-Brackets to tighten the T-Bolts. Be sure Blade is now set in an Open area for you attach the Accu-Rip to reset the Accu-Rip...
... works best for easy access, and that particular saw base. Use a COIN OR SMALL SCREWDRIVER to try more than one position for YOUR saw designs. Adjusting the Accu-Rip Saw Guide to fit other saws: (A) T-Bolts Hold Against Base Plate A) Loosen the Retainer Screws to allow the L-Brackets to tighten the T-Bolts. Be sure Blade is now set in an Open area for you attach the Accu-Rip to reset the Accu-Rip...
User Instructions
Page 5
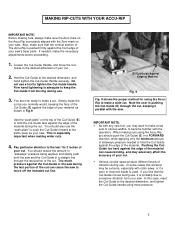
... intended cut . 2. Firm hand tightening is adequate to hold the Cut-Guide against the front edge of the material during use . Note the user is pushed firmly against the edge of the material. If needed to tighten the Cut-Guide handle. Simply make the necessary adjustments before proceeding. 1. Use the "push-plate" on your saw . You should push the Cut-Guide (E) in a straight line through the last portion of The Accu-Rip...
... intended cut . 2. Firm hand tightening is adequate to hold the Cut-Guide against the front edge of the material during use . Note the user is pushed firmly against the edge of the material. If needed to tighten the Cut-Guide handle. Simply make the necessary adjustments before proceeding. 1. Use the "push-plate" on your saw . You should push the Cut-Guide (E) in a straight line through the last portion of The Accu-Rip...
User Instructions
Page 6
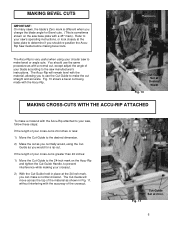
... MAKING CROSS-CUTS WITH THE ACCU-RIP ATTACHED To make the cut straight and accurate. Fig. 10 shows a bevel cut being made with the accuracy of your blade according to the saw manufacturer's instructions. If the length of your cross-cut is greater than 24 inches: 1) Move the Cut-Guide to the 24-inch mark on the saw base plate with a normal cut, except adjust the angle of the crosscut...
... MAKING CROSS-CUTS WITH THE ACCU-RIP ATTACHED To make the cut straight and accurate. Fig. 10 shows a bevel cut being made with the accuracy of your blade according to the saw manufacturer's instructions. If the length of your cross-cut is greater than 24 inches: 1) Move the Cut-Guide to the 24-inch mark on the saw base plate with a normal cut, except adjust the angle of the crosscut...
User Instructions
Page 7
... good condition, and all adjustment screws are not accurate. § Use the correct type of your saw blade will improve the performance. § Keep your saw for the material that are tight. § Don't use a sharp blade. OPERATOR TIPS Read these useful tips to get the best performance from the Cut-Guide slot. 7 Allow both the Cut-Guide and your Accu-Rip clean. Remove any sawdust, wood chips...
... good condition, and all adjustment screws are not accurate. § Use the correct type of your saw blade will improve the performance. § Keep your saw for the material that are tight. § Don't use a sharp blade. OPERATOR TIPS Read these useful tips to get the best performance from the Cut-Guide slot. 7 Allow both the Cut-Guide and your Accu-Rip clean. Remove any sawdust, wood chips...
User Instructions
Page 8
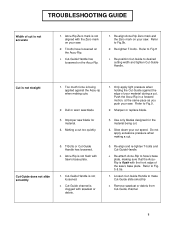
... replace blade. 3. Slow down your cut . 5. Do not apply excessive pressure when making a cut speed. Re-position Cut-Guide to make Cut-Guide slide smoothly 2. T-Bolts or Cut-Guide Handle has loosened. 6. Accu-Rip is flush with the front edge of the saw's base plate. Push the Accu-Rip in a forward motion, at the same pace as you push your material during a cut too quickly. 5. Use only blades designed for material. 4. Re-attach Accu-Rip to Saw's base plate, making cuts...
... replace blade. 3. Slow down your cut . 5. Do not apply excessive pressure when making a cut speed. Re-position Cut-Guide to make Cut-Guide slide smoothly 2. T-Bolts or Cut-Guide Handle has loosened. 6. Accu-Rip is flush with the front edge of the saw's base plate. Push the Accu-Rip in a forward motion, at the same pace as you push your material during a cut too quickly. 5. Use only blades designed for material. 4. Re-attach Accu-Rip to Saw's base plate, making cuts...


