HP Client Manager 6.1
Page 3
...computer individually. 3 With HPCM, SoftPaq installation can automatically and remotely update the BIOS on any client computer. HPCM can be configured to upgrade the BIOS firmware on the HPCM Server. With HPCM, the user can be downloaded to each client computer to select from the client ...security chip. You can use HPCM to change the BIOS settings, such as the Storage Options or the Boot Order, as new or missing PCs, memory, battery, disk drives, CPUs, and monitors. Normally, a SoftPaq would be used to happen automatically and remotely across all client computers. When...
...computer individually. 3 With HPCM, SoftPaq installation can automatically and remotely update the BIOS on any client computer. HPCM can be configured to upgrade the BIOS firmware on the HPCM Server. With HPCM, the user can be downloaded to each client computer to select from the client ...security chip. You can use HPCM to change the BIOS settings, such as the Storage Options or the Boot Order, as new or missing PCs, memory, battery, disk drives, CPUs, and monitors. Normally, a SoftPaq would be used to happen automatically and remotely across all client computers. When...
Hard Drive White Paper
Page 5
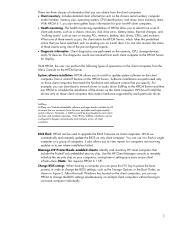
.../p /r commands to check your hard drive: - HP Recommendations for Notebook Users • Install HP Notebook LidSwitch Policy, or as an alternative, place the notebook into Standby mode before transporting it from one location to another. • Upgrade to the latest system BIOS, as given in the "F10 Setup Hard...for an extended period of time, e.g., when you are working in applications such as a word processor that executes primarily from electronic memory without having to access the hard drive very often. • Perform the Defrag operation periodically to optimize the reading and writing ...
.../p /r commands to check your hard drive: - HP Recommendations for Notebook Users • Install HP Notebook LidSwitch Policy, or as an alternative, place the notebook into Standby mode before transporting it from one location to another. • Upgrade to the latest system BIOS, as given in the "F10 Setup Hard...for an extended period of time, e.g., when you are working in applications such as a word processor that executes primarily from electronic memory without having to access the hard drive very often. • Perform the Defrag operation periodically to optimize the reading and writing ...
Compaq Evo Notebook N410c Series Hardware Guide
Page 5
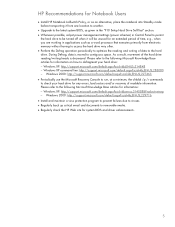
... to Wireless Devices 7-10 Connecting an Optional Cable Lock 7-10 8 Notebook Upgrades and Add-ons Before Removing or Installing Components 8-1 Upgrading Memory 8-2 Inserting and Removing a Memory Expansion Board 8-3 Upgrading or Adding a Modem or NIC 8-9 Adding and Using PC Cards 8-13 Configuring a PC Card 8-13 Inserting a PC Card 8-14 Removing a PC Card 8-15 Conserving Energy 8-16 Installing Additional Device Drivers 8-16...
... to Wireless Devices 7-10 Connecting an Optional Cable Lock 7-10 8 Notebook Upgrades and Add-ons Before Removing or Installing Components 8-1 Upgrading Memory 8-2 Inserting and Removing a Memory Expansion Board 8-3 Upgrading or Adding a Modem or NIC 8-9 Adding and Using PC Cards 8-13 Configuring a PC Card 8-13 Inserting a PC Card 8-14 Removing a PC Card 8-15 Conserving Energy 8-16 Installing Additional Device Drivers 8-16...
Compaq Evo Notebook N410c Series Hardware Guide
Page 68
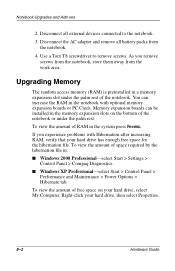
... rest. As you experience problems with optional memory expansion boards or PC Cards. Right-click your hard drive has enough free space for the hibernation file. Notebook Upgrades and Add-ons 2. Upgrading Memory The random access memory (RAM) is preinstalled in : ■ Windows 2000 Professional-select Start > Settings > Control Panel > Compaq Diagnostics. ■ Windows XP Professional-select Start...
... rest. As you experience problems with optional memory expansion boards or PC Cards. Right-click your hard drive has enough free space for the hibernation file. Notebook Upgrades and Add-ons 2. Upgrading Memory The random access memory (RAM) is preinstalled in : ■ Windows 2000 Professional-select Start > Settings > Control Panel > Compaq Diagnostics. ■ Windows XP Professional-select Start...
Compaq Evo Notebook N410c Series Hardware Guide
Page 69
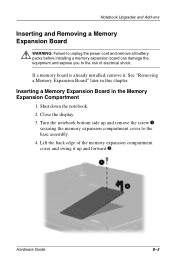
... Board in this chapter. Close the display. 3. If a memory board is already installed, remove it up and remove the screw 1 securing the memory expansion compartment cover to the risk of the memory expansion compartment cover and swing it . Notebook Upgrades and Add-ons Inserting and Removing a Memory Expansion Board Å WARNING: Failure to unplug the power...
... Board in this chapter. Close the display. 3. If a memory board is already installed, remove it up and remove the screw 1 securing the memory expansion compartment cover to the risk of the memory expansion compartment cover and swing it . Notebook Upgrades and Add-ons Inserting and Removing a Memory Expansion Board Å WARNING: Failure to unplug the power...
Compaq Evo Notebook N410c Series Hardware Guide
Page 70
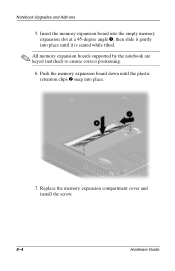
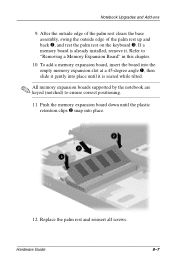
Notebook Upgrades and Add-ons 5. Insert the memory expansion board into the empty memory expansion slot at a 45-degree angle 1, then slide it gently into place. 7. Push the memory expansion board down until the plastic retention clips 2 snap into place until it is seated while tilted. ✎ All memory expansion boards supported by the notebook are keyed (notched) to ensure correct positioning. 6. Replace the memory expansion compartment cover and install the screw. 8-4 Hardware Guide
Notebook Upgrades and Add-ons 5. Insert the memory expansion board into the empty memory expansion slot at a 45-degree angle 1, then slide it gently into place. 7. Push the memory expansion board down until the plastic retention clips 2 snap into place until it is seated while tilted. ✎ All memory expansion boards supported by the notebook are keyed (notched) to ensure correct positioning. 6. Replace the memory expansion compartment cover and install the screw. 8-4 Hardware Guide
Compaq Evo Notebook N410c Series Hardware Guide
Page 71
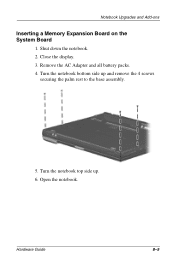
Hardware Guide 8-5 Turn the notebook bottom side up . 6. Remove the AC Adapter and all battery packs. 4. Close the display. 3. Open the notebook. Notebook Upgrades and Add-ons Inserting a Memory Expansion Board on the System Board 1. Turn the notebook top side up and remove the 4 screws securing the palm rest to the base assembly. 5. Shut down the notebook. 2.
Hardware Guide 8-5 Turn the notebook bottom side up . 6. Remove the AC Adapter and all battery packs. 4. Close the display. 3. Open the notebook. Notebook Upgrades and Add-ons Inserting a Memory Expansion Board on the System Board 1. Turn the notebook top side up and remove the 4 screws securing the palm rest to the base assembly. 5. Shut down the notebook. 2.
Compaq Evo Notebook N410c Series Hardware Guide
Page 73
... is seated while tilted. ✎ All memory expansion boards supported by the notebook are keyed (notched) to "Removing a Memory Expansion Board" in this chapter. 10. To add a memory expansion board, insert the board into the empty memory expansion slot at a 45-degree angle 1, then slide it gently into place. 12. ... outside edge of the palm rest up and back 2, and rest the palm rest on the keyboard 3. Hardware Guide 8-7 Push the memory expansion board down until the plastic retention clips 2 snap into place until it is already installed, remove it. Notebook Upgrades and Add-ons 9.
... is seated while tilted. ✎ All memory expansion boards supported by the notebook are keyed (notched) to "Removing a Memory Expansion Board" in this chapter. 10. To add a memory expansion board, insert the board into the empty memory expansion slot at a 45-degree angle 1, then slide it gently into place. 12. ... outside edge of the palm rest up and back 2, and rest the palm rest on the keyboard 3. Hardware Guide 8-7 Push the memory expansion board down until the plastic retention clips 2 snap into place until it is already installed, remove it. Notebook Upgrades and Add-ons 9.
Compaq Evo Notebook N410c Series Hardware Guide
Page 74
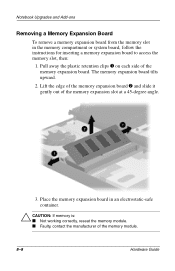
... 2 and slide it gently out of the memory module. 8-8 Hardware Guide Place the memory expansion board in the memory compartment or system board, follow the instructions for inserting a memory expansion board to access the memory slot, then: 1. Notebook Upgrades and Add-ons Removing a Memory Expansion Board To remove a memory expansion board from the memory slot in an electrostatic-safe container...
... 2 and slide it gently out of the memory module. 8-8 Hardware Guide Place the memory expansion board in the memory compartment or system board, follow the instructions for inserting a memory expansion board to access the memory slot, then: 1. Notebook Upgrades and Add-ons Removing a Memory Expansion Board To remove a memory expansion board from the memory slot in an electrostatic-safe container...
Compaq Evo Notebook N410c Series Hardware Guide
Page 79
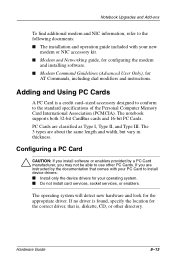
...and width, but vary in thickness. Configuring a PC Card Ä CAUTION: If you may not be able to the standard specifications of the Personal Computer Memory Card International Association (PCMCIA). Hardware Guide 8-13 Notebook Upgrades and Add-ons To find additional modem and NIC... information, refer to the following documents: ■ The installation and operation guide included with your PC Card to install device drivers...
...and width, but vary in thickness. Configuring a PC Card Ä CAUTION: If you may not be able to the standard specifications of the Personal Computer Memory Card International Association (PCMCIA). Hardware Guide 8-13 Notebook Upgrades and Add-ons To find additional modem and NIC... information, refer to the following documents: ■ The installation and operation guide included with your PC Card to install device drivers...
Compaq Evo Notebook N410c Series Hardware Guide
Page 82
... you need are preinstalled by Compaq. ✎ To save available memory, some device drivers are not being used. The other PC Card software that is provided by the manufacturer, even if prompted to run a particular PC Card. Some types of your notebook, they draw power from working...Do not install other software may prevent the notebook from the system even when they are not turned on. Installing Additional Device Drivers Device drivers are not in use. Notebook Upgrades and Add-ons Conserving Energy When PC Cards are installed in your PC Cards. 8-16 Hardware Guide
... you need are preinstalled by Compaq. ✎ To save available memory, some device drivers are not being used. The other PC Card software that is provided by the manufacturer, even if prompted to run a particular PC Card. Some types of your notebook, they draw power from working...Do not install other software may prevent the notebook from the system even when they are not turned on. Installing Additional Device Drivers Device drivers are not in use. Notebook Upgrades and Add-ons Conserving Energy When PC Cards are installed in your PC Cards. 8-16 Hardware Guide

Compaq Evo Notebook N410c Series Hardware Guide
Page 89
...hotkeys Quick Reference 3-2 I IDE drive light 2-3 infrared devices configuration guidelines 7-4 connecting 7-3 infrared port 2-6 installation device drivers 8-16 memory 8-9 NIC 8-9 PC Cards 8-13 Internet destinations, assigning Easy Access buttons to 3-9 Internet Setup wizard 3-9 J jack headphones, headset (optional) 2-5, 6-2 ..., resolving 4-3 Lucent/Agere Command Set 2-12 M memory compartment cover 2-9 memory expansion board inserting 8-3 installing 8-5 removing 8-8 upgrading 8-2 microphone, external (optional) connecting 6-3 jack 2-5, 6-2 microphone, internal 2-3, 6-2 Hardware Guide Index-3
...hotkeys Quick Reference 3-2 I IDE drive light 2-3 infrared devices configuration guidelines 7-4 connecting 7-3 infrared port 2-6 installation device drivers 8-16 memory 8-9 NIC 8-9 PC Cards 8-13 Internet destinations, assigning Easy Access buttons to 3-9 Internet Setup wizard 3-9 J jack headphones, headset (optional) 2-5, 6-2 ..., resolving 4-3 Lucent/Agere Command Set 2-12 M memory compartment cover 2-9 memory expansion board inserting 8-3 installing 8-5 removing 8-8 upgrading 8-2 microphone, external (optional) connecting 6-3 jack 2-5, 6-2 microphone, internal 2-3, 6-2 Hardware Guide Index-3

