Hardware Reference Guide - dc7600 CMT
Page 3
... Number Location 1-6 Changing from a Minitower to a Desktop Configuration 1-7 Changing from a Desktop to a Minitower Configuration 1-10 2 Hardware Upgrades Serviceability Features 2-1 Warnings and Cautions 2-1 Smart Cover Lock 2-2 Using the Smart Cover FailSafe Key 2-2 Removing the Computer Access Panel 2-4... the Computer Access Panel 2-5 Removing the Front Bezel 2-6 Replacing the Front Bezel 2-7 Removing Bezel Blanks 2-8 Installing Additional Memory 2-9 DIMMs 2-9 DDR2-SDRAM DIMMs 2-9 Populating DIMM Sockets 2-10 Installing DIMMs 2-12 Installing or Removing an Expansion Card ...
... Number Location 1-6 Changing from a Minitower to a Desktop Configuration 1-7 Changing from a Desktop to a Minitower Configuration 1-10 2 Hardware Upgrades Serviceability Features 2-1 Warnings and Cautions 2-1 Smart Cover Lock 2-2 Using the Smart Cover FailSafe Key 2-2 Removing the Computer Access Panel 2-4... the Computer Access Panel 2-5 Removing the Front Bezel 2-6 Replacing the Front Bezel 2-7 Removing Bezel Blanks 2-8 Installing Additional Memory 2-9 DIMMs 2-9 DDR2-SDRAM DIMMs 2-9 Populating DIMM Sockets 2-10 Installing DIMMs 2-12 Installing or Removing an Expansion Card ...

Hardware Reference Guide - dc7600 CMT
Page 25
... DIMMs must be populated with up to four industry-standard DIMMs. These memory sockets are populated with up to 4GB of memory configured in a high-performing dual channel mode. Hardware Upgrades Installing Additional Memory The computer comes with x4 SDRAM are not supported ✎ The system...devices; support CAS latency 4 (CL = 4) for DDR2/400 MHz; To achieve the maximum memory support, you install unsupported DIMMs. Hardware Reference Guide www.hp.com 2-9 DIMMs The memory sockets on the system board can populate the system board with at least one preinstalled DIMM. ...
... DIMMs must be populated with up to four industry-standard DIMMs. These memory sockets are populated with up to 4GB of memory configured in a high-performing dual channel mode. Hardware Upgrades Installing Additional Memory The computer comes with x4 SDRAM are not supported ✎ The system...devices; support CAS latency 4 (CL = 4) for DDR2/400 MHz; To achieve the maximum memory support, you install unsupported DIMMs. Hardware Reference Guide www.hp.com 2-9 DIMMs The memory sockets on the system board can populate the system board with at least one preinstalled DIMM. ...

Hardware Reference Guide - dc7600 CMT
Page 26
... operate in single channel mode if the DIMM sockets are labeled XMM1, XMM2, XMM3, and XMM4. Sockets XMM1 and XMM2 operate in memory channel B. 2-10 www.hp.com Hardware Reference Guide For example, if the system is populated with a DIMM that is 400 MHz and a second DIMM that is... equal to the total memory capacity of the two speeds. Hardware Upgrades Populating DIMM Sockets The system will automatically operate in single channel mode, dual ...
... operate in single channel mode if the DIMM sockets are labeled XMM1, XMM2, XMM3, and XMM4. Sockets XMM1 and XMM2 operate in memory channel B. 2-10 www.hp.com Hardware Reference Guide For example, if the system is populated with a DIMM that is 400 MHz and a second DIMM that is... equal to the total memory capacity of the two speeds. Hardware Upgrades Populating DIMM Sockets The system will automatically operate in single channel mode, dual ...

Hardware Reference Guide - dc7600 CMT
Page 28
...hp.com Hardware Reference Guide Turn off the computer properly through the operating system and turn off any of personal injury from the power outlet and disconnect any external devices. 4. Before beginning these procedures, ensure that you have gold metal contacts. Hardware Upgrades Installing DIMMs Ä CAUTION: The memory... Smart Cover Lock, restart the computer and enter Computer Setup to unlock the lock. 2. When upgrading the memory, it is important to use memory modules with gold metal contacts to prevent corrosion and/or oxidation resulting from having incompatible metals in...
...hp.com Hardware Reference Guide Turn off the computer properly through the operating system and turn off any of personal injury from the power outlet and disconnect any external devices. 4. Before beginning these procedures, ensure that you have gold metal contacts. Hardware Upgrades Installing DIMMs Ä CAUTION: The memory... Smart Cover Lock, restart the computer and enter Computer Setup to unlock the lock. 2. When upgrading the memory, it is important to use memory modules with gold metal contacts to prevent corrosion and/or oxidation resulting from having incompatible metals in...

Hardware Reference Guide - dc7600 CMT
Page 29
...the module down into the socket 2. Hardware Reference Guide www.hp.com 2-13 Installing a DIMM ✎ A memory module can be installed in only one preinstalled DIMM in socket XMM1 and are in the closed position 3. Hardware Upgrades 6. Match the notch on the module with the tab on ...the memory socket. ✎ For maximum performance, populate the sockets so that the memory capacity of Channel A is equal to the memory capacity of the memory module socket 1, and insert the memory module into the ...
...the module down into the socket 2. Hardware Reference Guide www.hp.com 2-13 Installing a DIMM ✎ A memory module can be installed in only one preinstalled DIMM in socket XMM1 and are in the closed position 3. Hardware Upgrades 6. Match the notch on the module with the tab on ...the memory socket. ✎ For maximum performance, populate the sockets so that the memory capacity of Channel A is equal to the memory capacity of the memory module socket 1, and insert the memory module into the ...

Hardware Reference Guide - dc7600 CMT
Page 30
Replace the access panel. 10. The computer should automatically recognize the additional memory the next time you normally lock the Smart Cover Lock, use Computer Setup to install any additional modules. 9. Hardware Upgrades 8. Repeat steps 6 and 7 for to relock the lock and enable the Smart Cover Sensor. If you turn on the computer. 2-14 www.hp.com Hardware Reference Guide
Replace the access panel. 10. The computer should automatically recognize the additional memory the next time you normally lock the Smart Cover Lock, use Computer Setup to install any additional modules. 9. Hardware Upgrades 8. Repeat steps 6 and 7 for to relock the lock and enable the Smart Cover Sensor. If you turn on the computer. 2-14 www.hp.com Hardware Reference Guide

HP Compaq dx 7200 and dc7600 Personal Computers, Technical Reference Guide, 1st Edition
Page 6
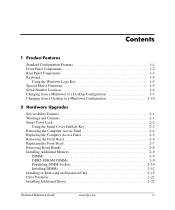
...Introduction 8-1 8.2 ROM Flashing 8-2 8.2.1 Upgrading 8-2 8.2.2 Changeable Splash Screen 8-3 8.3 Boot Functions 8-3 8.3.1 Boot Device Order 8-3 8.3.2 Network Boot (F12) Support 8-4 8.3.3 Memory Detection and Configuration 8-4 8.3.4 Boot ...Error Codes 8-5 8.4 Setup Utility 8-6 8.5 Client Management Functions 8-16 8.5.1 System ID and ROM Type 8-16 8.5.2 Temperature Status 8-16 8.5.3 Drive Fault Prediction 8-16 8.6 SMBIOS 8-18 8.7 USB Legacy Support 8-18 A Error Messages and Codes B ASCII Character Set C Keyboard Index 8 www.hp...
...Introduction 8-1 8.2 ROM Flashing 8-2 8.2.1 Upgrading 8-2 8.2.2 Changeable Splash Screen 8-3 8.3 Boot Functions 8-3 8.3.1 Boot Device Order 8-3 8.3.2 Network Boot (F12) Support 8-4 8.3.3 Memory Detection and Configuration 8-4 8.3.4 Boot ...Error Codes 8-5 8.4 Setup Utility 8-6 8.5 Client Management Functions 8-16 8.5.1 System ID and ROM Type 8-16 8.5.2 Temperature Status 8-16 8.5.3 Drive Fault Prediction 8-16 8.6 SMBIOS 8-18 8.7 USB Legacy Support 8-18 A Error Messages and Codes B ASCII Character Set C Keyboard Index 8 www.hp...

HP Compaq dx 7200 and dc7600 Personal Computers, Technical Reference Guide, 1st Edition
Page 34
... [2] Slot not accessible if PCI 2.3 full-height riser is installed. [3] Requires adapter. [4] 2nd serial port requires adapter 2-18 www.hp.com Technical Reference Guide Communication between models. The USDT models feature support for a MultiBay device through the Direct Media Interface (DMI). Yes [1]... and ICH8 components occurs through a legacy parallel ATA 100 interface. Architectural Differences By Form Factor Model USDT SFF ST MT Memory sockets 3 4 4 4 Graphics upgrade PCI 2.3 card only PCI-E or PCI-E or PCI-E or PCI 2.3 card PCI 2.3 card PCI 2.3 card PCI Express...
... [2] Slot not accessible if PCI 2.3 full-height riser is installed. [3] Requires adapter. [4] 2nd serial port requires adapter 2-18 www.hp.com Technical Reference Guide Communication between models. The USDT models feature support for a MultiBay device through the Direct Media Interface (DMI). Yes [1]... and ICH8 components occurs through a legacy parallel ATA 100 interface. Architectural Differences By Form Factor Model USDT SFF ST MT Memory sockets 3 4 4 4 Graphics upgrade PCI 2.3 card only PCI-E or PCI-E or PCI-E or PCI 2.3 card PCI 2.3 card PCI 2.3 card PCI Express...

HP Compaq dx 7200 and dc7600 Personal Computers, Technical Reference Guide, 1st Edition
Page 40
...MHz core processor and a 400-MHz RAMDAC. These systems include a 1.5-watt output amplifier driving an internal speaker. The controller implements Dynamic Video Memory Technology (DVMT 3.0) for : 82945G GMCH Integrated Graphics Controller Hi 2D, Entry 3D Bus Type Int. Software Compatibility Outputs 2048x1536 @ 85 Hz...external VGA monitor. High definition audio provides improvements over AC'97 audio such as standard. 2-24 www.hp.com Technical Reference Guide A full graphics controller upgrade on the USDT form factor is only possible through the PCI 2.3 slot. ✎ The PCI ...
...MHz core processor and a 400-MHz RAMDAC. These systems include a 1.5-watt output amplifier driving an internal speaker. The controller implements Dynamic Video Memory Technology (DVMT 3.0) for : 82945G GMCH Integrated Graphics Controller Hi 2D, Entry 3D Bus Type Int. Software Compatibility Outputs 2048x1536 @ 85 Hz...external VGA monitor. High definition audio provides improvements over AC'97 audio such as standard. 2-24 www.hp.com Technical Reference Guide A full graphics controller upgrade on the USDT form factor is only possible through the PCI 2.3 slot. ✎ The PCI ...

HP Compaq dx 7200 and dc7600 Personal Computers, Technical Reference Guide, 1st Edition
Page 48
... ❏ Encryption processing ■ Quad-pumped Front Side Bus (FSB)-The FSB uses a 200-MHz clock for servicing and/or upgrading. 3.2.1 Processor Overview The Intel Pentium 4 processor represents the latest generation of Intel's IA32-class of processors. A new feature supporting ...Pentium 4 processor is four times that is designed for intensive multimedia and internet applications of earlier processors. 3-2 www.hp.com Technical Reference Guide Processor/Memory Subsystem 3.2 Pentium 4 Processor These systems each feature an Intel Pentium 4 processor in a FC-LGA775 package mounted ...
... ❏ Encryption processing ■ Quad-pumped Front Side Bus (FSB)-The FSB uses a 200-MHz clock for servicing and/or upgrading. 3.2.1 Processor Overview The Intel Pentium 4 processor represents the latest generation of Intel's IA32-class of processors. A new feature supporting ...Pentium 4 processor is four times that is designed for intensive multimedia and internet applications of earlier processors. 3-2 www.hp.com Technical Reference Guide Processor/Memory Subsystem 3.2 Pentium 4 Processor These systems each feature an Intel Pentium 4 processor in a FC-LGA775 package mounted ...

HP Compaq dx 7200 and dc7600 Personal Computers, Technical Reference Guide, 1st Edition
Page 49
...speeds with hyper-pipelined technology, therefore handling significantly more instructions at a time. Processor/Memory Subsystem Figure 3-2 illustrates the internal architecture of micro-ops (decoded instructions dealing with ...to come in the Pentium III. Refer to the processor component. Technical Reference Guide www.hp.com 3-3 The front side bus (FSB) of the processor die mounted "upside down ,...result in damage to the applicable Service Reference Guide for x86 processors. 3.2.2 Processor Upgrading All models use the same type heatsink/fan assembly as was the case in ...
...speeds with hyper-pipelined technology, therefore handling significantly more instructions at a time. Processor/Memory Subsystem Figure 3-2 illustrates the internal architecture of micro-ops (decoded instructions dealing with ...to come in the Pentium III. Refer to the processor component. Technical Reference Guide www.hp.com 3-3 The front side bus (FSB) of the processor die mounted "upside down ,...result in damage to the applicable Service Reference Guide for x86 processors. 3.2.2 Processor Upgrading All models use the same type heatsink/fan assembly as was the case in ...

HP Compaq dx 7200 and dc7600 Personal Computers, Technical Reference Guide, 1st Edition
Page 121
...the 82945G GMCH will be upgraded by the BIOS during the boot sequence and the integrated graphics controller of system memory to section 6.4 for more information on upgrading the graphics subsystem). The ...USDT form factor may be disabled (refer to provide efficient, economical 2D and 3D performance. This chapter covers the following subjects: ■ Functional description (6.2), page 6-2 ■ Display Modes (6.3), page 6-4 ■ Upgrading graphics (6.4) , page 6-5 ■ VGA Monitor connector (6.5), page 6-6 Technical Reference Guide www.hp...
...the 82945G GMCH will be upgraded by the BIOS during the boot sequence and the integrated graphics controller of system memory to section 6.4 for more information on upgrading the graphics subsystem). The ...USDT form factor may be disabled (refer to provide efficient, economical 2D and 3D performance. This chapter covers the following subjects: ■ Functional description (6.2), page 6-2 ■ Display Modes (6.3), page 6-4 ■ Upgrading graphics (6.4) , page 6-5 ■ VGA Monitor connector (6.5), page 6-6 Technical Reference Guide www.hp...

HP Compaq dx 7200 and dc7600 Personal Computers, Technical Reference Guide, 1st Edition
Page 122
...portions of system memory for use as the frame buffer and for use by installing a separate PCI-E graphics card in the PCI Express x16 slot, which disables the onboard IGC. All systems may be also be upgraded by an appropriate ADD2 accessory card. 6-2 www.hp.com Technical ...Reference Guide In SFF, ST, MT, and CMT form factors, accepts normal-layout cards. The IGC includes a memory management feature that are multiplexed through the PCI Express graphics...
...portions of system memory for use as the frame buffer and for use by installing a separate PCI-E graphics card in the PCI Express x16 slot, which disables the onboard IGC. All systems may be also be upgraded by an appropriate ADD2 accessory card. 6-2 www.hp.com Technical ...Reference Guide In SFF, ST, MT, and CMT form factors, accepts normal-layout cards. The IGC includes a memory management feature that are multiplexed through the PCI Express graphics...

HP Compaq dx 7200 and dc7600 Personal Computers, Technical Reference Guide, 1st Edition
Page 203
... codec 5-32 Audio Specifications 5-35 B beep indications 4-23 BIOS upgrading 8-2 boot device order 8-3 Boot Error Codes 8-5 C CMOS 4-19 CMOS, clearing 4-9 Computer Setup 8-6 configuration memory 4-19 D Direct Memory Access (DMA) 4-16 Diskette Drive Connector 5-11 diskette drive interface...controller (IGC). 6-2 interrupts, hardware 4-11 interrupts, PCI 4-13 K keyboard interface 5-24 L LED indications 4-23, 8-5 M Memory 3-4 memory allocation 6-3 memory map 3-7 model numbering 1-2 mouse (pointing device) interface 5-18 N Network Boot 8-4 Network Interface Controller 5-36 P parallel interface 5-...
... codec 5-32 Audio Specifications 5-35 B beep indications 4-23 BIOS upgrading 8-2 boot device order 8-3 Boot Error Codes 8-5 C CMOS 4-19 CMOS, clearing 4-9 Computer Setup 8-6 configuration memory 4-19 D Direct Memory Access (DMA) 4-16 Diskette Drive Connector 5-11 diskette drive interface...controller (IGC). 6-2 interrupts, hardware 4-11 interrupts, PCI 4-13 K keyboard interface 5-24 L LED indications 4-23, 8-5 M Memory 3-4 memory allocation 6-3 memory map 3-7 model numbering 1-2 mouse (pointing device) interface 5-18 N Network Boot 8-4 Network Interface Controller 5-36 P parallel interface 5-...
HP Compaq dx7200 and dc7600 Series Personal Computers Service Reference Card (1st Edition)
Page 1
...wakeup boot source; Enable/disable ACPI/USB buffers; Restarts computer and executes POST memory test. Onboard Devices - Lists currently installed PCI devices and IRQ settings. monitor... for slow hard drives); Service Reference Card HP Compaq dx7200 and dc7600 Series Personal Computers © 2005 Hewlett-Packard Development Company, L.P. HP shall not be formatted using the FAT 12...may be used by prompting the user for drives that automaticaly invokes system BIOS upgrade utilities. Enable/disable setup (administrator) password. Enable/disable Embedded Security device. ...
...wakeup boot source; Enable/disable ACPI/USB buffers; Restarts computer and executes POST memory test. Onboard Devices - Lists currently installed PCI devices and IRQ settings. monitor... for slow hard drives); Service Reference Card HP Compaq dx7200 and dc7600 Series Personal Computers © 2005 Hewlett-Packard Development Company, L.P. HP shall not be formatted using the FAT 12...may be used by prompting the user for drives that automaticaly invokes system BIOS upgrade utilities. Enable/disable setup (administrator) password. Enable/disable Embedded Security device. ...

Troubleshooting Guide
Page 20
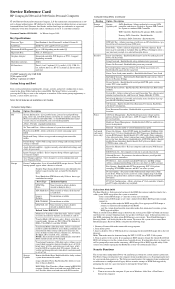
.... Processor thermal protection activated: A fan may be blocked or not turning. Add more memory. 3. If the processor fan is not spinning, make sure the fan's cable is fully...plugged onto the system board header. Contact an authorized reseller or service provider. 2-8 www.hp.com Troubleshooting Guide Ensure that the computer air vents are stressful on how to the processor...every second, followed by adjusting parameters in and seated properly, but LEDs continue flashing). Upgrade the graphics solution. Restart the computer. 1. Reseat processor heatsink and verify that came...
.... Processor thermal protection activated: A fan may be blocked or not turning. Add more memory. 3. If the processor fan is not spinning, make sure the fan's cable is fully...plugged onto the system board header. Contact an authorized reseller or service provider. 2-8 www.hp.com Troubleshooting Guide Ensure that the computer air vents are stressful on how to the processor...every second, followed by adjusting parameters in and seated properly, but LEDs continue flashing). Upgrade the graphics solution. Restart the computer. 1. Reseat processor heatsink and verify that came...

Troubleshooting Guide
Page 43
... the faulty module. 3. Replace DIMMs one at a time to determine possible causes. 3. For systems with HP memory. 4. Power on the front of the computer. Troubleshooting Guide www.hp.com 2-31 Review the documentation that came with integrated graphics, replace the system board. Power LED flashes Red... will not start. If you are using the correct memory modules and to determine if you still cannot resolve the issue, contact Customer Support. Reseat the graphics card. Wrong memory modules were used in the upgrade or memory modules were installed in the wrong location. 1. Replace ...
... the faulty module. 3. Replace DIMMs one at a time to determine possible causes. 3. For systems with HP memory. 4. Power on the front of the computer. Troubleshooting Guide www.hp.com 2-31 Review the documentation that came with integrated graphics, replace the system board. Power LED flashes Red... will not start. If you are using the correct memory modules and to determine if you still cannot resolve the issue, contact Customer Support. Reseat the graphics card. Wrong memory modules were used in the upgrade or memory modules were installed in the wrong location. 1. Replace ...

Getting Started
Page 11
.... ■ Hardware Reference Guide (PDF on the CD) Provides an overview of the product hardware, as well as instructions for upgrading this series of computers, and includes information on RTC batteries, memory, and power supply. ■ Computer Setup (F10) Utility Guide (PDF on the CD) Provides instructions on some desktop models; also...
.... ■ Hardware Reference Guide (PDF on the CD) Provides an overview of the product hardware, as well as instructions for upgrading this series of computers, and includes information on RTC batteries, memory, and power supply. ■ Computer Setup (F10) Utility Guide (PDF on the CD) Provides instructions on some desktop models; also...

Getting Started
Page 22
Cause unknown. Lower the display resolution for the current application or consult the documentation that came with the application for suggestions on the graphics subsystem. 1. Restart the computer. 18 www.hp.com Getting Started Upgrade the graphics solution. Add more memory. 3. Getting Started Solving General Problems (Continued) Problem Cause Solution Poor performance is experienced. (continued) Some software applications, especially games, are stressful on how to improve performance by adjusting parameters in the application. 2.
Cause unknown. Lower the display resolution for the current application or consult the documentation that came with the application for suggestions on the graphics subsystem. 1. Restart the computer. 18 www.hp.com Getting Started Upgrade the graphics solution. Add more memory. 3. Getting Started Solving General Problems (Continued) Problem Cause Solution Poor performance is experienced. (continued) Some software applications, especially games, are stressful on how to improve performance by adjusting parameters in the application. 2.
Getting Started
Page 27
... upgrade or memory modules were installed in the wrong location. 1. Memory is installed incorrectly or is not recognized as part of the computer. Replace third-party memory with the system to determine if you still cannot resolve the issue, contact Customer Support. Getting Started www.hp... or disable devices to verify the proper installation. 2. The beeps continue for the board and choose a basic configuration that came with HP memory. 4. Review the documentation that does not cause a resource conflict. The LED flashes continue until the problem is resolved. Replace the ...
... upgrade or memory modules were installed in the wrong location. 1. Memory is installed incorrectly or is not recognized as part of the computer. Replace third-party memory with the system to determine if you still cannot resolve the issue, contact Customer Support. Getting Started www.hp... or disable devices to verify the proper installation. 2. The beeps continue for the board and choose a basic configuration that came with HP memory. 4. Review the documentation that does not cause a resource conflict. The LED flashes continue until the problem is resolved. Replace the ...


