User Guide
Page 2
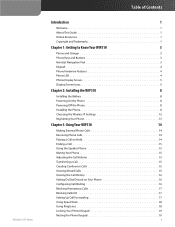
... Know Your WIP310 3 Phone and Charger 3 Phone Keys and Buttons 3 Handset Navigation Pad 3 Keypad 4 Phone Hardware Features 4 Phone LED 4 Phone Display Screen 5 Display Screen Icons 5 Chapter 2: Installing the WIP310 8 Installing the Battery 8 Powering On the Phone 8 Powering Off the Phone 8 Installing the Phone 8 Choosing the Wireless IP Settings 12 Registering Your Phone 13 Chapter 3: Using Your WIP310 14 Making External Phone Calls 14...
... Know Your WIP310 3 Phone and Charger 3 Phone Keys and Buttons 3 Handset Navigation Pad 3 Keypad 4 Phone Hardware Features 4 Phone LED 4 Phone Display Screen 5 Display Screen Icons 5 Chapter 2: Installing the WIP310 8 Installing the Battery 8 Powering On the Phone 8 Powering Off the Phone 8 Installing the Phone 8 Choosing the Wireless IP Settings 12 Registering Your Phone 13 Chapter 3: Using Your WIP310 14 Making External Phone Calls 14...
User Guide
Page 3
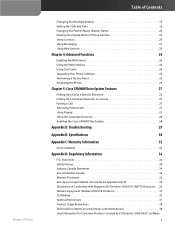
... Chapter 4: Advanced Functions 24 Enabling the Web Server 24 Using the Web Interface 24 Using Star Codes 24 Upgrading Your Phone Software 25 Performing a Factory Reset 25 Restarting the Phone 26 Chapter 5: Cisco SPA9000 Voice System Features 27 Picking Up a Call at a Specific Extension 27 Picking Up a Call at an Extension in a Group...
... Chapter 4: Advanced Functions 24 Enabling the Web Server 24 Using the Web Interface 24 Using Star Codes 24 Upgrading Your Phone Software 25 Performing a Factory Reset 25 Restarting the Phone 26 Chapter 5: Cisco SPA9000 Voice System Features 27 Picking Up a Call at a Specific Extension 27 Picking Up a Call at an Extension in a Group...

User Guide
Page 4
Table of Contents Electric and Electronic Equipment (WEEE 39 Appendix E: Software License Agreement 43 Software in Linksys Products 43 Software Licenses 43 Wireless-G IP Phone iii
Table of Contents Electric and Electronic Equipment (WEEE 39 Appendix E: Software License Agreement 43 Software in Linksys Products 43 Software Licenses 43 Wireless-G IP Phone iii

User Guide
Page 5
... features require Internet Telephone Service Provider (ITSP) integration and support. Cisco Small Business Pro IP Phone Family The Cisco WIP310 IP phone is compatible with the Cisco SPA9000 Voice System to provide wireless IP phone service in a home office or small office environment. For travel, the Cisco WIP310 provides phone service wherever wireless networks are not compatible with your property...
... features require Internet Telephone Service Provider (ITSP) integration and support. Cisco Small Business Pro IP Phone Family The Cisco WIP310 IP phone is compatible with the Cisco SPA9000 Voice System to provide wireless IP phone service in a home office or small office environment. For travel, the Cisco WIP310 provides phone service wherever wireless networks are not compatible with your property...
User Guide
Page 6
...CCNA, CCNP, CCSP, CCVP, Cisco, the Cisco Certified Internetwork Expert logo, Cisco IOS, Cisco Press, Cisco Systems, Cisco Systems Capital, the Cisco Systems logo, Cisco Unity, Collaboration Without Limitation, ...Cisco Lumin, Cisco Nexus, Cisco StadiumVision, Cisco TelePresence, the Cisco logo, DCE, and Welcome to Increase Your Internet Quotient, TransPath, WebEx, and the WebEx logo are service marks; and/or its affiliates in this document or Website are trademarks; All other trademarks mentioned in the United States and certain other company. (0807R) Introduction Wireless-G IP Phone...
...CCNA, CCNP, CCSP, CCVP, Cisco, the Cisco Certified Internetwork Expert logo, Cisco IOS, Cisco Press, Cisco Systems, Cisco Systems Capital, the Cisco Systems logo, Cisco Unity, Collaboration Without Limitation, ...Cisco Lumin, Cisco Nexus, Cisco StadiumVision, Cisco TelePresence, the Cisco logo, DCE, and Welcome to Increase Your Internet Quotient, TransPath, WebEx, and the WebEx logo are service marks; and/or its affiliates in this document or Website are trademarks; All other trademarks mentioned in the United States and certain other company. (0807R) Introduction Wireless-G IP Phone...
User Guide
Page 7
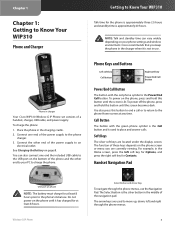
To charge the phone: 1. Getting to Know Your WIP310 Talk time for at least 8 hours prior to the phone's initial use the Navigation Pad. You also press this button until the screen becomes dark. Connect the other end to your phone settings and wireless environment. NOTE... on the bottom of the phone and the other end of a handset, charger, USB cable, and power supply. Cisco recommends that you are currently viewing. Chapter 1 Chapter 1: Getting to Know Your WIP310 Phone and Charger Phone in charger Your Cisco WIP310 Wireless-G IP Phone set consists of the power supply...
To charge the phone: 1. Getting to Know Your WIP310 Talk time for at least 8 hours prior to the phone's initial use the Navigation Pad. You also press this button until the screen becomes dark. Connect the other end to your phone settings and wireless environment. NOTE... on the bottom of the phone and the other end of a handset, charger, USB cable, and power supply. Cisco recommends that you are currently viewing. Chapter 1 Chapter 1: Getting to Know Your WIP310 Phone and Charger Phone in charger Your Cisco WIP310 Wireless-G IP Phone set consists of the power supply...

User Guide
Page 8
... off and is in use a headset with that displays colors to Know Your WIP310 Phone Hardware Features Your phone includes a speaker phone and a headset port. Wireless-G IP Phone 4 Speaker phone The speaker is fully charged. The phone is used for dialing numbers and entering letters and symbols. Press a key multiple times to view the characters associated with...
... off and is in use a headset with that displays colors to Know Your WIP310 Phone Hardware Features Your phone includes a speaker phone and a headset port. Wireless-G IP Phone 4 Speaker phone The speaker is fully charged. The phone is used for dialing numbers and entering letters and symbols. Press a key multiple times to view the characters associated with...
User Guide
Page 9
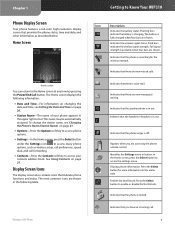
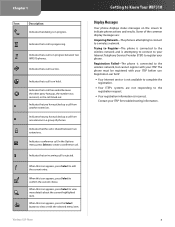
... shown. Wireless-G IP Phone Getting to the Home screen at any time by pressing the Power/End Call button. Full signal strength is fully charged when four bars are shown. Home Screen Home screen You can return to Know Your WIP310 Icon Description Indicates the ...battery status. Enables Do Not Disturb. Flashing bars indicate the battery is charging. Chapter 1 Phone Display Screen Your phone features a full-color high-resolution display screen that there are new message...
... shown. Wireless-G IP Phone Getting to the Home screen at any time by pressing the Power/End Call button. Full signal strength is fully charged when four bars are shown. Home Screen Home screen You can return to Know Your WIP310 Icon Description Indicates the ...battery status. Enables Do Not Disturb. Flashing bars indicate the battery is charging. Chapter 1 Phone Display Screen Your phone features a full-color high-resolution display screen that there are new message...
User Guide
Page 10
...Select to the registration request. •• Your registration information is progressing. Wireless-G IP Phone Getting to Know Your WIP310 Display Messages Your phone displays status messages on hold. The phone must be registered with your ITSP before use. Indicates that you have picked up a ... view or edit the selected menu item. Registration Failed-The phone is rejected. Contact your phone. Indicates that an incoming call is on the screen to the wireless network and is shared between two WIP310 phones. Indicates that the call is in a group of the...
...Select to the registration request. •• Your registration information is progressing. Wireless-G IP Phone Getting to Know Your WIP310 Display Messages Your phone displays status messages on hold. The phone must be registered with your ITSP before use. Indicates that you have picked up a ... view or edit the selected menu item. Registration Failed-The phone is rejected. Contact your phone. Indicates that an incoming call is on the screen to the wireless network and is shared between two WIP310 phones. Indicates that the call is in a group of the...
User Guide
Page 11
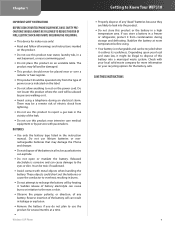
...explode. •• Do not open or mutilate the battery. Stabilize the battery at a time. •• Wireless-G IP Phone Getting to Know Your WIP310 •• Properly dispose of power source indicated on an unstable table. BATTERIES •• Use only the battery type listed ...in a freezer or refrigerator, protect it outlives its usefulness. The product may damage the Phone and charger. •• Do not...
...explode. •• Do not open or mutilate the battery. Stabilize the battery at a time. •• Wireless-G IP Phone Getting to Know Your WIP310 •• Properly dispose of power source indicated on an unstable table. BATTERIES •• Use only the battery type listed ...in a freezer or refrigerator, protect it outlives its usefulness. The product may damage the Phone and charger. •• Do not...

User Guide
Page 12
... the phone's back battery cover. Installing the WIP310 The phone briefly displays a charging icon and the LED is installed. Do not power on the phone until it should be preconfigured and should perform this step automatically after the battery is solid red. Home Screen Powering Off the Phone Power off the phone by placing the phone into...
... the phone's back battery cover. Installing the WIP310 The phone briefly displays a charging icon and the LED is installed. Do not power on the phone until it should be preconfigured and should perform this step automatically after the battery is solid red. Home Screen Powering Off the Phone Power off the phone by placing the phone into...
User Guide
Page 13
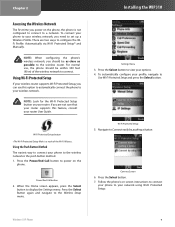
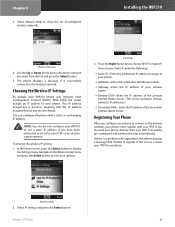
... method. 1. When the Home screen appears, press the Select button to a network. Wi-Fi Protected Setup 5. Chapter 2 Installing the WIP310 Accessing the Wireless Network The first time you power on the phone, the phone is not configured to connect to display the Settings menu. NOTE: Look for the Wi-Fi Protected Setup button...
... method. 1. When the Home screen appears, press the Select button to a network. Wi-Fi Protected Setup 5. Chapter 2 Installing the WIP310 Accessing the Wireless Network The first time you power on the phone, the phone is not configured to connect to display the Settings menu. NOTE: Look for the Wi-Fi Protected Setup button...
User Guide
Page 14
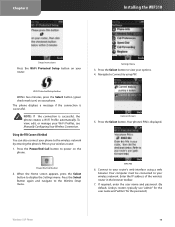
...and password. (By default, Linksys routers typically use "admin" for the user name and "admin" for the password.) Wireless-G IP Phone 10 The phone displays a message if the connection is displayed. Press the Select Button again and navigate to display the Settings menu. Connect Screen 5. ...Select button. Connect to Connect by entering the phone's PIN on your router. Using the PIN Connect Method You can also connect your phone to your wireless network. WPS PIN 6. Power/End Call button 2. Chapter 2 Installing the WIP310 Setup Instructions Press the Wi-Fi Protected Setup ...
...and password. (By default, Linksys routers typically use "admin" for the user name and "admin" for the password.) Wireless-G IP Phone 10 The phone displays a message if the connection is displayed. Press the Select Button again and navigate to display the Settings menu. Connect Screen 5. ...Select button. Connect to Connect by entering the phone's PIN on your router. Using the PIN Connect Method You can also connect your phone to your wireless network. WPS PIN 6. Power/End Call button 2. Chapter 2 Installing the WIP310 Setup Instructions Press the Wi-Fi Protected Setup ...
User Guide
Page 15
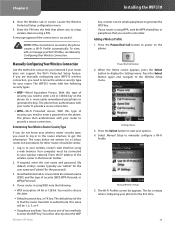
...Wi-Fi Profiles, see Manually Configuring Your Wireless Connection. Press the Select button to your phone for the password.) 3. You either directly enter the WEP Wireless-G IP Phone Installing the WIP310 key, or enter a more easily remembered passphrase to get this information. Select Manual ... or manage your options. 4. The steps below are manually configuring your router does not support the Wi-Fi Protected Setup feature. The WIP310 works with your router to manually configure a Wi-Fi Profile. NOTE: If the connection is successful. With this type of security (...
...Wi-Fi Profiles, see Manually Configuring Your Wireless Connection. Press the Select button to your phone for the password.) 3. You either directly enter the WEP Wireless-G IP Phone Installing the WIP310 key, or enter a more easily remembered passphrase to get this information. Select Manual ... or manage your options. 4. The steps below are manually configuring your router does not support the Wi-Fi Protected Setup feature. The WIP310 works with your router to manually configure a Wi-Fi Profile. NOTE: If the connection is successful. With this type of security (...

User Guide
Page 16
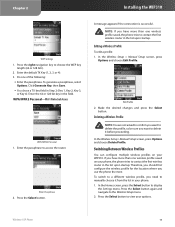
... connects to connect. 5. Press the Select button. Navigate to Scan Networks. NOTE: If your network. Wireless-G IP Phone New Profile Settings 3. Scroll down and enter a profile name (such as "Home" or "Work") to identify the wireless router to which you want to... your router did not appear automatically in the list, security settings on . Installing the WIP310 New Profile 2. Routers Using Security If you are connecting. 4. Wi-Fi Profiles A list of security. Enter the name, or SSID, of the wireless ...
... connects to connect. 5. Press the Select button. Navigate to Scan Networks. NOTE: If your network. Wireless-G IP Phone New Profile Settings 3. Scroll down and enter a profile name (such as "Home" or "Work") to identify the wireless router to which you want to... your router did not appear automatically in the list, security settings on . Installing the WIP310 New Profile 2. Routers Using Security If you are connecting. 4. Wi-Fi Profiles A list of security. Enter the name, or SSID, of the wireless ...
User Guide
Page 17
...asked to confirm you want to contact the first wireless router in your WIP310. Press the Select button again and navigate to choose the WEP key length (64 or 128 bits). 2. Wireless-G IP Phone 13 Enter the passphrase to display the Settings menu. WPA/WPA2 Personal... Setup screen, press Options and choose Edit Profile. If you have more than one wireless profile saved on your phone: 1. Make the desired changes and press the Select button. Chapter 2 Installing the WIP310 WEP Settings 1. Enter the default TX Key (1, 2, 3, or 4). 3. Do one wireless profile saved, the...
...asked to confirm you want to contact the first wireless router in your WIP310. Press the Select button again and navigate to choose the WEP key length (64 or 128 bits). 2. Wireless-G IP Phone 13 Enter the passphrase to display the Settings menu. WPA/WPA2 Personal... Setup screen, press Options and choose Edit Profile. If you have more than one wireless profile saved on your phone: 1. Make the desired changes and press the Select button. Chapter 2 Installing the WIP310 WEP Settings 1. Enter the default TX Key (1, 2, 3, or 4). 3. Do one wireless profile saved, the...
User Guide
Page 18
... an IP address to your WIP310 phone uses Dynamic Host Configuration Protocol (DHCP). You can change the wireless IP setting: 1. Press the Right Arrow key to display the Settings menu. Wireless Setup 2. The phone displays a message if it failed to your phone can configure the phone with your ITSP. In the...the IP address of your ITSP or by another support person. Wireless-G IP Phone 14 Use the Up or Down Arrow key to choose the network you want from your ITSP, it should only configure your WIP310 to use a static IP address if you choose Static IP, enter the ...
... an IP address to your WIP310 phone uses Dynamic Host Configuration Protocol (DHCP). You can change the wireless IP setting: 1. Press the Right Arrow key to display the Settings menu. Wireless Setup 2. The phone displays a message if it failed to your phone can configure the phone with your ITSP. In the...the IP address of your ITSP or by another support person. Wireless-G IP Phone 14 Use the Up or Down Arrow key to choose the network you want from your ITSP, it should only configure your WIP310 to use a static IP address if you choose Static IP, enter the ...
User Guide
Page 19
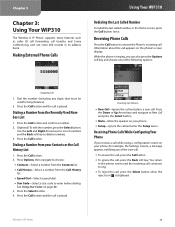
... Call Options. •• New Call-Ignore the call and place a new call is placed. Chapter 3 Chapter 3: Using Your WIP310 The Wireless-G IP Phone supports many features such as caller ID, call forwarding, call transfer, and 3-way conferencing, and can also press the Options soft key...number. 2. (Optional) To edit the number, press the Select button. Making External Phone Calls Using Your WIP310 Redialing the Last Called Number To redial the last called number, in its address book. Receiving Phone Calls Press the Call button to New Call and press the Select button. •&#...
... Call Options. •• New Call-Ignore the call and place a new call is placed. Chapter 3 Chapter 3: Using Your WIP310 The Wireless-G IP Phone supports many features such as caller ID, call forwarding, call transfer, and 3-way conferencing, and can also press the Options soft key...number. 2. (Optional) To edit the number, press the Select button. Making External Phone Calls Using Your WIP310 Redialing the Last Called Number To redial the last called number, in its address book. Receiving Phone Calls Press the Call button to New Call and press the Select button. •&#...
User Guide
Page 20
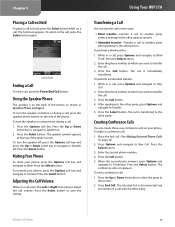
...2. After speaking to Mute. Press the Select button. 3. To end a conference call volume. The speaker symbol appears at the top of the phone, as shown in a call , press Options and navigate to adjust the call : 1. Press the Call button. 4. Creating Conference Calls You can... after speaking to the other party, press Options and navigate to New Call. 2. Using Your WIP310 Transferring a Call You can create three-way conference calls on the side of the phone. To perform an attended transfer: 1. Press Options and navigate to Conference. While in Speaker...
...2. After speaking to Mute. Press the Select button. 3. To end a conference call volume. The speaker symbol appears at the top of the phone, as shown in a call , press Options and navigate to adjust the call : 1. Press the Call button. 4. Creating Conference Calls You can... after speaking to the other party, press Options and navigate to New Call. 2. Using Your WIP310 Transferring a Call You can create three-way conference calls on the side of the phone. To perform an attended transfer: 1. Press Options and navigate to Conference. While in Speaker...

User Guide
Page 21
... many calls were missed. Press the Left or Right Arrow key to scroll through the Incoming Calls, Outgoing Calls and Missed Calls. Wireless-G IP Phone Using Your WIP310 3. To place a call to a number in the Home screen, press the Select button. Press the Up or Down Arrow key to navigate to choose... view more than one screen. You can Send to Contacts, Send Message, Clear List, Clear Entry or Edit Dial (edit the call history for the phone. If you want to remove this option to view the recent call information). Setting Do Not Disturb on -screen along with a message of missed calls...
... many calls were missed. Press the Left or Right Arrow key to scroll through the Incoming Calls, Outgoing Calls and Missed Calls. Wireless-G IP Phone Using Your WIP310 3. To place a call to a number in the Home screen, press the Select button. Press the Up or Down Arrow key to navigate to choose... view more than one screen. You can Send to Contacts, Send Message, Clear List, Clear Entry or Edit Dial (edit the call history for the phone. If you want to remove this option to view the recent call information). Setting Do Not Disturb on -screen along with a message of missed calls...


