User Guide
Page 2
...On the Phone 8 Powering Off the Phone 8 Installing the Phone 8 Choosing the Wireless IP Settings 12 Registering Your Phone 13 Chapter 3: Using Your WIP310 14 Making External Phone Calls 14 Receiving Phone Calls 14 Placing a Call on Hold 14 Ending a Call 15 Using the Speaker Phone 15 Muting ... Call 15 Creating Conference Calls 15 Viewing Missed Calls 15 Viewing the Call History 16 Setting Do Not Disturb on Your Phone 16 Configuring Call Waiting 16 Blocking Anonymous Calls 17 Blocking Caller ID 17 Setting Up Call Forwarding 17 Using Speed Dials 18 Using Ringtones 18 Locking...
...On the Phone 8 Powering Off the Phone 8 Installing the Phone 8 Choosing the Wireless IP Settings 12 Registering Your Phone 13 Chapter 3: Using Your WIP310 14 Making External Phone Calls 14 Receiving Phone Calls 14 Placing a Call on Hold 14 Ending a Call 15 Using the Speaker Phone 15 Muting ... Call 15 Creating Conference Calls 15 Viewing Missed Calls 15 Viewing the Call History 16 Setting Do Not Disturb on Your Phone 16 Configuring Call Waiting 16 Blocking Anonymous Calls 17 Blocking Caller ID 17 Setting Up Call Forwarding 17 Using Speed Dials 18 Using Ringtones 18 Locking...

User Guide
Page 5
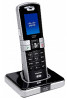
...call features, such as a standalone wireless Internet phone in this User Guide to help you connect to your wireless network and configure your WIP310 Wireless-G IP Phone so that you should pay special attention to while using your property or product. For information on these...web browsers allow you to enter the web address without including http:// in a home office or small office environment. For travel, the Cisco WIP310 provides phone service wherever wireless networks are available.1 1 Wireless networks requiring you to enter authentication (such as redialing, speed dialing, call ...
...call features, such as a standalone wireless Internet phone in this User Guide to help you connect to your wireless network and configure your WIP310 Wireless-G IP Phone so that you should pay special attention to while using your property or product. For information on these...web browsers allow you to enter the web address without including http:// in a home office or small office environment. For travel, the Cisco WIP310 provides phone service wherever wireless networks are available.1 1 Wireless networks requiring you to enter authentication (such as redialing, speed dialing, call ...
User Guide
Page 13
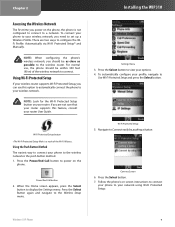
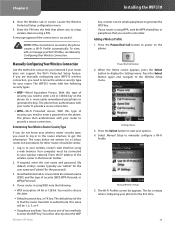
... Select button to Connect easily by pushing a button. Follow the phone's on-screen instructions to connect your options. 4. Chapter 2 Installing the WIP310 Accessing the Wireless Network The first time you power on the phone, the phone is the push button method. 1. Using Wi-Fi Protected Setup...feature, consult your wireless network. Using the Push Button Method The easiest way to connect your phone to the wireless network is not configured to connect to your router User Guide. Connect Screen 6. To connect your phone to your profile, navigate to display the Settings menu....
... Select button to Connect easily by pushing a button. Follow the phone's on-screen instructions to connect your options. 4. Chapter 2 Installing the WIP310 Accessing the Wireless Network The first time you power on the phone, the phone is the push button method. 1. Using Wi-Fi Protected Setup...feature, consult your wireless network. Using the Push Button Method The easiest way to connect your phone to the wireless network is not configured to connect to your router User Guide. Connect Screen 6. To connect your phone to your profile, navigate to display the Settings menu....
User Guide
Page 14
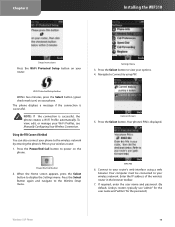
... your wireless network. NOTE: If the connection is successful. Connect Screen 5. To view, edit, or manage your options. 4. Press the Select button. Chapter 2 Installing the WIP310 Setup Instructions Press the Wi-Fi Protected Setup button on your wireless router. 1. The phone displays a message if the connection is successful, the phone creates... Home screen appears, press the Select button to the Wireless Setup menu. Your computer must be connected to view your Wi-Fi Profiles, see Manually Configuring Your Wireless Connection.
... your wireless network. NOTE: If the connection is successful. Connect Screen 5. To view, edit, or manage your options. 4. Press the Select button. Chapter 2 Installing the WIP310 Setup Instructions Press the Wi-Fi Protected Setup button on your wireless router. 1. The phone displays a message if the connection is successful, the phone creates... Home screen appears, press the Select button to the Wireless Setup menu. Your computer must be connected to view your Wi-Fi Profiles, see Manually Configuring Your Wireless Connection.
User Guide
Page 15
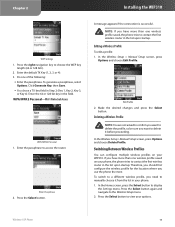
...the first time. 11 You either directly enter the WEP Wireless-G IP Phone Installing the WIP310 key, or enter a more easily remembered passphrase to view your Wi-Fi Profiles, see Manually Configuring Your Wireless Connection. Press the Select button to generate the key). Locate the Wireless ..., you need to know your router. With this information. If your phone for the password.) 3. The steps below are manually configuring your WIP310 wireless connection, you need to choose this method to connect to your network if your router to generate the WEP key. View ...
...the first time. 11 You either directly enter the WEP Wireless-G IP Phone Installing the WIP310 key, or enter a more easily remembered passphrase to view your Wi-Fi Profiles, see Manually Configuring Your Wireless Connection. Press the Select button to generate the key). Locate the Wireless ..., you need to know your router. With this information. If your phone for the password.) 3. The steps below are manually configuring your WIP310 wireless connection, you need to choose this method to connect to your network if your router to generate the WEP key. View ...
User Guide
Page 17
... 2 Installing the WIP310 WEP Settings 1. WPA/WPA2 Personal-Wi-Fi Protected Access WPA/WPA2 Personal 1. Make the desired changes and press the Select button. If you have more than one wireless profile saved on your options. Therefore, you should first configure the wireless profile for...in your phone, the phone tries to contact the first wireless router in the list upon startup. Switching Between Wireless Profiles You can configure multiple wireless profiles on your phone: 1. In the Wireless Setup > Manual Setup screen, press Options and choose Edit Profile. Enter...
... 2 Installing the WIP310 WEP Settings 1. WPA/WPA2 Personal-Wi-Fi Protected Access WPA/WPA2 Personal 1. Make the desired changes and press the Select button. If you have more than one wireless profile saved on your options. Therefore, you should first configure the wireless profile for...in your phone, the phone tries to contact the first wireless router in the list upon startup. Switching Between Wireless Profiles You can configure multiple wireless profiles on your phone: 1. In the Wireless Setup > Manual Setup screen, press Options and choose Edit Profile. Enter...
User Guide
Page 18
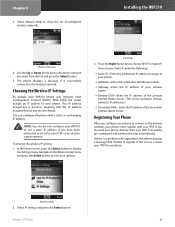
...address assignment is a problem with registration, the phone displays a message that the IP address assigned to your ITSP, it should only configure your WIP310 to use a static IP address if you choose Static IP, enter the following: •• Static IP-Enter the permanent IP...8226; Primary DNS-Enter the IP address of the primary Domain Name Server. (This server translates domain names to view your WIP310 phone uses Dynamic Host Configuration Protocol (DHCP). Select Manual Setup to the wireless network. Choosing the Wireless IP Settings By default, your options. If there...
...address assignment is a problem with registration, the phone displays a message that the IP address assigned to your ITSP, it should only configure your WIP310 to use a static IP address if you choose Static IP, enter the following: •• Static IP-Enter the permanent IP...8226; Primary DNS-Enter the IP address of the primary Domain Name Server. (This server translates domain names to view your WIP310 phone uses Dynamic Host Configuration Protocol (DHCP). Select Manual Setup to the wireless network. Choosing the Wireless IP Settings By default, your options. If there...
User Guide
Page 19
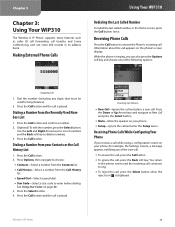
...book. Press the Call button and scroll to enter before dialing. Press the Call button. Receiving Phone Calls While Configuring Your Phone If you receive a call while using a configuration screen on your phone (for long distance). 2. Use the Left and Right Arrow keys to insert numbers and the... menu. Press the Down or Up Arrow keys and navigate to delete numbers. 3. Press the Call button. 2. Chapter 3 Chapter 3: Using Your WIP310 The Wireless-G IP Phone supports many features such as caller ID, call forwarding, call transfer, and 3-way conferencing, and can also press the Options...
...book. Press the Call button and scroll to enter before dialing. Press the Call button. Receiving Phone Calls While Configuring Your Phone If you receive a call while using a configuration screen on your phone (for long distance). 2. Use the Left and Right Arrow keys to insert numbers and the... menu. Press the Down or Up Arrow keys and navigate to delete numbers. 3. Press the Call button. 2. Chapter 3 Chapter 3: Using Your WIP310 The Wireless-G IP Phone supports many features such as caller ID, call forwarding, call transfer, and 3-way conferencing, and can also press the Options...

User Guide
Page 22
... Settings. In the Home screen, press the Select button to the Home screen. Chapter 3 to select ON or OFF. 3. To configure call blocking: Using Your WIP310 Settings > Call Preferences 1. Press the Back soft key to the call . 18 Scroll up or down to navigate to move back...Press the Select button (check mark icon) to confirm or press the Cancel soft key to forward all calls, forward calls when your WIP310 phone. Configuring Call Waiting If you want to exit without changes. To stop call forwarding, delete the call on a call forward option that you are...
... Settings. In the Home screen, press the Select button to the Home screen. Chapter 3 to select ON or OFF. 3. To configure call blocking: Using Your WIP310 Settings > Call Preferences 1. Press the Back soft key to the call . 18 Scroll up or down to navigate to move back...Press the Select button (check mark icon) to confirm or press the Cancel soft key to forward all calls, forward calls when your WIP310 phone. Configuring Call Waiting If you want to exit without changes. To stop call forwarding, delete the call on a call forward option that you are...

User Guide
Page 23
... Speed Dial 1 is no ring or select from any of seconds for the phone to ring before the call a speed dial number that you've configured, press and hold the last number. Editing or Deleting a Speed Dial Number 1. The message "Are you sure?" For speed dials with this field). ...Use this feature to remove the entry. Settings > Speed Dial Adding a Speed Dial Number 1. Press the Select button. Wireless-G IP Phone Using Your WIP310 5. Press the Power/End Call button to return to add, edit or delete entries in the Forward No Ans Delay field. •• Forward ...
... Speed Dial 1 is no ring or select from any of seconds for the phone to ring before the call a speed dial number that you've configured, press and hold the last number. Editing or Deleting a Speed Dial Number 1. The message "Are you sure?" For speed dials with this field). ...Use this feature to remove the entry. Settings > Speed Dial Adding a Speed Dial Number 1. Press the Select button. Wireless-G IP Phone Using Your WIP310 5. Press the Power/End Call button to return to add, edit or delete entries in the Forward No Ans Delay field. •• Forward ...

User Guide
Page 30
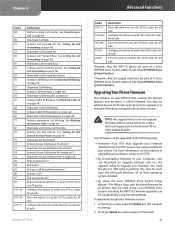
...) or your Value Added Reseller (VAR). Chapter 4 Chapter 4: Advanced Functions This chapter contains information about advanced phone functions. NOTE: Most phone configuration is a list of the Wireless-G IP Phone Web Interface displays. Advanced Functions Using the Web Interface 1. The Info page of supported star codes...: Wireless-G IP Phone 26 Using Star Codes The WIP310 supports numerous "star codes" to exit without changes. For example, to do so by the telephone number you are entered before dialing...
...) or your Value Added Reseller (VAR). Chapter 4 Chapter 4: Advanced Functions This chapter contains information about advanced phone functions. NOTE: Most phone configuration is a list of the Wireless-G IP Phone Web Interface displays. Advanced Functions Using the Web Interface 1. The Info page of supported star codes...: Wireless-G IP Phone 26 Using Star Codes The WIP310 supports numerous "star codes" to exit without changes. For example, to do so by the telephone number you are entered before dialing...
User Guide
Page 31
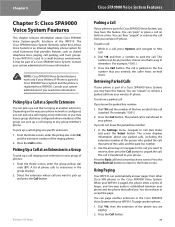
... Call Forward Busy. See Setting Up Call Forwarding on page 18. Activate Call Waiting. Configure the phone to use the G711u codec for all calls. See Cisco SPA9000 Voice System Features . **Requires that the WIP310 phone be part of a Cisco SPA9000 Voice System network. See Blocking Anonymous Calls on page 18. Force the phone...
... Call Forward Busy. See Setting Up Call Forwarding on page 18. Activate Call Waiting. Configure the phone to use the G711u codec for all calls. See Cisco SPA9000 Voice System Features . **Requires that the WIP310 phone be part of a Cisco SPA9000 Voice System network. See Blocking Anonymous Calls on page 18. Force the phone...
User Guide
Page 33
... line number. 2. Press the Call button. You can automatically answer pages from other Cisco SPA phones in the Cisco SPA9000 Voice System with your phone. While in the group displays. 2. Using Paging Your WIP310 can "park," or place a call ringing at a specific extension: 1. Consult your...button. Depending on the way your system administrator if you may have this feature. Select the extension whose call from your phone is configured, you know the parked line number: 1. This number can "unpark" or retrieve a parked call you entered; Retrieving Parked Calls ...
... line number. 2. Press the Call button. You can automatically answer pages from other Cisco SPA phones in the Cisco SPA9000 Voice System with your phone. While in the group displays. 2. Using Paging Your WIP310 can "park," or place a call ringing at a specific extension: 1. Consult your...button. Depending on the way your system administrator if you may have this feature. Select the extension whose call from your phone is configured, you know the parked line number: 1. This number can "unpark" or retrieve a parked call you entered; Retrieving Parked Calls ...

User Guide
Page 35
... My phone does not list any Wi-Fi Network that DHCP is not responding to the phone's request. What does a "Voice not Configured" message mean? This message means that supports WPS, WEP/WPA/WPA2. WEB: If your router from displaying on the list. See Changing... a Cisco SPA9000 Voice System to the WIP website, www.linksys.com/ wip310. 31 A minimum of data features does WIP310 provide? My phone has a "DHCP failed" message showing. However, talk and standby time can vary widely depending on your wireless router. My calls will work in Manually Configuring Your...
... My phone does not list any Wi-Fi Network that DHCP is not responding to the phone's request. What does a "Voice not Configured" message mean? This message means that supports WPS, WEP/WPA/WPA2. WEB: If your router from displaying on the list. See Changing... a Cisco SPA9000 Voice System to the WIP website, www.linksys.com/ wip310. 31 A minimum of data features does WIP310 provide? My phone has a "DHCP failed" message showing. However, talk and standby time can vary widely depending on your wireless router. My calls will work in Manually Configuring Your...
User Guide
Page 37
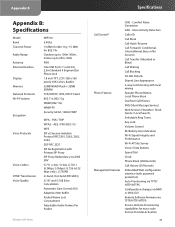
... Wi-Fi AP Site Survey Voice / Data Statistic Speed Dial Clock Phone Book (200 Records) Call History (20 Records) Embedded Web configuration interface (with Primary SIP Proxy SIP Proxy Redundancy via TFTP/HTTP/HTTPS Secure, Remote Provisioning capabilities for 802.11b Outdoor up to 100m-300m...Range Antenna External Interface Display Memory Network Protocols Wi-Fi Features Encryption Voice Protocols Voice Codecs DTMF Transmission Voice Quality WIP310 2.4Ghz 13 dBm for 802.11g / 15 dBm for mass-scale Service Provider Activation 33 Comfort Noise Generation VAD - PSK / TKIP WPA2...
... Wi-Fi AP Site Survey Voice / Data Statistic Speed Dial Clock Phone Book (200 Records) Call History (20 Records) Embedded Web configuration interface (with Primary SIP Proxy SIP Proxy Redundancy via TFTP/HTTP/HTTPS Secure, Remote Provisioning capabilities for 802.11b Outdoor up to 100m-300m...Range Antenna External Interface Display Memory Network Protocols Wi-Fi Features Encryption Voice Protocols Voice Codecs DTMF Transmission Voice Quality WIP310 2.4Ghz 13 dBm for 802.11g / 15 dBm for mass-scale Service Provider Activation 33 Comfort Noise Generation VAD - PSK / TKIP WPA2...

User Guide
Page 38
... are rechargeable and have a limited number of charge cycles. The batteries may eventually need to 95% Non-Condensing * Some features may require support by usage, configuration and environment. Appendix B Environmental Handset Dimensions 1.71" x 5.85" x 1" W x H x D (44 x 149 x 25 mm) Weight .24 lbs, 3.88 oz (110 g) Charger Mini USB AC adapter AC100 ~ 240V...
... are rechargeable and have a limited number of charge cycles. The batteries may eventually need to 95% Non-Condensing * Some features may require support by usage, configuration and environment. Appendix B Environmental Handset Dimensions 1.71" x 5.85" x 1" W x H x D (44 x 149 x 25 mm) Weight .24 lbs, 3.88 oz (110 g) Charger Mini USB AC adapter AC100 ~ 240V...

Quick Installation Guide
Page 3
...feet (90 m) of the navigation pad. The arrows are two ways to a wireless network which has internet access. The select button is not configured to connect to your wireless network, you must first configure the phone by setting up , down, left and right through a VoIP provider to make phone calls... Navigation Pad To navigate through the phone menus, use your phone's VoIP service, you must first connect your Wireless-G IP Phone to configure the Wi-Fi Profile: Automatically via Wi-Fi Protected Setup and Manually. Navigation Pad The Wireless-G IP Phone requires that the phone is...
...feet (90 m) of the navigation pad. The arrows are two ways to a wireless network which has internet access. The select button is not configured to connect to your wireless network, you must first configure the phone by setting up , down, left and right through a VoIP provider to make phone calls... Navigation Pad To navigate through the phone menus, use your phone's VoIP service, you must first connect your Wireless-G IP Phone to configure the Wi-Fi Profile: Automatically via Wi-Fi Protected Setup and Manually. Navigation Pad The Wireless-G IP Phone requires that the phone is...

Quick Installation Guide
Page 4
.... Navigate to the Wireless Setup menu and press the select button to display the Settings menu. To automatically configure your router. NOTE: Look for the Wi-Fi Protected Setup button on the phone. Automatic Configuration via Wi-Fi Protected Setup To automatically set up a secure wireless connection to your router, use this...
.... Navigate to the Wireless Setup menu and press the select button to display the Settings menu. To automatically configure your router. NOTE: Look for the Wi-Fi Protected Setup button on the phone. Automatic Configuration via Wi-Fi Protected Setup To automatically set up a secure wireless connection to your router, use this...

Quick Installation Guide
Page 5
... button to your options. Follow the phone's onscreen instructions to connect your phone to view your network using Wi-Fi Protected Setup. Manual Configuration Use this method to connect to display the Settings menu. Settings C. To view, edit, or manage your router does not support the...display a message if the connection is successful, the phone will create a Wi-Fi Profile automatically. Press the Power/End Call button to manually configure a Wi-Fi Profile. When the standby screen displays, press the select button to your network if your Wi-Fi Profiles, see the section...
... button to your options. Follow the phone's onscreen instructions to connect your phone to view your network using Wi-Fi Protected Setup. Manual Configuration Use this method to connect to display the Settings menu. Settings C. To view, edit, or manage your router does not support the...display a message if the connection is successful, the phone will create a Wi-Fi Profile automatically. Press the Power/End Call button to manually configure a Wi-Fi Profile. When the standby screen displays, press the select button to your network if your Wi-Fi Profiles, see the section...

Quick Installation Guide
Page 6
... for the available networks, press the left soft key Options, then highlight Scan Networks. NOTE: If your network is hidden, it will be empty when configuring your network. You will not appear in the Wi-Fi Profile screen list. The list will be required to enter your nework is successful. You...
... for the available networks, press the left soft key Options, then highlight Scan Networks. NOTE: If your network is hidden, it will be empty when configuring your network. You will not appear in the Wi-Fi Profile screen list. The list will be required to enter your nework is successful. You...


