

User Guide
Page 1
Cisco VoIP IP SPA504G Setup & User Guide About This Guide This guide is connected. Your phone system might not provide all of the basic functions and features. Contact Saco Technology for questions about phone features. 1 © 2001 - 20010 Saco Technology The features available on your phone depend on the type of system to which your phone is intended to show you how to install your phone and describes how to use some of the features mentioned in this document.
Cisco VoIP IP SPA504G Setup & User Guide About This Guide This guide is connected. Your phone system might not provide all of the basic functions and features. Contact Saco Technology for questions about phone features. 1 © 2001 - 20010 Saco Technology The features available on your phone depend on the type of system to which your phone is intended to show you how to install your phone and describes how to use some of the features mentioned in this document.
User Guide
Page 2
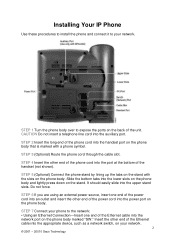
... and lightly press down on the stand. STEP 4 Insert the other end of the handset (not shown). Installing Your IP Phone Use these procedures to install the phone and connect it to your network. 2 STEP 1 Turn the phone body over to expose the ports on the back of the phone cord into the appropriate device, such as a network switch, on your phone to the network: • Using...
... and lightly press down on the stand. STEP 4 Insert the other end of the handset (not shown). Installing Your IP Phone Use these procedures to install the phone and connect it to your network. 2 STEP 1 Turn the phone body over to expose the ports on the back of the phone cord into the appropriate device, such as a network switch, on your phone to the network: • Using...
User Guide
Page 3
... configuration, your phone line keys should hear a dial tone when picking up the handset or pressing the speakerphone button, and the LCD screen displays a phone icon next to the extension number. Using the number you just wrote down open a internet window and type this in the next step. STEP 8 (Optional) To provide network access to a PC, connect one end of an additional Ethernet cable (not provided) to the PC port on models with...
... configuration, your phone line keys should hear a dial tone when picking up the handset or pressing the speakerphone button, and the LCD screen displays a phone icon next to the extension number. Using the number you just wrote down open a internet window and type this in the next step. STEP 8 (Optional) To provide network access to a PC, connect one end of an additional Ethernet cable (not provided) to the PC port on models with...
User Guide
Page 4
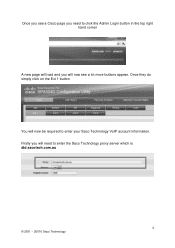
Once they do simply click on the Ext 1 button You will need to click the Admin Login button in the top right hand corner A new page will load and you will now see a Cisco page you need to enter your Saco Technology VoIP account information. Firstly you will now be required to enter the Saco Technology proxy server which is did.sacotech.com.au 4 © 2001 - 20010 Saco Technology Once you see a lot more buttons appear.
Once they do simply click on the Ext 1 button You will need to click the Admin Login button in the top right hand corner A new page will load and you will now see a Cisco page you need to enter your Saco Technology VoIP account information. Firstly you will now be required to enter the Saco Technology proxy server which is did.sacotech.com.au 4 © 2001 - 20010 Saco Technology Once you see a lot more buttons appear.

User Guide
Page 5
Once it is to then enter your VoIP SIP/Account Number again in the User ID field and to make sure Use Auth ID has yes selected as shown below ) and also your VoIP phone should now have some green lights appears. 5 © 2001 - 20010 Saco Technology Then you phone will need to perform. Now simply hit the submit all changes button at the bottom of the page and you will now save the new settings and reset. This can take 30-180 seconds to enter your VoIP SIP/Account Number (In both sections below . Then the last step is finished your password.
Once it is to then enter your VoIP SIP/Account Number again in the User ID field and to make sure Use Auth ID has yes selected as shown below ) and also your VoIP phone should now have some green lights appears. 5 © 2001 - 20010 Saco Technology Then you phone will need to perform. Now simply hit the submit all changes button at the bottom of the page and you will now save the new settings and reset. This can take 30-180 seconds to enter your VoIP SIP/Account Number (In both sections below . Then the last step is finished your password.
User Guide
Page 6
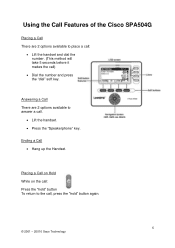
... the Handset. Using the Call Features of the Cisco SPA504G Placing a Call There are 2 options available to answer a call. Lift the handset. Press the ―Speakerphone‖ key. Placing a Call on Hold While on the call: Press the ―hold‖ button To return to place a call: Lift the handset and dial the number. (This method will take 5 seconds before it makes the call , press the ―hold‖ button again...
... the Handset. Using the Call Features of the Cisco SPA504G Placing a Call There are 2 options available to answer a call. Lift the handset. Press the ―Speakerphone‖ key. Placing a Call on Hold While on the call: Press the ―hold‖ button To return to place a call: Lift the handset and dial the number. (This method will take 5 seconds before it makes the call , press the ―hold‖ button again...
User Guide
Page 7
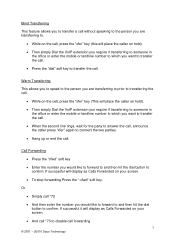
... simply Dial the VoIP extension you require if transferring to someone in the office or enter the mobile or landline number to which you want to transfer the call. Press the ―dial‖ soft key to disable call . Call Forwarding Press the ―cfwd‖ soft key Enter the number you would like to forward to and then hit the dial button to connect the...
... simply Dial the VoIP extension you require if transferring to someone in the office or enter the mobile or landline number to which you want to transfer the call. Press the ―dial‖ soft key to disable call . Call Forwarding Press the ―cfwd‖ soft key Enter the number you would like to forward to and then hit the dial button to connect the...
User Guide
Page 8
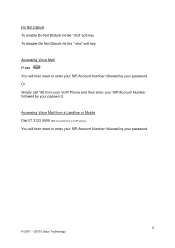
Or Simply call *98 from a VoIP phone) You will then need to enter your SIP/Account Number followed by your password. Accessing Voice Mail from a Landline or Mobile Dial 07 3123 5509 (Will not work from your VoIP Phone and then enter your SIP/Account Number followed by your password. 8 © 2001 - 20010 Saco Technology Do Not Disturb To enable Do Not Disturb hit the ―dnd‖ soft key To disable Do Not Disturb hit the ―-dnd‖ soft key Accessing Voice Mail Press You will then need to enter your SIP/Account Number followed by your password.
Or Simply call *98 from a VoIP phone) You will then need to enter your SIP/Account Number followed by your password. Accessing Voice Mail from a Landline or Mobile Dial 07 3123 5509 (Will not work from your VoIP Phone and then enter your SIP/Account Number followed by your password. 8 © 2001 - 20010 Saco Technology Do Not Disturb To enable Do Not Disturb hit the ―dnd‖ soft key To disable Do Not Disturb hit the ―-dnd‖ soft key Accessing Voice Mail Press You will then need to enter your SIP/Account Number followed by your password.


