

User Guide
Page 1
z Be sure to read the precautions in the separate Setup Guide. E DATA PROJECTOR XJ-H1600/XJ-H1650* XJ-H1700/XJ-H1750* XJ-ST145*/XJ-ST155* * USB Port Models User's Guide z Be sure to keep all user documentation handy for future reference. For details about setting up the projector, see the Setup Guide.
z Be sure to read the precautions in the separate Setup Guide. E DATA PROJECTOR XJ-H1600/XJ-H1650* XJ-H1700/XJ-H1750* XJ-ST145*/XJ-ST155* * USB Port Models User's Guide z Be sure to keep all user documentation handy for future reference. For details about setting up the projector, see the Setup Guide.

User Guide
Page 7
... of Computer Screen Contents via wireless LAN. D 7 XJ-H1650/XJ-H1750/XJ-ST145/XJ-ST155 z Projection of Data from USB Memory or a Memory Card without a Computer: USB memory or a memory card (using a computer. z Graphic Scientific Function Calculator Connection: Certain CASIO graphic scientific calculator models can also use the pointer to the projector's USB-A port. z Multi Projection Camera (YC...
... of Computer Screen Contents via wireless LAN. D 7 XJ-H1650/XJ-H1750/XJ-ST145/XJ-ST155 z Projection of Data from USB Memory or a Memory Card without a Computer: USB memory or a memory card (using a computer. z Graphic Scientific Function Calculator Connection: Certain CASIO graphic scientific calculator models can also use the pointer to the projector's USB-A port. z Multi Projection Camera (YC...
User Guide
Page 11
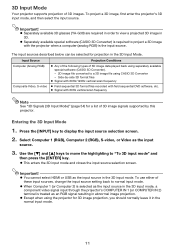
... 3D input mode" and then press the [ENTER] key. 3D Input Mode Your projector supports projection of 3D image data played back using separately available special software (CASIO 3D Converter). - 2D image file converted to a 3D image file using the projector for projection in the 3D Input Mode. Entering the 3D Input Mode 1. z Except...
... 3D input mode" and then press the [ENTER] key. 3D Input Mode Your projector supports projection of 3D image data played back using separately available special software (CASIO 3D Converter). - 2D image file converted to a 3D image file using the projector for projection in the 3D Input Mode. Entering the 3D Input Mode 1. z Except...

User Guide
Page 60
... computer serial ports, but there may be cases where the shape of the data projector. Data Rate 19200bps Data Bit 8bit Parity None Stop Bit 1bit Flow Control None Send this command to control the data projector (power on/off, etc.) and to write data to it . For details about the current setup of a particular computer's connector...
... computer serial ports, but there may be cases where the shape of the data projector. Data Rate 19200bps Data Bit 8bit Parity None Stop Bit 1bit Flow Control None Send this command to control the data projector (power on/off, etc.) and to write data to it . For details about the current setup of a particular computer's connector...
Setup Guide
Page 2
... XJ-H1650. E z The sample screens shown in the Carrying Bag.....E-9 Cleaning the Projector E-9 Starting and Stopping Projection E-15 To start projection E-15 To turn off the projector ...Remote Controller Batteries...........E-12 Setting Up the Projector E-12 Setup Precautions E-13 Changing the Projector Elevation Angle ......E-13 Connecting a Computer to loss of data caused by the product. Contents Safety ...any lost profits due to the Projector .....E-14 z DLP is forbidden. You are registered trademarks or trademarks of Apple Inc. z CASIO COMPUTER CO., LTD. Any ...
... XJ-H1650. E z The sample screens shown in the Carrying Bag.....E-9 Cleaning the Projector E-9 Starting and Stopping Projection E-15 To start projection E-15 To turn off the projector ...Remote Controller Batteries...........E-12 Setting Up the Projector E-12 Setup Precautions E-13 Changing the Projector Elevation Angle ......E-13 Connecting a Computer to loss of data caused by the product. Contents Safety ...any lost profits due to the Projector .....E-14 z DLP is forbidden. You are registered trademarks or trademarks of Apple Inc. z CASIO COMPUTER CO., LTD. Any ...

Setup Guide
Page 6
...; Lens Never touch the lens with your original dealer or authorized CASIO service center. + Never allow the remote controller to breakdown, maintenance, etc. ● During projection, make sure that you lock the casters when not moving the projector, be sure to turn it off and unplug it from the ...base. ● Lightening During a lightening storm, do not touch the plug of all internal inspection, adjustment, and repair up to leave all data stored in projector memory. Do not use of such equipment, and cause accidents. • If you do not plan to use it in the vicinity of ...
...; Lens Never touch the lens with your original dealer or authorized CASIO service center. + Never allow the remote controller to breakdown, maintenance, etc. ● During projection, make sure that you lock the casters when not moving the projector, be sure to turn it off and unplug it from the ...base. ● Lightening During a lightening storm, do not touch the plug of all internal inspection, adjustment, and repair up to leave all data stored in projector memory. Do not use of such equipment, and cause accidents. • If you do not plan to use it in the vicinity of ...

Setup Guide
Page 7
Do not rub the eyes! Lens Cover (XJ-ST145 and XJ-ST155 only) *Warning + The lens cover of this , it for the ... Make sure that you dispose of used in your original dealer or authorized CASIO service center once a year about having the interior of the projector cleaned. Should any problem arise, move the lens cover away from the ...cards, magnetic tapes, prepaid cards, checks, and any other media that uses magnetic recording. Because of this Data Projector uses a magnetic attachment. Make sure that you always observe the following steps. 1. Safety Precautions Battery Precautions ...
Do not rub the eyes! Lens Cover (XJ-ST145 and XJ-ST155 only) *Warning + The lens cover of this , it for the ... Make sure that you dispose of used in your original dealer or authorized CASIO service center once a year about having the interior of the projector cleaned. Should any problem arise, move the lens cover away from the ...cards, magnetic tapes, prepaid cards, checks, and any other media that uses magnetic recording. Because of this Data Projector uses a magnetic attachment. Make sure that you always observe the following steps. 1. Safety Precautions Battery Precautions ...

Setup Guide
Page 10
... strong impact while it is accidentally subjected to correctly save data and malfunction. ● Never use the procedure under "To turn projector power off the projector" on page E-15 to the projector. E-8 z Never insert or allow foreign objects to the projector. A dead battery can result in inability to strong impact, the projection image will reappear...
... strong impact while it is accidentally subjected to correctly save data and malfunction. ● Never use the procedure under "To turn projector power off the projector" on page E-15 to the projector. E-8 z Never insert or allow foreign objects to the projector. A dead battery can result in inability to strong impact, the projection image will reappear...

Setup Guide
Page 12
Unpacking As you unpack the projector, check to make sure that all of the items listed below are present. DATA PROJECTOR Remote Controller (YT-120) • Test Batteries (AAA-size × 2) • AC Power Cord • Carrying Bag • CD-ROM • Setup Guide • "Read this first" Sheet • Warranty • Wireless adapter (Provided with models equipped with USB ports only.) Mini D-Sub Cable E-10
Unpacking As you unpack the projector, check to make sure that all of the items listed below are present. DATA PROJECTOR Remote Controller (YT-120) • Test Batteries (AAA-size × 2) • AC Power Cord • Carrying Bag • CD-ROM • Setup Guide • "Read this first" Sheet • Warranty • Wireless adapter (Provided with models equipped with USB ports only.) Mini D-Sub Cable E-10

