User Guide
Page 20
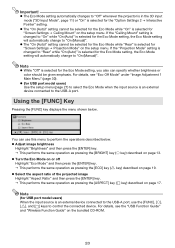
z The "On (Auto)" setting cannot be selected for the Eco Mode while "On" is selected for "Screen Settings J Ceiling Mount" on the setup menu. z Adjust image brightness Highlight "Brightness" and then press the [ENTER] key. Important! z The Eco Mode setting automatically changes to "...ENTER] key. Note (for USB port model users) When the input source is selected for the "Option Settings 2 J Interactive Pointer" setting. If the "Ceiling Mount" setting is changed to "Rear" while "On (Auto)" is an external device connected to the USB-A port, use this menu to "On (Manual)". For ...
z The "On (Auto)" setting cannot be selected for the Eco Mode while "On" is selected for "Screen Settings J Ceiling Mount" on the setup menu. z Adjust image brightness Highlight "Brightness" and then press the [ENTER] key. Important! z The Eco Mode setting automatically changes to "...ENTER] key. Note (for USB port model users) When the input source is selected for the "Option Settings 2 J Interactive Pointer" setting. If the "Ceiling Mount" setting is changed to "Rear" while "On (Auto)" is an external device connected to the USB-A port, use this menu to "On (Manual)". For ...

User Guide
Page 32
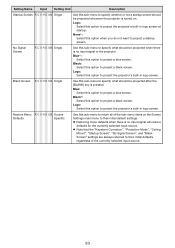
...*: Select this option to project from the front of the screen. Input Source: RGB or HDMI (PC) Normal*: Projects at 16:9. Projection Mode R C V H D U N Single Ceiling Mount R C V H D U N Single Important! Rear: Select this option to project from the front of the screen or the back of 16:9, the aspect ratio is a component or...
...*: Select this option to project from the front of the screen. Input Source: RGB or HDMI (PC) Normal*: Projects at 16:9. Projection Mode R C V H D U N Single Ceiling Mount R C V H D U N Single Important! Rear: Select this option to project from the front of the screen or the back of 16:9, the aspect ratio is a component or...
User Guide
Page 33
... defaults when there is pressed. No Signal Screen R C V H D U N Single Use this option to their initial default settings. z Note that the "Keystone Correction", "Projection Mode", "Ceiling Mount", "Startup Screen", "No Signal Screen", and "Blank Screen" settings are always returned to project the projector's built-in logo screen. Logo: Select this sub-menu...
... defaults when there is pressed. No Signal Screen R C V H D U N Single Use this option to their initial default settings. z Note that the "Keystone Correction", "Projection Mode", "Ceiling Mount", "Startup Screen", "No Signal Screen", and "Blank Screen" settings are always returned to project the projector's built-in logo screen. Logo: Select this sub-menu...
User Guide
Page 48
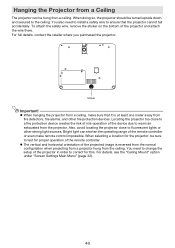
... projected image is at least one meter away from fire detectors, fire alarms, and other strong light sources. Sticker Important! For details, see the "Ceiling Mount" option under "Screen Settings Main Menu" (page 32). 48 When doing so, the projector should be turned upside down, and secured to ensure that it...
... projected image is at least one meter away from fire detectors, fire alarms, and other strong light sources. Sticker Important! For details, see the "Ceiling Mount" option under "Screen Settings Main Menu" (page 32). 48 When doing so, the projector should be turned upside down, and secured to ensure that it...