
User Guide
Page 1
E DATA PROJECTOR XJ-A141/XJ-A146* XJ-A241/XJ-A246* XJ-A251/XJ-A256* * USB Port Models User's Guide z Be sure to keep all user documentation handy for future reference. z Be sure to read the precautions in the separate Setup Guide.
E DATA PROJECTOR XJ-A141/XJ-A146* XJ-A241/XJ-A246* XJ-A251/XJ-A256* * USB Port Models User's Guide z Be sure to keep all user documentation handy for future reference. z Be sure to read the precautions in the separate Setup Guide.
User Guide
Page 3
... the Projector 12 Connecting to a Video Device 13 Connection to a composite video output 13 Connection to a component video output 13 Operation During Projection 14 Selecting the Input Source 14 To select a different input source 14 Resolution ...14 Image Operations During Projection 15 Adjusting Image Brightness 15 To use manual keystone correction 15 Selecting the Color Mode 16 Zooming an Image ...16 Momentarily Blanking the Image and Muting the Audio 17 Freezing an Image...17 Displaying a Pointer in the Projected Image 18 Changing the...
... the Projector 12 Connecting to a Video Device 13 Connection to a composite video output 13 Connection to a component video output 13 Operation During Projection 14 Selecting the Input Source 14 To select a different input source 14 Resolution ...14 Image Operations During Projection 15 Adjusting Image Brightness 15 To use manual keystone correction 15 Selecting the Color Mode 16 Zooming an Image ...16 Momentarily Blanking the Image and Muting the Audio 17 Freezing an Image...17 Displaying a Pointer in the Projected Image 18 Changing the...

User Guide
Page 4
...Factory Defaults 31 Setup Menu Contents 33 Image Adjustment 1 Main Menu 33 Image Adjustment 2 Main Menu 35 Volume Adjustment Main Menu 35 Screen Settings Main Menu 36 Input Settings Main Menu 38 Option Settings 1 Main Menu 39 Option Settings 2 Main Menu 40 USB Settings Main Menu (USB Port Models Only 42 Wireless Main Menu (USB Port Models Only 42 Operational Info Main Menu 42 Restore All Defaults Main Menu 42 Cleaning the Projector 43 Cleaning the Projector Exterior 43 Cleaning the Lens 43 Cleaning Intake and Exhaust Vents 43 Troubleshooting 44 Indicators 44 Error Indicators...
...Factory Defaults 31 Setup Menu Contents 33 Image Adjustment 1 Main Menu 33 Image Adjustment 2 Main Menu 35 Volume Adjustment Main Menu 35 Screen Settings Main Menu 36 Input Settings Main Menu 38 Option Settings 1 Main Menu 39 Option Settings 2 Main Menu 40 USB Settings Main Menu (USB Port Models Only 42 Wireless Main Menu (USB Port Models Only 42 Operational Info Main Menu 42 Restore All Defaults Main Menu 42 Cleaning the Projector 43 Cleaning the Projector Exterior 43 Cleaning the Lens 43 Cleaning Intake and Exhaust Vents 43 Troubleshooting 44 Indicators 44 Error Indicators...
User Guide
Page 6
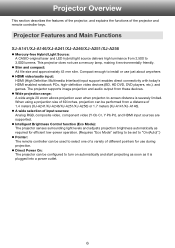
... to install or use a mercury lamp, making it is severely limited. The projector supports image projection and audio output from a distance of 1.4 meters (XJ-A241/XJ-A246/XJ-A251/XJ-A256) or 1.7 meters (XJ-A141/XJ-A146). When using a projection size of different pointers for use during projection. z A wide selection of the projector and remote controller keys. Projector Features and Main Functions XJ-A141/XJ-A146/XJ-A241/XJ-A246/XJ-A251/XJ-A256 z Mercury-free Hybrid Light Source: A CASIO-original laser and LED hybrid light source delivers high luminance...
... to install or use a mercury lamp, making it is severely limited. The projector supports image projection and audio output from a distance of 1.4 meters (XJ-A241/XJ-A246/XJ-A251/XJ-A256) or 1.7 meters (XJ-A141/XJ-A146). When using a projection size of different pointers for use during projection. z A wide selection of the projector and remote controller keys. Projector Features and Main Functions XJ-A141/XJ-A146/XJ-A241/XJ-A246/XJ-A251/XJ-A256 z Mercury-free Hybrid Light Source: A CASIO-original laser and LED hybrid light source delivers high luminance...
User Guide
Page 7
... software for converting PowerPoint presentation data to the projector's USB port for fine resolution projection of documents and other images. z Graphic Scientific Function Calculator Connection: Certain CASIO graphic scientific calculator models can be connected directly to the projector for projection. After a wireless LAN connection is established, the contents of the computer screen can be sent to the projector's USB port for projection of Data from widescreen notebook PCs and HD video input sources. XJ-A241/XJ-A246/XJ-A251/XJ-A256...
... software for converting PowerPoint presentation data to the projector's USB port for fine resolution projection of documents and other images. z Graphic Scientific Function Calculator Connection: Certain CASIO graphic scientific calculator models can be connected directly to the projector for projection. After a wireless LAN connection is established, the contents of the computer screen can be sent to the projector's USB port for projection of Data from widescreen notebook PCs and HD video input sources. XJ-A241/XJ-A246/XJ-A251/XJ-A256...
User Guide
Page 8
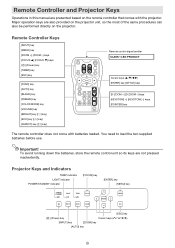
... two supplied batteries before use. Remote Controller and Projector Keys Operations in this manual are presented based on the projector. Remote Controller Keys [INPUT] key [MENU] key [ZOOM +] [ZOOM -] keys [FOCUS S] [FOCUS T] keys [P] (Power) key [TIMER] key [ESC] key [FUNC] key [AUTO] key [BLANK] key [FREEZE] key [COLOR MODE] key [VOLUME] key [BRIGHT] key ([O] key) [ECO] key ([f] key) [ASPECT] key ([Z] key) Remote control signal emitter CLASS 1 LED PRODUCT Cursor keys (S/T/W/X) [ENTER] key ([STYLE] key) [D-ZOOM +] [D-ZOOM -] keys [KEYSTONE +] [KEYSTONE...
... two supplied batteries before use. Remote Controller and Projector Keys Operations in this manual are presented based on the projector. Remote Controller Keys [INPUT] key [MENU] key [ZOOM +] [ZOOM -] keys [FOCUS S] [FOCUS T] keys [P] (Power) key [TIMER] key [ESC] key [FUNC] key [AUTO] key [BLANK] key [FREEZE] key [COLOR MODE] key [VOLUME] key [BRIGHT] key ([O] key) [ECO] key ([f] key) [ASPECT] key ([Z] key) Remote control signal emitter CLASS 1 LED PRODUCT Cursor keys (S/T/W/X) [ENTER] key ([STYLE] key) [D-ZOOM +] [D-ZOOM -] keys [KEYSTONE +] [KEYSTONE...
User Guide
Page 15
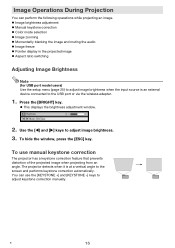
... window. 2. Use the [W] and [X] keys to the USB port or via the wireless adapter. 1. z Image brightness adjustment z Manual keystone correction z Color mode selection z Image zooming z Momentarily blanking the image and muting the audio z Image freeze z Pointer display in the projected image z Aspect ratio switching Adjusting Image Brightness Note (for USB port model users) Use the setup menu (page 25) to adjust image brightness when the input source is at a vertical angle to adjust keystone correction manually. To use the [KEYSTONE +] and [KEYSTONE -] keys to the screen...
... window. 2. Use the [W] and [X] keys to the USB port or via the wireless adapter. 1. z Image brightness adjustment z Manual keystone correction z Color mode selection z Image zooming z Momentarily blanking the image and muting the audio z Image freeze z Pointer display in the projected image z Aspect ratio switching Adjusting Image Brightness Note (for USB port model users) Use the setup menu (page 25) to adjust image brightness when the input source is at a vertical angle to adjust keystone correction manually. To use the [KEYSTONE +] and [KEYSTONE -] keys to the screen...
User Guide
Page 23
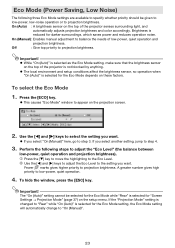
Brightness is selected for "Screen Settings J Projection Mode" (page 37) on the top of the projector senses surrounding light, and automatically adjusts projection brightness and color accordingly. Important! z While "On (Auto)" is selected as the Eco Mode setting, make sure that the brightness sensor on these factors. Use the [W] and [X] keys to select the setting you want . Important! If the "Projection Mode" setting is changed to "Rear" while "On...
Brightness is selected for "Screen Settings J Projection Mode" (page 37) on the top of the projector senses surrounding light, and automatically adjusts projection brightness and color accordingly. Important! z While "On (Auto)" is selected as the Eco Mode setting, make sure that the brightness sensor on these factors. Use the [W] and [X] keys to select the setting you want . Important! If the "Projection Mode" setting is changed to "Rear" while "On...
User Guide
Page 28
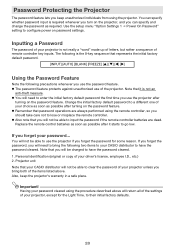
... password... Change the initial factory default password to a different one of remote controller key inputs. Replace the remote control batteries as soon as possible after it is not really a "word" made up of letters, but rather a sequence of your password cleared using the projector. Important! Password Protecting the Projector The password feature lets you will need to enter the initial factory default password the first time you turn on password settings. z Remember that it starts...
... password... Change the initial factory default password to a different one of remote controller key inputs. Replace the remote control batteries as soon as possible after it is not really a "word" made up of letters, but rather a sequence of your password cleared using the projector. Important! Password Protecting the Projector The password feature lets you will need to enter the initial factory default password the first time you turn on password settings. z Remember that it starts...
User Guide
Page 29
... . [INPUT] [AUTO] [BLANK] [FREEZE] [S] [T] [W] [X] 5. We strongly suggest that the password has been changed. Use the [T] key to select "Change Password", and then press the [ENTER] key. After entering the new password, press the [ENTER] key. indicates that you keep a written or other type of record of your password key sequence. [INPUT], [AUTO], [BLANK], [FREEZE], [VOLUME], [COLOR MODE], [D-ZOOM +], [D-ZOOM -], [KEYSTONE +], [KEYSTONE -], [MENU], [POINTER], [O], [f], [Z], [S], [T], [W], [X], [FUNC] 8. Press the [ESC] key. appears. You will display...
... . [INPUT] [AUTO] [BLANK] [FREEZE] [S] [T] [W] [X] 5. We strongly suggest that the password has been changed. Use the [T] key to select "Change Password", and then press the [ENTER] key. After entering the new password, press the [ENTER] key. indicates that you keep a written or other type of record of your password key sequence. [INPUT], [AUTO], [BLANK], [FREEZE], [VOLUME], [COLOR MODE], [D-ZOOM +], [D-ZOOM -], [KEYSTONE +], [KEYSTONE -], [MENU], [POINTER], [O], [f], [Z], [S], [T], [W], [X], [FUNC] 8. Press the [ESC] key. appears. You will display...
User Guide
Page 33
... Unit: The setting unit indicates how a setting is indicated by an asterisk (*). Source Specific*1 Use this sub-menu to adjust the contrast of the settings as follows: R : RGB input C : component video input V : video input H : HDMI (PC) input D : HDMI (DTV) input W : Wireless LAN input (USB port models only) U : USB input (USB port models only) The letter N indicates that appears in the projected image. Input source names are abbreviated as they appear on the setup menu. A larger value makes the image sharper, while a smaller value makes it . Setup Menu Contents This...
... Unit: The setting unit indicates how a setting is indicated by an asterisk (*). Source Specific*1 Use this sub-menu to adjust the contrast of the settings as follows: R : RGB input C : component video input V : video input H : HDMI (PC) input D : HDMI (DTV) input W : Wireless LAN input (USB port models only) U : USB input (USB port models only) The letter N indicates that appears in the projected image. Input source names are abbreviated as they appear on the setup menu. A larger value makes the image sharper, while a smaller value makes it . Setup Menu Contents This...
User Guide
Page 35
... the Image Adjustment 2 main menu to its initial default setting. When this happens, use this setting when there is no input signal will restore defaults for both wireless LAN input (W) and USB input (U). When there is flickering in the projected image while RGB is selected as the input source, it means that is being input when the setting is not correct. When this happens, use this sub-menu to adjust the frequency manually. Phase R Restore Menu R C V Defaults Signal Specific Source Specific Important! Signal Specific...
... the Image Adjustment 2 main menu to its initial default setting. When this happens, use this setting when there is no input signal will restore defaults for both wireless LAN input (W) and USB input (U). When there is flickering in the projected image while RGB is selected as the input source, it means that is being input when the setting is not correct. When this happens, use this sub-menu to adjust the frequency manually. Phase R Restore Menu R C V Defaults Signal Specific Source Specific Important! Signal Specific...
User Guide
Page 38
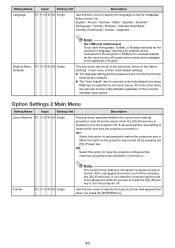
... initial default settings. Restore Menu R C V H D W U N Source Defaults Specific Use this sub-menu to return all of the sub-menu items on display of the name of the currently selected input source. 38 Input Settings Main Menu Setting Name Input Setting Unit Description COMPUTER R C Terminal N Single Use this sub-menu to specify manually the type of signal being input from the projector's AV terminal. Auto*: Automatically detects the signal being input from the video device that the "Signal Name Indicator" setting is connected...
... initial default settings. Restore Menu R C V H D W U N Source Defaults Specific Use this sub-menu to return all of the sub-menu items on display of the name of the currently selected input source. 38 Input Settings Main Menu Setting Name Input Setting Unit Description COMPUTER R C Terminal N Single Use this sub-menu to specify manually the type of signal being input from the projector's AV terminal. Auto*: Automatically detects the signal being input from the video device that the "Signal Name Indicator" setting is connected...
User Guide
Page 40
... the [P] (Power) key. z The "Auto Adjust" item is returned to its initial default only when RGB input is selected for messages, setup menus, etc. Pointer R C V H D W U N Single Note The current zoom setting is not saved if projector power is turned on. Use this option to have Portuguese, Turkish, or Russian selected as the projector's language, selecting an external device connected to the projector's USB port or wireless adapter as the input source will...
... the [P] (Power) key. z The "Auto Adjust" item is returned to its initial default only when RGB input is selected for messages, setup menus, etc. Pointer R C V H D W U N Single Note The current zoom setting is not saved if projector power is turned on. Use this option to have Portuguese, Turkish, or Russian selected as the projector's language, selecting an external device connected to the projector's USB port or wireless adapter as the input source will...
User Guide
Page 42
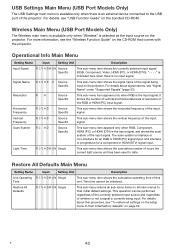
... HDMI (DTV is indicated here when there is the input signal. For details about this unit. Resolution RH Source Specific This sub-menu item appears only when RGB is no input signal. Restore All Defaults Main Menu Setting Name Input Setting Unit Description Unit Operating R C V H D W U N Single Time This sub-menu item shows the cumulative operating time of the input signal. For details about signal names, see the "Wireless Function Guide" on the setup menu to the USB port of...
... HDMI (DTV is indicated here when there is the input signal. For details about this unit. Resolution RH Source Specific This sub-menu item appears only when RGB is no input signal. Restore All Defaults Main Menu Setting Name Input Setting Unit Description Unit Operating R C V H D W U N Single Time This sub-menu item shows the cumulative operating time of the input signal. For details about signal names, see the "Wireless Function Guide" on the setup menu to the USB port of...
User Guide
Page 44
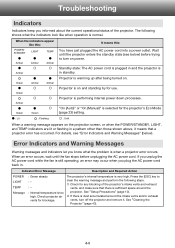
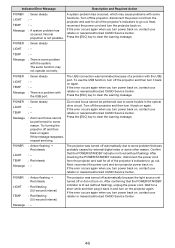
... the projector enters the standby state (see "Error Indicators and Warning Messages" (below ) before unplugging the AC power cord. Check projector air vents for any blocking of the projector. The projector's internal temperature is warming up after being turned on the projection screen, or when the POWER/STANDBY, LIGHT, and TEMP indicators are lit or flashing in standby. Projector is on power. Projector is performing internal power down processes. For details, see below ). Indicator/Error Message Description and Required Action POWER LIGHT TEMP Message : Green steady...
... the projector enters the standby state (see "Error Indicators and Warning Messages" (below ) before unplugging the AC power cord. Check projector air vents for any blocking of the projector. The projector's internal temperature is warming up after being turned on the projection screen, or when the POWER/STANDBY, LIGHT, and TEMP indicators are lit or flashing in standby. Projector is on power. Projector is performing internal power down processes. For details, see below ). Indicator/Error Message Description and Required Action POWER LIGHT TEMP Message : Green steady...
User Guide
Page 45
... internal overheating. Message : - The last time you were using the projector, power turned off due to go out. Confirm that the POWER/STANDBY indicator is sufficient space around the intake vents and/or exhaust vents, turn power back on, contact your retailer or nearest authorized CASIO Service Center. Power has turned off the projector and remove it . The projector will turn the projector back on . TEMP : - POWER : Amber flashing J Red steady LIGHT : Red steady TEMP : Red steady Message : There is a problem...
... internal overheating. Message : - The last time you were using the projector, power turned off due to go out. Confirm that the POWER/STANDBY indicator is sufficient space around the intake vents and/or exhaust vents, turn power back on, contact your retailer or nearest authorized CASIO Service Center. Power has turned off the projector and remove it . The projector will turn the projector back on . TEMP : - POWER : Amber flashing J Red steady LIGHT : Red steady TEMP : Red steady Message : There is a problem...
User Guide
Page 46
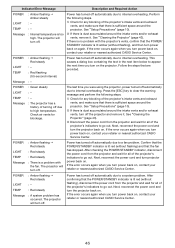
.... POWER : Green steady LIGHT : - If the error occurs again when you turn on , contact your retailer or nearest authorized CASIO Service Center. POWER LIGHT TEMP Message : Green steady :- :- : Zoom and focus cannot be performed due to clear the warning message. Message : There is lit red (without flashing), unplug the power cord. To use the USB function, turn off and then back on , contact your retailer or nearest authorized CASIO Service Center. After checking the POWER/STANDBY indicator, disconnect the power cord from...
.... POWER : Green steady LIGHT : - If the error occurs again when you turn on , contact your retailer or nearest authorized CASIO Service Center. POWER LIGHT TEMP Message : Green steady :- :- : Zoom and focus cannot be performed due to clear the warning message. Message : There is lit red (without flashing), unplug the power cord. To use the USB function, turn off and then back on , contact your retailer or nearest authorized CASIO Service Center. After checking the POWER/STANDBY indicator, disconnect the power cord from...
User Guide
Page 47
...required operation on the projector. Indicator/Error Message POWER : Amber flashing J Red steady LIGHT : Not lit or red flashing TEMP : Red flashing (2-second interval) Message : - Power has turned off automatically due to the component video output terminal of a video device connected to go out. Image color or display is open. Connect the AC power cord correctly. z The computer or video device connected to exit the setup menu. 47 Connect to display the setup menu. 2. On the setup menu, select "Auto" for the "Input Settings J COMPUTER Terminal" setting on . If the input signal...
...required operation on the projector. Indicator/Error Message POWER : Amber flashing J Red steady LIGHT : Not lit or red flashing TEMP : Red flashing (2-second interval) Message : - Power has turned off automatically due to the component video output terminal of a video device connected to go out. Image color or display is open. Connect the AC power cord correctly. z The computer or video device connected to exit the setup menu. 47 Connect to display the setup menu. 2. On the setup menu, select "Auto" for the "Input Settings J COMPUTER Terminal" setting on . If the input signal...

User Guide
Page 48
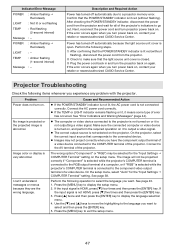
... input source device. The "Option Settings 1 J Power On Password" setting on the setup menu is turned on, so the projector is connected to adjust image focus. not light. Use the [COLOR MODE] key to make sure there is malfunctioning. The remote controller does z The remote controller batteries may not match projector settings. z When a video device's or computer's HDMI output is password protected. Problem Cause and Recommended Action No sound z The projector's volume level setting may be selected for the "Option Settings 2 J HDMI Audio Out" setting...
... input source device. The "Option Settings 1 J Power On Password" setting on the setup menu is turned on, so the projector is connected to adjust image focus. not light. Use the [COLOR MODE] key to make sure there is malfunctioning. The remote controller does z The remote controller batteries may not match projector settings. z When a video device's or computer's HDMI output is password protected. Problem Cause and Recommended Action No sound z The projector's volume level setting may be selected for the "Option Settings 2 J HDMI Audio Out" setting...


