

User Manual
Page 1
For details about setting up the projector, see the User's Guide (Basic Operations). Be sure to read the precautions in the separate User's Guide (Basic Operations). E DATA PROJECTOR XJ-A130/XJ-A135* XJ-A140/XJ-A145* XJ-A230/XJ-A235* XJ-A240/XJ-A245* * USB Port Models User's Guide Be sure to keep all user documentation handy for future reference.
For details about setting up the projector, see the User's Guide (Basic Operations). Be sure to read the precautions in the separate User's Guide (Basic Operations). E DATA PROJECTOR XJ-A130/XJ-A135* XJ-A140/XJ-A145* XJ-A230/XJ-A235* XJ-A240/XJ-A245* * USB Port Models User's Guide Be sure to keep all user documentation handy for future reference.
User Manual
Page 3
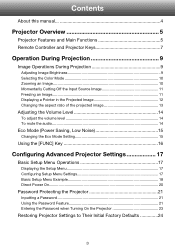
... 5 Remote Controller and Projector Keys 7 Operation During Projection 9 Image Operations During Projection 9 Adjusting Image Brightness 9 Selecting the Color Mode 10 Zooming an Image ...10 Momentarily Cutting Off the Input Source Image 11 Freezing an Image...11 Displaying a Pointer in the Projected Image 12 Changing the aspect ratio of the projected image 13 Adjusting the Volume Level 14 To adjust the volume level 14 To mute the audio...14 Eco Mode (Power Saving, Low Noise 15 Changing the Eco Mode Setting 15 Using the...
... 5 Remote Controller and Projector Keys 7 Operation During Projection 9 Image Operations During Projection 9 Adjusting Image Brightness 9 Selecting the Color Mode 10 Zooming an Image ...10 Momentarily Cutting Off the Input Source Image 11 Freezing an Image...11 Displaying a Pointer in the Projected Image 12 Changing the aspect ratio of the projected image 13 Adjusting the Volume Level 14 To adjust the volume level 14 To mute the audio...14 Eco Mode (Power Saving, Low Noise 15 Changing the Eco Mode Setting 15 Using the...
User Manual
Page 4
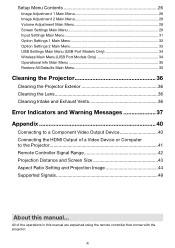
... Menu 35 Cleaning the Projector 36 Cleaning the Projector Exterior 36 Cleaning the Lens 36 Cleaning Intake and Exhaust Vents 36 Error Indicators and Warning Messages 37 Appendix 40 Connecting to a Component Video Output Device 40 Connecting the HDMI Output of the operations in this manual... All of a Video Device or Computer to the Projector 41 Remote Controller Signal Range 42 Projection Distance and Screen Size 43 Aspect Ratio Setting and Projection Image 44 Supported Signals 48 About this manual are explained using the remote controller...
... Menu 35 Cleaning the Projector 36 Cleaning the Projector Exterior 36 Cleaning the Lens 36 Cleaning Intake and Exhaust Vents 36 Error Indicators and Warning Messages 37 Appendix 40 Connecting to a Component Video Output Device 40 Connecting the HDMI Output of the operations in this manual... All of a Video Device or Computer to the Projector 41 Remote Controller Signal Range 42 Projection Distance and Screen Size 43 Aspect Ratio Setting and Projection Image 44 Supported Signals 48 About this manual are explained using the remote controller...
User Manual
Page 5
... PCs and HD video input sources. 5 This makes it is severely limited. When using a projection size of different pointers for use just about anywhere. HDMI video/audio input: HDMI (High Definition Multimedia Interface) input support enables direct connectivity with low power consumption and low heat generation. Slim and compact: A4 file size and approximately 43mm slim. Compact enough to install or use during projection. Direct Power On: The projector can be...
... PCs and HD video input sources. 5 This makes it is severely limited. When using a projection size of different pointers for use just about anywhere. HDMI video/audio input: HDMI (High Definition Multimedia Interface) input support enables direct connectivity with low power consumption and low heat generation. Slim and compact: A4 file size and approximately 43mm slim. Compact enough to install or use during projection. Direct Power On: The projector can be...
User Manual
Page 6
... Connection: Certain CASIO graphic scientific calculator models can be connected directly to the projector's USB port for fine resolution projection of data without using a commercially available USB card reader) can be connected directly to the projector for projection of the calculator screen contents. Projection of Computer Screen Contents via Wireless LAN: The projector comes with a wireless LAN adapter. The projector comes with special software for converting PowerPoint presentation data to a format that can be projected directly from USB...
... Connection: Certain CASIO graphic scientific calculator models can be connected directly to the projector's USB port for fine resolution projection of data without using a commercially available USB card reader) can be connected directly to the projector for projection of the calculator screen contents. Projection of Computer Screen Contents via Wireless LAN: The projector comes with a wireless LAN adapter. The projector comes with special software for converting PowerPoint presentation data to a format that can be projected directly from USB...
User Manual
Page 8
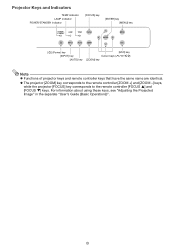
... Indicators TEMP indicator LAMP indicator POWER/STANDBY indicator [FOCUS] key [ENTER] key [MENU] key [P] (Power) key [INPUT] key [AUTO] key [ESC] key Cursor keys (q/w/U/I) [ZOOM] key Note Functions of projector keys and remote controller keys that have the same name are identical. The projector [ZOOM] key corresponds to the remote controller [ZOOM +] and [ZOOM -] keys, while the projector [FOCUS] key corresponds to the remote controller [FOCUS ] and [FOCUS ] keys. For information about using these keys, see "Adjusting...
... Indicators TEMP indicator LAMP indicator POWER/STANDBY indicator [FOCUS] key [ENTER] key [MENU] key [P] (Power) key [INPUT] key [AUTO] key [ESC] key Cursor keys (q/w/U/I) [ZOOM] key Note Functions of projector keys and remote controller keys that have the same name are identical. The projector [ZOOM] key corresponds to the remote controller [ZOOM +] and [ZOOM -] keys, while the projector [FOCUS] key corresponds to the remote controller [FOCUS ] and [FOCUS ] keys. For information about using these keys, see "Adjusting...
User Manual
Page 9
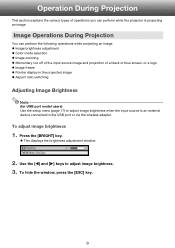
... adjustment Color mode selection Image zooming Momentary cut off of the input source image and projection of operations you can perform while the projector is an external device connected to the USB port or via the wireless adapter. Operation During Projection This section explains the various types of a black or blue screen, or a logo Image freeze Pointer display in the projected image Aspect ratio switching Adjusting Image Brightness Note (for USB port model users) Use the setup menu...
... adjustment Color mode selection Image zooming Momentary cut off of the input source image and projection of operations you can perform while the projector is an external device connected to the USB port or via the wireless adapter. Operation During Projection This section explains the various types of a black or blue screen, or a logo Image freeze Pointer display in the projected image Aspect ratio switching Adjusting Image Brightness Note (for USB port model users) Use the setup menu...
User Manual
Page 12
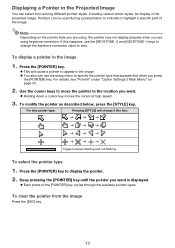
..., see "Pointer" under "Option Settings 2 Main Menu" on the pointer style you are using keystone correction. Pointers can select from the image Press the [ESC] key. 12 Keep pressing the [POINTER] key until the pointer you want is displayed. Each press of the image. Use the cursor keys to move the pointer to the location you want . Holding...
..., see "Pointer" under "Option Settings 2 Main Menu" on the pointer style you are using keystone correction. Pointers can select from the image Press the [ESC] key. 12 Keep pressing the [POINTER] key until the pointer you want is displayed. Each press of the image. Use the cursor keys to move the pointer to the location you want . Holding...

User Manual
Page 15
... low-power, low-noise operation while maintaining lamp brightness to the USB port or via the wireless adapter. 15 Note (for USB port model users) Use the setup menu (page 17) to select the Eco Mode when the input source is selected (filled in). 2. Off : Gives maximum priority to the highlighted Eco Mode name. 3. Changing the Eco Mode Setting 1. The currently selected Eco Mode is the one whose button is an external device connected...
... low-power, low-noise operation while maintaining lamp brightness to the USB port or via the wireless adapter. 15 Note (for USB port model users) Use the setup menu (page 17) to select the Eco Mode when the input source is selected (filled in). 2. Off : Gives maximum priority to the highlighted Eco Mode name. 3. Changing the Eco Mode Setting 1. The currently selected Eco Mode is the one whose button is an external device connected...

User Manual
Page 21
... password operations are dead. Note that represents the initial factory default password. [INPUT] [AUTO] [BLANK] [FREEZE Using the Password Feature Note the following two items to your CASIO distributor to bring both of the items listed above will need to enter the initial factory default password the first time you use the projector if you forget the password for the lamp time, to a different one of remote controller key inputs. Having your password...
... password operations are dead. Note that represents the initial factory default password. [INPUT] [AUTO] [BLANK] [FREEZE Using the Password Feature Note the following two items to your CASIO distributor to bring both of the items listed above will need to enter the initial factory default password the first time you use the projector if you forget the password for the lamp time, to a different one of remote controller key inputs. Having your password...

User Manual
Page 22
... message "The password you to eight key operations long. You can look it . [INPUT] [AUTO] [BLANK] [FREEZE 5. To change the password 1. Enter the current password. If the projector is wrong." Press the [ESC] key to return to display the setup menu. 2. Press the [MENU] key to step 7. 22 We strongly suggest that the password has been changed. Use the [] key to select "Power On Password...
... message "The password you to eight key operations long. You can look it . [INPUT] [AUTO] [BLANK] [FREEZE 5. To change the password 1. Enter the current password. If the projector is wrong." Press the [ESC] key to return to display the setup menu. 2. Press the [MENU] key to step 7. 22 We strongly suggest that the password has been changed. Use the [] key to select "Power On Password...
User Manual
Page 26
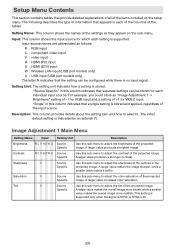
... value increases color saturation. Source Specific Use this column indicates that a single setting is no input signal. Image Adjustment 1 Main Menu Setting Name Input Brightness R C V H DWU Contrast R C V H DWU Sharpness V Saturation V Tint V Setting Unit Description Source Specific Use this sub-menu to adjust the sharpness of the outlines in this sub-menu to adjust the brightness of the projected image. Input source names are abbreviated as they appear on the setup menu. Source Specific Use this column indicates that separate settings can be...
... value increases color saturation. Source Specific Use this column indicates that a single setting is no input signal. Image Adjustment 1 Main Menu Setting Name Input Brightness R C V H DWU Contrast R C V H DWU Sharpness V Saturation V Tint V Setting Unit Description Source Specific Use this sub-menu to adjust the sharpness of the outlines in this sub-menu to adjust the brightness of the projected image. Input source names are abbreviated as they appear on the setup menu. Source Specific Use this column indicates that separate settings can be...
User Manual
Page 28
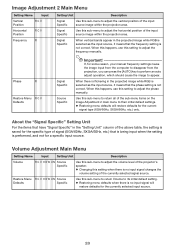
... projection, you can press the [AUTO] key to perform an auto adjust operation, which should cause the image to adjust the volume level of the input source image within the projection area. Image Adjustment 2 Main Menu Setting Name Input Vertical Position RCV Horizontal Position RCV Frequency R Setting Unit Description Signal Specific Use this sub-menu to adjust the frequency manually. When this happens, use this setting to adjust the horizontal position of the projector's speaker. Changing this setting...
... projection, you can press the [AUTO] key to perform an auto adjust operation, which should cause the image to adjust the volume level of the input source image within the projection area. Image Adjustment 2 Main Menu Setting Name Input Vertical Position RCV Horizontal Position RCV Frequency R Setting Unit Description Signal Specific Use this sub-menu to adjust the frequency manually. When this happens, use this setting to adjust the horizontal position of the projector's speaker. Changing this setting...
User Manual
Page 30
... sub-menu to configure the projector for the currently selected input source. Note that the "Keystone Correction", "Projection Mode", "Ceiling Mount", "Startup Screen", "No Signal Screen", and "Blank Screen" settings are always returned to their initial default settings. Restoring menu defaults when there is no input signal to project a black screen. None*: Select this option to project the projector's built-in logo screen. This setting flips the front projected image horizontally. Logo: Select this option to project a blue screen. Logo...
... sub-menu to configure the projector for the currently selected input source. Note that the "Keystone Correction", "Projection Mode", "Ceiling Mount", "Startup Screen", "No Signal Screen", and "Blank Screen" settings are always returned to their initial default settings. Restoring menu defaults when there is no input signal to project a black screen. None*: Select this option to project the projector's built-in logo screen. This setting flips the front projected image horizontally. Logo: Select this option to project a blue screen. Logo...
User Manual
Page 31
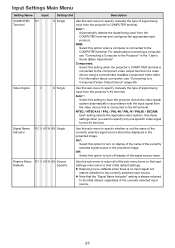
... this option to turn off display of the signal source name. Auto*: Select this setting to have the projector switch the video signal system automatically in the projected image. Signal Name R C V H D W U N Single Indicator Use this sub-menu to specify whether or not the name of the currently selected signal source should be displayed in the "User's Guide (Basic Operations)". Video Signal V N Single Use this sub-menu to specify manually the type of signal being input from the COMPUTER terminal...
... this option to turn off display of the signal source name. Auto*: Select this setting to have the projector switch the video signal system automatically in the projected image. Signal Name R C V H D W U N Single Indicator Use this sub-menu to specify whether or not the name of the currently selected signal source should be displayed in the "User's Guide (Basic Operations)". Video Signal V N Single Use this sub-menu to specify manually the type of signal being input from the COMPUTER terminal...
User Manual
Page 33
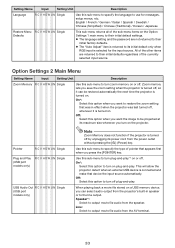
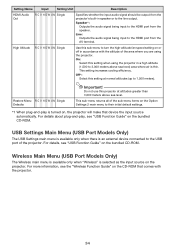
... USB Audio Out R C V H D W U N Single (USB port models only) Note Zoom Memory does not function if the projector is turned on . This will allow the projector detect when an external USB device is selected for messages, setup menus, etc. When playing back a movie file stored on a USB memory device, you save the zoom setting when the projector is turned on . Zoom memory lets you can be projected at its power cord from...
... USB Audio Out R C V H D W U N Single (USB port models only) Note Zoom Memory does not function if the projector is turned on . This will allow the projector detect when an external USB device is selected for messages, setup menus, etc. When playing back a movie file stored on a USB memory device, you save the zoom setting when the projector is turned on . Zoom memory lets you can be projected at its power cord from...
User Manual
Page 34
..., see the "Wireless Function Guide" on the CD-ROM that device the input source automatically. This setting increases cooling efficiency. Setting Name Input Setting Unit Description HDMI Audio Out R C V H D W U N Single Specifies whether the input audio signal should be output from the projector's built-in accordance with the projector. 34 Wireless Main Menu (USB Port Models Only) The Wireless main menu is available only when "Wireless" is an external device connected to the HDMI port from the...
..., see the "Wireless Function Guide" on the CD-ROM that device the input source automatically. This setting increases cooling efficiency. Setting Name Input Setting Unit Description HDMI Audio Out R C V H D W U N Single Specifies whether the input audio signal should be output from the projector's built-in accordance with the projector. 34 Wireless Main Menu (USB Port Models Only) The Wireless main menu is available only when "Wireless" is an external device connected to the HDMI port from the...
User Manual
Page 37
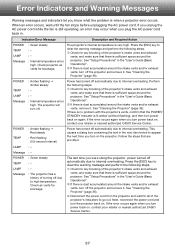
.... See "Cleaning the Projector" (page 36). POWER TEMP : Amber flashing Red steady : Red flashing (0.5-second interval) Power has turned off automatically due to internal overheating. See "Setup Precautions" in the "User's Guide (Basic Operations)". If there is when a projector error occurs. The last time you turn power back on , contact your retailer or nearest authorized CASIO Service Center. 37 If you unplug the AC power cord while the fan is still operating, an error may...
.... See "Cleaning the Projector" (page 36). POWER TEMP : Amber flashing Red steady : Red flashing (0.5-second interval) Power has turned off automatically due to internal overheating. See "Setup Precautions" in the "User's Guide (Basic Operations)". If there is when a projector error occurs. The last time you turn power back on , contact your retailer or nearest authorized CASIO Service Center. 37 If you unplug the AC power cord while the fan is still operating, an error may...
User Manual
Page 38
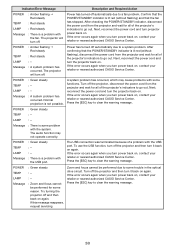
... USB port. LAMP : - If this message reappears, request servicing. If the error occurs again when you turn power back on , contact your retailer or nearest authorized CASIO Service Center. POWER : Amber flashing Red steady TEMP : Red steady LAMP : - Confirm that the POWER/STANDBY indicator is lit red (without flashing) and that the POWER/STANDBY indicator is lit red (without flashing), disconnect the power cord from the projector and wait for all of the projector's indicators to go out. After checking the POWER/STANDBY indicator...
... USB port. LAMP : - If this message reappears, request servicing. If the error occurs again when you turn power back on , contact your retailer or nearest authorized CASIO Service Center. POWER : Amber flashing Red steady TEMP : Red steady LAMP : - Confirm that the POWER/STANDBY indicator is lit red (without flashing) and that the POWER/STANDBY indicator is lit red (without flashing), disconnect the power cord from the projector and wait for all of the projector's indicators to go out. After checking the POWER/STANDBY indicator...
User Manual
Page 39
... the lamp cover is lit red (without flashing), disconnect the power cord from the projector and wait for all of the projector's indicators to go out. If the error occurs again when you turn projector power back on , contact your retailer or nearest authorized CASIO Service Center. After checking the POWER/STANDBY indicator, disconnect the power cord from the projector. Check to go out. POWER : Amber flashing Red steady TEMP : Red flashing (0.5-second interval) LAMP : Red flashing (0.5-second interval) Message : - Power has turned...
... the lamp cover is lit red (without flashing), disconnect the power cord from the projector and wait for all of the projector's indicators to go out. If the error occurs again when you turn projector power back on , contact your retailer or nearest authorized CASIO Service Center. After checking the POWER/STANDBY indicator, disconnect the power cord from the projector. Check to go out. POWER : Amber flashing Red steady TEMP : Red flashing (0.5-second interval) LAMP : Red flashing (0.5-second interval) Message : - Power has turned...

