User Guide
Page 7
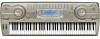
... up to the 620 standards tones, the keyboard also includes 50 realistic drawbar organ tones. You can also select percussion or key click, and even edit the parameters of preset tone and save up to 16 of tones and rhythms by downloading data from the CASIO MUSIC SITE, or by the CD...
... up to the 620 standards tones, the keyboard also includes 50 realistic drawbar organ tones. You can also select percussion or key click, and even edit the parameters of preset tone and save up to 16 of tones and rhythms by downloading data from the CASIO MUSIC SITE, or by the CD...
User Guide
Page 8
...You can use your computer (Internet Data Expansion System) You can also load a card with a standard MIDI file (SMF) and play it back on the keyboard. ❐ Built-in floppy disk drive (WK-3800 only) Save original tones or songs you created with a standard MIDI file (SMF) and play it back... and easy connection to a computer.* * Note that you will need a commercially available USB cable (A-B type) to connect to simplify transfer of data from the CASIO MUSIC SITE. ❐ SD Memory Card Slot A built-in SD memory card slot helps to a computer using the USB port. ❐ Mixer You can ...
...You can use your computer (Internet Data Expansion System) You can also load a card with a standard MIDI file (SMF) and play it back on the keyboard. ❐ Built-in floppy disk drive (WK-3800 only) Save original tones or songs you created with a standard MIDI file (SMF) and play it back... and easy connection to a computer.* * Note that you will need a commercially available USB cable (A-B type) to connect to simplify transfer of data from the CASIO MUSIC SITE. ❐ SD Memory Card Slot A built-in SD memory card slot helps to a computer using the USB port. ❐ Mixer You can ...
User Guide
Page 9
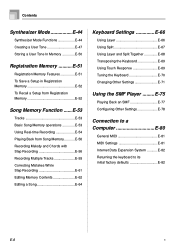
... E-12 Power Supply E-14 Using batteries E-14 Using the AC Adaptor E-15 Auto Power Off E-15 Turning Off the Keyboard E-15 Memory Contents E-16 Connections E-17 Basic Operations E-19 To play the keyboard E-19 Selecting a Tone E-19 PIANO SETTING Button E-20 Using the PITCH BEND Wheel E-21 Using the MODULATION E-21 Using...
... E-12 Power Supply E-14 Using batteries E-14 Using the AC Adaptor E-15 Auto Power Off E-15 Turning Off the Keyboard E-15 Memory Contents E-16 Connections E-17 Basic Operations E-19 To play the keyboard E-19 Selecting a Tone E-19 PIANO SETTING Button E-20 Using the PITCH BEND Wheel E-21 Using the MODULATION E-21 Using...
User Guide
Page 10
...SMF E-77 Configuring Other Settings E-78 Connection to a Computer E-80 General MIDI E-81 MIDI Settings E-81 Internet Data Expansion System E-82 Returning the keyboard to its initial factory defaults E-82 E-8 B E-53 Tracks E-53 Basic Song Memory operations E-53 Using Real-time Recording E-54 Playing Back from ...Step Recording E-56 Recording Multiple Tracks E-59 Correcting Mistakes While Step Recording E-61 Editing Memory Contents E-62 Editing a Song E-64 Keyboard Settings E-66 Using Layer E-66 Using Split E-67 Using Layer and Split Together E-68 Transposing the...
...SMF E-77 Configuring Other Settings E-78 Connection to a Computer E-80 General MIDI E-81 MIDI Settings E-81 Internet Data Expansion System E-82 Returning the keyboard to its initial factory defaults E-82 E-8 B E-53 Tracks E-53 Basic Song Memory operations E-53 Using Real-time Recording E-54 Playing Back from ...Step Recording E-56 Recording Multiple Tracks E-59 Correcting Mistakes While Step Recording E-61 Editing Memory Contents E-62 Editing a Song E-64 Keyboard Settings E-66 Using Layer E-66 Using Split E-67 Using Layer and Split Together E-68 Transposing the...
User Guide
Page 13
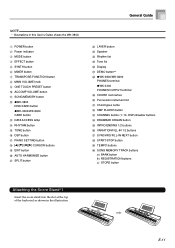
... MEMORY TRACK buttons a) BANK button b) REGISTRATION buttons c) STORE button Attaching the Score Stand*1 Insert the score stand into the slot at the top of the keyboard as shown in the illustration. E-11
... MEMORY TRACK buttons a) BANK button b) REGISTRATION buttons c) STORE button Attaching the Score Stand*1 Insert the score stand into the slot at the top of the keyboard as shown in the illustration. E-11
User Guide
Page 16
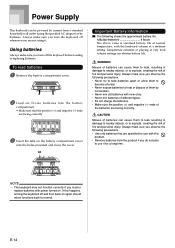
... batteries are not using the specified AC adaptor) or by incineration. • Never mix old batteries with this happens, turning the keyboard off the keyboard before loading or replacing batteries. Always make sure you do not plan to use it for use with new ones. • Never...I The following precautions. • Use only batteries that the positive (+) and negative (-) ends are specified for a long time. Power Supply This keyboard can be powered by current from the product if you observe the following precautions. • Never try to take batteries apart or allow them to...
... batteries are not using the specified AC adaptor) or by incineration. • Never mix old batteries with this happens, turning the keyboard off the keyboard before loading or replacing batteries. Always make sure you do not plan to use it for use with new ones. • Never...I The following precautions. • Use only batteries that the positive (+) and negative (-) ends are specified for a long time. Power Supply This keyboard can be powered by current from the product if you observe the following precautions. • Never try to take batteries apart or allow them to...
User Guide
Page 17
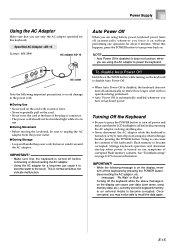
... without performing any other technique besides pressing the POWER button. See "Troubleshooting" on page E-97 for a long time can cause the contents of the keyboard's Flash memory to unplug the AC adaptor from the power outlet. E-15 G During Use • Never pull on the cord with no matter how...user tones, song memory data, etc.) currently stored in use only the AC adaptor specified for this happens, press the POWER button to turn on keyboard power. G During Storage • Loop and bundle the power cord, but never wind it is automatically enabled whenever you turn power back on. ...
... without performing any other technique besides pressing the POWER button. See "Troubleshooting" on page E-97 for a long time can cause the contents of the keyboard's Flash memory to unplug the AC adaptor from the power outlet. E-15 G During Use • Never pull on the cord with no matter how...user tones, song memory data, etc.) currently stored in use only the AC adaptor specified for this happens, press the POWER button to turn on keyboard power. G During Storage • Loop and bundle the power cord, but never wind it is automatically enabled whenever you turn power back on. ...
User Guide
Page 18
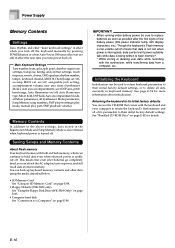
... mode, manual play part, SMF playback volume) Memory Contents In addition to a Computer" on page E-82 for more information about initialization. Main Keyboard Settings Tone number, layer, split, split point, drawbar organ tone settings, transpose, tuning, and contrast settings, touch response, reverb, chorus, DSP... (Synthesizer Mode), user area accompaniments, user DSP area, pitch bend range, Auto Harmonize on power, and still recall data stored in keyboard memory. E-16 See "Bundled CD-ROM Data" on page E-80. Power Supply Memory Contents Settings Tone, rhythm, and other data ...
... mode, manual play part, SMF playback volume) Memory Contents In addition to a Computer" on page E-82 for more information about initialization. Main Keyboard Settings Tone number, layer, split, split point, drawbar organ tone settings, transpose, tuning, and contrast settings, touch response, reverb, chorus, DSP... (Synthesizer Mode), user area accompaniments, user DSP area, pitch bend range, Auto Harmonize on power, and still recall data stored in keyboard memory. E-16 See "Bundled CD-ROM Data" on page E-80. Power Supply Memory Contents Settings Tone, rhythm, and other data ...
User Guide
Page 19
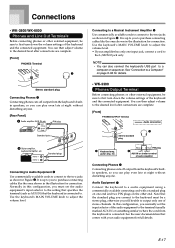
...cables like the ones shown in this configuration, you will be sure to first turn down the volume settings of the keyboard and the connected equipment. Use the keyboard's MAIN VOLUME knob to adjust the volume level. • If your audio equipment for details. • WK-... you can then adjust volume to the desired level after connections are complete. [Front] PHONES/OUTPUT Terminal Audio connection 1 Stereo standard plug 3 Keyboard amp, guitar amp, etc. White Red PIN plug 2 LEFT RIGHT AUX IN or similar terminal of audio amplifier Connecting Phones 1 Connecting phones ...
...cables like the ones shown in this configuration, you will be sure to first turn down the volume settings of the keyboard and the connected equipment. Use the keyboard's MAIN VOLUME knob to adjust the volume level. • If your audio equipment for details. • WK-... you can then adjust volume to the desired level after connections are complete. [Front] PHONES/OUTPUT Terminal Audio connection 1 Stereo standard plug 3 Keyboard amp, guitar amp, etc. White Red PIN plug 2 LEFT RIGHT AUX IN or similar terminal of audio amplifier Connecting Phones 1 Connecting phones ...
User Guide
Page 20
...keys. For details on how to which you are sustained. The wrong type of connector at either end can cause one of the keyboard to the keyboard, and a connector that are sounding when the pedal is depressed are connecting. With a sostenuto pedal, you press the keys and .... Example: WK-3800 SUSTAIN/ASSIGNABLE JACK Terminal E-18 SP-20 Connections Musical Instrument Amplifier 3 Use a commercially available connecting cord to connect the keyboard to sound until the pedal is released. Sustain Pedal • With piano tones, depressing the pedal causes notes to linger, much like a piano...
...keys. For details on how to which you are sustained. The wrong type of connector at either end can cause one of the keyboard to the keyboard, and a connector that are sounding when the pedal is depressed are connecting. With a sostenuto pedal, you press the keys and .... Example: WK-3800 SUSTAIN/ASSIGNABLE JACK Terminal E-18 SP-20 Connections Musical Instrument Amplifier 3 Use a commercially available connecting cord to connect the keyboard to sound until the pedal is released. Sustain Pedal • With piano tones, depressing the pedal causes notes to linger, much like a piano...
User Guide
Page 21
...contain the same data as advanced tones 000 through tone numbers, scrolling jumps across the unused numbers. See "About the DSP Button" on the keyboard. Tone Types Standard Tones: 620 Preset Tones + 124 User Tones Number Number of the available tone names is selected, for tones created by you... tones, which are variations of the same data as shown below. For details about waveforms, see "Using the Drawbar Organ Mode" on the keyboard console. "Advanced Tones" are created by viewing the DSP button. This status can be checked by programming in the above range (standard tones ...
...contain the same data as advanced tones 000 through tone numbers, scrolling jumps across the unused numbers. See "About the DSP Button" on the keyboard. Tone Types Standard Tones: 620 Preset Tones + 124 User Tones Number Number of the available tone names is selected, for tones created by you... tones, which are variations of the same data as shown below. For details about waveforms, see "Using the Drawbar Organ Mode" on the keyboard console. "Advanced Tones" are created by viewing the DSP button. This status can be checked by programming in the above range (standard tones ...
User Guide
Page 22
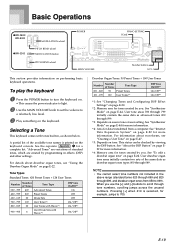
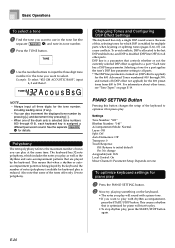
...Auto Harmonize: Off Transpose: 0 Touch Response: Off: Returns to optimize it by pressing [-]. • When one of notes (polyphony) available for keyboard play is reduced. E-20 Because of the tones offer only 10-note polyphony. PIANO SETTING Button Pressing this , selecting tones for which includes the notes...other tones, see "Tone Types" on (DSP effect is assigned a different percussion sound. DSP line is a parameter that are played by the keyboard, the number of the drum sets is selected (tone numbers 600 through 399, and turned off (DSP effect not applied) for a part ...
...Auto Harmonize: Off Transpose: 0 Touch Response: Off: Returns to optimize it by pressing [-]. • When one of notes (polyphony) available for keyboard play is reduced. E-20 Because of the tones offer only 10-note polyphony. PIANO SETTING Button Pressing this , selecting tones for which includes the notes...other tones, see "Tone Types" on (DSP effect is assigned a different percussion sound. DSP line is a parameter that are played by the keyboard, the number of the drum sets is selected (tone numbers 600 through 399, and turned off (DSP effect not applied) for a part ...

User Guide
Page 23
..., or other similar tone. • Modulation affects different tones in the Synthesizer Mode or other mode exits the current mode and then changes the keyboard setup. • The setup of a sound. NOTE • With saxophone and electrical guitar tones, the most realistic sounding effects can go)... the modulation effect using the editing function of a note. It works best with notes that are sustained (held) by keeping a keyboard key held down a keyboard key with your right hand, use the MODULATION Wheel 1 While playing melody notes with your right hand, rotate the MODULATION wheel with...
..., or other similar tone. • Modulation affects different tones in the Synthesizer Mode or other mode exits the current mode and then changes the keyboard setup. • The setup of a sound. NOTE • With saxophone and electrical guitar tones, the most realistic sounding effects can go)... the modulation effect using the editing function of a note. It works best with notes that are sustained (held) by keeping a keyboard key held down a keyboard key with your right hand, use the MODULATION Wheel 1 While playing melody notes with your right hand, rotate the MODULATION wheel with...
User Guide
Page 24
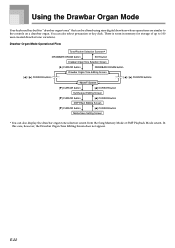
Using the Drawbar Organ Mode Your keyboard has built-in memory for storage of up to the controls on a drawbar organ. In this case, however, the Drawbar Organ Tone Editing Screen does ...
Using the Drawbar Organ Mode Your keyboard has built-in memory for storage of up to the controls on a drawbar organ. In this case, however, the Drawbar Organ Tone Editing Screen does ...
User Guide
Page 26
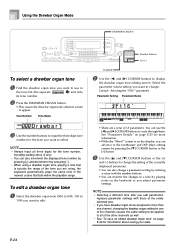
... (if any). • You can also increment the displayed tone number by pressing [+] and decrement it by pressing [-]. • When using , the keyboard automatically plays the same note in the nearest octave that is on page E-26 for the tone you adjust parameter settings. To edit a drawbar organ... different tone after you edit parameters replaces parameter settings with the number buttons. • You can use in a tone by playing notes on the keyboard as well. • See "To save an edited drawbar organ tone" on the display, you can advance to the synthesizer and DSP effect editing...
... (if any). • You can also increment the displayed tone number by pressing [+] and decrement it by pressing [-]. • When using , the keyboard automatically plays the same note in the nearest octave that is on page E-26 for the tone you adjust parameter settings. To edit a drawbar organ... different tone after you edit parameters replaces parameter settings with the number buttons. • You can use in a tone by playing notes on the keyboard as well. • See "To save an edited drawbar organ tone" on the display, you can advance to the synthesizer and DSP effect editing...

User Guide
Page 27
... time, which can edit the Synthesizer Mode parameters and DSP parameters of drawbar organ tones. Click Off on ....... When you hold down a key on the keyboard, the sound produced decays until it takes for the percussion sound to decay. Pressing the key again sounds the note again at a louder volume. Off...
... time, which can edit the Synthesizer Mode parameters and DSP parameters of drawbar organ tones. Click Off on ....... When you hold down a key on the keyboard, the sound produced decays until it takes for the percussion sound to decay. Pressing the key again sounds the note again at a louder volume. Off...
User Guide
Page 29
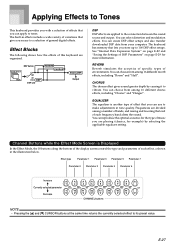
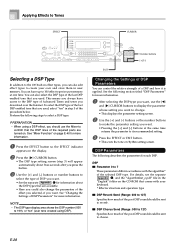
... the bottom of the display screen control the type and parameters of each frequency band alters the sound. E-27 Applying Effects to Tones This keyboard provides you with a selection of effects that you can reproduce the optimal acoustics for the type of music you are playing (classics, for...number of bands, and raising and lowering the level of each effect, a shown in effects include a wide variety of general digital effects. The keyboard has memory that you store up to vibrate. Effect Blocks The following shows how the effects of DSP Parameters" on DSP DSP Line REVERB CHORUS...
... the bottom of the display screen control the type and parameters of each frequency band alters the sound. E-27 Applying Effects to Tones This keyboard provides you with a selection of effects that you can reproduce the optimal acoustics for the type of music you are playing (classics, for...number of bands, and raising and lowering the level of each effect, a shown in effects include a wide variety of general digital effects. The keyboard has memory that you store up to vibrate. Effect Blocks The following shows how the effects of DSP Parameters" on DSP DSP Line REVERB CHORUS...
User Guide
Page 30
... [-] buttons or the number buttons to make the parameter setting you should be sent to chorus. You can also edit effect types to create your keyboard. * Effector structure and operation type I DSP Reverb Send (Range: 000 to 127) Specifies how much of the last DSP enabled tone that the DSP lines...
... [-] buttons or the number buttons to make the parameter setting you should be sent to chorus. You can also edit effect types to create your keyboard. * Effector structure and operation type I DSP Reverb Send (Range: 000 to 127) Specifies how much of the last DSP enabled tone that the DSP lines...

User Guide
Page 31
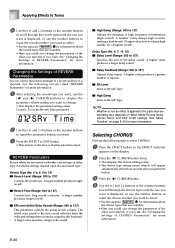
... are currently playing on and off settings. For example, when you whether or not DSP is currently selected for the currently selected part on the keyboard between enabled (DSP line ON) and disabled (DSP line OFF). You cannot change or cancel a demo tune effect. • Changing the effect ... on Mixer Mode Reverb Send, Chorus Send, and DSP on the DSP line for information about fives seconds after you assign an Advanced Tone to a keyboard part (Channels 1 through letters at the current cursor location. • Use the [̇] and [̈] CURSOR buttons to move each part that...
... are currently playing on and off settings. For example, when you whether or not DSP is currently selected for the currently selected part on the keyboard between enabled (DSP line ON) and disabled (DSP line OFF). You cannot change or cancel a demo tune effect. • Changing the effect ... on Mixer Mode Reverb Send, Chorus Send, and DSP on the DSP line for information about fives seconds after you assign an Advanced Tone to a keyboard part (Channels 1 through letters at the current cursor location. • Use the [̇] and [̈] CURSOR buttons to move each part that...
User Guide
Page 32
... want . A larger number produces longer reverb. A higher value produces a larger delay sound. See "Changing the Settings of a reverb and how it is output by this keyboard. I Delay Feedback (Range: 000 to 127) This parameter controls the initial reverb volume. I ER Level (Initial Echo Sound) (Range: 000 to 127) Adjusts delay repeat...
... want . A larger number produces longer reverb. A higher value produces a larger delay sound. See "Changing the Settings of a reverb and how it is output by this keyboard. I Delay Feedback (Range: 000 to 127) This parameter controls the initial reverb volume. I ER Level (Initial Echo Sound) (Range: 000 to 127) Adjusts delay repeat...


