
User Guide
Page 2
... not be sure to provide reasonable protection against harmful interference in accordance with the limits for children under 3 years. • Use only CASIO AD-A12150LW adaptor. • The AC adaptor is completely disconnected from the apparatus. 11. Declaration of the polarized or grounding-...the following two conditions: (1) This device may cause harmful interference to which can radiate radio frequency energy and, if not installed and used , use an AC adaptor that produce heat. 9. TO REDUCE THE RISK OF FIRE OR ELECTRIC SHOCK, REFER SERVICING TO QUALIFIED SERVICE PERSONNEL. Read...
... not be sure to provide reasonable protection against harmful interference in accordance with the limits for children under 3 years. • Use only CASIO AD-A12150LW adaptor. • The AC adaptor is completely disconnected from the apparatus. 11. Declaration of the polarized or grounding-...the following two conditions: (1) This device may cause harmful interference to which can radiate radio frequency energy and, if not installed and used , use an AC adaptor that produce heat. 9. TO REDUCE THE RISK OF FIRE OR ELECTRIC SHOCK, REFER SERVICING TO QUALIFIED SERVICE PERSONNEL. Read...

User Guide
Page 3
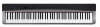
...Product Specifications E-29 Operating Precautions E-30 Appendix A-1 Tone List A-1 Song List A-1 MIDI Implementation Chart Company and product names used in Songs .......... E-20 Parameter List E-21 Reverb E-21 Chorus E-21 Tone selection E-21 Brilliance (BRILLIANCE E-21 Layer...E-19 To configure settings with the keyboard E-19 Keyboard Keys Used for Configuring Settings.......... English Contents General Guide E-2 FUNCTION Button E-3 Saving Settings and Using Operation Lock E-3 Power Outlet E-4 Using an AC Adaptor E-4 Connections E-5 Connecting Headphones E-5 Connecting Audio...
...Product Specifications E-29 Operating Precautions E-30 Appendix A-1 Tone List A-1 Song List A-1 MIDI Implementation Chart Company and product names used in Songs .......... E-20 Parameter List E-21 Reverb E-21 Chorus E-21 Tone selection E-21 Brilliance (BRILLIANCE E-21 Layer...E-19 To configure settings with the keyboard E-19 Keyboard Keys Used for Configuring Settings.......... English Contents General Guide E-2 FUNCTION Button E-3 Saving Settings and Using Operation Lock E-3 Power Outlet E-4 Using an AC Adaptor E-4 Connections E-5 Connecting Headphones E-5 Connecting Audio...
User Guide
Page 5
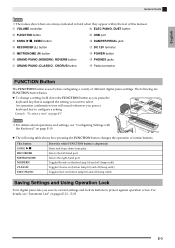
.... Selects the left-hand part. An operation confirmation tone will sound whenever you want to select. Saving Settings and Using Operation Lock Your digital piano lets you press the keyboard key that is used when configuring a variety of certain buttons. z To change a setting, hold down the FUNCTION button as you save its...
.... Selects the left-hand part. An operation confirmation tone will sound whenever you want to select. Saving Settings and Using Operation Lock Your digital piano lets you press the keyboard key that is used when configuring a variety of certain buttons. z To change a setting, hold down the FUNCTION button as you save its...
User Guide
Page 6
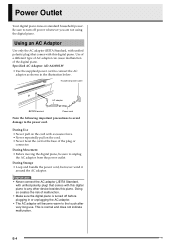
... the digital piano. E-4 B During Movement • Before moving the digital piano, be sure to the power cord. Specified AC Adaptor: AD-A12150LW • Use the supplied power cord to connect the AC adaptor as shown in or unplugging the AC adaptor. • The AC adaptor will become warm to... AC adaptor DC 12V terminal Power cord Note the following important precautions to avoid damage to unplug the AC adaptor from the power outlet. Use of a different type of AC adaptor can cause malfunction of malfunction. • Make sure the digital piano is normal and does not indicate...
... the digital piano. E-4 B During Movement • Before moving the digital piano, be sure to the power cord. Specified AC Adaptor: AD-A12150LW • Use the supplied power cord to connect the AC adaptor as shown in or unplugging the AC adaptor. • The AC adaptor will become warm to... AC adaptor DC 12V terminal Power cord Note the following important precautions to avoid damage to unplug the AC adaptor from the power outlet. Use of a different type of AC adaptor can cause malfunction of malfunction. • Make sure the digital piano is normal and does not indicate...

User Guide
Page 7
...or an Amplifier You can practice even late at night without bothering others. INPUT 1 INPUT 2 Standard plug Connecting Audio Equipment (Figure 1) Use commercially available connecting cords (Mini Plug × 1, Pin Plugs × 2) to connect as it will result in Figure 2. Connecting headphones... headphones PHONES jacks Stereo mini plug Connect commercially available headphones to the digital piano is connected (AUX IN, etc.) Adjust volume using the digital piano's VOLUME controller. * Digital Piano: Stereo mini plug Amplifier : Inputs signals for more powerful volume and better ...
...or an Amplifier You can practice even late at night without bothering others. INPUT 1 INPUT 2 Standard plug Connecting Audio Equipment (Figure 1) Use commercially available connecting cords (Mini Plug × 1, Pin Plugs × 2) to connect as it will result in Figure 2. Connecting headphones... headphones PHONES jacks Stereo mini plug Connect commercially available headphones to the digital piano is connected (AUX IN, etc.) Adjust volume using the digital piano's VOLUME controller. * Digital Piano: Stereo mini plug Amplifier : Inputs signals for more powerful volume and better ...

User Guide
Page 8
... that are specified for use the pedals for expression that is similar to that are sustained until the pedal is required in the column to use the pedal as the tone, pressing this product from the CASIO catalog available from your retailer, and from the CASIO website at the following URL.... NOTE • You can then use with this pedal are depressed are sold separately for ...
... that are specified for use the pedals for expression that is similar to that are sustained until the pedal is required in the column to use the pedal as the tone, pressing this product from the CASIO catalog available from your retailer, and from the CASIO website at the following URL.... NOTE • You can then use with this pedal are depressed are sold separately for ...
User Guide
Page 9
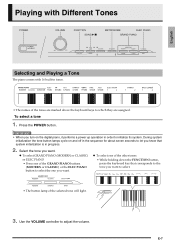
... corresponds to the tone you turn on and off in order to adjust the volume. Select the tone you want . E-7 z To select one you want . Use the VOLUME controller to initialize its system. To select a tone 1. Press the POWER button.
... corresponds to the tone you turn on and off in order to adjust the volume. Select the tone you want . E-7 z To select one you want . Use the VOLUME controller to initialize its system. To select a tone 1. Press the POWER button.

User Guide
Page 10
...BASS 2) Selecting either of the two BASS (LOWER) tones (1 or 2) in the range of the keyboard. While holding down the FUNCTION button, use the BRILLIANCE keys to familiarize yourself with an accompaniment. E-8 BASS 1 PIPE ORGAN (Currently selected tone.) NOTE • To return the keyboard to ...8226; The GRAND PIANO tone (VARIATION) is quick to respond to 3. This is a good choice for musically delicate expressions. Try using the GRAND PIANO buttons. This tone is a natural piano tone that closely resembles the sound of piano pedals operations (acoustic resonance), for...
...BASS 2) Selecting either of the two BASS (LOWER) tones (1 or 2) in the range of the keyboard. While holding down the FUNCTION button, use the BRILLIANCE keys to familiarize yourself with an accompaniment. E-8 BASS 1 PIPE ORGAN (Currently selected tone.) NOTE • To return the keyboard to ...8226; The GRAND PIANO tone (VARIATION) is quick to respond to 3. This is a good choice for musically delicate expressions. Try using the GRAND PIANO buttons. This tone is a natural piano tone that closely resembles the sound of piano pedals operations (acoustic resonance), for...

User Guide
Page 11
While holding down the FUNCTION button and press both of the layered tones. NOTE • You also can layer piano tones by using the procedure under "Selecting and Playing a Tone" (page E-7). When specifying two tones for layering, first tone you press the ELEC PIANO button. &#...unlayer the keyboard, select another tone. • You cannot perform the layer operation when recording to Track 2. HARPSICHORD STRINGS 1 2. English Layering Two Tones Use the following procedure to layer two tones, so they sound at the same time. C1 C2 C3 C4 C5 C6 C7 C8 Initial default (Center...
While holding down the FUNCTION button and press both of the layered tones. NOTE • You also can layer piano tones by using the procedure under "Selecting and Playing a Tone" (page E-7). When specifying two tones for layering, first tone you press the ELEC PIANO button. &#...unlayer the keyboard, select another tone. • You cannot perform the layer operation when recording to Track 2. HARPSICHORD STRINGS 1 2. English Layering Two Tones Use the following procedure to layer two tones, so they sound at the same time. C1 C2 C3 C4 C5 C6 C7 C8 Initial default (Center...

User Guide
Page 12
... To do this: Turn on reverb Select this setting: 1: Room 2: Small Hall 3: Large Hall 4: Stadium • Chorus Value To do this: Turn on and off 1. Using the Metronome 1. Chorus : Adds more breadth to digitally produce complex acoustic effects. The DSP is assigned to each tone whenever you press one of 0, 2, 3, 4, 5, or... the METRONOME button. • This starts the metronome. • The lamp above the SONG a button flash in time with a steady beat. Playing with Different Tones Using Effects Reverb : Makes your notes.
... To do this: Turn on reverb Select this setting: 1: Room 2: Small Hall 3: Large Hall 4: Stadium • Chorus Value To do this: Turn on and off 1. Using the Metronome 1. Chorus : Adds more breadth to digitally produce complex acoustic effects. The DSP is assigned to each tone whenever you press one of 0, 2, 3, 4, 5, or... the METRONOME button. • This starts the metronome. • The lamp above the SONG a button flash in time with a steady beat. Playing with Different Tones Using Effects Reverb : Makes your notes.
User Guide
Page 13
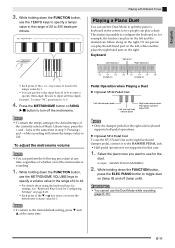
...hand part on the left and the student can play a duet. IMPORTANT! • You cannot use the SP-3 Pedal Unit as the right keyboard damper pedal, connect it possible to configure the ...value by 1. keys at the same time in this case. 1. While holding down the FUNCTION button, use the TEMPO keys to specify a tempo value in the range of whether or not the metronome is ...to input all three digits. Example: GRAND PIANO (MODERN) 2. While holding down the FUNCTION button, use the METRONOME VOLUME keys to specify a volume value in the range of the currently selected Music Library tune...
...hand part on the left and the student can play a duet. IMPORTANT! • You cannot use the SP-3 Pedal Unit as the right keyboard damper pedal, connect it possible to configure the ...value by 1. keys at the same time in this case. 1. While holding down the FUNCTION button, use the TEMPO keys to specify a tempo value in the range of whether or not the metronome is ...to input all three digits. Example: GRAND PIANO (MODERN) 2. While holding down the FUNCTION button, use the METRONOME VOLUME keys to specify a volume value in the range of the currently selected Music Library tune...

User Guide
Page 15
...The tune selection and playback stop operations described above are possible during demo playback. key raises or lowers the song number by 1. • You can use the SONG SELECT keys to digital piano memory. For details, see step 2 under "Playing Back a Specific Music Library Song". 2. Playing Back a... select a specific song during demo tune play . E-13 IMPORTANT! • After you use the value input keys (0 to 9) to stop . The tone assigned to the keyboard is playing. • You can use the procedure below to select one of the song you want to play along with a ...
...The tune selection and playback stop operations described above are possible during demo playback. key raises or lowers the song number by 1. • You can use the SONG SELECT keys to digital piano memory. For details, see step 2 under "Playing Back a Specific Music Library Song". 2. Playing Back a... select a specific song during demo tune play . E-13 IMPORTANT! • After you use the value input keys (0 to 9) to stop . The tone assigned to the keyboard is playing. • You can use the procedure below to select one of the song you want to play along with a ...

User Guide
Page 17
... recorded in memory. • Should power fail during recording, all of two tracks: Track 1 and Track 2. Using the RECORDER Button Each press of recorded data due to malfunction, repair, or for later playback. Tracks A track ... consists of the data in the track you play back together as a single song. Recorded Data • Keyboard play • Tone used • Pedal operations • Reverb and chorus settings (Track 1 only) • Tempo setting (Track 1 only) • Layer... Off Playback Standby Record Standby Normal E-15 IMPORTANT! • CASIO COMPUTER CO., LTD.
... recorded in memory. • Should power fail during recording, all of two tracks: Track 1 and Track 2. Using the RECORDER Button Each press of recorded data due to malfunction, repair, or for later playback. Tracks A track ... consists of the data in the track you play back together as a single song. Recorded Data • Keyboard play • Tone used • Pedal operations • Reverb and chorus settings (Track 1 only) • Tempo setting (Track 1 only) • Layer... Off Playback Standby Record Standby Normal E-15 IMPORTANT! • CASIO COMPUTER CO., LTD.

User Guide
Page 18
... you are recording, configure the beat and tempo settings, and then press the METRONOME button. Select the tone and effects (Track 1 only) you want to use in your recording. • Tone (page E-7) • Effects (page E-10) NOTE • If you want to record. • Make sure that the digital piano ...is standing by for recording to Track 1. 2. See "Using the Metronome" on the keyboard. • Recording will flash to indicate that the indicator lamp for the record track is flashing.
... you are recording, configure the beat and tempo settings, and then press the METRONOME button. Select the tone and effects (Track 1 only) you want to use in your recording. • Tone (page E-7) • Effects (page E-10) NOTE • If you want to record. • Make sure that the digital piano ...is standing by for recording to Track 1. 2. See "Using the Metronome" on the keyboard. • Recording will flash to indicate that the indicator lamp for the record track is flashing.
User Guide
Page 19
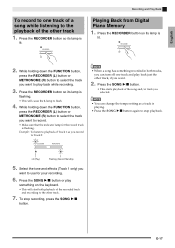
...; This will start both tracks, you can change the tempo setting as you want to play back just the other track, if you want to use for the record track is lit. 2. Lit (Play) Flashing (Record Standby) 5. English To record to one track and play back while recording...
...; This will start both tracks, you can change the tempo setting as you want to play back just the other track, if you want to use for the record track is lit. 2. Lit (Play) Flashing (Record Standby) 5. English To record to one track and play back while recording...

User Guide
Page 21
...at the same time. Type A: Direct input Example: Pressing the STRINGS keyboard key to select the STRINGS 1 tone Type B: Raising or lowering a setting using the numeric keys (0 to 9) Example: To enter "120", press keys 1, 2, 0. E-19 To configure settings with the keyboard 1. Example: To ...other settings. Keyboard Setting Operation Types There are three types of operations that you also can use the FUNCTION button in step 3. Use the "Parameter List" on pages E-21 - E-23. E-23. Type C: Value input using the + and - or T and S keyboard keys • Holding down the FUNCTION ...
...at the same time. Type A: Direct input Example: Pressing the STRINGS keyboard key to select the STRINGS 1 tone Type B: Raising or lowering a setting using the numeric keys (0 to 9) Example: To enter "120", press keys 1, 2, 0. E-19 To configure settings with the keyboard 1. Example: To ...other settings. Keyboard Setting Operation Types There are three types of operations that you also can use the FUNCTION button in step 3. Use the "Parameter List" on pages E-21 - E-23. E-23. Type C: Value input using the + and - or T and S keyboard keys • Holding down the FUNCTION ...

User Guide
Page 22
... bpUSB device mode bkBrilliance boTouch response bnMetronome beat −+ OFF ON OFF ON OFF ON OFF ON E-20 Configuring Settings with the Keyboard Keyboard Keys Used for Configuring Settings • The numbers 1 through cl correspond to the same numbers in the "Parameter List" on pages E-21 -
... bpUSB device mode bkBrilliance boTouch response bnMetronome beat −+ OFF ON OFF ON OFF ON OFF ON E-20 Configuring Settings with the Keyboard Keyboard Keys Used for Configuring Settings • The numbers 1 through cl correspond to the same numbers in the "Parameter List" on pages E-21 -

User Guide
Page 23
...required). • During recording, pressing + and - B Specifies the metronome volume. (page E-11) Remarks • Always enter three digits when using the number keys (0 to 9) to input a value. A Specifies the metronome beat. • The metronome beat setting cannot be changed while ...playback of 120. • Always enter two-digits when using the number keys (0 to 9) to 4 Default: 2 See page E-7. English Configuring Settings with the Keyboard Parameter List ■ Tones...
...required). • During recording, pressing + and - B Specifies the metronome volume. (page E-11) Remarks • Always enter three digits when using the number keys (0 to 9) to input a value. A Specifies the metronome beat. • The metronome beat setting cannot be changed while ...playback of 120. • Always enter two-digits when using the number keys (0 to 9) to 4 Default: 2 See page E-7. English Configuring Settings with the Keyboard Parameter List ■ Tones...

User Guide
Page 25
... piano is turned on /off . computer song data to digital • Each press of the MIDI channels (1 through 16) as the Send channel, which is used for Local control • The Local control setting cannot be the digital piano's buttons (except changed while Music Library playback is in the Duet Mode...
... piano is turned on /off . computer song data to digital • Each press of the MIDI channels (1 through 16) as the Send channel, which is used for Local control • The Local control setting cannot be the digital piano's buttons (except changed while Music Library playback is in the Duet Mode...

User Guide
Page 26
...! • Never connect to a computer that your computer complies with these requirements before starting up your computer automatically. 4. http://world.casio.com/ E-24 B Doing so can connect the digital piano to a computer and exchange MIDI data between them. Connecting the Digital Piano... to Your Computer IMPORTANT! • Make sure you are using. Connecting to a Computer You can cause problems with your computer. z Operating System Windows® XP (SP2 or later)*1 Windows Vista&#...
...! • Never connect to a computer that your computer complies with these requirements before starting up your computer automatically. 4. http://world.casio.com/ E-24 B Doing so can connect the digital piano to a computer and exchange MIDI data between them. Connecting the Digital Piano... to Your Computer IMPORTANT! • Make sure you are using. Connecting to a Computer You can cause problems with your computer. z Operating System Windows® XP (SP2 or later)*1 Windows Vista&#...


