User Guide
Page 2
... instructions. 3. Do not install near water. 6. The wide blade or the third prong are designed to correct the interference by turning the equipment off and on a circuit different from the MAINS, you need to operate the equipment. Refer all servicing to disconnect the AC adaptor before using the AD-12 Adaptor to power the unit, be exposed to the power cord...
... instructions. 3. Do not install near water. 6. The wide blade or the third prong are designed to correct the interference by turning the equipment off and on a circuit different from the MAINS, you need to operate the equipment. Refer all servicing to disconnect the AC adaptor before using the AD-12 Adaptor to power the unit, be exposed to the power cord...
User Guide
Page 3
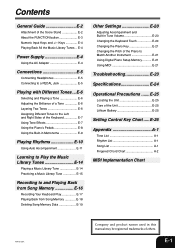
... and product names used in Tune Volume E-20 Changing the Keyboard Touch E-20 Changing the Piano Key E-21 Changing the Pitch of the Score Stand E-2 About the FUNCTION button E-3 Numeric Input Keys and +/- E-4 Power Supply E-4 Using the AC Adaptor E-4 Connections E-5 Connecting Headphones E-5 Connecting to Match Another Instrument E-21 Using Digital Piano Setup Memory E-21 Using MIDI E-21 Troubleshooting E-23 Specifications E-24 Operational Precautions ....... E-1 Contents General Guide E-2 Attachment of the Piano to a PEDAL Jack E-5 Playing with Different Tones ...
... and product names used in Tune Volume E-20 Changing the Keyboard Touch E-20 Changing the Piano Key E-21 Changing the Pitch of the Score Stand E-2 About the FUNCTION button E-3 Numeric Input Keys and +/- E-4 Power Supply E-4 Using the AC Adaptor E-4 Connections E-5 Connecting Headphones E-5 Connecting to Match Another Instrument E-21 Using Digital Piano Setup Memory E-21 Using MIDI E-21 Troubleshooting E-23 Specifications E-24 Operational Precautions ....... E-1 Contents General Guide E-2 Attachment of the Piano to a PEDAL Jack E-5 Playing with Different Tones ...
User Guide
Page 5
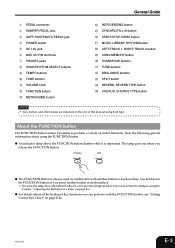
...Example: "Adjusting the Brilliance of this manual using the FUNCTION button. General Guide 1 PEDAL connector 2 DAMPER PEDAL jack 3 SOFT/SOSTENUTO PEDAL jack 4 POWER button 5 DC 12V jack 6 MIDI OUT/IN terminals 7 PHONES jacks 8 SONG/RHYTHM SELECT buttons 9 TEMPO buttons 0 TONE buttons A VOLUME knob B FUNCTION button C METRONOME button D INTRO/ENDING button E SYNCHRO/FILL-IN button F START/STOP, DEMO button G MUSIC LIBRARY, RHYTHM button H LEFT/TRACK 1 RIGHT/TRACK 2 button I SONG MEMORY button J TRANSPOSE buttons K TUNE buttons L BRILLIANCE buttons M SPLIT button N REVERB, REVERB TYPE button...
...Example: "Adjusting the Brilliance of this manual using the FUNCTION button. General Guide 1 PEDAL connector 2 DAMPER PEDAL jack 3 SOFT/SOSTENUTO PEDAL jack 4 POWER button 5 DC 12V jack 6 MIDI OUT/IN terminals 7 PHONES jacks 8 SONG/RHYTHM SELECT buttons 9 TEMPO buttons 0 TONE buttons A VOLUME knob B FUNCTION button C METRONOME button D INTRO/ENDING button E SYNCHRO/FILL-IN button F START/STOP, DEMO button G MUSIC LIBRARY, RHYTHM button H LEFT/TRACK 1 RIGHT/TRACK 2 button I SONG MEMORY button J TRANSPOSE buttons K TUNE buttons L BRILLIANCE buttons M SPLIT button N REVERB, REVERB TYPE button...

User Guide
Page 6
... AC Adaptor Make sure that is preset for the Music Library tune that you turn off before connecting or disconnecting the AC adaptor. • Using the AC adaptor for this time, notes do not sound when you can power this digital piano by plugging it to become warm to the power cord. G During Use • Never pull on the cord with the Music Library tunes on the keyboard, if you hold down the FUNCTION button...
... AC Adaptor Make sure that is preset for the Music Library tune that you turn off before connecting or disconnecting the AC adaptor. • Using the AC adaptor for this time, notes do not sound when you can power this digital piano by plugging it to become warm to the power cord. G During Use • Never pull on the cord with the Music Library tunes on the keyboard, if you hold down the FUNCTION button...
User Guide
Page 7
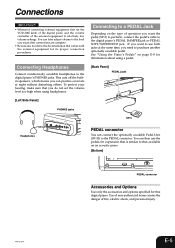
... about using headphones. [Back Panel] PEDAL jacks [Left Side Panel] PHONES jacks SP-3 Headphones PEDAL connector You can then use both jacks at night without disturbing others. Connecting to relatively low volume settings. This cuts off the builtin speakers, which means you can later adjust volume to that comes with the external equipment for this digital piano. You can practice even late at the same time, you want to use the pedals for...
... about using headphones. [Back Panel] PEDAL jacks [Left Side Panel] PHONES jacks SP-3 Headphones PEDAL connector You can then use both jacks at night without disturbing others. Connecting to relatively low volume settings. This cuts off the builtin speakers, which means you can later adjust volume to that comes with the external equipment for this digital piano. You can practice even late at the same time, you want to use the pedals for...
User Guide
Page 9
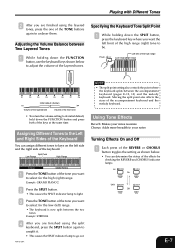
... holding down the FUNCTION button, use the keyboard keys shown below . • You can assign different tones to keys on the left limit of the high range (right) tone to go out. 404A-E-009A NOTE • The split point setting also controls the point where the keyboard splits between the accompaniment keyboard (pages E-12, 13) and the melody keyboard. Using Tone Effects Reverb: Makes your notes resonate Chorus: Adds more breadth to your notes Turning Effects On...
... holding down the FUNCTION button, use the keyboard keys shown below . • You can assign different tones to keys on the left limit of the high range (right) tone to go out. 404A-E-009A NOTE • The split point setting also controls the point where the keyboard splits between the accompaniment keyboard (pages E-12, 13) and the melody keyboard. Using Tone Effects Reverb: Makes your notes resonate Chorus: Adds more breadth to your notes Turning Effects On...
User Guide
Page 10
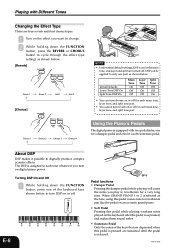
... pedal causes note to turn reverb on or off . When GRAND PIANO 1 or 2 is on digital piano power. Initial Defaults Layer Tone DSP On Split Tone DSP On Main Tone On Off Off Layer Tone Off On Off Split Tone Off Off On • You can be applied to only one of the keyboard keys shown below . Turning DSP On and Off 1 While holding down the FUNCTION button, press one part as the tone, using...
... pedal causes note to turn reverb on or off . When GRAND PIANO 1 or 2 is on digital piano power. Initial Defaults Layer Tone DSP On Split Tone DSP On Main Tone On Off Off Layer Tone Off On Off Split Tone Off Off On • You can be applied to only one of the keyboard keys shown below . Turning DSP On and Off 1 While holding down the FUNCTION button, press one part as the tone, using...
User Guide
Page 11
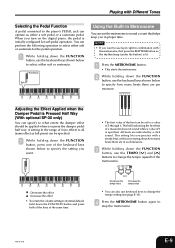
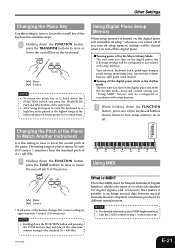
... volume setting to its initial default, hold down the FUNCTION button and press both of 0 is initially configured for the pedal operation. 1 While holding down the FUNCTION button, use the keyboard keys shown below to sound a count that helps keep you turn on the digital piano, the pedal is specified. Adjusting the Effect Applied when the Damper Pedal is Pressed Half Way (With optional SP-30 only) You can use the metronome...
... volume setting to its initial default, hold down the FUNCTION button and press both of 0 is initially configured for the pedal operation. 1 While holding down the FUNCTION button, use the keyboard keys shown below to sound a count that helps keep you turn on the digital piano, the pedal is specified. Adjusting the Effect Applied when the Damper Pedal is Pressed Half Way (With optional SP-30 only) You can use the metronome...

User Guide
Page 12
... same time selects rhythm 0. 2 While holding down the FUNCTION button, use the keyboard keys shown below to input a rhythm number. • If you want your accompaniment rhythm to include percussion instrument sounds, select a rhythm in rhythms. Rhythms 0 through 9 include percussion instrument sounds, but rhythms 10 through 19. 1 Press the RHYTHM button so the RHYTHM indicator lamp (below to input a number. * Tempo Range: 30 to use the TEMPO [ ] and [ ] buttons to change the tempo setting. (1) While holding down the FUNCTION button, press the TEMPO button...
... same time selects rhythm 0. 2 While holding down the FUNCTION button, use the keyboard keys shown below to input a rhythm number. • If you want your accompaniment rhythm to include percussion instrument sounds, select a rhythm in rhythms. Rhythms 0 through 9 include percussion instrument sounds, but rhythms 10 through 19. 1 Press the RHYTHM button so the RHYTHM indicator lamp (below to input a number. * Tempo Range: 30 to use the TEMPO [ ] and [ ] buttons to change the tempo setting. (1) While holding down the FUNCTION button, press the TEMPO button...

User Guide
Page 13
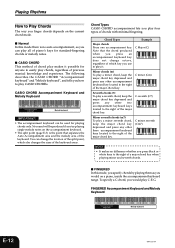
... "How to change the mood of the three chord modes (MODE). With such rhythms, make sure that CASIO CHORD, FINGERED, or FULL RANGE CHORD is selected before stopping auto accompaniment play . Using Auto Accompaniment With auto accompaniment, the keyboard automatically plays rhythm, bass, and chord parts in accordance with chords you select using simplified keyboard fingerings, or chords you play . For more information see "Adjusting Accompaniment and Built-in Tune Volume" on page E-12 for the selected rhythm before you press any drum or rhythm sounds.
... "How to change the mood of the three chord modes (MODE). With such rhythms, make sure that CASIO CHORD, FINGERED, or FULL RANGE CHORD is selected before stopping auto accompaniment play . Using Auto Accompaniment With auto accompaniment, the keyboard automatically plays rhythm, bass, and chord parts in accordance with chords you select using simplified keyboard fingerings, or chords you play . For more information see "Adjusting Accompaniment and Built-in Tune Volume" on page E-12 for the selected rhythm before you press any drum or rhythm sounds.
User Guide
Page 14
... current chord mode. Chord Types CASIO CHORD accompaniment lets you try playing single melody notes on a piano, inside the accompaniment keyboard range. C minor (Cm) C C#DE E F F#GA A B B C C#DE E F Seventh chords (7) To play a seventh chord, keep the major chord key depressed and press any other two accompaniment keyboard keys located to play it possible for playing chords only. Note that separates the Auto Accompaniment area and the melody area of chord play makes it . I CASIO CHORD This method of the keyboard. No sound will be used...
... current chord mode. Chord Types CASIO CHORD accompaniment lets you try playing single melody notes on a piano, inside the accompaniment keyboard range. C minor (Cm) C C#DE E F F#GA A B B C C#DE E F Seventh chords (7) To play a seventh chord, keep the major chord key depressed and press any other two accompaniment keyboard keys located to play it possible for playing chords only. Note that separates the Auto Accompaniment area and the melody area of chord play makes it . I CASIO CHORD This method of the keyboard. No sound will be used...
User Guide
Page 17
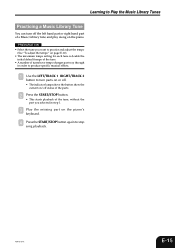
... Tunes Practicing a Music Library Tune You can turn off the left hand part or right hand part of the tune, without the part you want to practice and adjust the tempo (See "To adjust the tempo" on page E-10). • The maximum tempo setting for each tune is double the initial default tempo of the tune. • A number of tunes have tempo changes part way through in step 1. 3 Play the missing part on the piano's keyboard. 4 Press the START...
... Tunes Practicing a Music Library Tune You can turn off the left hand part or right hand part of the tune, without the part you want to practice and adjust the tempo (See "To adjust the tempo" on page E-10). • The maximum tempo setting for each tune is double the initial default tempo of the tune. • A number of tunes have tempo changes part way through in step 1. 3 Play the missing part on the piano's keyboard. 4 Press the START...
User Guide
Page 18
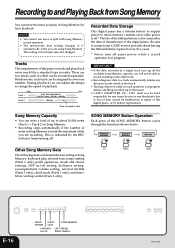
... Track 1 Auto Accompaniment (rhythm, bass, chords), melody Track 2 Melody Data recorded in track Recorded Data Storage This digital piano has a lithium battery to supply power to loss of data caused by the REC indicator lamp turning off .* The life of the SONG MEMORY button cycles through the functions shown below. Playback Standby Record Standby Normal Other Song Memory Data The following data is indicated by malfunction or repair of which can be assigned its own tone number. During playback you are using Song Memory. NOTE...
... Track 1 Auto Accompaniment (rhythm, bass, chords), melody Track 2 Melody Data recorded in track Recorded Data Storage This digital piano has a lithium battery to supply power to loss of data caused by the REC indicator lamp turning off .* The life of the SONG MEMORY button cycles through the functions shown below. Playback Standby Record Standby Normal Other Song Memory Data The following data is indicated by malfunction or repair of which can be assigned its own tone number. During playback you are using Song Memory. NOTE...
User Guide
Page 19
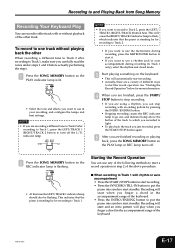
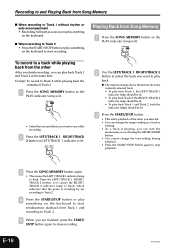
... piano into synchro start standby. NOTE • If you are recording a different tune to Track 2 after recording to Track 1, make sure you carefully read the notes under steps 1 and 2 before actually performing the steps. 1 Press the SONG MEMORY button so the PLAY indicator lamp is standing by for recording to Track 2. • If you want to use the metronome during recording (to Track 1 only), select the rhythm and chord mode. 3 Start playing something on the keyboard. • This will play...
... piano into synchro start standby. NOTE • If you are recording a different tune to Track 2 after recording to Track 1, make sure you carefully read the notes under steps 1 and 2 before actually performing the steps. 1 Press the SONG MEMORY button so the PLAY indicator lamp is standing by for recording to Track 2. • If you want to use the metronome during recording (to Track 1 only), select the rhythm and chord mode. 3 Start playing something on the keyboard. • This will play...
User Guide
Page 20
... rhythm or auto accompaniment • Recording will start recording. To record to a track while playing back from the other After you finish recording, you can turn the metronome on or off using the METRONOME button. • You cannot change the tempo setting as you are finished, press the START/ STOP button again to stop playback. 3 Press the SONG MEMORY button again. • This causes the LEFT/TRACK 1 indicator lamp to flash. Press the LEFT/TRACK 1 RIGHT/ TRACK 2 button...
... rhythm or auto accompaniment • Recording will start recording. To record to a track while playing back from the other After you finish recording, you can turn the metronome on or off using the METRONOME button. • You cannot change the tempo setting as you are finished, press the START/ STOP button again to stop playback. 3 Press the SONG MEMORY button again. • This causes the LEFT/TRACK 1 indicator lamp to flash. Press the LEFT/TRACK 1 RIGHT/ TRACK 2 button...
User Guide
Page 23
... not sound properly for digital signals and connectors that makes it off in the Music Library Mode The next time you turn setup memory on the digital piano and enter the rhythm mode, non-local control setting (see "Using MIDI" below) will remember its setup* whenever you turn on or off the digital piano. Tune selection, keyboard touch, pedal type, damper pedal setting, metronome beat, layered tone volume balance, split point, send channel Turning off the digital piano while in the rhythm mode The next time you turn it possible to exchange musical data between musical...
... not sound properly for digital signals and connectors that makes it off in the Music Library Mode The next time you turn setup memory on the digital piano and enter the rhythm mode, non-local control setting (see "Using MIDI" below) will remember its setup* whenever you turn on or off the digital piano. Tune selection, keyboard touch, pedal type, damper pedal setting, metronome beat, layered tone volume balance, split point, send channel Turning off the digital piano while in the rhythm mode The next time you turn it possible to exchange musical data between musical...
User Guide
Page 24
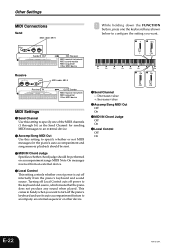
... the FUNCTION button, press one of the MIDI channels (1 through 16) as the Send Channel for the piano's auto accompaniment and song memory playback should be sent. 3 MIDI IN Chord Judge Specifies whether chord judge should be performed on accompaniment range MIDI Note On messages received from an external device. 4 Local Control This setting controls whether or not power is cut off internally from the piano's keyboard and sound source. Turning off Local Control cuts off power to the keyboard...
... the FUNCTION button, press one of the MIDI channels (1 through 16) as the Send Channel for the piano's auto accompaniment and song memory playback should be sent. 3 MIDI IN Chord Judge Specifies whether chord judge should be performed on accompaniment range MIDI Note On messages received from an external device. 4 Local Control This setting controls whether or not power is cut off internally from the piano's keyboard and sound source. Turning off Local Control cuts off power to the keyboard...
User Guide
Page 25
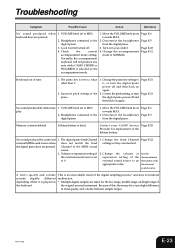
... the external sound source to C, or turn the digital piano power off and then back on the keyboard. Check the current accompaniment mode setting. Page E-6 Page E-5 Memory contents deleted. Local Control turned off and then back on Local control. 4. Normally, the accompaniment keyboard will not produce any note while CASIO CHORD or FINGERED is dead. No sound produced by demo tune play. 1. Disconnect the headphones from the digital piano. Page E-21 Page E-21 No sound produced by connected external MIDI sound source when the digital piano keys...
... the external sound source to C, or turn the digital piano power off and then back on the keyboard. Check the current accompaniment mode setting. Page E-6 Page E-5 Memory contents deleted. Local Control turned off and then back on Local control. 4. Normally, the accompaniment keyboard will not produce any note while CASIO CHORD or FINGERED is dead. No sound produced by demo tune play. 1. Disconnect the headphones from the digital piano. Page E-21 Page E-21 No sound produced by connected external MIDI sound source when the digital piano keys...
User Guide
Page 26
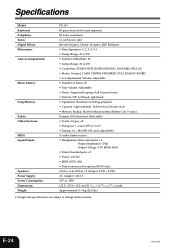
...Tones: Digital Effects: Metronome: Auto Accompaniment: Music Library: Song Memory: Pedals: Other Functions: MIDI: Input/Output: Speakers: Power Supply: Power Consumption: Dimensions: Weight: PX-110 88 piano keys (with layer, split Reverb (4 types), Chorus (4 types), DSP, Brilliance • Time Signatures: 0, 2, 3, 4, 5, 6 • Tempo Range: 30 to 255 • Number of Rhythms: 20 • Tempo Range: 30 to 255 • Controllers: START/STOP, INTRO/ENDING, SYNCHRO/FILL-IN • Modes: Normal, CASIO CHORD, FINGERED, FULL RANGE CHORD • Accompaniment Volume: Adjustable • Number...
...Tones: Digital Effects: Metronome: Auto Accompaniment: Music Library: Song Memory: Pedals: Other Functions: MIDI: Input/Output: Speakers: Power Supply: Power Consumption: Dimensions: Weight: PX-110 88 piano keys (with layer, split Reverb (4 types), Chorus (4 types), DSP, Brilliance • Time Signatures: 0, 2, 3, 4, 5, 6 • Tempo Range: 30 to 255 • Number of Rhythms: 20 • Tempo Range: 30 to 255 • Controllers: START/STOP, INTRO/ENDING, SYNCHRO/FILL-IN • Modes: Normal, CASIO CHORD, FINGERED, FULL RANGE CHORD • Accompaniment Volume: Adjustable • Number...
User Guide
Page 28
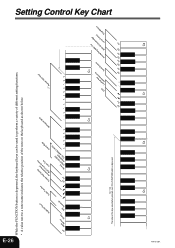
... FUNCTION button is depressed. C3 C4 DSP Layerveodlutomneebalance Send Channel Accomp/SongMMIIDDIIIONuCt hoLrodcJauldCgoentrol Setup Memory Off On -+ Off On Off On Off On Off On C5 C6 C7 C8 404A-E-028A C6 The notes of the note on the keyboard as shown below. Keyboard Touch Off WeakNormal Strong Soft Sostenuto Pedal Function Damper PeAdcacloSmBetuptiianltgn-iinmTeunnCt/eouVnotluTomnee Chord Mode Metronome Beat Off On NormaCl ASIOFCINHGOEFRRUDELLD-RANGE CHORD 0 2 3 4 5 6 - +0 12 +/-, Number Input Keys...
... FUNCTION button is depressed. C3 C4 DSP Layerveodlutomneebalance Send Channel Accomp/SongMMIIDDIIIONuCt hoLrodcJauldCgoentrol Setup Memory Off On -+ Off On Off On Off On Off On C5 C6 C7 C8 404A-E-028A C6 The notes of the note on the keyboard as shown below. Keyboard Touch Off WeakNormal Strong Soft Sostenuto Pedal Function Damper PeAdcacloSmBetuptiianltgn-iinmTeunnCt/eouVnotluTomnee Chord Mode Metronome Beat Off On NormaCl ASIOFCINHGOEFRRUDELLD-RANGE CHORD 0 2 3 4 5 6 - +0 12 +/-, Number Input Keys...


