
User Guide
Page 5
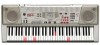
... when unplugging. Cleaning Before cleaning the product, always unplug the AC adaptor from the wall outlet. 3. Location Avoid locating the product on an unstable stand, on a trip or other longterm absence. • At least once a year, unplug the AC adaptor from the wall outlet and disconnect all ... plastic bag the product comes in over , creating the risk of this precaution is built up in your original retailer or an authorized CASIO Service Provider. Particular care concerning this product after it has been damaged by dropping or subjecting it from the wall outlet first. Always...
... when unplugging. Cleaning Before cleaning the product, always unplug the AC adaptor from the wall outlet. 3. Location Avoid locating the product on an unstable stand, on a trip or other longterm absence. • At least once a year, unplug the AC adaptor from the wall outlet and disconnect all ... plastic bag the product comes in over , creating the risk of this precaution is built up in your original retailer or an authorized CASIO Service Provider. Particular care concerning this product after it has been damaged by dropping or subjecting it from the wall outlet first. Always...
User Guide
Page 6
...Sudden power failure when playing at high volumes • Dimming of personal injury. Heavy Objects Never place heavy object on the stand correctly. * Stand is required when using the microphone • Dimming of keyboard lights when notes sound • Loss of power, sound distortion... indicator when a microphone is well illuminated. Sound Volume Do not listen to fall from a connected computer 655A-E-006A Correct Stand* Assembly An incorrectly assembled stand can damage your physician. Make sure you release a key • A totally different tone may sound • Abnormal ...
...Sudden power failure when playing at high volumes • Dimming of personal injury. Heavy Objects Never place heavy object on the stand correctly. * Stand is required when using the microphone • Dimming of keyboard lights when notes sound • Loss of power, sound distortion... indicator when a microphone is well illuminated. Sound Volume Do not listen to fall from a connected computer 655A-E-006A Correct Stand* Assembly An incorrectly assembled stand can damage your physician. Make sure you release a key • A totally different tone may sound • Abnormal ...
User Guide
Page 8
... Voice Fingering Guide E-28 Using the Metronome E-28 Using a Microphone for Karaoke E-29 E-6 655A-E-008A Contents Safety Precautions E-1 Main Features E-5 General Guide E-8 Attaching the Score Stand E-10 Quick Reference E-11 To play the keyboard E-11 Power Supply E-13 Using batteries E-13 Using the AC Adaptor E-13 Auto Power Off E-14 Power...
... Voice Fingering Guide E-28 Using the Metronome E-28 Using a Microphone for Karaoke E-29 E-6 655A-E-008A Contents Safety Precautions E-1 Main Features E-5 General Guide E-8 Attaching the Score Stand E-10 Quick Reference E-11 To play the keyboard E-11 Power Supply E-13 Using batteries E-13 Using the AC Adaptor E-13 Auto Power Off E-14 Power...
User Guide
Page 12
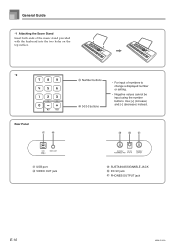
General Guide *1 Attaching the Score Stand Insert both ends of the music stand provided with the keyboard into the two holes on the top surface. *2 Rear Panel g h e Number buttons f [+]/[-] buttons • For input of numbers to change a displayed number or setting. • Negative values cannot be input using the number buttons. i jk g USB port h VIDEO OUT jack i SUSTAIN/ASSIGNABLE JACK j DC 9V jack k PHONES/OUTPUT jack E-10 655A-E-012A Use [+] (increase) and [-] (decrease) instead.
General Guide *1 Attaching the Score Stand Insert both ends of the music stand provided with the keyboard into the two holes on the top surface. *2 Rear Panel g h e Number buttons f [+]/[-] buttons • For input of numbers to change a displayed number or setting. • Negative values cannot be input using the number buttons. i jk g USB port h VIDEO OUT jack i SUSTAIN/ASSIGNABLE JACK j DC 9V jack k PHONES/OUTPUT jack E-10 655A-E-012A Use [+] (increase) and [-] (decrease) instead.

User Guide
Page 27
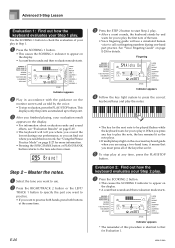
... the hand on the display whose part is selected for practice. 3 Press the STEP 1 button to start Step 1 play. • After a count sounds, they keyboard stands by and waits for you to master your favorite tunes. Pressing a key while another key is held down is played for the corresponding number of...
... the hand on the display whose part is selected for practice. 3 Press the STEP 1 button to start Step 1 play. • After a count sounds, they keyboard stands by and waits for you to master your favorite tunes. Pressing a key while another key is held down is played for the corresponding number of...
User Guide
Page 28
... the display. • A count beat sounds and then evaluation mode starts. 3 Press the STEP 2 button to start Step 2 play. • After a count sounds, the keyboard stands by the voice. • To stop play at the same time. See "Voice Fingering Guide" on -screen keyboard guide when you are lit. 5 To stop...
... the display. • A count beat sounds and then evaluation mode starts. 3 Press the STEP 2 button to start Step 2 play. • After a count sounds, the keyboard stands by the voice. • To stop play at the same time. See "Voice Fingering Guide" on -screen keyboard guide when you are lit. 5 To stop...
User Guide
Page 38
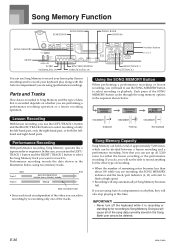
... whether you are performing a performance recording operation or a lesson recording operation. Playback Standby Recording Standby SONG MEMORY off the keyboard while it is recording or standing by re-recording only one of the song data currently stored in the sequence shown below , using (performance recording). If you do, you will stop...
... whether you are performing a performance recording operation or a lesson recording operation. Playback Standby Recording Standby SONG MEMORY off the keyboard while it is recording or standing by re-recording only one of the song data currently stored in the sequence shown below , using (performance recording). If you do, you will stop...


