User Guide
Page 5
... Misuse of batteries can cause it for use it to the AC adaptor, fire, and electric shock. Location Avoid locating the product on an unstable stand, on a trip or other long-term absence. • At least once a year, unplug the AC adaptor from the electrical outlet. E-3 03.10.7, 5:30 PM ...AC adaptor creates the risk of suffocation. Doing so creates the risk of fire and electric shock. Keep off of the product and stand.* Climbing onto the product or stand can cause them to leak resulting in damage to nearby objects, or to explode, creating the risk of damage to tip over...
... Misuse of batteries can cause it for use it to the AC adaptor, fire, and electric shock. Location Avoid locating the product on an unstable stand, on a trip or other long-term absence. • At least once a year, unplug the AC adaptor from the electrical outlet. E-3 03.10.7, 5:30 PM ...AC adaptor creates the risk of suffocation. Doing so creates the risk of fire and electric shock. Keep off of the product and stand.* Climbing onto the product or stand can cause them to leak resulting in damage to nearby objects, or to explode, creating the risk of damage to tip over...

User Guide
Page 6
... into your eyes or onto your physician before using this product. • Use this product, stop using the microphone • Dimming of keyboard lights when notes sound • Loss of the product. LCD panel liquid can tip over or the object to crack, creating the risk of... flashing light can damage your physician. E-4 LK55_e_01-07.p65 4 Heavy Objects Never place heavy object on the stand correctly. * Stand is available as this, be sure to replace them or shift to one of the alternate power sources whenever you release a key • A totally different tone may sound •...
... into your eyes or onto your physician before using this product. • Use this product, stop using the microphone • Dimming of keyboard lights when notes sound • Loss of the product. LCD panel liquid can tip over or the object to crack, creating the risk of... flashing light can damage your physician. E-4 LK55_e_01-07.p65 4 Heavy Objects Never place heavy object on the stand correctly. * Stand is available as this, be sure to replace them or shift to one of the alternate power sources whenever you release a key • A totally different tone may sound •...

User Guide
Page 11
... KEY LIGHT button G ADVANCED 3-STEP LESSON SYSTEM Z SCORING 1 button [ PRACTICE PHRASE button \ SCORING 2 button ] STEP 1 to 3 button ^ METRONOME button a LEFT button, TRACK 1 button b RIGHT button, TRACK 2 button c SPEAK button *1 Attaching the Score Stand Insert the score stand into the slot at the top of the keyboard... as shown in the illustration. 642A-E-011A LK55_e_08-21.p65 9 03.10.7, 5:30 PM E-9 In this manual using bold type. • This keyboard has two PLAY/STOP buttons.
... KEY LIGHT button G ADVANCED 3-STEP LESSON SYSTEM Z SCORING 1 button [ PRACTICE PHRASE button \ SCORING 2 button ] STEP 1 to 3 button ^ METRONOME button a LEFT button, TRACK 1 button b RIGHT button, TRACK 2 button c SPEAK button *1 Attaching the Score Stand Insert the score stand into the slot at the top of the keyboard... as shown in the illustration. 642A-E-011A LK55_e_08-21.p65 9 03.10.7, 5:30 PM E-9 In this manual using bold type. • This keyboard has two PLAY/STOP buttons.

User Guide
Page 30
... for you accidentally press more than one of notes. • Pressing more than one key at any keyboard keys to play the notes. • The key for the next note to play . • After a count sounds, they keyboard stands by arrows around it . STEP2 STEP1 LEFT • If you to be performed with Step 1 play. •...
... for you accidentally press more than one of notes. • Pressing more than one key at any keyboard keys to play the notes. • The key for the next note to play . • After a count sounds, they keyboard stands by arrows around it . STEP2 STEP1 LEFT • If you to be performed with Step 1 play. •...

User Guide
Page 31
...count beat sounds and then evaluation mode starts. Step 2 - Indicator appears Al oha Oe Fingering 3 Follow the key light system to press the correct keyboard keys and play the notes. • The key for more information. • Pressing the SONG BANK button or PIANO BANK button returns to the tune selection screen...hands. • You can also use . 2 Press the STEP 2 button to start Step 2 play. • After a count sounds, the keyboard stands by the voice. • To stop evaluation, press the PLAY/STOP button. Simply select one of the two-hand tunes in accordance with Piano Bank...
...count beat sounds and then evaluation mode starts. Step 2 - Indicator appears Al oha Oe Fingering 3 Follow the key light system to press the correct keyboard keys and play the notes. • The key for more information. • Pressing the SONG BANK button or PIANO BANK button returns to the tune selection screen...hands. • You can also use . 2 Press the STEP 2 button to start Step 2 play. • After a count sounds, the keyboard stands by the voice. • To stop evaluation, press the PLAY/STOP button. Simply select one of the two-hand tunes in accordance with Piano Bank...
User Guide
Page 53
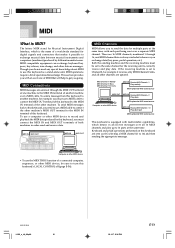
...and computers (machines) produced by selecting a MIDI channel (1 to another machine over a separate MIDI channel. MIDI keyboard or MIDI sound sourcce Computer or other data as a stand-alone unit, MIDI operations require a bit of a worldwide standard for digital signals and connectors that will help ...to get you to send the data for example, it can exchange keyboard key press, key release, tone change, and other MIDI...
...and computers (machines) produced by selecting a MIDI channel (1 to another machine over a separate MIDI channel. MIDI keyboard or MIDI sound sourcce Computer or other data as a stand-alone unit, MIDI operations require a bit of a worldwide standard for digital signals and connectors that will help ...to get you to send the data for example, it can exchange keyboard key press, key release, tone change, and other MIDI...

User Guide
Page 59
...VALUE= 0 PROGRAM CHANGE= 96 *2 RPN stands for smoothly sliding the pitch upwards or downwards during keyboard play . NOTE • Sustain (control number 64), sostenuto (control number 66), and soft (control number 67) effects applied using the control values of this keyboard. MIDI PROGRAM CHANGE This is a list...DATA ENTRY (control numbers 6 and 38). A PROGRAM CHANGE message is a special control change its tone number. The following data. This keyboard does not send pitch bend data, but it can be send or received using CONTROL CHANGE. Receipt of a PROGRAM CHANGE message from ...
...VALUE= 0 PROGRAM CHANGE= 96 *2 RPN stands for smoothly sliding the pitch upwards or downwards during keyboard play . NOTE • Sustain (control number 64), sostenuto (control number 66), and soft (control number 67) effects applied using the control values of this keyboard. MIDI PROGRAM CHANGE This is a list...DATA ENTRY (control numbers 6 and 38). A PROGRAM CHANGE message is a special control change its tone number. The following data. This keyboard does not send pitch bend data, but it can be send or received using CONTROL CHANGE. Receipt of a PROGRAM CHANGE message from ...

User Guide
Page 60
...channel. • Any notes being sustained using a sustain pedal or sostenuto pedal continue to process than 100msec until the next pedal off this keyboard's GM system. Originally, system exclusives were unique to a particular model, but now there are also universal system exclusives that are applicable to... turn off . GM stands for General MIDI. • GM SYSTEM ON takes more than other control changes. ALL NOTES OFF This message turns off , regardless of...
...channel. • Any notes being sustained using a sustain pedal or sostenuto pedal continue to process than 100msec until the next pedal off this keyboard's GM system. Originally, system exclusives were unique to a particular model, but now there are also universal system exclusives that are applicable to... turn off . GM stands for General MIDI. • GM SYSTEM ON takes more than other control changes. ALL NOTES OFF This message turns off , regardless of...
User Guide
Page 75
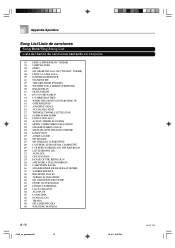
... HERO ("SPIDER-MAN" THEME) 01 COMPLICATED 02 HERO 03 MY HEART WILL GO ON ("TITANIC" THEME) 04 LIVIN' LA VIDA LOCA 05 DAYDREAM BELIEVER 06 STAND BY ME 07 THE GIRL FROM IPANEMA 08 WE WISH YOU A MERRY CHRISTMAS 09 JINGLE BELLS 10 SILENT NIGHT 11 JOY TO THE WORLD 12...
... HERO ("SPIDER-MAN" THEME) 01 COMPLICATED 02 HERO 03 MY HEART WILL GO ON ("TITANIC" THEME) 04 LIVIN' LA VIDA LOCA 05 DAYDREAM BELIEVER 06 STAND BY ME 07 THE GIRL FROM IPANEMA 08 WE WISH YOU A MERRY CHRISTMAS 09 JINGLE BELLS 10 SILENT NIGHT 11 JOY TO THE WORLD 12...


