User Guide
Page 4
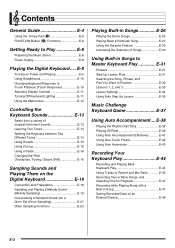
...E-2 E-9 Turning on Power and Playing E-9 Using Headphones E-10 Changing Keyboard Response to Touch Pressure (Touch Response E-10 Adjusting Display Contrast E-11 Turning Off Keyboard Lighting E-11 Using the Metronome E-12 Controlling the Keyboard Sounds E-13 Select from a variety of Songs E-30 Using Built-...in Songs to Master Keyboard Play E-31 Phrases E-31 Step Up Lesson Flow E-31 ...
...E-2 E-9 Turning on Power and Playing E-9 Using Headphones E-10 Changing Keyboard Response to Touch Pressure (Touch Response E-10 Adjusting Display Contrast E-11 Turning Off Keyboard Lighting E-11 Using the Metronome E-12 Controlling the Keyboard Sounds E-13 Select from a variety of Songs E-30 Using Built-...in Songs to Master Keyboard Play E-31 Phrases E-31 Step Up Lesson Flow E-31 ...
User Guide
Page 11
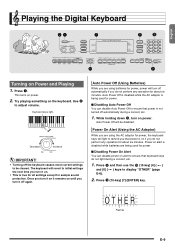
.... O T H E R Flashes E-9 Playing the Digital Keyboard 21 7 bp bs English bo ct Turning on the keyboard. Try playing something on Power and Playing 1. The keyboard will be cleared. Auto Power Off will revert to ensure that keyboard keys do not light during a concert, etc. 1. Power On Alert (Using ... While holding down bp, turn it off automatically if you do not perform any operation for power, power will light to adjust volume. Press 1. Keyboard keys light. Auto Power Off (Using Batteries) While you turn on power. 2. This turns on power. Once you turn...
.... O T H E R Flashes E-9 Playing the Digital Keyboard 21 7 bp bs English bo ct Turning on the keyboard. Try playing something on Power and Playing 1. The keyboard will be cleared. Auto Power Off will revert to ensure that keyboard keys do not light during a concert, etc. 1. Power On Alert (Using ... While holding down bp, turn it off automatically if you do not perform any operation for power, power will light to adjust volume. Press 1. Keyboard keys light. Auto Power Off (Using Batteries) While you turn on power. 2. This turns on power. Once you turn...
User Guide
Page 13
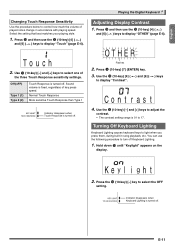
.... • The contrast setting range is turned off . Select the setting that best matches your playing style. 1. Indicator disappears when Keyboard Lighting is 01 to display "Touch" (page E-6). O T H E R Flashes 2. Turning Off Keyboard Lighting Keyboard Lighting causes keyboard keys to select the OFF setting. T o u c h 2. Off (oFF) Type 1 (1) Type 2 (2) Touch Response is fixed, regardless of key press speed. Playing...
.... • The contrast setting range is turned off . Select the setting that best matches your playing style. 1. Indicator disappears when Keyboard Lighting is 01 to display "Touch" (page E-6). O T H E R Flashes 2. Turning Off Keyboard Lighting Keyboard Lighting causes keyboard keys to select the OFF setting. T o u c h 2. Off (oFF) Type 1 (1) Type 2 (2) Touch Response is fixed, regardless of key press speed. Playing...

User Guide
Page 16
...ngs 4. Select the tone for a split keyboard 1. Press cp. Press bp and then use bs (10-key) to select the second tone you want. Example: 021 ELEC.PIANO 1 E.Pi ano1 2. Use bs (10-key) to select the tone you want. Example: 273 FLUTE 1 Flute 1 2. Lights 3. Example: 046 VIBRAPHONE 1 Vi bes... 1 4. Play something on the keyboard. Use bs (10-key) to layer two different tones (such as piano and strings) so they sound simultaneously when you ...
...ngs 4. Select the tone for a split keyboard 1. Press cp. Press bp and then use bs (10-key) to select the second tone you want. Example: 021 ELEC.PIANO 1 E.Pi ano1 2. Use bs (10-key) to select the tone you want. Example: 273 FLUTE 1 Flute 1 2. Lights 3. Example: 046 VIBRAPHONE 1 Vi bes... 1 4. Play something on the keyboard. Use bs (10-key) to layer two different tones (such as piano and strings) so they sound simultaneously when you ...

User Guide
Page 21
...i ng Flashes 3. Output the sound from the external device or microphone. This enters sampling standby. See "Deleting a Sampled Sound" on the Digital Keyboard. • You may not be sure to read "Protecting Against Accidental Deletion of other memory data you want to the following. To sample a sound... Kbytes) Remaining memory capacity No Da t a No sampled sound stored Lights • In place of the microphone. Play something on page E-24 for 10 seconds. The allowable sampling time (in Digital Keyboard memory as tone numbers 571 through 575. To help ensure that you want...
...i ng Flashes 3. Output the sound from the external device or microphone. This enters sampling standby. See "Deleting a Sampled Sound" on the Digital Keyboard. • You may not be sure to read "Protecting Against Accidental Deletion of other memory data you want to the following. To sample a sound... Kbytes) Remaining memory capacity No Da t a No sampled sound stored Lights • In place of the microphone. Play something on page E-24 for 10 seconds. The allowable sampling time (in Digital Keyboard memory as tone numbers 571 through 575. To help ensure that you want...

User Guide
Page 22
...bt to cn). Lights 3. Press the button (bt to cn) that was displayed before step 2 of Sampled Sound Looped Playback You can use the following procedure to loop a sampled sound so it continues to repeat, as you press any keyboard key. • Pressing the keyboard key quickly will ...volume. 3. While the loop is at different pitches. Sampling Sounds and Playing Them on the Digital Keyboard ■ How sampled sounds are played Pressing Middle C (C4) will play on the Digital Keyboard. 1. To select this tone number: 571 572 573 574 575 Press this procedure. E-20 ...
...bt to cn). Lights 3. Press the button (bt to cn) that was displayed before step 2 of Sampled Sound Looped Playback You can use the following procedure to loop a sampled sound so it continues to repeat, as you press any keyboard key. • Pressing the keyboard key quickly will ...volume. 3. While the loop is at different pitches. Sampling Sounds and Playing Them on the Digital Keyboard ■ How sampled sounds are played Pressing Middle C (C4) will play on the Digital Keyboard. 1. To select this tone number: 571 572 573 574 575 Press this procedure. E-20 ...

User Guide
Page 23
...number. 3. Pitch 3 (Ptch3) Changes the pitch from high to low, at an increasing rate. No Da t a Lights • In place of the resonating sound when the keyboard key is released. Press the keyboard key to which you want to apply effects. 2. Press bp to change. Loop 2 (Loop2) Loops the sample sound... and raises the pitch of the above steps, you are assigned to each keyboard key. • You can store up to three drum sets and store them as tone numbers 576, 577, and 578. bq lights. 2. Funny 2 (Funy2) Alternates between high and low. Press cs. Loop 3 (...
...number. 3. Pitch 3 (Ptch3) Changes the pitch from high to low, at an increasing rate. No Da t a Lights • In place of the resonating sound when the keyboard key is released. Press the keyboard key to which you want to apply effects. 2. Press bp to change. Loop 2 (Loop2) Loops the sample sound... and raises the pitch of the above steps, you are assigned to each keyboard key. • You can store up to three drum sets and store them as tone numbers 576, 577, and 578. bq lights. 2. Funny 2 (Funy2) Alternates between high and low. Press cs. Loop 3 (...

User Guide
Page 24
...a sampled sound from the external device or microphone. E-22 There are eight sounds per drum set . Indicates keyboard keys that make up memory space and you can repeat steps 3 through 6 to enter the tone number .... Output the sound from the external device. Press ct. See "Deleting a Sampled Sound" on the Digital Keyboard 5. Press bp and then use the procedures in this procedure. Example: To copy sampled sound of the microphone... destination. Sampling also will start automatically. Samp l i ng Lights 6. Smp l D r m1 Flashes at high speed This is finished, press cs.
...a sampled sound from the external device or microphone. E-22 There are eight sounds per drum set . Indicates keyboard keys that make up memory space and you can repeat steps 3 through 6 to enter the tone number .... Output the sound from the external device. Press ct. See "Deleting a Sampled Sound" on the Digital Keyboard 5. Press bp and then use the procedures in this procedure. Example: To copy sampled sound of the microphone... destination. Sampling also will start automatically. Samp l i ng Lights 6. Smp l D r m1 Flashes at high speed This is finished, press cs.

User Guide
Page 29
...number of the song you want. • See page E-69 for a complete list of the built-in this section to the previous measure. Keyboard keys will continue (repeat) until you press bm to resume playback from the display). Sustain pedal Tempo Note Beat Measure Playing Built-in Songs ...from the point where you release it . ■ Skip Forward 1. Holding down 9 skips back at high speed until you release it . Song playback will light as notes are played. Each press of bk skips ahead one measure. B E-27 You can play back one of available songs. 3. Press br. 2....
...number of the song you want. • See page E-69 for a complete list of the built-in this section to the previous measure. Keyboard keys will continue (repeat) until you press bm to resume playback from the display). Sustain pedal Tempo Note Beat Measure Playing Built-in Songs ...from the point where you release it . ■ Skip Forward 1. Holding down 9 skips back at high speed until you release it . Song playback will light as notes are played. Each press of bk skips ahead one measure. B E-27 You can play back one of available songs. 3. Press br. 2....

User Guide
Page 35
...Play the song on the keyboard in Songs to press next. Song playback will wait for the next note flashes. 3. Lights Master playing the correct note with the correct timing. 4 Song playback will wait until you play the correct note. Lights E-33 Voice fingering guide uses... a simulate voice to announce which finger you should use. Voice fingering guide also uses a simulate voice to announce which finger you should use . 4 Pressing the correct keyboard key causes song playback to press...
...Play the song on the keyboard in Songs to press next. Song playback will wait for the next note flashes. 3. Lights Master playing the correct note with the correct timing. 4 Song playback will wait until you play the correct note. Lights E-33 Voice fingering guide uses... a simulate voice to announce which finger you should use. Voice fingering guide also uses a simulate voice to announce which finger you should use . 4 Pressing the correct keyboard key causes song playback to press...

User Guide
Page 36
... This disables phrase repeat play next. Press bs (10-key) [7] (ENTER) key. This starts Lesson 3. Lights Lights 2. Play the song along with both hand parts and then press bm. Press the keyboard keys you learned in Lessons 1, 2, and 3, it is time to try playing the entire song from beginning... note. • Note guide sounds the correct note to be played. 4 If you are still unable to press the correct keyboard key, the Digital Keyboard will display keyboard guidance and voice fingering guide will wait for Lessons 1, 2, and 3. 1. Try playing with the song playback. Disappears Turning Off...
... This disables phrase repeat play next. Press bs (10-key) [7] (ENTER) key. This starts Lesson 3. Lights Lights 2. Play the song along with both hand parts and then press bm. Press the keyboard keys you learned in Lessons 1, 2, and 3, it is time to try playing the entire song from beginning... note. • Note guide sounds the correct note to be played. 4 If you are still unable to press the correct keyboard key, the Digital Keyboard will display keyboard guidance and voice fingering guide will wait for Lessons 1, 2, and 3. 1. Try playing with the song playback. Disappears Turning Off...

User Guide
Page 38
...the lessons successfully. • In Lesson 2 and Lesson 3, the Digital Keyboard advances to the next lesson if you want to Master Keyboard Play Using Auto Step Up Lesson With Auto Step Up Lesson, the Digital Keyboard advances through all of whether the "Bravo!" Select the song and part... you are able to the first phrase in Songs to practice (page E-27). 2. Listen to achieve the "Bravo!" Flashes Lights 3. evaluation result. • To cancel a ...
...the lessons successfully. • In Lesson 2 and Lesson 3, the Digital Keyboard advances to the next lesson if you want to Master Keyboard Play Using Auto Step Up Lesson With Auto Step Up Lesson, the Digital Keyboard advances through all of whether the "Bravo!" Select the song and part... you are able to the first phrase in Songs to practice (page E-27). 2. Listen to achieve the "Bravo!" Flashes Lights 3. evaluation result. • To cancel a ...
User Guide
Page 39
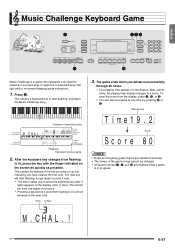
... be changed. • All buttons except 1, bm, and co are disabled while a game is a game that light and to on the screen as quickly as you to press the keyboard key after it goes from the display, press bp, bq, or br. • You can cancel a game ...the Music Challenge song. Press co. The next key will not advance to keyboard keys that measures your score. • Pressing a key before it lights appears on the display. This causes a keyboard key to a score. Music Challenge Keyboard Game 1 brbqbp English bm co Music Challenge is in response to the next ...
... be changed. • All buttons except 1, bm, and co are disabled while a game is a game that light and to on the screen as quickly as you to press the keyboard key after it goes from the display, press bp, bq, or br. • You can cancel a game ...the Music Challenge song. Press co. The next key will not advance to keyboard keys that measures your score. • Pressing a key before it lights appears on the display. This causes a keyboard key to a score. Music Challenge Keyboard Game 1 brbqbp English bm co Music Challenge is in response to the next ...
User Guide
Page 41
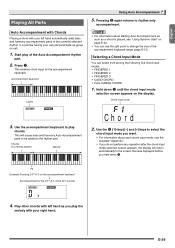
...among the following five chord input modes. • FINGERED 1 • FINGERED 2 • FINGERED 3 • CASIO CHORD • FULL RANGE CHORD 1. F3 Example: Pressing D-F#-A-C on the accompaniment keyboard. Pressing bn again returns to rhythm only accompaniment. • For information about each chord input mode, see "Using...display will cause bass and harmony Auto Accompaniment parts to be added to play of the accompaniment keyboard range (page E-15). Accompaniment keyboard Lights Using Auto Accompaniment 5. Chord input mode 3. Start play chords. Use the accompaniment...
...among the following five chord input modes. • FINGERED 1 • FINGERED 2 • FINGERED 3 • CASIO CHORD • FULL RANGE CHORD 1. F3 Example: Pressing D-F#-A-C on the accompaniment keyboard. Pressing bn again returns to rhythm only accompaniment. • For information about each chord input mode, see "Using...display will cause bass and harmony Auto Accompaniment parts to be added to play of the accompaniment keyboard range (page E-15). Accompaniment keyboard Lights Using Auto Accompaniment 5. Chord input mode 3. Start play chords. Use the accompaniment...

User Guide
Page 46
Configure the tone, rhythm, and other settings you want to record everything you play on the keyboard. • You can use . 5. If you have recorded, press bm again. Flashes Lights 7. Start playing. To stop recording, press bm. Lights Lights 3. Press 5 again. Each press of bm starts and stops playback. To play back what you do...
Configure the tone, rhythm, and other settings you want to record everything you play on the keyboard. • You can use . 5. If you have recorded, press bm again. Flashes Lights 7. Start playing. To stop recording, press bm. Lights Lights 3. Press 5 again. Each press of bm starts and stops playback. To play back what you do...
User Guide
Page 47
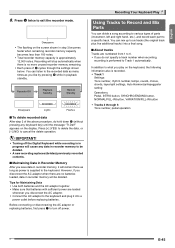
... Use both batteries and the AC adaptor together. • Make sure that batteries with sufficient power are loaded whenever you play on the keyboard, the following information also is recorded. • Track 1 Settings: Tone number, rhythm number, tempo, reverb, chorus, chords, layer/split... on the display. Recorder Off Playback Standby Record Standby Disappears Lights Flashes ■ To delete recorded data After step 3 of 5 cycles through 6 Tone number, pedal operation • Turning off power. Recording Your Keyboard Play Using Tracks to Record and Mix Parts You can mix...
... Use both batteries and the AC adaptor together. • Make sure that batteries with sufficient power are loaded whenever you play on the keyboard, the following information also is recorded. • Track 1 Settings: Tone number, rhythm number, tempo, reverb, chorus, chords, layer/split... on the display. Recorder Off Playback Standby Record Standby Disappears Lights Flashes ■ To delete recorded data After step 3 of 5 cycles through 6 Tone number, pedal operation • Turning off power. Recording Your Keyboard Play Using Tracks to Record and Mix Parts You can mix...

User Guide
Page 48
... stop recording, press bm. • To play as you play on the keyboard to Track 1, perform steps 1 through 5 to re-record a track, press 5. Press bm. Record the first part to input the tone number. 4. Lights Lights 2. After you finish recording all of the tracks, press bm. • ... number not displayed). • If you have recorded, press bm again. Press 5. Repeat steps 2 through 4 under "Recording and Playing Back Keyboard Play" (page E-44). Pressing a key toggles playback of the next track to which you want to record the other tracks and record what you...
... stop recording, press bm. • To play as you play on the keyboard to Track 1, perform steps 1 through 5 to re-record a track, press 5. Press bm. Record the first part to input the tone number. 4. Lights Lights 2. After you finish recording all of the tracks, press bm. • ... number not displayed). • If you have recorded, press bm again. Press 5. Repeat steps 2 through 4 under "Recording and Playing Back Keyboard Play" (page E-44). Pressing a key toggles playback of the next track to which you want to record the other tracks and record what you...

User Guide
Page 49
...delete recorded data After step 2 of the display for playback. 1. Making a new recording replaces (deletes) previously recorded data. 1. Recording Your Keyboard Play Recording while Playing Along with a Built-in recorder memory. Press br. 2. Tone number, song number, pedal operation, tempo, reverb, chorus...play . To stop recording or playback, press bm. 4. Press 5. A song number will disappear if you want to the recording. Lights 3. English Recording Two or More Songs, and Selecting One for Playback You can select a specific song for a few seconds. After that...
...delete recorded data After step 2 of the display for playback. 1. Making a new recording replaces (deletes) previously recorded data. 1. Recording Your Keyboard Play Recording while Playing Along with a Built-in recorder memory. Press br. 2. Tone number, song number, pedal operation, tempo, reverb, chorus...play . To stop recording or playback, press bm. 4. Press 5. A song number will disappear if you want to the recording. Lights 3. English Recording Two or More Songs, and Selecting One for Playback You can select a specific song for a few seconds. After that...
User Guide
Page 50
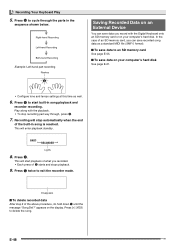
... will start built-in song playback and recorder recording. appears on an External Device You can save recorded song data as well. 6. Recording Your Keyboard Play 5. In the case of an SD memory card, you can save data on your computer's hard disk See page E-61. • Configure... • Each press of the above procedure, do hold down 5 until the message "Song Del?" Press [+] (YES) to exit the recorder mode. Lights 8. Press 5 twice to delete the song. Right-hand Recording Left-hand Recording Both-hand Recording Example: Left-hand part recording Flashes Saving Recorded Data on...
... will start built-in song playback and recorder recording. appears on an External Device You can save recorded song data as well. 6. Recording Your Keyboard Play 5. In the case of an SD memory card, you can save data on your computer's hard disk See page E-61. • Configure... • Each press of the above procedure, do hold down 5 until the message "Song Del?" Press [+] (YES) to exit the recorder mode. Lights 8. Press 5 twice to delete the song. Right-hand Recording Left-hand Recording Both-hand Recording Example: Left-hand part recording Flashes Saving Recorded Data on...
User Guide
Page 52
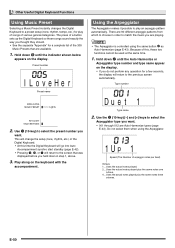
... display. Because of various genres/categories. Uses the actual notes played plus the same notes one octave. 4 ... Preset number I LoveHe r Preset name Lights 2. Use bs (10-key) to select the preset number you thought they should. • See the separate "Appendix" for a complete list of ...a button sets up the Digital Keyboard so those songs sound exactly the way you want . • 001 through 012 are playing. • The Arpeggiator is controlled using the Arpeggiator....
... display. Because of various genres/categories. Uses the actual notes played plus the same notes one octave. 4 ... Preset number I LoveHe r Preset name Lights 2. Use bs (10-key) to select the preset number you thought they should. • See the separate "Appendix" for a complete list of ...a button sets up the Digital Keyboard so those songs sound exactly the way you want . • 001 through 012 are playing. • The Arpeggiator is controlled using the Arpeggiator....


