Owners Manual
Page 2
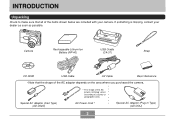
... Ion Battery (NP-40) USB Cradle (CA-31) Strap CD-ROM USB Cable AV Cable Basic Reference • Note that all of the AC adaptor depends on the area where you purchased the camera. Special AC Adaptor (Inlet Type) (AD-C52G) * The shape of the AC power cord plug varies according to make... Power Cord * Special AC Adaptor (Plug-in Type) (AD-C52J) 2 INTRODUCTION INTRODUCTION Unpacking Check to country or geographic area. If something is missing, contact your camera.
... Ion Battery (NP-40) USB Cradle (CA-31) Strap CD-ROM USB Cable AV Cable Basic Reference • Note that all of the AC adaptor depends on the area where you purchased the camera. Special AC Adaptor (Inlet Type) (AD-C52G) * The shape of the AC power cord plug varies according to make... Power Cord * Special AC Adaptor (Plug-in Type) (AD-C52J) 2 INTRODUCTION INTRODUCTION Unpacking Check to country or geographic area. If something is missing, contact your camera.
Owners Manual
Page 3
... record an image 21 To view a recorded image 22 To delete an image 22 23 GETTING READY About This Manual 23 General Guide 24 Camera 24 USB Cradle 27 Monitor Screen Contents 28 REC Modes 28 PLAY Mode 32 Changing the Contents of the Monitor Screen 33 Attaching the Strap 35 Power... Settings ... 51 To configure display language and clock settings 52 54 BASIC IMAGE RECORDING Recording an Image 54 Specifying the Recording Mode 54 Aiming the Camera 55 Recording an Image 56 Using the Optical Viewfinder 62 Using Zoom 63 Optical Zoom 63 Digital Zoom 65 3
... record an image 21 To view a recorded image 22 To delete an image 22 23 GETTING READY About This Manual 23 General Guide 24 Camera 24 USB Cradle 27 Monitor Screen Contents 28 REC Modes 28 PLAY Mode 32 Changing the Contents of the Monitor Screen 33 Attaching the Strap 35 Power... Settings ... 51 To configure display language and clock settings 52 54 BASIC IMAGE RECORDING Recording an Image 54 Specifying the Recording Mode 54 Aiming the Camera 55 Recording an Image 56 Using the Optical Viewfinder 62 Using Zoom 63 Optical Zoom 63 Digital Zoom 65 3
Owners Manual
Page 6
INTRODUCTION Adding Audio to a Snapshot 177 To re-record audio 178 Playing Back a Voice Recording File 179 Displaying Camera Images on a TV Screen 180 Selecting the Video Output System 181 183 DELETING FILES Deleting a Single File 183 Deleting All Files 184 185 FILE MANAGEMENT ... 196 Editing the Date and Time of an Image 197 Changing the Display Language 198 Changing the Brightness of the Monitor Screen ..... 199 Changing the USB Port Protocol 200 Configuring [ ] (REC) and [ ] (PLAY) Power On/Off Functions 201 Formatting Built-in Memory 202 6
INTRODUCTION Adding Audio to a Snapshot 177 To re-record audio 178 Playing Back a Voice Recording File 179 Displaying Camera Images on a TV Screen 180 Selecting the Video Output System 181 183 DELETING FILES Deleting a Single File 183 Deleting All Files 184 185 FILE MANAGEMENT ... 196 Editing the Date and Time of an Image 197 Changing the Display Language 198 Changing the Brightness of the Monitor Screen ..... 199 Changing the USB Port Protocol 200 Configuring [ ] (REC) and [ ] (PLAY) Power On/Off Functions 201 Formatting Built-in Memory 202 6
Owners Manual
Page 7
INTRODUCTION 203 USING A MEMORY CARD Using a Memory Card 204 To insert a memory card into the camera 204 To replace the memory card 205 Formatting a Memory Card 206 Copying Files 207 To copy all the files in built-in memory to a memory... 212 To configure print settings for all images 213 Using PictBridge or USB DIRECT-PRINT 214 Date Printing 218 PRINT Image Matching III 219 Exif Print 219 220 VIEWING IMAGES ON A COMPUTER Using the Camera with a Windows Computer ........ 220 Using the Camera with a Macintosh Computer ....... 228 Using a Memory Card to Transfer Images ...
INTRODUCTION 203 USING A MEMORY CARD Using a Memory Card 204 To insert a memory card into the camera 204 To replace the memory card 205 Formatting a Memory Card 206 Copying Files 207 To copy all the files in built-in memory to a memory... 212 To configure print settings for all images 213 Using PictBridge or USB DIRECT-PRINT 214 Date Printing 218 PRINT Image Matching III 219 Exif Print 219 220 VIEWING IMAGES ON A COMPUTER Using the Camera with a Windows Computer ........ 220 Using the Camera with a Macintosh Computer ....... 228 Using a Memory Card to Transfer Images ...
Owners Manual
Page 8
INTRODUCTION 238 USING THE CAMERA WITH A COMPUTER Using the Camera with a Windows Computer ........ 238 Selecting the Software You ... Movie 250 Viewing User Documentation (PDF Files) 252 User Registration 252 Exiting the Menu Application 252 Using the Camera with a Macintosh Computer ....... 253 Selecting the Software You Need 253 Computer System Requirements 254 Managing Images on ... 256 Viewing User Documentation (PDF Files) 258 To register as a camera user 258 259 APPENDIX Menu Reference 259 Indicator Lamp Reference 262 Troubleshooting Guide 265 If you have...
INTRODUCTION 238 USING THE CAMERA WITH A COMPUTER Using the Camera with a Windows Computer ........ 238 Selecting the Software You ... Movie 250 Viewing User Documentation (PDF Files) 252 User Registration 252 Exiting the Menu Application 252 Using the Camera with a Macintosh Computer ....... 253 Selecting the Software You Need 253 Computer System Requirements 254 Managing Images on ... 256 Viewing User Documentation (PDF Files) 258 To register as a camera user 258 259 APPENDIX Menu Reference 259 Indicator Lamp Reference 262 Troubleshooting Guide 265 If you have...
Owners Manual
Page 10
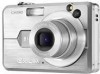
...Internet without using a memory card. • Bundled with a USB Cradle The bundled USB cradle can be used to charge the camera's battery (page 37), to view images on the camera and enter the mode you view images while the camera is on the cradle (page 174). • REC mode or...images to use. • AF assist light (page 59) Improves auto focus accuracy when shooting under dim lighting. • 24X zoom (page 63) 3X optical zoom, 8X digital zoom • Flash Assist (page 71) This feature compensates when flash intensity is a product of the latest LCD manufacturing technology that less...
...Internet without using a memory card. • Bundled with a USB Cradle The bundled USB cradle can be used to charge the camera's battery (page 37), to view images on the camera and enter the mode you view images while the camera is on the cradle (page 174). • REC mode or...images to use. • AF assist light (page 59) Improves auto focus accuracy when shooting under dim lighting. • 24X zoom (page 63) 3X optical zoom, 8X digital zoom • Flash Assist (page 71) This feature compensates when flash intensity is a product of the latest LCD manufacturing technology that less...
Owners Manual
Page 13
...be used when specifying images and quantities for Camera File system) data storage protocol provides image compatibility between the digital camera and printers. • Bundled with Photo Loader and Photohands (pages 242, 245, 255) Your camera comes bundled with Photohands, and application that ...Storage (page 234) DCF (Design rule for printing by professional print services. • PictBridge and USB DIRECT-PRINT support (page 214) Connect directly to a PictBridge or USB DIRECT-PRINT compatible printer and you want using a DPOF compatible printer. INTRODUCTION • Support for SD...
...be used when specifying images and quantities for Camera File system) data storage protocol provides image compatibility between the digital camera and printers. • Bundled with Photo Loader and Photohands (pages 242, 245, 255) Your camera comes bundled with Photohands, and application that ...Storage (page 234) DCF (Design rule for printing by professional print services. • PictBridge and USB DIRECT-PRINT support (page 214) Connect directly to a PictBridge or USB DIRECT-PRINT compatible printer and you want using a DPOF compatible printer. INTRODUCTION • Support for SD...
Owners Manual
Page 16
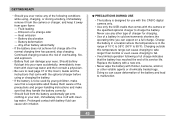
... corruption of test images and check the results to ensure that the camera is configured correctly and operating properly. Removing the battery, removing the memory card, or placing the camera onto the USB cradle while the green operation lamp is still flashing after you first...number of data in file memory. - Removing the battery or memory card, or setting the camera onto the USB cradle while the camera is being performed - INTRODUCTION I Data Error Precautions • Your digital camera is manufactured using the camera to record important images, make sure you turn off the...
... corruption of test images and check the results to ensure that the camera is configured correctly and operating properly. Removing the battery, removing the memory card, or placing the camera onto the USB cradle while the green operation lamp is still flashing after you first...number of data in file memory. - Removing the battery or memory card, or setting the camera onto the USB cradle while the camera is being performed - INTRODUCTION I Data Error Precautions • Your digital camera is manufactured using the camera to record important images, make sure you turn off the...

Owners Manual
Page 18
...; If the exterior of the lens. The date and time will reset whenever the camera is due to power this camera. Doing so can remove dust particles from the lens surface by the battery and/or the USB cradle for about 24 hours. Avoid touching the flash. If the flash becomes dirty, ...wipe it clean with proper operation of the camera. I Lens • Never apply too much force when cleaning the surface of the...
...; If the exterior of the lens. The date and time will reset whenever the camera is due to power this camera. Doing so can remove dust particles from the lens surface by the battery and/or the USB cradle for about 24 hours. Avoid touching the flash. If the flash becomes dirty, ...wipe it clean with proper operation of the camera. I Lens • Never apply too much force when cleaning the surface of the...
Owners Manual
Page 19
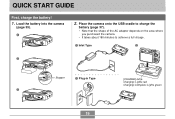
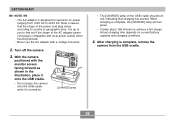
Place the camera onto the USB cradle to charge the battery (page 37). • Note that the shape of the AC adaptor depends on the area where you purchased the camera. • It takes about 180 minutes to achieve a full charge. 1 Inlet Type 2 2 Stopper 1 Plug-in Type [CHARGE] lamp Charging: Lights red Charging Complete: Lights green 3 19 QUICK START GUIDE QUICK START GUIDE First, charge the battery! 1. Load the battery into the camera (page 35). 1 2.
Place the camera onto the USB cradle to charge the battery (page 37). • Note that the shape of the AC adaptor depends on the area where you purchased the camera. • It takes about 180 minutes to achieve a full charge. 1 Inlet Type 2 2 Stopper 1 Plug-in Type [CHARGE] lamp Charging: Lights red Charging Complete: Lights green 3 19 QUICK START GUIDE QUICK START GUIDE First, charge the battery! 1. Load the battery into the camera (page 35). 1 2.
Owners Manual
Page 27
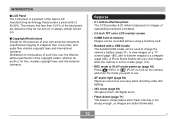
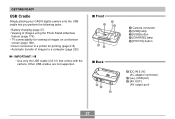
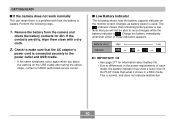
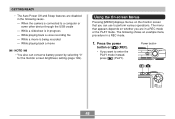
GETTING READY USB Cradle Simply placing your CASIO digital camera onto the USB cradle lets you perform the following tasks. • Battery charging (page 37) • Viewing of images using the Photo Stand slideshow feature (page 174). &#...a printer for printing (page 215) • Automatic transfer of images to a computer (page 220) IMPORTANT! • Use only the USB cradle (CA-31) that comes with the camera. Other USB cradles are not supported. I Front 2 13 54 I Back 67 8 1 Camera connector 2 [USB] lamp 3 [USB] button 4 [CHARGE] lamp 5 [PHOTO] button 6 [DC IN 5.3V] (AC adaptor connector...
GETTING READY USB Cradle Simply placing your CASIO digital camera onto the USB cradle lets you perform the following tasks. • Battery charging (page 37) • Viewing of images using the Photo Stand slideshow feature (page 174). &#...a printer for printing (page 215) • Automatic transfer of images to a computer (page 220) IMPORTANT! • Use only the USB cradle (CA-31) that comes with the camera. Other USB cradles are not supported. I Front 2 13 54 I Back 67 8 1 Camera connector 2 [USB] lamp 3 [USB] button 4 [CHARGE] lamp 5 [PHOTO] button 6 [DC IN 5.3V] (AC adaptor connector...
Owners Manual
Page 37
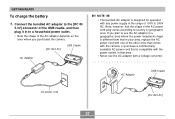
...[DC IN 5.3V] 37 GETTING READY To charge the battery 1. If you purchased the camera. [DC IN 5.3V] USB Cradle AC Adaptor NOTE • The bundled AC adaptor is compatible with the power outlets ... in the range of the AC power cord plug varies according to use the AC adaptor with the camera, or purchase a commercially available AC power cord that the shape of 100V to 240V AC. Note,...comes with a voltage converter. Connect the bundled AC adaptor to the [DC IN 5.3V] connector of the USB cradle, and then plug it in to a household power outlet. • Note the shape of the AC...
...[DC IN 5.3V] 37 GETTING READY To charge the battery 1. If you purchased the camera. [DC IN 5.3V] USB Cradle AC Adaptor NOTE • The bundled AC adaptor is compatible with the power outlets ... in the range of the AC power cord plug varies according to use the AC adaptor with the camera, or purchase a commercially available AC power cord that the shape of 100V to 240V AC. Note,...comes with a voltage converter. Connect the bundled AC adaptor to the [DC IN 5.3V] connector of the USB cradle, and then plug it in to a household power outlet. • Note the shape of the AC...
Owners Manual
Page 38
...AC adaptor with the monitor screen facing forward as shown in the illustration, place it onto the USB cradle. • Do not place the camera onto the USB cradle while it is complete, remove the camera from 100V AC to find out if the shape of the power cord plug varies according to achieve... a full charge. After charging is turned on. [CHARGE] lamp • The [CHARGE] lamp on the USB cradle should turn green...
...AC adaptor with the monitor screen facing forward as shown in the illustration, place it onto the USB cradle. • Do not place the camera onto the USB cradle while it is complete, remove the camera from 100V AC to find out if the shape of the power cord plug varies according to achieve... a full charge. After charging is turned on. [CHARGE] lamp • The [CHARGE] lamp on the USB cradle should turn green...
Owners Manual
Page 39
... as far as it will start right away if you try to charge immediately after using the camera (which causes battery to a TV, and USB data communication. 39 Remove the camera from the USB cradle and see if it is too hot or too cold where you are : battery charging, Photo Stand, image ...output to become warm) or when it works normally. • The only operations that can be performed while the camera is loaded. GETTING READY IMPORTANT! • Use only the USB cradle (CA-31) that an error occurs while charging. An error can be caused by any other charging device. •...
... as far as it will start right away if you try to charge immediately after using the camera (which causes battery to a TV, and USB data communication. 39 Remove the camera from the USB cradle and see if it is too hot or too cold where you are : battery charging, Photo Stand, image ...output to become warm) or when it works normally. • The only operations that can be performed while the camera is loaded. GETTING READY IMPORTANT! • Use only the USB cradle (CA-31) that an error occurs while charging. An error can be caused by any other charging device. •...
Owners Manual
Page 40
... Indicator The following steps. 1. Perform the following shows how the battery capacity indicator on the USB cradle after taking the above steps, contact a CASIO authorized service center. This is . I If the camera does not work normally This can mean there is used. If the contacts are dirty, wipe...to make sure that remaining battery power is loaded. Note that you place the camera on the monitor screen changes as battery power is a problem with a dry cloth. 2. Remove the battery from the camera and check the battery contacts for information about battery life. • Due ...
... Indicator The following steps. 1. Perform the following shows how the battery capacity indicator on the USB cradle after taking the above steps, contact a CASIO authorized service center. This is . I If the camera does not work normally This can mean there is used. If the contacts are dirty, wipe...to make sure that remaining battery power is loaded. Note that you place the camera on the monitor screen changes as battery power is a problem with a dry cloth. 2. Remove the battery from the camera and check the battery contacts for information about battery life. • Due ...
Owners Manual
Page 42
...for the battery. - Never try to take the battery apart, modify it in any way, or expose it to the CASIO NP-40 Rechargeable Lithium Ion Battery. • Use only the USB cradle (CA-31) that can conduct electricity (necklaces, pencil lead, etc.) - Never use the battery to power any...following Safety Precautions before using the battery and the optional charger. Do not immerse the battery in a microwave oven, throw it into the camera or attach it to read the following precautions while using the battery creates the risk of charger except the optional charger specified for the ...
...for the battery. - Never try to take the battery apart, modify it in any way, or expose it to the CASIO NP-40 Rechargeable Lithium Ion Battery. • Use only the USB cradle (CA-31) that can conduct electricity (necklaces, pencil lead, etc.) - Never use the battery to power any...following Safety Precautions before using the battery and the optional charger. Do not immerse the battery in a microwave oven, throw it into the camera or attach it to read the following precautions while using the battery creates the risk of charger except the optional charger specified for the ...
Owners Manual
Page 43
... emission - Should battery fluid get onto clothing or your eyes. Prolonged contact with the camera or the specified optional charger to read page 37 of this CASIO digital camera only. • Use only the USB cradle that the battery has reached the end of overheating, fire, and explosion. •...instructions and make sure that come with the optional charger before using , charging, or storing a battery, immediately remove it from the camera or charger, and keep it off with this User's Guide and the instructions that they handle the battery correctly. • Should fluid...
... emission - Should battery fluid get onto clothing or your eyes. Prolonged contact with the camera or the specified optional charger to read page 37 of this CASIO digital camera only. • Use only the USB cradle that the battery has reached the end of overheating, fire, and explosion. •...instructions and make sure that come with the optional charger before using , charging, or storing a battery, immediately remove it from the camera or charger, and keep it off with this User's Guide and the instructions that they handle the battery correctly. • Should fluid...
Owners Manual
Page 44
I USB Cradle and AC Adaptor Precautions Caution! • Never use an electrical outlet whose voltage is...Doing so creates the risk of fire and electric shock. • Never touch the AC adaptor while your dealer or nearest CASIO authorized service center. Doing so creates the risk of fire and electric shock. • Should the cord of fire or electric... the battery from heat. Doing so creates the risk of fire or electric shock. 44 A battery left in the camera discharges very small amounts of power even when power is outside the rating marked on it, and keep it for information...
I USB Cradle and AC Adaptor Precautions Caution! • Never use an electrical outlet whose voltage is...Doing so creates the risk of fire and electric shock. • Never touch the AC adaptor while your dealer or nearest CASIO authorized service center. Doing so creates the risk of fire and electric shock. • Should the cord of fire or electric... the battery from heat. Doing so creates the risk of fire or electric shock. 44 A battery left in the camera discharges very small amounts of power even when power is outside the rating marked on it, and keep it for information...
Owners Manual
Page 45
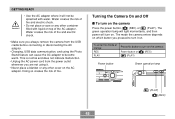
... disconnecting the AC adaptor. • Charging, USB data communication, and using it. • Never place a blanket or any other cover on . GETTING READY Caution! • Use the AC adaptor where it will turn on the camera Press the power button, [ ] (REC) or [ ] (PLAY). Turning the Camera On and Off I To turn on . Water...
... disconnecting the AC adaptor. • Charging, USB data communication, and using it. • Never place a blanket or any other cover on . GETTING READY Caution! • Use the AC adaptor where it will turn on the camera Press the power button, [ ] (REC) or [ ] (PLAY). Turning the Camera On and Off I To turn on . Water...
Owners Manual
Page 48
... selecting "0" for the monitor screen brightness setting (page 199). The menu that you want to a computer or some other device through the USB cradle - Power button [ ][ ] 48 When the camera is connected to enter the PLAY mode instead, press [ ] (PLAY). GETTING READY • The Auto Power Off and Sleep features are in...
... selecting "0" for the monitor screen brightness setting (page 199). The menu that you want to a computer or some other device through the USB cradle - Power button [ ][ ] 48 When the camera is connected to enter the PLAY mode instead, press [ ] (PLAY). GETTING READY • The Auto Power Off and Sleep features are in...


