Owners Manual
Page 3
... QUICK START GUIDE First, charge the battery 19 To configure display language and clock settings ..... 20 To record an image 21 To view a recorded image 22 To delete an image 22 23 GETTING READY About This Manual 23 General Guide 24 Camera 24 USB Cradle 27 Monitor Screen Contents 28 REC Modes 28 PLAY Mode 32 Changing the Contents of the Monitor Screen 33 Attaching the Strap 35 Power Requirements 35 Loading the Rechargeable Battery 35 To charge...
... QUICK START GUIDE First, charge the battery 19 To configure display language and clock settings ..... 20 To record an image 21 To view a recorded image 22 To delete an image 22 23 GETTING READY About This Manual 23 General Guide 24 Camera 24 USB Cradle 27 Monitor Screen Contents 28 REC Modes 28 PLAY Mode 32 Changing the Contents of the Monitor Screen 33 Attaching the Strap 35 Power Requirements 35 Loading the Rechargeable Battery 35 To charge...
Owners Manual
Page 4
...Using the Flash 67 Flash Unit Status 70 Changing the Flash Intensity Setting 71 Using Flash Assist 71 Using the Self-timer 73 Specifying Image Size 76 Specifying Image Quality 77 79 OTHER RECORDING FUNCTIONS Selecting the Focus Mode 79 Using Auto Focus 80 Using the Macro Mode 83 Using Pan Focus 84 Using the Infinity Mode 85 Using Manual Focus 85 Using Focus Lock 87 Exposure Compensation (EV Shift 88 Adjusting White Balance 89 Configuring the White Balance Setting Manually 91 Specifying the Exposure Mode 92 Using Aperture Priority AE 92 Using Shutter Speed...
...Using the Flash 67 Flash Unit Status 70 Changing the Flash Intensity Setting 71 Using Flash Assist 71 Using the Self-timer 73 Specifying Image Size 76 Specifying Image Quality 77 79 OTHER RECORDING FUNCTIONS Selecting the Focus Mode 79 Using Auto Focus 80 Using the Macro Mode 83 Using Pan Focus 84 Using the Infinity Mode 85 Using Manual Focus 85 Using Focus Lock 87 Exposure Compensation (EV Shift 88 Adjusting White Balance 89 Configuring the White Balance Setting Manually 91 Specifying the Exposure Mode 92 Using Aperture Priority AE 92 Using Shutter Speed...
Owners Manual
Page 6
...-record audio 178 Playing Back a Voice Recording File 179 Displaying Camera Images on a TV Screen 180 Selecting the Video Output System 181 183 DELETING FILES Deleting a Single File 183 Deleting All Files 184 185 FILE MANAGEMENT Folders 185 Memory Folders and Files 185 Protecting Files 186 To protect a single file 186 To protect all files in memory 187 Using the FAVORITE Folder 187 To copy a file to the FAVORITE folder 187 To display a file in the FAVORITE folder 189 To delete a file from the FAVORITE folder 190 To delete...
...-record audio 178 Playing Back a Voice Recording File 179 Displaying Camera Images on a TV Screen 180 Selecting the Video Output System 181 183 DELETING FILES Deleting a Single File 183 Deleting All Files 184 185 FILE MANAGEMENT Folders 185 Memory Folders and Files 185 Protecting Files 186 To protect a single file 186 To protect all files in memory 187 Using the FAVORITE Folder 187 To copy a file to the FAVORITE folder 187 To display a file in the FAVORITE folder 189 To delete a file from the FAVORITE folder 190 To delete...
Owners Manual
Page 8
... Viewing User Documentation (PDF Files) 252 User Registration 252 Exiting the Menu Application 252 Using the Camera with a Macintosh Computer ....... 253 Selecting the Software You Need 253 Computer System Requirements 254 Managing Images on a Macintosh 255 Playing Back a Movie on your Macintosh 256 Viewing User Documentation (PDF Files) 258 To register as a camera user 258 259 APPENDIX Menu Reference 259 Indicator Lamp Reference 262 Troubleshooting Guide 265 If you have problems installing the USB driver... 270 Display Messages 271 Specifications...
... Viewing User Documentation (PDF Files) 252 User Registration 252 Exiting the Menu Application 252 Using the Camera with a Macintosh Computer ....... 253 Selecting the Software You Need 253 Computer System Requirements 254 Managing Images on a Macintosh 255 Playing Back a Movie on your Macintosh 256 Viewing User Documentation (PDF Files) 258 To register as a camera user 258 259 APPENDIX Menu Reference 259 Indicator Lamp Reference 262 Troubleshooting Guide 265 If you have problems installing the USB driver... 270 Display Messages 271 Specifications...
Owners Manual
Page 9
...EX-Z850. • CASIO COMPUTER CO., LTD. shall not be trademarks or service marks of others. • Photo Loader and Photohands are subject to the use of this manual. • CASIO COMPUTER CO., LTD. assumes no responsibility for any damage or loss caused by the screens and configuration of the actual camera. • The SD logo is a registered trademark. • Windows... User's Guide may also be held liable for any third party due to change without notice. • CASIO COMPUTER CO., LTD. INTRODUCTION IMPORTANT! • The contents of this manual are the property of CASIO ...
...EX-Z850. • CASIO COMPUTER CO., LTD. shall not be trademarks or service marks of others. • Photo Loader and Photohands are subject to the use of this manual. • CASIO COMPUTER CO., LTD. assumes no responsibility for any damage or loss caused by the screens and configuration of the actual camera. • The SD logo is a registered trademark. • Windows... User's Guide may also be held liable for any third party due to change without notice. • CASIO COMPUTER CO., LTD. INTRODUCTION IMPORTANT! • The contents of this manual are the property of CASIO ...
Owners Manual
Page 12
... Movie" (whose recording starts from about five seconds before the shutter button is pressed). • Audio Snapshot mode (page 131) Use this mode to record snapshots that also include audio. • Voice Recording (page 133) Quick and easy recording of voice input. • Real-time RGB histogram (page 134) An on-screen histogram lets you adjust exposure as you view the effect on overall image brightness, which makes shooting under difficult lighting...
... Movie" (whose recording starts from about five seconds before the shutter button is pressed). • Audio Snapshot mode (page 131) Use this mode to record snapshots that also include audio. • Voice Recording (page 133) Quick and easy recording of voice input. • Real-time RGB histogram (page 134) An on-screen histogram lets you adjust exposure as you view the effect on overall image brightness, which makes shooting under difficult lighting...
Owners Manual
Page 16
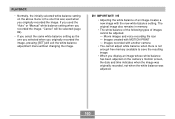
... record important images, make sure you turn off the camera - Removing the battery or memory card, or setting the camera onto the USB cradle while the camera is configured correctly and operating properly. Other abnormal operations Any of the above conditions can cause an error message to eliminate the cause of data in file memory. - Follow the instructions provided by the message to appear on the monitor screen (page 271). Before using the camera! Removing the battery, removing the memory card...
... record important images, make sure you turn off the camera - Removing the battery or memory card, or setting the camera onto the USB cradle while the camera is configured correctly and operating properly. Other abnormal operations Any of the above conditions can cause an error message to eliminate the cause of data in file memory. - Follow the instructions provided by the message to appear on the monitor screen (page 271). Before using the camera! Removing the battery, removing the memory card...
Owners Manual
Page 47
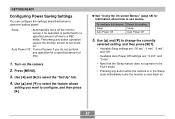
... of time in a REC mode. Auto Power Off : Turns off the monitor screen if no operation is in the PLAY mode. • Pressing any operation for information about how to select the feature whose setting you do not perform any button while the camera is performed for a specified amount of time. 1. Use [̇] and [̈] to conserve battery power. Use [̆] and [̄] to change the currently selected setting, and...
... of time in a REC mode. Auto Power Off : Turns off the monitor screen if no operation is in the PLAY mode. • Pressing any operation for information about how to select the feature whose setting you do not perform any button while the camera is performed for a specified amount of time. 1. Use [̇] and [̈] to conserve battery power. Use [̆] and [̄] to change the currently selected setting, and...
Owners Manual
Page 104
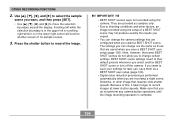
... the shutter button to move the selection boundary around the display. OTHER RECORDING FUNCTIONS 2. Use and [̈] to select the sample scene you select a BEST SHOT scene. Scrolling left or scrolling right while it takes longer to another BEST SHOT scene or turn off the camera. They are configured when you want to change are the same as a BEST SHOT user setup (page 106). • Digital...
... the shutter button to move the selection boundary around the display. OTHER RECORDING FUNCTIONS 2. Use and [̈] to select the sample scene you select a BEST SHOT scene. Scrolling left or scrolling right while it takes longer to another BEST SHOT scene or turn off the camera. They are configured when you want to change are the same as a BEST SHOT user setup (page 106). • Digital...
Owners Manual
Page 148
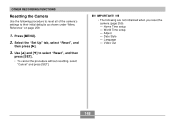
... their initial defaults as shown under "Menu Reference" on page 259. 1. IMPORTANT! • The following procedure to reset all of the camera's settings to select "Reset", and then press [SET]. • To cancel the procedure without resetting, select "Cancel" and press [SET]. Home Time setup - Language - Press [MENU]. 2. World Time setup - Adjust - Date Style - Video Out 148 OTHER RECORDING FUNCTIONS Resetting the Camera Use the following are not initialized when you reset the camera (page 259...
... their initial defaults as shown under "Menu Reference" on page 259. 1. IMPORTANT! • The following procedure to reset all of the camera's settings to select "Reset", and then press [SET]. • To cancel the procedure without resetting, select "Cancel" and press [SET]. Home Time setup - Language - Press [MENU]. 2. World Time setup - Adjust - Date Style - Video Out 148 OTHER RECORDING FUNCTIONS Resetting the Camera Use the following are not initialized when you reset the camera (page 259...
Owners Manual
Page 160
... following types of an image creates a new image with MOTION PRINT - Images created with the new white balance setting. If you used when you originally recorded the image, pressing [SET] will be adjusted. - PLAYBACK • Normally, the initially selected white balance setting on the camera's monitor screen, the date and time indicates when the image was originally recorded, not when the white balance was used the "Auto" or "Manual" white balance setting when you recorded the image, "Cancel" will exit the white balance adjustment menu without changing the image.
... following types of an image creates a new image with MOTION PRINT - Images created with the new white balance setting. If you used when you originally recorded the image, pressing [SET] will be adjusted. - PLAYBACK • Normally, the initially selected white balance setting on the camera's monitor screen, the date and time indicates when the image was originally recorded, not when the white balance was used the "Auto" or "Manual" white balance setting when you recorded the image, "Cancel" will exit the white balance adjustment menu without changing the image.
Owners Manual
Page 173
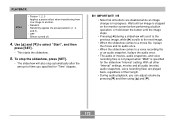
.... With all other "Interval" settings, movies and all buttons are played back, regardless of time you can adjust volume by pressing [̄] and then using [̆] and [̄]. 173 IMPORTANT! • Note that all audio (movies, audio snapshots, voice recording files) are disabled while an image change is specified for "Time" elapses. Use [̆] and [̄] to select "Start", and then press [SET]. • This starts the slideshow. 5. To stop...
.... With all other "Interval" settings, movies and all buttons are played back, regardless of time you can adjust volume by pressing [̄] and then using [̆] and [̄]. 173 IMPORTANT! • Note that all audio (movies, audio snapshots, voice recording files) are disabled while an image change is specified for "Time" elapses. Use [̆] and [̄] to select "Start", and then press [SET]. • This starts the slideshow. 5. To stop...
Owners Manual
Page 178
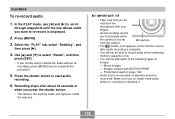
... the camera is low. • You cannot add audio to the following types of images. - recording, press [MENU] here to start audio recording. 6. Images created with the new one whose audio you press the shutter button. • This deletes the existing audio and replaces it . 178 In the PLAY mode, use [̇] and [̈] to delete the audio without re- Recording stops after audio recording is displayed. 2. Use [̆...
... the camera is low. • You cannot add audio to the following types of images. - recording, press [MENU] here to start audio recording. 6. Images created with the new one whose audio you press the shutter button. • This deletes the existing audio and replaces it . 178 In the PLAY mode, use [̇] and [̈] to delete the audio without re- Recording stops after audio recording is displayed. 2. Use [̆...
Owners Manual
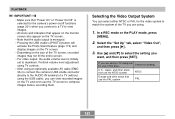
Page 181
... view recorded images on the size of a TV (without using an optionally available AV cable (EMC3A) to connect the camera's USB cradle connector directly to maximum. PLAYBACK IMPORTANT! • Make sure that "Power On" or "Power On/Off" is selected for use in this setting: NTSC PAL 181 Select the "Set Up" tab, select "Video Out", and then press [̈]. 3. If you are using. 1. In a REC mode or the PLAY mode, press [MENU]. 2. Perform volume...
... view recorded images on the size of a TV (without using an optionally available AV cable (EMC3A) to connect the camera's USB cradle connector directly to maximum. PLAYBACK IMPORTANT! • Make sure that "Power On" or "Power On/Off" is selected for use in this setting: NTSC PAL 181 Select the "Set Up" tab, select "Video Out", and then press [̈]. 3. If you are using. 1. In a REC mode or the PLAY mode, press [MENU]. 2. Perform volume...
Owners Manual
Page 202
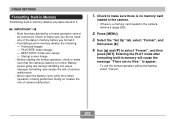
...;]. 4. Entering the PLAY mode after formatting built-in memory will cause the message "There are no memory card loaded in the camera. • If there is no files." BEST SHOT mode user setups - FAVORITE folder images - Protected images - Battery power going low during formatting can cause improper formatting and creates the risk of camera malfunction. 1. IMPORTANT! • Note that the camera's battery is being performed. Use [̆] and [̄] to make sure that data deleted by a format operation cannot be recovered.
...;]. 4. Entering the PLAY mode after formatting built-in memory will cause the message "There are no memory card loaded in the camera. • If there is no files." BEST SHOT mode user setups - FAVORITE folder images - Protected images - Battery power going low during formatting can cause improper formatting and creates the risk of camera malfunction. 1. IMPORTANT! • Note that the camera's battery is being performed. Use [̆] and [̄] to make sure that data deleted by a format operation cannot be recovered.
Owners Manual
Page 221
... camera. • USB driver installation is not required in the case of Windows XP, 2000, and Me. 221 Though it onto the USB cradle. • This camera supports USB 2.0 Hi-Speed protocol. Use of the special AC adaptor is recommended to power the camera during data communication. VIEWING IMAGES ON A COMPUTER IMPORTANT! • Low battery power can cause the camera to power down data transfer and even cause operational problems. Do not try to establish a connection...
... camera. • USB driver installation is not required in the case of Windows XP, 2000, and Me. 221 Though it onto the USB cradle. • This camera supports USB 2.0 Hi-Speed protocol. Use of the special AC adaptor is recommended to power the camera during data communication. VIEWING IMAGES ON A COMPUTER IMPORTANT! • Low battery power can cause the camera to power down data transfer and even cause operational problems. Do not try to establish a connection...
Owners Manual
Page 222
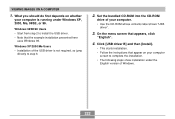
... the English version of the USB driver is not required, so jump directly to step 6. 2. Windows XP/2000/Me Users • Installation of Windows. 222 VIEWING IMAGES ON A COMPUTER 1. On the menu screen that appear on whether your computer. • Use the CD-ROM whose contents label shows "USB driver". 3. Windows 98SE/98 Users • Start from step 2 to complete the installation. • The following steps show installation under Windows XP...
... the English version of the USB driver is not required, so jump directly to step 6. 2. Windows XP/2000/Me Users • Installation of Windows. 222 VIEWING IMAGES ON A COMPUTER 1. On the menu screen that appear on whether your computer. • Use the CD-ROM whose contents label shows "USB driver". 3. Windows 98SE/98 Users • Start from step 2 to complete the installation. • The following steps show installation under Windows XP...

Owners Manual
Page 238
... 9.0c Supported Windows Versions XP/2000/Me 98SE/98 XP/2000/Me/98SE/98 Required Operation Use the USB cradle to establish a connection between the camera and computer. Install Photo Loader 2.3 (page 242). * If the computer does not have DirectX 9.0 or higher installed, install DirectX 9.0c (page 244). 238 Using the Camera with a Windows Computer Your digital camera comes bundled with useful applications for image transfer Software Name - Install the USB driver Type...
... 9.0c Supported Windows Versions XP/2000/Me 98SE/98 XP/2000/Me/98SE/98 Required Operation Use the USB cradle to establish a connection between the camera and computer. Install Photo Loader 2.3 (page 242). * If the computer does not have DirectX 9.0 or higher installed, install DirectX 9.0c (page 244). 238 Using the Camera with a Windows Computer Your digital camera comes bundled with useful applications for image transfer Software Name - Install the USB driver Type...
Owners Manual
Page 256
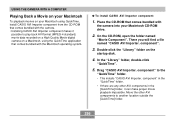
... format (MPEG-4 standard) movie data recorded on a High Quality Movie digital camera on a Macintosh, using the QuickTime application that comes bundled with the camera into your Macintosh using QuickTime, install CASIO AVI Importer component from the CD-ROM that comes bundled with the camera. • Installing CASIO AVI Importer component makes it can make proper movie playback impossible. Double-click the "Library" folder on the startup disk. 4. There you will find a file named "CASIO AVI Importer...
... format (MPEG-4 standard) movie data recorded on a High Quality Movie digital camera on a Macintosh, using the QuickTime application that comes bundled with the camera into your Macintosh using QuickTime, install CASIO AVI Importer component from the CD-ROM that comes bundled with the camera. • Installing CASIO AVI Importer component makes it can make proper movie playback impossible. Double-click the "Library" folder on the startup disk. 4. There you will find a file named "CASIO AVI Importer...
Owners Manual
Page 269
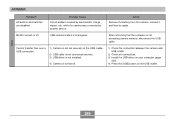
... Remove the battery from the camera, reinsert it, and then try again. Cannot transfer files over a USB connection. 1) Camera is not set securely on the USB cradle. After confirming that the computer is in progress. Other 269 USB communication is not accessing camera memory, disconnect the USB cable. 1) Check the connection between the camera and USB cradle. 2) Check all connections. 3) Install the USB driver on your computer (page 220). 4) Press the [USB] button on...
... Remove the battery from the camera, reinsert it, and then try again. Cannot transfer files over a USB connection. 1) Camera is not set securely on the USB cradle. After confirming that the computer is in progress. Other 269 USB communication is not accessing camera memory, disconnect the USB cable. 1) Check the connection between the camera and USB cradle. 2) Check all connections. 3) Install the USB driver on your computer (page 220). 4) Press the [USB] button on...


