Owners Manual
Page 2
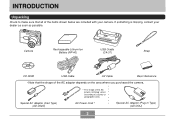
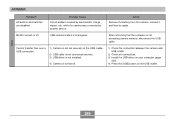
...) * The shape of the AC adaptor depends on the area where you purchased the camera. INTRODUCTION INTRODUCTION Unpacking Check to country or geographic area. Camera Rechargeable Lithium Ion Battery (NP-40) USB Cradle (CA-31) Strap CD-ROM USB Cable AV Cable Basic Reference • Note that the shape of the AC power cord plug varies...
...) * The shape of the AC adaptor depends on the area where you purchased the camera. INTRODUCTION INTRODUCTION Unpacking Check to country or geographic area. Camera Rechargeable Lithium Ion Battery (NP-40) USB Cradle (CA-31) Strap CD-ROM USB Cable AV Cable Basic Reference • Note that the shape of the AC power cord plug varies...
Owners Manual
Page 16
... of the above conditions can cause an error message to ensure that the camera is configured correctly and operating properly. Before using precision digital components. Disconnecting the USB cable, removing the camera from the USB cradle, or disconnecting the AC adaptor from the USB cradle while a data communication operation is still flashing after you first record a number...
... of the above conditions can cause an error message to ensure that the camera is configured correctly and operating properly. Before using precision digital components. Disconnecting the USB cable, removing the camera from the USB cradle, or disconnecting the AC adaptor from the USB cradle while a data communication operation is still flashing after you first record a number...
Owners Manual
Page 180
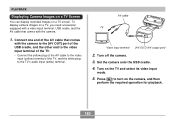
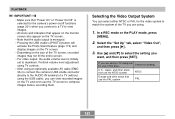
... Screen You can display recorded images on the camera, and then perform the required operation for playback. 180 Turn on a TV, you need a television equipped with a video input terminal, USB cradle, and the AV cable that comes with the camera. 1. To display camera images on the TV and select its video ...input mode. 5. Connect one end of the AV cable that comes with the camera to the [AV OUT] port of the USB cradle, and the other end ...
... Screen You can display recorded images on the camera, and then perform the required operation for playback. 180 Turn on a TV, you need a television equipped with a video input terminal, USB cradle, and the AV cable that comes with the camera. 1. To display camera images on the TV and select its video ...input mode. 5. Connect one end of the AV cable that comes with the camera to the [AV OUT] port of the USB cradle, and the other end ...
Owners Manual
Page 181
...You can view recorded images on the size of a TV (without using the USB cable), you can select either NTSC or PAL for use in this setting: NTSC PAL...776;]. 3. PLAYBACK IMPORTANT! • Make sure that "Power On" or "Power On/Off" is selected for the camera's power on/off functions (page 201) when you connect to a TV to view images. • All icons and.... Perform volume level adjustment using TV controls. • After using an optionally available AV cable (EMC3A) to connect the camera's USB cradle connector directly to the AUDIO IN terminal of the TV screen, recorded images may not...
...You can view recorded images on the size of a TV (without using the USB cable), you can select either NTSC or PAL for use in this setting: NTSC PAL...776;]. 3. PLAYBACK IMPORTANT! • Make sure that "Power On" or "Power On/Off" is selected for the camera's power on/off functions (page 201) when you connect to a TV to view images. • All icons and.... Perform volume level adjustment using TV controls. • After using an optionally available AV cable (EMC3A) to connect the camera's USB cradle connector directly to the AUDIO IN terminal of the TV screen, recorded images may not...
Owners Manual
Page 215
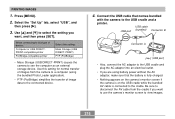
...772;] to select the setting you want to use the camera's monitor screen to the USB cradle and plug the AC adaptor into an electrical outlet. • If you want , and then press [SET]. USB cable USB port (bundled) Connector B Connector A [ ] (USB port) • Also, connect the AC adaptor to ...view images. 215 Press [MENU]. 2. Be sure to disconnect the AV cable from the camera to a computer (using battery power without the AC adaptor, ...
...772;] to select the setting you want to use the camera's monitor screen to the USB cradle and plug the AC adaptor into an electrical outlet. • If you want , and then press [SET]. USB cable USB port (bundled) Connector B Connector A [ ] (USB port) • Also, connect the AC adaptor to ...view images. 215 Press [MENU]. 2. Be sure to disconnect the AV cable from the camera to a computer (using battery power without the AC adaptor, ...
Owners Manual
Page 218
... Precautions • See the documentation that comes with your printer manufacturer for details about models that support PictBridge and USB DIRECT-PRINT, upgrades, etc. • Never disconnect the USB cable, or perform any camera or USB cradle operation while printing is provided as a PDF file on the CD-ROM that comes bundled with your service...
... Precautions • See the documentation that comes with your printer manufacturer for details about models that support PictBridge and USB DIRECT-PRINT, upgrades, etc. • Never disconnect the USB cable, or perform any camera or USB cradle operation while printing is provided as a PDF file on the CD-ROM that comes bundled with your service...
Owners Manual
Page 224
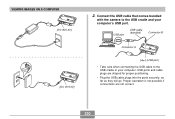
... correct. 224 Connect the USB cable that comes bundled with the camera to the USB cradle or your computer's USB port. USB port USB cable (bundled) Connector B Connector A 8. Use [̆] and [̄] to turn it on, and then press its [MENU] button. 9. Turn off the camera. [ ] (USB port) • Take care when connecting the USB cable to the USB cradle and your computer...
... correct. 224 Connect the USB cable that comes bundled with the camera to the USB cradle or your computer's USB port. USB port USB cable (bundled) Connector B Connector A 8. Use [̆] and [̄] to turn it on, and then press its [MENU] button. 9. Turn off the camera. [ ] (USB port) • Take care when connecting the USB cable to the USB cradle and your computer...
Owners Manual
Page 228
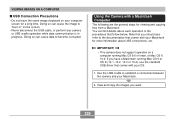
...or OS X (10.1, 10.2, 10.3 or 10.4), use the standard USB driver that follow below. Use the USB cradle to "burn in" on the screen. • Never disconnect the USB cable, or perform any camera or USB cradle operation while data communication is in the procedures that comes with your Macintosh.... 2. VIEWING IMAGES ON A COMPUTER I USB Connection Precautions • Do not leave the same image displayed ...
...or OS X (10.1, 10.2, 10.3 or 10.4), use the standard USB driver that follow below. Use the USB cradle to "burn in" on the screen. • Never disconnect the USB cable, or perform any camera or USB cradle operation while data communication is in the procedures that comes with your Macintosh.... 2. VIEWING IMAGES ON A COMPUTER I USB Connection Precautions • Do not leave the same image displayed ...
Owners Manual
Page 230
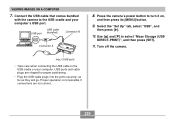
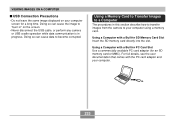
Connect the USB cable that comes bundled with the camera to the USB cradle or your computer's USB port. USB ports and cable plugs are not correct. 230 USB port USB cable (bundled) Connector B [DC IN 5.3V] Connector A [ ] (USB port) • Take care when connecting the USB cable to the USB cradle and your computer. Proper operation is not possible if connections are shaped for proper positioning. • Plug the USB cable plugs into the ports securely, as far as they will go. VIEWING IMAGES ON A COMPUTER [DC IN 5.3V] 2.
Connect the USB cable that comes bundled with the camera to the USB cradle or your computer's USB port. USB ports and cable plugs are not correct. 230 USB port USB cable (bundled) Connector B [DC IN 5.3V] Connector A [ ] (USB port) • Take care when connecting the USB cable to the USB cradle and your computer. Proper operation is not possible if connections are shaped for proper positioning. • Plug the USB cable plugs into the ports securely, as far as they will go. VIEWING IMAGES ON A COMPUTER [DC IN 5.3V] 2.
Owners Manual
Page 233
... memory card. For full details, see the user documentation that comes with a Built-in this section describe how to transfer images from the camera to become corrupted. Using a Memory Card to Transfer Images to "burn in" on your computer screen for an SD memory card or MMC... SD memory card directly into the slot. VIEWING IMAGES ON A COMPUTER I USB Connection Precautions • Do not leave the same image displayed on the screen. • Never disconnect the USB cable, or perform any camera or USB cradle operation while data communication is in PC Card Slot Use a commercially available...
... memory card. For full details, see the user documentation that comes with a Built-in this section describe how to transfer images from the camera to become corrupted. Using a Memory Card to Transfer Images to "burn in" on your computer screen for an SD memory card or MMC... SD memory card directly into the slot. VIEWING IMAGES ON A COMPUTER I USB Connection Precautions • Do not leave the same image displayed on the screen. • Never disconnect the USB cable, or perform any camera or USB cradle operation while data communication is in PC Card Slot Use a commercially available...
Owners Manual
Page 254
... to use. Photo Loader 1.1 OS: OS 9 Memory: 32MB HD: At least 3MB • USB connection is supported on the number of images and the sizes of the applications. CASIO AVI Importer component 1.0 OS: OS X 10.2.8 or greater QuickTime: QuickTime 6.5.2 or greater IMPORTANT! ...camera to do is supported using the standard USB driver that comes bundled with the operating system, so all you are greater, depending on a Macintosh running each of the images being handled. Be sure to check the requirements for the particular application you need to your Macintosh using the USB cable...
... to use. Photo Loader 1.1 OS: OS 9 Memory: 32MB HD: At least 3MB • USB connection is supported on the number of images and the sizes of the applications. CASIO AVI Importer component 1.0 OS: OS X 10.2.8 or greater QuickTime: QuickTime 6.5.2 or greater IMPORTANT! ...camera to do is supported using the standard USB driver that comes bundled with the operating system, so all you are greater, depending on a Macintosh running each of the images being handled. Be sure to check the requirements for the particular application you need to your Macintosh using the USB cable...
Owners Manual
Page 269
... the computer is not accessing camera memory, disconnect the USB cable. 1) Check the connection between the camera and USB cradle. 2) Check all connections. 3) Install the USB driver on your computer (page 220). 4) Press the [USB] button on the USB cradle. 2) USB cable is not connected securely. 3) USB driver is not installed. 4) Camera is not set securely on the USB cradle. Monitor screen is...
... the computer is not accessing camera memory, disconnect the USB cable. 1) Check the connection between the camera and USB cradle. 2) Check all connections. 3) Install the USB driver on your computer (page 220). 4) Press the [USB] button on the USB cradle. 2) USB cable is not connected securely. 3) USB driver is not installed. 4) Camera is not set securely on the USB cradle. Monitor screen is...
Owners Manual
Page 270
...running Windows 98SE/98 before installing the USB driver from the bundled CD-ROM, or if you have problems installing the USB driver... This will need to re-install the camera's USB driver. APPENDIX If you will make it impossible for the computer to recognize the digital camera when it is connected. You may... not be able to install the USB driver properly if you use the USB cable to connect the camera to re-install the USB driver, see the USB driver's "Read me" file on the CD-ROM that...
...running Windows 98SE/98 before installing the USB driver from the bundled CD-ROM, or if you have problems installing the USB driver... This will need to re-install the camera's USB driver. APPENDIX If you will make it impossible for the computer to recognize the digital camera when it is connected. You may... not be able to install the USB driver properly if you use the USB cable to connect the camera to re-install the USB driver, see the USB driver's "Read me" file on the CD-ROM that...
Owners Manual
Page 277
... Weight Approximately 130 g (4.6 oz) (excluding battery and accessories) Bundled Accessories ........ CD-ROM; Low temperatures shorten battery life. USB cable; USB cradle (CA-31); Special AC adaptor; They do not guarantee that you will be able to battery failure. Strap; Operation Number... seconds, during which two images are recorded, one image about every 10 seconds *4 Approximate time for continuous movie recording, without using zoom. *5 Voice recording times are recorded. *2 Continuous Recording Conditions • Temperature: 23°C (73°F) • Monitor screen...
... Weight Approximately 130 g (4.6 oz) (excluding battery and accessories) Bundled Accessories ........ CD-ROM; Low temperatures shorten battery life. USB cable; USB cradle (CA-31); Special AC adaptor; They do not guarantee that you will be able to battery failure. Strap; Operation Number... seconds, during which two images are recorded, one image about every 10 seconds *4 Approximate time for continuous movie recording, without using zoom. *5 Voice recording times are recorded. *2 Continuous Recording Conditions • Temperature: 23°C (73°F) • Monitor screen...
Owners Manual
Page 278
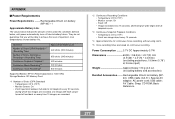
USB port; APPENDIX I USB Cradle (CA-31) Input/Output Terminals .... AC adaptor terminal (DC IN 5.3V) / AV output ...5.3V DC, 650 mA Dimensions 50(W) × 20(H) × 70(D) mm (2.0˝(W) × 0.8˝(H) × 2.8˝(D)) (excluding projections and cable) Weight Approximately 90 g (3.2 oz) I Special AC Adaptor (Plug-in Type) (AD-C52J) Power Requirement .......... 100 to 104°F) Dimensions 38.5(W) ...× 18(H) × 70(D) mm (2.0˝(W) × 0.7˝(H) × 2.8˝(D)) (excluding projections and cable) Weight Approximately 90 g (3.2 oz) 278 Camera connector;
USB port; APPENDIX I USB Cradle (CA-31) Input/Output Terminals .... AC adaptor terminal (DC IN 5.3V) / AV output ...5.3V DC, 650 mA Dimensions 50(W) × 20(H) × 70(D) mm (2.0˝(W) × 0.8˝(H) × 2.8˝(D)) (excluding projections and cable) Weight Approximately 90 g (3.2 oz) I Special AC Adaptor (Plug-in Type) (AD-C52J) Power Requirement .......... 100 to 104°F) Dimensions 38.5(W) ...× 18(H) × 70(D) mm (2.0˝(W) × 0.7˝(H) × 2.8˝(D)) (excluding projections and cable) Weight Approximately 90 g (3.2 oz) 278 Camera connector;


