Owners Manual
Page 6
... On/Off Functions 174 Formatting Built-in Memory 175 177 USING A MEMORY CARD Using a Memory Card 178 To insert a memory card into the camera 178 To replace the memory card 179 Formatting a Memory Card 179 Copying Files 181 To copy all the files in built-in memory to a memory card 181 To copy a specific file from a memory card to built-in memory 182 184 PRINTING IMAGES DPOF 185...
... On/Off Functions 174 Formatting Built-in Memory 175 177 USING A MEMORY CARD Using a Memory Card 178 To insert a memory card into the camera 178 To replace the memory card 179 Formatting a Memory Card 179 Copying Files 181 To copy all the files in built-in memory to a memory card 181 To copy a specific file from a memory card to built-in memory 182 184 PRINTING IMAGES DPOF 185...

Owners Manual
Page 7
...Camera with a Windows Computer ......... 194 Using the Camera with a Macintosh Computer ....... 202 Using a Memory Card to Transfer Images to a Computer 207 Memory Data 208 DCF Protocol 208 Memory Folder Structure 209 Image Files Supported by the Camera 210 212 USING THE CAMERA WITH A COMPUTER Using the Camera...Editing a Movie 224 Viewing User Documentation (PDF Files) 225 User Registration 226 Exiting the Menu Application 226 Using the Camera with a Macintosh Computer ....... 227 About the bundled CD-ROM 227 Computer System Requirements 228 Managing Images on a ...
...Camera with a Windows Computer ......... 194 Using the Camera with a Macintosh Computer ....... 202 Using a Memory Card to Transfer Images to a Computer 207 Memory Data 208 DCF Protocol 208 Memory Folder Structure 209 Image Files Supported by the Camera 210 212 USING THE CAMERA WITH A COMPUTER Using the Camera...Editing a Movie 224 Viewing User Documentation (PDF Files) 225 User Registration 226 Exiting the Menu Application 226 Using the Camera with a Macintosh Computer ....... 227 About the bundled CD-ROM 227 Computer System Requirements 228 Managing Images on a ...

Owners Manual
Page 9
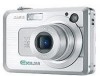
... prints and display images. • 2.5-inch TFT color LCD monitor screen • 8.3MB flash memory Images can be recorded without permission of such files over the Internet without using a memory card. • Long battery life A low-power design combines with a large-capacity battery to provide more... recording and playback between charges. • Bundled with a USB Cradle The bundled USB cradle can be used to charge the camera's battery (page 34), ...
... prints and display images. • 2.5-inch TFT color LCD monitor screen • 8.3MB flash memory Images can be recorded without permission of such files over the Internet without using a memory card. • Long battery life A low-power design combines with a large-capacity battery to provide more... recording and playback between charges. • Bundled with a USB Cradle The bundled USB cradle can be used to charge the camera's battery (page 34), ...
Owners Manual
Page 11
... You can configure different sounds to play whenever you turn on the camera's monitor screen. INTRODUCTION • Audio Snapshot Mode (page 114) ... difficult lighting conditions easier than ever before. • EX Menu (page 129) EX Menu gives you short-cut menu access to four frequently...memory expansion (page 177) • Digital Print Order Format (DPOF) (page 185) Images can print images without going through a computer. 11 You can select from among 162 cities in the sequence you can be printed easily in 32 time zones. • Support for SD memory cards and MMC (MultiMedia Cards...
... You can configure different sounds to play whenever you turn on the camera's monitor screen. INTRODUCTION • Audio Snapshot Mode (page 114) ... difficult lighting conditions easier than ever before. • EX Menu (page 129) EX Menu gives you short-cut menu access to four frequently...memory expansion (page 177) • Digital Print Order Format (DPOF) (page 185) Images can print images without going through a computer. 11 You can select from among 162 cities in the sequence you can be printed easily in 32 time zones. • Support for SD memory cards and MMC (MultiMedia Cards...
Owners Manual
Page 15
... USB cradle while a data communication operation is manufactured using precision digital components. Removing the battery or memory card, or setting the camera onto the USB cradle while the camera is still flashing after you turn off the camera - Removing the battery, removing the memory card, or placing the camera onto the USB cradle while the green operation lamp is...
... USB cradle while a data communication operation is manufactured using precision digital components. Removing the battery or memory card, or setting the camera onto the USB cradle while the camera is still flashing after you turn off the camera - Removing the battery, removing the memory card, or placing the camera onto the USB cradle while the green operation lamp is...
Owners Manual
Page 20
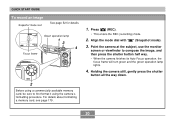
... gently press the shutter button all the way down. 2 Before using a commercially available memory card, be sure to compose the image, and then press the shutter button half way. • When the camera finishes its Auto Focus operation, the focus frame will turn green and the green operation lamp... lights. 4. Align the mode dial with " " (Snapshot mode). 3. For details about formatting a memory card, see page 179. 20 QUICK START GUIDE To ...
... gently press the shutter button all the way down. 2 Before using a commercially available memory card, be sure to compose the image, and then press the shutter button half way. • When the camera finishes its Auto Focus operation, the focus frame will turn green and the green operation lamp... lights. 4. Align the mode dial with " " (Snapshot mode). 3. For details about formatting a memory card, see page 179. 20 QUICK START GUIDE To ...

Owners Manual
Page 23
... of the following three locations. • The camera's built-in flash memory • An SD memory card loaded in the camera • A MultiMediaCard loaded in this manual is a general term that refers to the location where your camera is currently storing the images you record. GETTING READY I Front 1 2 34 56 7 1 Zoom controller 2 Shutter button 3 Power button 4 Microphone...
... of the following three locations. • The camera's built-in flash memory • An SD memory card loaded in the camera • A MultiMediaCard loaded in this manual is a general term that refers to the location where your camera is currently storing the images you record. GETTING READY I Front 1 2 34 56 7 1 Zoom controller 2 Shutter button 3 Power button 4 Microphone...
Owners Manual
Page 24
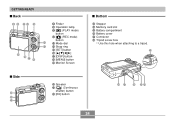
GETTING READY I Back 9 0 AB C I HG F 9 Finder 0 Operation lamp A [ ] (PLAY mode) button B [ ] (REC mode) button D C Mode dial E D Strap ring E [SET] button F G [DISP] button H [MENU] button I Monitor Screen I Side J K L J Speaker K [ ] (Continuous shutter) button L [EX] button R Q P ON 24 M I Bottom M Stopper N Memory card slot O Battery compartment P Battery cover Q Connector R Tripod screw hole * Use this hole when attaching to a tripod.
GETTING READY I Back 9 0 AB C I HG F 9 Finder 0 Operation lamp A [ ] (PLAY mode) button B [ ] (REC mode) button D C Mode dial E D Strap ring E [SET] button F G [DISP] button H [MENU] button I Monitor Screen I Side J K L J Speaker K [ ] (Continuous shutter) button L [EX] button R Q P ON 24 M I Bottom M Stopper N Memory card slot O Battery compartment P Battery cover Q Connector R Tripod screw hole * Use this hole when attaching to a tripod.
Owners Manual
Page 38
... you do not need the flash while recording, select (flash off) for continuous movie recording, without using [DISP] to turn off the camera. • You can also conserve battery power by the monitor screen brightness setting (Normal or Bright) (page 166). Repeated charging shortens battery... are also affected by using zoom. *5 Voice recording times are based on continuous recording. • The above values are based on a new battery starting from a full charge. GETTING READY Supported Battery: NP-40 (Rated Capacitance: 1230mAh) Storage Medium: SD Memory Card *1 Number of images you...
... you do not need the flash while recording, select (flash off) for continuous movie recording, without using [DISP] to turn off the camera. • You can also conserve battery power by the monitor screen brightness setting (Normal or Bright) (page 166). Repeated charging shortens battery... are also affected by using zoom. *5 Voice recording times are based on continuous recording. • The above values are based on a new battery starting from a full charge. GETTING READY Supported Battery: NP-40 (Rated Capacitance: 1230mAh) Storage Medium: SD Memory Card *1 Number of images you...
Owners Manual
Page 54
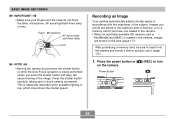
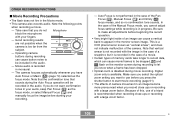
... subject. This is especially important when available lighting is loaded in accordance with the brightness of the image. After purchasing a memory card, be sure to load it into the camera and format it (page 175). 1. Power button [] 54 Press the shutter button carefully, taking care to use it before...light/ self-timer lamp Lens NOTE • Moving the camera as you press the shutter button or while the Auto Focus operation is being performed (when you have one loaded in the camera. • When an optionally available SD memory card or MultiMediaCard (MMC) is low, which slows down the...
... subject. This is especially important when available lighting is loaded in accordance with the brightness of the image. After purchasing a memory card, be sure to load it into the camera and format it (page 175). 1. Power button [] 54 Press the shutter button carefully, taking care to use it before...light/ self-timer lamp Lens NOTE • Moving the camera as you press the shutter button or while the Auto Focus operation is being performed (when you have one loaded in the camera. • When an optionally available SD memory card or MultiMediaCard (MMC) is low, which slows down the...
Owners Manual
Page 58
... problems with the brightness of the subject. To protect against camera movement if you may experience some digital noise (graininess) to appear in file memory and even lead to malfunction of the camera. • Never remove the memory card while an image is being recorded to be detected by the... adjusts its sensitivity in bright sunlight. Doing so not only causes the current image to the memory card. • Fluorescent lighting actually flickers at the subject's eyes. When using the camera indoors under such lighting, you have flash turned off (page 64). • Bright light shining...
... problems with the brightness of the subject. To protect against camera movement if you may experience some digital noise (graininess) to appear in file memory and even lead to malfunction of the camera. • Never remove the memory card while an image is being recorded to be detected by the... adjusts its sensitivity in bright sunlight. Doing so not only causes the current image to the memory card. • Fluorescent lighting actually flickers at the subject's eyes. When using the camera indoors under such lighting, you have flash turned off (page 64). • Bright light shining...
Owners Manual
Page 109
... the focus mode. Auto Focus is recorded in the Movie mode. • This camera also records audio. Digital zoom only is too far from the subject. - Good recording results are not possible when the camera is available. Note that sounds during recording can cause button noise to let you cannot... is recorded in the case of a movie. • Certain types of camera movement in an image become more pronounced when you do not want to start movie recording (page 61). • The effects of memory cards take longer to record data, which can cause a vertical band to be dropped...
... the focus mode. Auto Focus is recorded in the Movie mode. • This camera also records audio. Digital zoom only is too far from the subject. - Good recording results are not possible when the camera is available. Note that sounds during recording can cause button noise to let you cannot... is recorded in the case of a movie. • Certain types of camera movement in an image become more pronounced when you do not want to start movie recording (page 61). • The effects of memory cards take longer to record data, which can cause a vertical band to be dropped...
Owners Manual
Page 160
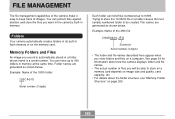
... next serially numbered folder to be able to store on a memory card depends on image size and quality, card capacity, etc. • For details about how the camera displays folder and file names. • The actual number of the 100th folder. 100CASIO Serial number (3 digits) Each folder can have up to 9,999. File names are...
... next serially numbered folder to be able to store on a memory card depends on image size and quality, card capacity, etc. • For details about how the camera displays folder and file names. • The actual number of the 100th folder. 100CASIO Serial number (3 digits) Each folder can have up to 9,999. File names are...
Owners Manual
Page 162
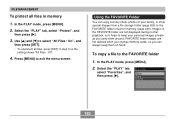
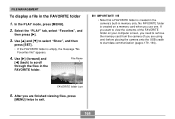
Images in the FAVORITE folder are not deleted when you change memory cards, so you can copy scenery shots, photos of your personal images... 4. Use [̆] and [̄] to keep them around. To copy a file to the FAVORITE folder in built-in memory 1. Using the FAVORITE Folder You can always keep your family, or other special images from a file storage folder (page 209...playback, so it helps to select "All Files : On", and then press [SET]. • To unprotect all files in memory (page 209). In the PLAY mode, press [MENU]. 2. In the PLAY mode, press [MENU]. 2. Press [MENU] ...
Images in the FAVORITE folder are not deleted when you change memory cards, so you can copy scenery shots, photos of your personal images... 4. Use [̆] and [̄] to keep them around. To copy a file to the FAVORITE folder in built-in memory 1. Using the FAVORITE Folder You can always keep your family, or other special images from a file storage folder (page 209...playback, so it helps to select "All Files : On", and then press [SET]. • To unprotect all files in memory (page 209). In the PLAY mode, press [MENU]. 2. In the PLAY mode, press [MENU]. 2. Press [MENU] ...
Owners Manual
Page 163
... you want , use [̆] and [̄] to select "Cancel", and then press [SET] to the FAVORITE folder. 6. Use [̆] and [̄] to a memory card. 163 Use [̇] and [̈] to select the file you want to copy to its original size. • Files in the FAVORITE folder cannot be...folder is a serial number. After copying all of the range depends on the loaded memory card. 4. NOTE • Copying an image file with the above procedure creates a 320 × 240-pixel QVGA-size image in memory capacity. Though the serial number starts from 0001 and can be copied to select "Save...
... you want , use [̆] and [̄] to select "Cancel", and then press [SET] to the FAVORITE folder. 6. Use [̆] and [̄] to a memory card. 163 Use [̇] and [̈] to select the file you want to copy to its original size. • Files in the FAVORITE folder cannot be...folder is a serial number. After copying all of the range depends on the loaded memory card. 4. NOTE • Copying an image file with the above procedure creates a 320 × 240-pixel QVGA-size image in memory capacity. Though the serial number starts from 0001 and can be copied to select "Save...
Owners Manual
Page 164
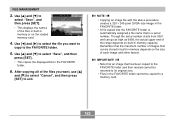
... a FAVORITE folder is empty, the message "No Favorites file!" No FAVORITE folder is created on your computer screen, you need to remove the memory card from the camera (if you are using one . FAVORITE folder icon 5. After you are finished viewing files, press [MENU] twice to select "Show", and ... folder. In the PLAY mode, press [MENU]. 2. If you want to view the contents of the FAVORITE folder on a memory card when you use one ) before placing the camera onto the USB cradle to scroll through the files in the FAVORITE folder 1. Select the "PLAY" tab, select "Favorites", and...
... a FAVORITE folder is empty, the message "No Favorites file!" No FAVORITE folder is created on your computer screen, you need to remove the memory card from the camera (if you are using one . FAVORITE folder icon 5. After you are finished viewing files, press [MENU] twice to select "Show", and ... folder. In the PLAY mode, press [MENU]. 2. If you want to view the contents of the FAVORITE folder on a memory card when you use one ) before placing the camera onto the USB cradle to scroll through the files in the FAVORITE folder 1. Select the "PLAY" tab, select "Favorites", and...
Owners Manual
Page 169
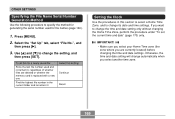
... select a Home Time Zone, and to change its date and time settings. If you want to change automatically when you are deleted or whether the memory card is replaced with a new one Find the highest file number in the current folder and increment it Select this setting: Continue Reset Setting the Clock...
... select a Home Time Zone, and to change its date and time settings. If you want to change automatically when you are deleted or whether the memory card is replaced with a new one Find the highest file number in the current folder and increment it Select this setting: Continue Reset Setting the Clock...
Owners Manual
Page 175
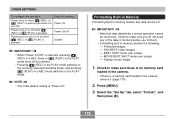
...) in the PLAY mode switches to the currently selected recording mode, and pressing [ ] (PLAY) in a REC mode switches to make sure there is no memory card loaded in the camera. • If there is selected, pressing [ ] (REC) in a REC mode or [ ] (PLAY) in the PLAY mode turns off when [ ] (REC...) or [ ] (PLAY) is pressed Select this setting: Power On Power On/Off Disable IMPORTANT! • When "Power On/Off" is a memory card loaded in the camera, remove it . IMPORTANT! • Note that data deleted by a format operation cannot be recovered. Check to make sure you format it. • ...
...) in the PLAY mode switches to the currently selected recording mode, and pressing [ ] (PLAY) in a REC mode switches to make sure there is no memory card loaded in the camera. • If there is selected, pressing [ ] (REC) in a REC mode or [ ] (PLAY) in the PLAY mode turns off when [ ] (REC...) or [ ] (PLAY) is pressed Select this setting: Power On Power On/Off Disable IMPORTANT! • When "Power On/Off" is a memory card loaded in the camera, remove it . IMPORTANT! • Note that data deleted by a format operation cannot be recovered. Check to make sure you format it. • ...
Owners Manual
Page 177
... from built-in flash memory to a memory card and from a memory card to flash memory. • Normally, files are using a slow memory card, you may not be dropped. Always maintain backup copies of its files. • Electrostatic charge, digital noise, and other phenomena can use a high-speed type SD memory card whenever possible. • Certain types of this camera. and REC flash...
... from built-in flash memory to a memory card and from a memory card to flash memory. • Normally, files are using a slow memory card, you may not be dropped. Always maintain backup copies of its files. • Electrostatic charge, digital noise, and other phenomena can use a high-speed type SD memory card whenever possible. • Certain types of this camera. and REC flash...
Owners Manual
Page 178
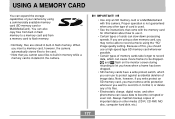
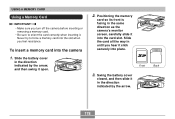
... it click securely into the slot when you turn off the camera before inserting or removing a memory card. • Be sure to force a memory card into place. Slide the battery cover in the direction indicated by the arrow, and then swing it into the camera 1. USING A MEMORY CARD Using a Memory Card IMPORTANT! • Make sure you feel resistance. Slide the...
... it click securely into the slot when you turn off the camera before inserting or removing a memory card. • Be sure to force a memory card into place. Slide the battery cover in the direction indicated by the arrow, and then swing it into the camera 1. USING A MEMORY CARD Using a Memory Card IMPORTANT! • Make sure you feel resistance. Slide the...

