
Owners Manual
Page 2
INTRODUCTION INTRODUCTION Unpacking Check to country or geographic area. Camera Rechargeable Lithium Ion Battery (NP-40) USB Cradle (CA-24) Strap CD-ROM USB Cable Basic Reference • Note that the shape of the AC adaptor depends on the area where you purchased the camera. * The shape of the AC power cord plug varies... possible. Special AC Adaptor (Inlet Type) (AD-C51G) AC Power Cord * Special AC Adaptor (Plug-in Type) (AD-C51J) 2 If something is missing, contact your camera.
INTRODUCTION INTRODUCTION Unpacking Check to country or geographic area. Camera Rechargeable Lithium Ion Battery (NP-40) USB Cradle (CA-24) Strap CD-ROM USB Cable Basic Reference • Note that the shape of the AC adaptor depends on the area where you purchased the camera. * The shape of the AC power cord plug varies... possible. Special AC Adaptor (Inlet Type) (AD-C51G) AC Power Cord * Special AC Adaptor (Plug-in Type) (AD-C51J) 2 If something is missing, contact your camera.
Owners Manual
Page 3
...QUICK START GUIDE First, charge the battery 16 To configure display language and clock settings ..... 17 To record an image 18 To view a recorded image 19 To delete an image 19 20 GETTING READY About This Manual 20 General Guide 21 Camera 21 USB Cradle 23 Monitor Screen... of the Monitor Screen 26 Attaching the Strap 28 Power Requirements 29 Loading and Removing the Rechargeable Battery 29 To charge the battery 31 Power Supply Precautions 36 Turning the Camera On and Off 39 Configuring Power Saving Settings 41 Using the On-screen Menus 42 Configuring Display ...
...QUICK START GUIDE First, charge the battery 16 To configure display language and clock settings ..... 17 To record an image 18 To view a recorded image 19 To delete an image 19 20 GETTING READY About This Manual 20 General Guide 21 Camera 21 USB Cradle 23 Monitor Screen... of the Monitor Screen 26 Attaching the Strap 28 Power Requirements 29 Loading and Removing the Rechargeable Battery 29 To charge the battery 31 Power Supply Precautions 36 Turning the Camera On and Off 39 Configuring Power Saving Settings 41 Using the On-screen Menus 42 Configuring Display ...
Owners Manual
Page 8
... service names used herein may arise through the use of the EX-Z55. • CASIO COMPUTER CO., LTD. Except as a result of malfunction, repairs, or battery replacement. assumes no responsibility for any third party due to CASIO COMPUTER CO., LTD. 8 software. assumes no responsibility for any... registered trademarks or trademarks of Adobe Systems Incorporated in this manual. • CASIO COMPUTER CO., LTD. assumes no responsibility for any loss or claims by the screens and configuration of the actual camera. • The SD logo is a registered trademark. • Windows, ...
... service names used herein may arise through the use of the EX-Z55. • CASIO COMPUTER CO., LTD. Except as a result of malfunction, repairs, or battery replacement. assumes no responsibility for any third party due to CASIO COMPUTER CO., LTD. 8 software. assumes no responsibility for any... registered trademarks or trademarks of Adobe Systems Incorporated in this manual. • CASIO COMPUTER CO., LTD. assumes no responsibility for any loss or claims by the screens and configuration of the actual camera. • The SD logo is a registered trademark. • Windows, ...
Owners Manual
Page 9
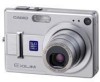
... a memory card. • REC mode or PLAY mode power up (page 39) Press [ ] (REC) or [ ] (PLAY) to turn on the camera and enter the mode you lock the focus point. 9 Features • 5 million effective pixels The CCD provides 5.25 million total pixels of very highresolution for.... • 2.5-inch TFT color LCD monitor screen • Long battery life A low-power design combines with a large-capacity battery to provide more recording and playback between charges. • 12X zoom (page 55) 3X optical zoom, 4X digital zoom • 9.3MB flash memory Images can be recorded without permission...
... a memory card. • REC mode or PLAY mode power up (page 39) Press [ ] (REC) or [ ] (PLAY) to turn on the camera and enter the mode you lock the focus point. 9 Features • 5 million effective pixels The CCD provides 5.25 million total pixels of very highresolution for.... • 2.5-inch TFT color LCD monitor screen • Long battery life A low-power design combines with a large-capacity battery to provide more recording and playback between charges. • 12X zoom (page 55) 3X optical zoom, 4X digital zoom • 9.3MB flash memory Images can be recorded without permission...

Owners Manual
Page 10
...8226; World Time (page 141) A simple operation sets the current time for your friend, even if you are trying to record and the camera performs troublesome setups automatically for beautiful pictures every time. • Business Shot (page 89) Business Shot automatically corrects rectangular shapes when recording the image...only two people around. • Triple Self-timer (page 63) The self-timer can be performed. You can be used to charge the camera's battery, and to transfer images to a computer. This means you can create images that matches the type of an alarm clock. This helps to ...
...8226; World Time (page 141) A simple operation sets the current time for your friend, even if you are trying to record and the camera performs troublesome setups automatically for beautiful pictures every time. • Business Shot (page 89) Business Shot automatically corrects rectangular shapes when recording the image...only two people around. • Triple Self-timer (page 63) The self-timer can be performed. You can be used to charge the camera's battery, and to transfer images to a computer. This means you can create images that matches the type of an alarm clock. This helps to ...

Owners Manual
Page 13
... • Never open the battery cover, disconnect the AC adaptor from the camera, or unplug the AC adaptor from the power outlet, and contact your dealer or nearest CASIO authorized service center. • Never use is prohibited. Using the camera under these conditions creates the ...8226; Physical damage and malfunction of the plug. Intense light from the power outlet, and contact your nearest CASIO authorized service center for repair. Next, remove the camera's battery and/or unplug the AC adaptor power cord from the power outlet, and contact your own maintenance. •...
... • Never open the battery cover, disconnect the AC adaptor from the camera, or unplug the AC adaptor from the power outlet, and contact your dealer or nearest CASIO authorized service center. • Never use is prohibited. Using the camera under these conditions creates the ...8226; Physical damage and malfunction of the plug. Intense light from the power outlet, and contact your nearest CASIO authorized service center for repair. Next, remove the camera's battery and/or unplug the AC adaptor power cord from the power outlet, and contact your own maintenance. •...

Owners Manual
Page 14
... operation is performing a record or memory access operation - INTRODUCTION I Data Error Precautions • Your digital camera is manufactured using precision digital components. Removing the battery or memory card, or setting the camera onto the USB cradle while the camera is being performed - Low battery power - I Operating conditions • This camera is designed for proper operation before using the...
... operation is performing a record or memory access operation - INTRODUCTION I Data Error Precautions • Your digital camera is manufactured using precision digital components. Removing the battery or memory card, or setting the camera onto the USB cradle while the camera is being performed - Low battery power - I Operating conditions • This camera is designed for proper operation before using the...

Owners Manual
Page 15
... on a cold day or otherwise expose it into a location that is the possibility that might cause condensation. • To keep condensation from the camera and leave the battery cover open for a few hours. Doing so can remove dust particles from the lens surface by using a lens blower to conditions that condensation can...
... on a cold day or otherwise expose it into a location that is the possibility that might cause condensation. • To keep condensation from the camera and leave the battery cover open for a few hours. Doing so can remove dust particles from the lens surface by using a lens blower to conditions that condensation can...

Owners Manual
Page 16
Place the camera onto the USB cradle to charge the battery (page 31). • Note that the shape of the AC adaptor depends on the area where you purchased the camera. • It takes about 190 minutes to achieve a full charge. 1 Inlet Type 2 2 Stopper 1 Plug-in Type [CHARGE] lamp Charging: Lights red Charging Complete: Lights green 3 16 QUICK START GUIDE QUICK START GUIDE First, charge the battery! 1. Load the battery into the camera (page 29). 1 2.
Place the camera onto the USB cradle to charge the battery (page 31). • Note that the shape of the AC adaptor depends on the area where you purchased the camera. • It takes about 190 minutes to achieve a full charge. 1 Inlet Type 2 2 Stopper 1 Plug-in Type [CHARGE] lamp Charging: Lights red Charging Complete: Lights green 3 16 QUICK START GUIDE QUICK START GUIDE First, charge the battery! 1. Load the battery into the camera (page 29). 1 2.
Owners Manual
Page 20
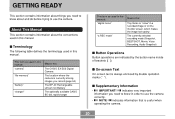
...need to know about the conventions used in this manual: "digital noise" "a REC mode" Means this manual. About This Manual This section contains information about and do before trying to use the camera. I On-screen Text On-screen text is always enclosed ...50) The NP-40 Rechargeable Lithium Ion Battery The optionally available CASIO BC-30L rapid charger This term as used in this manual: "camera" "file memory" "battery" "charger" Means this: The CASIO EX-Z55 Digital Camera The location where the camera is useful when operating the camera. 20 The currently selected recording mode (...
...need to know about the conventions used in this manual: "digital noise" "a REC mode" Means this manual. About This Manual This section contains information about and do before trying to use the camera. I On-screen Text On-screen text is always enclosed ...50) The NP-40 Rechargeable Lithium Ion Battery The optionally available CASIO BC-30L rapid charger This term as used in this manual: "camera" "file memory" "battery" "charger" Means this: The CASIO EX-Z55 Digital Camera The location where the camera is useful when operating the camera. 20 The currently selected recording mode (...

Owners Manual
Page 22
GETTING READY I Back 89 I H : AB C G FE D 8 Viewfinder 9 Operation lamp 0 [ ] (PLAY mode) button A Zoom button B [ ] (REC mode) button C Strap ring D [SET] button E [MENU] button F [DISP] button G H Monitor Screen I Speaker I Bottom J Stopper K Memory card slot L Battery compartment M Battery cover N Connector O Tripod screw hole * Use this hole when attaching to a tripod. J K ON L M 22
GETTING READY I Back 89 I H : AB C G FE D 8 Viewfinder 9 Operation lamp 0 [ ] (PLAY mode) button A Zoom button B [ ] (REC mode) button C Strap ring D [SET] button E [MENU] button F [DISP] button G H Monitor Screen I Speaker I Bottom J Stopper K Memory card slot L Battery compartment M Battery cover N Connector O Tripod screw hole * Use this hole when attaching to a tripod. J K ON L M 22

Owners Manual
Page 23
I Front 1 23 54 1 Camera connector 2 [USB] lamp 3 [USB] button 4 [CHARGE] lamp 5 [PHOTO] button I Back 6 7 6 [DC IN 5.3V] (AC adaptor connector) 7 [USB] (USB port) 23 GETTING READY USB Cradle Simply placing your CASIO digital camera onto the USB cradle lets you perform the following tasks. • Battery charging (page 31) • Automatic transfer of images to a computer (page 160) • Direct connection to a printer for printing (page 156) • Viewing of images using the Photo Stand slideshow feature (page 119).
I Front 1 23 54 1 Camera connector 2 [USB] lamp 3 [USB] button 4 [CHARGE] lamp 5 [PHOTO] button I Back 6 7 6 [DC IN 5.3V] (AC adaptor connector) 7 [USB] (USB port) 23 GETTING READY USB Cradle Simply placing your CASIO digital camera onto the USB cradle lets you perform the following tasks. • Battery charging (page 31) • Automatic transfer of images to a computer (page 160) • Direct connection to a printer for printing (page 156) • Viewing of images using the Photo Stand slideshow feature (page 119).

Owners Manual
Page 25
... off Icon Help if you want (page 103). A Aperture value (page 52) B ISO sensitivity (page 100) C Date and time (page 139) D EV value (page 76) E Battery capacity (page 35) F Histogram (page 97) G Focus frame (page 51) • Focusing complete: Green • Focusing failed: Red NOTE • Changing the setting of any...
... off Icon Help if you want (page 103). A Aperture value (page 52) B ISO sensitivity (page 100) C Date and time (page 139) D EV value (page 76) E Battery capacity (page 35) F Histogram (page 97) G Focus frame (page 51) • Focusing complete: Green • Focusing failed: Red NOTE • Changing the setting of any...

Owners Manual
Page 26
... reduction A White balance indicator (page 78) AWB Auto C REC modes (page 48) Snapshot BESTSHOT Daylight Cloudy D Battery capacity (page 35) Shade E Histogram (page 97) 1 Fluorescent 1 F EV value (page 76) 2 Fluorescent 2 Tungsten Manual IMPORTANT! • Some information may not display properly if you display an image that was recorded using a different digital camera model.
... reduction A White balance indicator (page 78) AWB Auto C REC modes (page 48) Snapshot BESTSHOT Daylight Cloudy D Battery capacity (page 35) Shade E Histogram (page 97) 1 Fluorescent 1 F EV value (page 76) 2 Fluorescent 2 Tungsten Manual IMPORTANT! • Some information may not display properly if you display an image that was recorded using a different digital camera model.

Owners Manual
Page 29
... the stopper in the direction indicated by a rechargeable lithium ion battery (NP-40). GETTING READY Power Requirements Your camera is powered by the arrow in the illustration, align the (-) mark on the battery with the (-) mark on the camera and slide the battery into the camera. (-) mark Stopper (-) marks NP-40 • Push the bottom of...
... the stopper in the direction indicated by a rechargeable lithium ion battery (NP-40). GETTING READY Power Requirements Your camera is powered by the arrow in the illustration, align the (-) mark on the battery with the (-) mark on the camera and slide the battery into the camera. (-) mark Stopper (-) marks NP-40 • Push the bottom of...

Owners Manual
Page 30
... lithium ion battery to charge the battery before using the camera for the first time (page 31). Use of any other type of the slot. Open the battery cover. 2. Release the stopper and pull the battery from the camera. • Take care so you purchase the camera. The battery is not supported.... You need to power this camera. Swing the battery cover closed, and then slide it in the direction...
... lithium ion battery to charge the battery before using the camera for the first time (page 31). Use of any other type of the slot. Open the battery cover. 2. Release the stopper and pull the battery from the camera. • Take care so you purchase the camera. The battery is not supported.... You need to power this camera. Swing the battery cover closed, and then slide it in the direction...

Owners Manual
Page 31
... power receptacle shape is different from that in your area, replace the AC power cord with one of the other ones that comes with the camera, or purchase a commercially available AC power cord that is designed for operation with the power outlets in the range of the AC power cord plug... varies according to 240V AC. AC Adaptor USB Cradle AC power cord [DC IN 5.3V] 31 Note, however, that area. If you purchased the camera. [DC IN 5.3V] USB Cradle AC Adaptor NOTE • The bundled AC adaptor is compatible with any power supply in that the shape of 100V...
... power receptacle shape is different from that in your area, replace the AC power cord with one of the other ones that comes with the camera, or purchase a commercially available AC power cord that is designed for operation with the power outlets in the range of the AC power cord plug... varies according to 240V AC. AC Adaptor USB Cradle AC power cord [DC IN 5.3V] 31 Note, however, that area. If you purchased the camera. [DC IN 5.3V] USB Cradle AC Adaptor NOTE • The bundled AC adaptor is compatible with any power supply in that the shape of 100V...

Owners Manual
Page 32
...the AC adaptor power cord plug is complete, remove the camera from 100V AC to charge the special NP-40 rechargeable lithium ion battery. Note, however, that comes with local power outlets when traveling abroad. 2. Turn off the camera. 3. When charging is complete, the [CHARGE] lamp ...will go. • The [CHARGE] lamp on current battery capacity and charging conditions. 32 GETTING READY NOTE • The AC adaptor is designed for...
...the AC adaptor power cord plug is complete, remove the camera from 100V AC to charge the special NP-40 rechargeable lithium ion battery. Note, however, that comes with local power outlets when traveling abroad. 2. Turn off the camera. 3. When charging is complete, the [CHARGE] lamp ...will go. • The [CHARGE] lamp on current battery capacity and charging conditions. 32 GETTING READY NOTE • The AC adaptor is designed for...
Owners Manual
Page 33
... cradle and see if it works normally. • The following are the only operations that can be caused by any of the camera's battery, exchanging data with how the battery is loaded. Check to make sure that the AC adaptor's power cord is connected securely to the power outlet and USB cradle. &#.... The [CHARGE] lamp will turn red and charging will start right away if you try to charge immediately after taking the above steps, contact a CASIO authorized service center. 33 GETTING READY • The [CHARGE] lamp may remain amber colored and the charge operation may not start when the...
... cradle and see if it works normally. • The following are the only operations that can be caused by any of the camera's battery, exchanging data with how the battery is loaded. Check to make sure that the AC adaptor's power cord is connected securely to the power outlet and USB cradle. &#.... The [CHARGE] lamp will turn red and charging will start right away if you try to charge immediately after taking the above steps, contact a CASIO authorized service center. 33 GETTING READY • The [CHARGE] lamp may remain amber colored and the charge operation may not start when the...

Owners Manual
Page 34
...Temperature: 23°C (73°F) • Scroll one image with flash; Low temperatures and continued use reduce battery life. GETTING READY I Battery Life Guidelines The battery life guideline values given below indicate the amount of time under the conditions defined below the table, until power ...Operation Number of Shots (CIPA Standard)*1 (Operating Time) Number of Shots, Continuous Recording*2 (Operating Time) Apporoximate Battery Life 400 shots (200 minutes) 1070 shots (210 minutes) Continuous Snapshot Playback*3 Continuous Voice Recording*4 410 minutes 380 minutes Supported...
...Temperature: 23°C (73°F) • Scroll one image with flash; Low temperatures and continued use reduce battery life. GETTING READY I Battery Life Guidelines The battery life guideline values given below indicate the amount of time under the conditions defined below the table, until power ...Operation Number of Shots (CIPA Standard)*1 (Operating Time) Number of Shots, Continuous Recording*2 (Operating Time) Apporoximate Battery Life 400 shots (200 minutes) 1070 shots (210 minutes) Continuous Snapshot Playback*3 Continuous Voice Recording*4 410 minutes 380 minutes Supported...


