
Owners Manual
Page 3
...if you or any damages, lost profits, or claims by loss of memory contents due to ensure that the example screens and product illustrations shown in ...to the characteristics of the production process. This is forbidden. shall not be held liable for CASIO. • CASIO COMPUTER CO., LTD. LCD Panel The liquid crystal panel of the monitor screen uses high-precision ... a test shot to malfunction, repair, or any other reason. • Note that the camera is forbidden under copyright laws. • CASIO COMPUTER CO., LTD. shall not be held liable for any third party due to the use...
...if you or any damages, lost profits, or claims by loss of memory contents due to ensure that the example screens and product illustrations shown in ...to the characteristics of the production process. This is forbidden. shall not be held liable for CASIO. • CASIO COMPUTER CO., LTD. LCD Panel The liquid crystal panel of the monitor screen uses high-precision ... a test shot to malfunction, repair, or any other reason. • Note that the camera is forbidden under copyright laws. • CASIO COMPUTER CO., LTD. shall not be held liable for any third party due to the use...
Owners Manual
Page 4
... 13 What is a digital camera 13 What you can do with your CASIO camera 14 First, charge the battery prior to use 15 ❚ To charge the battery 15 ❚ To load the battery 16 Configuring Basic Settings the First Time You Turn On the Camera 18 Preparing a Memory Card 19 ❚ Supported Memory Cards 19 ❚...
... 13 What is a digital camera 13 What you can do with your CASIO camera 14 First, charge the battery prior to use 15 ❚ To charge the battery 15 ❚ To load the battery 16 Configuring Basic Settings the First Time You Turn On the Camera 18 Preparing a Memory Card 19 ❚ Supported Memory Cards 19 ❚...
Owners Manual
Page 5
... 58 ❚ Using the Self-timer Self-timer) . . . 59 ❚ Shooting with Face Detection Face Detection) . . . 60 ❚ Reducing the Effects of Camera and Subject Movement . . . . (Anti Shake) . . . 60 ❚ Specifying the Auto Focus Area AF Area) . . . 60 ❚ Using the easy ... On or Off Digital Zoom) . . . 62 ❚ Turning on Image Review Review) . . . 62 ❚ Using Icon Help Icon Help) . . . 62 ❚ Configuring Power On Default Settings Memory) . . . 63 Image Quality Settings Quality) . . 64 ❚ Specifying Snapshot Size Size) . . . 64 ❚ Specifying...
... 58 ❚ Using the Self-timer Self-timer) . . . 59 ❚ Shooting with Face Detection Face Detection) . . . 60 ❚ Reducing the Effects of Camera and Subject Movement . . . . (Anti Shake) . . . 60 ❚ Specifying the Auto Focus Area AF Area) . . . 60 ❚ Using the easy ... On or Off Digital Zoom) . . . 62 ❚ Turning on Image Review Review) . . . 62 ❚ Using Icon Help Icon Help) . . . 62 ❚ Configuring Power On Default Settings Memory) . . . 63 Image Quality Settings Quality) . . 64 ❚ Specifying Snapshot Size Size) . . . 64 ❚ Specifying...

Owners Manual
Page 6
... 90 ❚ Uploading Movie Files to YouTube 91 ❚ Transferring Images from Your Computer to Camera Memory 93 ❚ Viewing User Documentation PDF Files) . . . 95 ❚ User Registration 95 Using the Camera with a Macintosh 96 ❚ Connecting the Camera to Your Computer and Saving Files 96 ❚ Transferring Images Automatically and Managing Them on...
... 90 ❚ Uploading Movie Files to YouTube 91 ❚ Transferring Images from Your Computer to Camera Memory 93 ❚ Viewing User Documentation PDF Files) . . . 95 ❚ User Registration 95 Using the Camera with a Macintosh 96 ❚ Connecting the Camera to Your Computer and Saving Files 96 ❚ Transferring Images Automatically and Managing Them on...

Owners Manual
Page 7
... Settings USB) . 112 Selecting the Screen Aspect Ratio and Video Output System Video Out) . 112 Formatting Built-in Memory or a Memory Card Format) . 113 Resetting the Camera to Factory Defaults Reset) . 113 ❚❙ Configuring Monitor Screen Settings 114 Using the On-screen Histogram to Check...123 ❚ To replace the battery 123 ❚ Battery Precautions 124 ❚ Using the Camera in another Country 124 Using a Memory Card 125 ❚ To replace the memory card 125 Computer System Requirements for Bundled Software Bundled CD-ROM) . 127 Reset Initial Default ...
... Settings USB) . 112 Selecting the Screen Aspect Ratio and Video Output System Video Out) . 112 Formatting Built-in Memory or a Memory Card Format) . 113 Resetting the Camera to Factory Defaults Reset) . 113 ❚❙ Configuring Monitor Screen Settings 114 Using the On-screen Histogram to Check...123 ❚ To replace the battery 123 ❚ Battery Precautions 124 ❚ Using the Camera in another Country 124 Using a Memory Card 125 ❚ To replace the memory card 125 Computer System Requirements for Bundled Software Bundled CD-ROM) . 127 Reset Initial Default ...

Owners Manual
Page 8
Camera Front 12 34 Back 8 9 bk bl [ ] 76 [ ] [ ] 5 [ ] br bq bp bo bn bm [SET] 1Zoom controller 9[0] (movie) button (pages 23, 42, 69) (page 45) 2Shutter ..., 24, 33) bpControl button ([8] [2] [4] [6]) (pages 27, 29, 33, 52, 114) bq[p] (PLAY) button (pages 21, 26) brMonitor screen (pages 10, 114) Bottom cm cl bsBattery/memory card slots (pages 16, 19, 123, 125) btUSB/AV port (pages 70, 80, 88, 97) bs ckConnector cover clSpeaker cmTripod hole Use this hole when...
Camera Front 12 34 Back 8 9 bk bl [ ] 76 [ ] [ ] 5 [ ] br bq bp bo bn bm [SET] 1Zoom controller 9[0] (movie) button (pages 23, 42, 69) (page 45) 2Shutter ..., 24, 33) bpControl button ([8] [2] [4] [6]) (pages 27, 29, 33, 52, 114) bq[p] (PLAY) button (pages 21, 26) brMonitor screen (pages 10, 114) Bottom cm cl bsBattery/memory card slots (pages 16, 19, 123, 125) btUSB/AV port (pages 70, 80, 88, 97) bs ckConnector cover clSpeaker cmTripod hole Use this hole when...

Owners Manual
Page 10
...2Continuous shutter (page 58) 3Self-timer (page 59) 4Recording mode (page 23) 5Image deterioration indicator (page 43) 6Metering mode (page 66) 7Remaining snapshot memory capacity (page 137) 8Snapshot image size (page 30) 9Snapshot image quality (page 64) bkFlash (page 33) blFace detection (page 35) bmAnti Shake (... in various modes. They do not represent screens that can appear on the camera. . Monitor Screen Contents The monitor screen uses various indicators, icons, and values to keep you informed of the camera's status. • The sample screens in this section are intended to show...
...2Continuous shutter (page 58) 3Self-timer (page 59) 4Recording mode (page 23) 5Image deterioration indicator (page 43) 6Metering mode (page 66) 7Remaining snapshot memory capacity (page 137) 8Snapshot image size (page 30) 9Snapshot image quality (page 64) bkFlash (page 33) blFace detection (page 35) bmAnti Shake (... in various modes. They do not represent screens that can appear on the camera. . Monitor Screen Contents The monitor screen uses various indicators, icons, and values to keep you informed of the camera's status. • The sample screens in this section are intended to show...

Owners Manual
Page 11
easy Mode bk3 cm ck 7 8 br . Movie Recording Panel : Off 34 1 7 6 Panel : On 3 12 8 7 6 1Recording mode (page 45) 2Remaining movie memory capacity (page 45) 3Focus mode (page 54) 2 4White balance setting (page 37) 8 5Exposure compensation (page 39) 6Battery level indicator (page 17) 7Histogram (page 114) 8Movie recording time (page 45) 5 4 5 11
easy Mode bk3 cm ck 7 8 br . Movie Recording Panel : Off 34 1 7 6 Panel : On 3 12 8 7 6 1Recording mode (page 45) 2Remaining movie memory capacity (page 45) 3Focus mode (page 54) 2 4White balance setting (page 37) 8 5Exposure compensation (page 39) 6Battery level indicator (page 17) 7Histogram (page 114) 8Movie recording time (page 45) 5 4 5 11
Owners Manual
Page 13
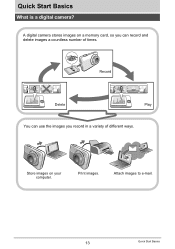
Print images. A digital camera stores images on your computer. Quick Start Basics What is a digital camera? Record Delete Play You can use the images you can record and delete images a countless number of different ways. Attach images to e-mail. 13 Quick Start Basics Store images on a memory card, so you record in a variety of times.
Print images. A digital camera stores images on your computer. Quick Start Basics What is a digital camera? Record Delete Play You can use the images you can record and delete images a countless number of different ways. Attach images to e-mail. 13 Quick Start Basics Store images on a memory card, so you record in a variety of times.

Owners Manual
Page 17
... below. 3. Close the battery cover. Battery Power Conservation Tips • When you do not need to use the flash, select ? (flash off the camera (pages 110, 111). 17 Quick Start Basics If this happens, load new battery and then set the correct time and date (page 109). • ... wasting battery power when you switch between the REC mode and PLAY mode. • The camera date and time display will not be correct if the camera is left for information about battery life and memory capacity. Close the battery cover and then shift the slider towards LOCK. • For information...
... below. 3. Close the battery cover. Battery Power Conservation Tips • When you do not need to use the flash, select ? (flash off the camera (pages 110, 111). 17 Quick Start Basics If this happens, load new battery and then set the correct time and date (page 109). • ... wasting battery power when you switch between the REC mode and PLAY mode. • The camera date and time display will not be correct if the camera is left for information about battery life and memory capacity. Close the battery cover and then shift the slider towards LOCK. • For information...

Owners Manual
Page 19
...at least 24 hours after you hear it into place. Press [ON/OFF] (Power) to turn off the camera and then open it as indicated by the arrows in memory that can be used to store images and movies, you probably will want to change. • Removing the... battery too soon after configuring settings. Load a memory card. NOTE • Each country controls its front is facing upwards (in the direction of memory card. Do not remove the battery for greater capacity. Supported Memory Cards - The camera does not come with a memory card. Front Front Back 19 Quick Start Basics ...
...at least 24 hours after you hear it into place. Press [ON/OFF] (Power) to turn off the camera and then open it as indicated by the arrows in memory that can be used to store images and movies, you probably will want to change. • Removing the... battery too soon after configuring settings. Load a memory card. NOTE • Each country controls its front is facing upwards (in the direction of memory card. Do not remove the battery for greater capacity. Supported Memory Cards - The camera does not come with a memory card. Front Front Back 19 Quick Start Basics ...

Owners Manual
Page 20
To format (initialize) a new memory card You need to your retailer or nearest CASIO authorized service center. Formatting a memory card on it for the first time, copy the Eye-Fi Manager install files to format a memory card again. Select the "Set Up" tab, select "Format" and then press [6]. 3. ...operation, etc. • Before formatting a new Eye-Fi card to use the camera to a card has slowed down data processing by the camera. In the case of an SD or SDHC memory card, formatting on the camera and press [MENU]. 2. Close the battery cover. Turn on a computer can result...
To format (initialize) a new memory card You need to your retailer or nearest CASIO authorized service center. Formatting a memory card on it for the first time, copy the Eye-Fi Manager install files to format a memory card again. Select the "Set Up" tab, select "Format" and then press [6]. 3. ...operation, etc. • Before formatting a new Eye-Fi card to use the camera to a card has slowed down data processing by the camera. In the case of an SD or SDHC memory card, formatting on the camera and press [MENU]. 2. Close the battery cover. Turn on a computer can result...

Owners Manual
Page 23
Snapshot mode icon Monitor screen Shutter button [r] (REC) Remaining Snapshot Memory Capacity (page 137) 2. Zoom controller w Wide Angle z Telephoto 23 Quick Start Basics Point the camera at the subject. To shoot a snapshot 1. Press [r] (REC) to turn on the display. Make sure R is on the camera. You can zoom the image, if you want. If it isn't, see page 49.
Snapshot mode icon Monitor screen Shutter button [r] (REC) Remaining Snapshot Memory Capacity (page 137) 2. Zoom controller w Wide Angle z Telephoto 23 Quick Start Basics Point the camera at the subject. To shoot a snapshot 1. Press [r] (REC) to turn on the display. Make sure R is on the camera. You can zoom the image, if you want. If it isn't, see page 49.

Owners Manual
Page 26
...shutter button while in the PLAY mode or while a menu screen is displayed will display one of the snapshots currently stored in on the camera's monitor screen. • For information about the displayed snapshot also is included (page 12). • You also can clear the ...enter the [p] (PLAY) PLAY mode. • This will switch directly to view only the snapshot (page 114). • You can zoom in memory. • Information about how to you zoom the image and check its details after recording it. 2. Viewing Snapshots Use the following procedure to view snapshots...
...shutter button while in the PLAY mode or while a menu screen is displayed will display one of the snapshots currently stored in on the camera's monitor screen. • For information about the displayed snapshot also is included (page 12). • You also can clear the ...enter the [p] (PLAY) PLAY mode. • This will switch directly to view only the snapshot (page 114). • You can zoom in memory. • Information about how to you zoom the image and check its details after recording it. 2. Viewing Snapshots Use the following procedure to view snapshots...

Owners Manual
Page 27
...) deletes both the snapshot and the audio file. Press [p] (PLAY) to enter the PLAY mode and then press [2] ( ). 2. To delete all files. Deleting Images If memory becomes full, you can delete images you want to delete is displayed. 3. Press [p] (PLAY) to enter the PLAY mode and then press [2] ( ). 2. Use [8] and [2] to...
...) deletes both the snapshot and the audio file. Press [p] (PLAY) to enter the PLAY mode and then press [2] ( ). 2. To delete all files. Deleting Images If memory becomes full, you can delete images you want to delete is displayed. 3. Press [p] (PLAY) to enter the PLAY mode and then press [2] ( ). 2. Use [8] and [2] to...

Owners Manual
Page 28
... to other very low contrast subject - Very shiny subject - Doing so can cause digital noise in a dark location - Shooting Indoors under Fluorescent Lighting • Minute flickering of the camera, etc. • If unwanted light is shining directly onto the lens, shade the... lens with a repeating horizontal pattern - Solid color wall or other images stored in memory, malfunction of fluorescent lighting can make proper focus impossible...
... to other very low contrast subject - Very shiny subject - Doing so can cause digital noise in a dark location - Shooting Indoors under Fluorescent Lighting • Minute flickering of the camera, etc. • If unwanted light is shining directly onto the lens, shade the... lens with a repeating horizontal pattern - Solid color wall or other images stored in memory, malfunction of fluorescent lighting can make proper focus impossible...

Owners Manual
Page 31
... Number of images that larger images have more pixels, so they take up more memory space. Best when you plan to send images by e-mail, etc. • For information about resizing existing snapshots, see page 75. 31 Snapshot Tutorial Best ... about movie image size, see page 65. • For information about image size, image quality, and number of Pixels Less detail, but takes up more memory.
... Number of images that larger images have more pixels, so they take up more memory space. Best when you plan to send images by e-mail, etc. • For information about resizing existing snapshots, see page 75. 31 Snapshot Tutorial Best ... about movie image size, see page 65. • For information about image size, image quality, and number of Pixels Less detail, but takes up more memory.

Owners Manual
Page 32
...Print 3M (2048x1536) 3.5"x5" Print VGA (640x480) E Mail Description Good detail for better clarity even for "High Definition Television". . Your camera can record images that are relatively coarser. • The initial factory default image size setting is relatively more important than the usual 4:3 aspect ratio... of print paper. • The letters "HDTV" stand for images cropped (page 76) from the original Good detail Best when preserving memory capacity is "12M". • Selecting "3:2" records images with the aspect ratio an HDTV screen. • You should regard the print ...
...Print 3M (2048x1536) 3.5"x5" Print VGA (640x480) E Mail Description Good detail for better clarity even for "High Definition Television". . Your camera can record images that are relatively coarser. • The initial factory default image size setting is relatively more important than the usual 4:3 aspect ratio... of print paper. • The letters "HDTV" stand for images cropped (page 76) from the original Good detail Best when preserving memory capacity is "12M". • Selecting "3:2" records images with the aspect ratio an HDTV screen. • You should regard the print ...

Owners Manual
Page 45
...recording stops Recording time automatically after 29 minutes of movie you are trying to 29 minutes long. Movie recording also will stop automatically if memory becomes full before you can record will change its setup accordingly, for beautiful movies every time. Remaining recording time (page 138) [0]...the movie you select. 2. Selecting the BEST SHOT scene named Night Scene, for the movie (page 65). This will configure the camera so night scenes appear clearer and brighter. 45 Recording Movie Images and Audio Recording Movie Images and Audio To record a movie 1. ...
...recording stops Recording time automatically after 29 minutes of movie you are trying to 29 minutes long. Movie recording also will stop automatically if memory becomes full before you can record will change its setup accordingly, for beautiful movies every time. Remaining recording time (page 138) [0]...the movie you select. 2. Selecting the BEST SHOT scene named Night Scene, for the movie (page 65). This will configure the camera so night scenes appear clearer and brighter. 45 Recording Movie Images and Audio Recording Movie Images and Audio To record a movie 1. ...
Owners Manual
Page 46
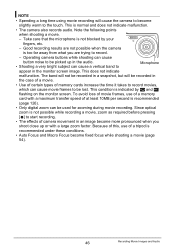
... in the monitor screen image. The band will not be recorded in a snapshot, but will cause the camera to become slightly warm to the touch. Because of this, use of memory cards increase the time it takes to record movies, which can be lost. NOTE • Spending a ... maximum transfer speed of a tripod is recommended (page 126). • Only digital zoom can cause movie frames to start recording. • The effects of camera movement in the case of a movie. • Use of certain types of a memory card with a large zoom factor. To avoid loss of movie frames, use...
... in the monitor screen image. The band will not be recorded in a snapshot, but will cause the camera to become slightly warm to the touch. Because of this, use of memory cards increase the time it takes to record movies, which can be lost. NOTE • Spending a ... maximum transfer speed of a tripod is recommended (page 126). • Only digital zoom can cause movie frames to start recording. • The effects of camera movement in the case of a movie. • Use of certain types of a memory card with a large zoom factor. To avoid loss of movie frames, use...


