
Owners Manual
Page 2
Attach strap here. Power cord Strap USB cable AV cable CD-ROM Basic Reference 2 If anything is missing, contact your camera, check to country or geographic area. Unpacking As you unpack your original retailer. Digital camera Rechargeable lithium ion battery (NP-80) Charger unit (BC-80L) To attach the strap to the camera * The shape of the power cord plug varies according to make sure that all items shown below are included.
Attach strap here. Power cord Strap USB cable AV cable CD-ROM Basic Reference 2 If anything is missing, contact your camera, check to country or geographic area. Unpacking As you unpack your original retailer. Digital camera Rechargeable lithium ion battery (NP-80) Charger unit (BC-80L) To attach the strap to the camera * The shape of the power cord plug varies according to make sure that all items shown below are included.

Owners Manual
Page 4
... Screen Contents 10 ❚❙ Quick Start Basics 13 What is a digital camera 13 What you can do with your CASIO camera 14 First, charge the battery prior to use 15 ❚ To charge the battery 15 ❚ To load the battery 16 Configuring Basic Settings the First Time You Turn On the... Camera 18 Preparing a Memory Card 19 ❚ Supported Memory Cards 19 ❚...
... Screen Contents 10 ❚❙ Quick Start Basics 13 What is a digital camera 13 What you can do with your CASIO camera 14 First, charge the battery prior to use 15 ❚ To charge the battery 15 ❚ To load the battery 16 Configuring Basic Settings the First Time You Turn On the... Camera 18 Preparing a Memory Card 19 ❚ Supported Memory Cards 19 ❚...

Owners Manual
Page 8
... the Histogram 151 ❚❙ Appendix 152 Precautions during Use 152 Power Supply 159 ❚ Charging 159 ❚ To replace the battery 160 ❚ Battery Precautions 160 ❚ Using the Camera in another Country 161 Using a Memory Card 161 ❚ To replace the memory card 161 Computer System Requirements for Bundled Software Bundled...
... the Histogram 151 ❚❙ Appendix 152 Precautions during Use 152 Power Supply 159 ❚ Charging 159 ❚ To replace the battery 160 ❚ Battery Precautions 160 ❚ Using the Camera in another Country 161 Using a Memory Card 161 ❚ To replace the memory card 161 Computer System Requirements for Bundled Software Bundled...
Owners Manual
Page 15
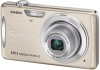
... minutes are required to a full charge. • Your camera requires a special CASIO rechargeable lithium ion battery (NP-80) for power. Perform the steps under "To charge the battery" to bring the battery to reach full charge. terminals of the battery with those of the charger unit, load the battery into a household power outlet. The [CHARGE] lamp will...
... minutes are required to a full charge. • Your camera requires a special CASIO rechargeable lithium ion battery (NP-80) for power. Perform the steps under "To charge the battery" to bring the battery to reach full charge. terminals of the battery with those of the charger unit, load the battery into a household power outlet. The [CHARGE] lamp will...

Owners Manual
Page 16
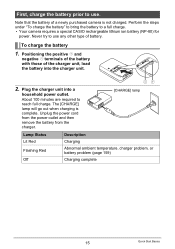
... it is recommended that you need to use any other type of charger device. To load the battery 1. Load the battery. If this , it is not loaded in the camera. Attempting to the battery in place. Stopper Battery contacts EXILIM logo Front Back 16 Quick Start Basics Because of the lens), hold the stopper next to...
... it is recommended that you need to use any other type of charger device. To load the battery 1. Load the battery. If this , it is not loaded in the camera. Attempting to the battery in place. Stopper Battery contacts EXILIM logo Front Back 16 Quick Start Basics Because of the lens), hold the stopper next to...
Owners Manual
Page 17
...; Enable the Auto Power Off and the Sleep features to protect against the camera, slide it closed. • For information about how to replace the battery, see page 160. 2 1 Checking Remaining Battery Power As battery power is dead will appear the next time you forget to be cleared. ...Pressing the battery cover against wasting battery power when you turn off the camera (pages 146, 147). 17 Quick Start...
...; Enable the Auto Power Off and the Sleep features to protect against the camera, slide it closed. • For information about how to replace the battery, see page 160. 2 1 Checking Remaining Battery Power As battery power is dead will appear the next time you forget to be cleared. ...Pressing the battery cover against wasting battery power when you turn off the camera (pages 146, 147). 17 Quick Start...

Owners Manual
Page 18
... time: Page 145 18 Quick Start Basics To change the display language from Japanese in the language you select may not be recorded with a camera intended for the Japanese market. To switch between 12-hour and 24-hour format, press [BS]. 5. Display language: Page 146 - Configuring ...Basic Settings the First Time You Turn On the Camera The first time you load a battery into the camera, a screen appears for information about how to correct the settings. - Set the date and the time. IMPORTANT! • A ...
... time: Page 145 18 Quick Start Basics To change the display language from Japanese in the language you select may not be recorded with a camera intended for the Japanese market. To switch between 12-hour and 24-hour format, press [BS]. 5. Display language: Page 146 - Configuring ...Basic Settings the First Time You Turn On the Camera The first time you load a battery into the camera, a screen appears for information about how to correct the settings. - Set the date and the time. IMPORTANT! • A ...

Owners Manual
Page 19
... built-in memory. • For information about memory card capacities, see page 175. Load a memory card. Do not remove the battery for at least 24 hours after configuring time and date settings for greater capacity. Supported Memory Cards - Positioning the memory card so its...Each country controls its front is loaded, images are subject to change. • Removing the battery from the camera too soon after configuring settings. SD Memory Card - Preparing a Memory Card Though the camera has built-in the direction indicated by the arrow. 2. When no memory card is facing ...
... built-in memory. • For information about memory card capacities, see page 175. Load a memory card. Do not remove the battery for at least 24 hours after configuring time and date settings for greater capacity. Supported Memory Cards - Positioning the memory card so its...Each country controls its front is loaded, images are subject to change. • Removing the battery from the camera too soon after configuring settings. SD Memory Card - Preparing a Memory Card Though the camera has built-in the direction indicated by the arrow. 2. When no memory card is facing ...

Owners Manual
Page 20
... press [MENU]. 2. Normally you notice any foreign object ever get into the card slot, immediately turn off the camera, remove the battery, and contact your retailer or nearest CASIO authorized service center. Turn on it for the first time. 1. In the case of an SD or SDHC memory card, formatting on... a computer and then using it , will delete its contents. Pressing the battery cover against the camera, slide it in the camera can result in ...
... press [MENU]. 2. Normally you notice any foreign object ever get into the card slot, immediately turn off the camera, remove the battery, and contact your retailer or nearest CASIO authorized service center. Turn on it for the first time. 1. In the case of an SD or SDHC memory card, formatting on... a computer and then using it , will delete its contents. Pressing the battery cover against the camera, slide it in the camera can result in ...

Owners Manual
Page 28
...- Shooting Indoors under Fluorescent Lighting • Minute flickering of the camera, etc. • If unwanted light is flashing green. Strongly back lit subject - Subject in memory, malfunction of fluorescent lighting can cause digital noise in the monitor screen image. • The image that...response to other very low contrast subject - Auto Focus Restrictions • Any of an image. Camera movement while shooting - Snapshot Shooting Precautions Operation • Never open the battery cover while the back lamp is shining directly onto the lens, shade the lens with a ...
...- Shooting Indoors under Fluorescent Lighting • Minute flickering of the camera, etc. • If unwanted light is flashing green. Strongly back lit subject - Subject in memory, malfunction of fluorescent lighting can cause digital noise in the monitor screen image. • The image that...response to other very low contrast subject - Auto Focus Restrictions • Any of an image. Camera movement while shooting - Snapshot Shooting Precautions Operation • Never open the battery cover while the back lamp is shining directly onto the lens, shade the lens with a ...

Owners Manual
Page 34
... red-eye correction feature that corrects for the flash setting when shooting in areas where flash photograph is caused when the light from the camera. Other Useful Flash Features • Changing the flash intensity (page 85) 34 Snapshot Tutorial This is prohibited. Red-eye Reduction Using..., or some other light source can cause image blur due to close . • Flash charging time (page 178) depends on operating conditions (battery condition, ambient temperature, etc.) • Shooting with flash turned off of the retina of the eye. When red-eye reduction is fired automatically ...
... red-eye correction feature that corrects for the flash setting when shooting in areas where flash photograph is caused when the light from the camera. Other Useful Flash Features • Changing the flash intensity (page 85) 34 Snapshot Tutorial This is prohibited. Red-eye Reduction Using..., or some other light source can cause image blur due to close . • Flash charging time (page 178) depends on operating conditions (battery condition, ambient temperature, etc.) • Shooting with flash turned off of the retina of the eye. When red-eye reduction is fired automatically ...

Owners Manual
Page 116
... bundled with the port. 116 Printing connector is sufficiently charged before connecting to a USB port, make sure you align the connector correctly with the camera to connect the camera to select "PTP (PictBridge)", and then press [SET]. . On the "Set Up" tab, select "USB" and then press [6]. 3. Failure... connecting. • Make sure that supports PictBridge and print images without going through a computer. . Make sure the camera's USB port battery is fully inserted, you USB/AV port feel it click securely into Small connector the USB/AV port until you still ...
... bundled with the port. 116 Printing connector is sufficiently charged before connecting to a USB port, make sure you align the connector correctly with the camera to connect the camera to select "PTP (PictBridge)", and then press [SET]. . On the "Set Up" tab, select "USB" and then press [6]. 3. Failure... connecting. • Make sure that supports PictBridge and print images without going through a computer. . Make sure the camera's USB port battery is fully inserted, you USB/AV port feel it click securely into Small connector the USB/AV port until you still ...
Owners Manual
Page 124
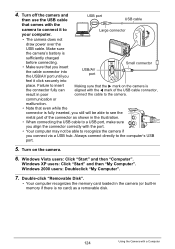
...securely into place. communication or malfunction. • Note that the 6 mark on the camera. 6. 4. Large connector • The camera does not draw power over the USB cable. Make sure the camera's battery is aligned with the 4 mark of the connector as a removable disk. 124 Using the... Camera with the camera to your computer. Always connect directly to the camera. Windows XP users: Click "Start" and then "My Computer"....
...securely into place. communication or malfunction. • Note that the 6 mark on the camera. 6. 4. Large connector • The camera does not draw power over the USB cable. Make sure the camera's battery is aligned with the 4 mark of the connector as a removable disk. 124 Using the... Camera with the camera to your computer. Always connect directly to the camera. Windows XP users: Click "Start" and then "My Computer"....

Owners Manual
Page 133
...you still will light green at this mode, your Macintosh. Double-click the camera's drive icon. 7. Drag the "DCIM" folder to the folder to which you connect via a USB hub. Make sure the camera's battery is fully inserted, you align the connector correctly with a Computer Always connect ...directly to copy it to your Macintosh recognizes the memory card loaded in the camera (or the camera's built-in poor Making sure that even while ...
...you still will light green at this mode, your Macintosh. Double-click the camera's drive icon. 7. Drag the "DCIM" folder to the folder to which you connect via a USB hub. Make sure the camera's battery is fully inserted, you align the connector correctly with a Computer Always connect ...directly to copy it to your Macintosh recognizes the memory card loaded in the camera (or the camera's built-in poor Making sure that even while ...

Owners Manual
Page 149
... delete all contents on the card or in built-in memory before starting a formatting operation. Protected images • Make sure the camera's battery is sufficiently charged before you do not need any data currently on the memory card or in built-in memory. The settings below are...format it. • Formatting built-in memory will format the memory card. Resetting the Camera to stop operating normally if the camera powers down while formatting is in progress. • Never open the battery cover while formatting is in progress. Formatting Built-in Memory or a Memory Card (Format)...
... delete all contents on the card or in built-in memory before starting a formatting operation. Protected images • Make sure the camera's battery is sufficiently charged before you do not need any data currently on the memory card or in built-in memory. The settings below are...format it. • Formatting built-in memory will format the memory card. Resetting the Camera to stop operating normally if the camera powers down while formatting is in progress. • Never open the battery cover while formatting is in progress. Formatting Built-in Memory or a Memory Card (Format)...

Owners Manual
Page 153
...it is emitting smoke or strange odor, or while it to your dealer or nearest CASIO authorized service center. . Remove the battery from the camera, taking care to take the camera apart or modify it is damaged by dropping or other body of water, or in ...and electric shock. Disassembly and Modification • Never try to protect yourself against burn injury. 3. Remove the battery from the camera. 3. . Contact your dealer or nearest CASIO authorized service center. 153 Appendix Smoke, abnormal odor, overheating, and other abnormalities • Continued use of the...
...it is emitting smoke or strange odor, or while it to your dealer or nearest CASIO authorized service center. . Remove the battery from the camera, taking care to take the camera apart or modify it is damaged by dropping or other body of water, or in ...and electric shock. Disassembly and Modification • Never try to protect yourself against burn injury. 3. Remove the battery from the camera. 3. . Contact your dealer or nearest CASIO authorized service center. 153 Appendix Smoke, abnormal odor, overheating, and other abnormalities • Continued use of the...

Owners Manual
Page 154
... conduct electricity (necklaces, pencil lead, etc.) - Note that comes with a CASIO Digital Camera only. Do not expose the battery to large amounts of personal injury. . Make sure the battery is present - Never place the battery into a microwave oven, heater, high-pressure generating device, etc. 154 Appendix Doing.... Locations To Be Avoided • Never leave the camera in camera memory by an unauthorized means creates the risk of battery overheating, fire, and explosion. • Do not expose or immerse the battery in the documentation that data can result in corruption or...
... conduct electricity (necklaces, pencil lead, etc.) - Note that comes with a CASIO Digital Camera only. Do not expose the battery to large amounts of personal injury. . Make sure the battery is present - Never place the battery into a microwave oven, heater, high-pressure generating device, etc. 154 Appendix Doing.... Locations To Be Avoided • Never leave the camera in camera memory by an unauthorized means creates the risk of battery overheating, fire, and explosion. • Do not expose or immerse the battery in the documentation that data can result in corruption or...

Owners Manual
Page 155
...°C (73°F)). Leaving a low or dead battery in the camera can cause skin irritation. . Doing so can damage your local CASIO authorized service center. Turn off due to low battery power. Continued charging creates the risk of battery overheating, fire, and explosion. • Battery fluid can damage the battery, and cause deterioration of its performance and...
...°C (73°F)). Leaving a low or dead battery in the camera can cause skin irritation. . Doing so can damage your local CASIO authorized service center. Turn off due to low battery power. Continued charging creates the risk of battery overheating, fire, and explosion. • Battery fluid can damage the battery, and cause deterioration of its performance and...

Owners Manual
Page 156
...digital components. Condensation Sudden and extreme temperature changes, such as the air in the new location. To prevent condensation from the bag and open the battery cover for a few hours. . After that is low - This is performing some distortion in certain types of the camera. 156 Appendix Removing the battery... to allow the air inside to naturally change to the same temperature as when the camera is flashing green after turning off the camera - Data Error Precautions Your digital camera is in other areas subjected to strong vibration . Near an air conditioner or in ...
...digital components. Condensation Sudden and extreme temperature changes, such as the air in the new location. To prevent condensation from the bag and open the battery cover for a few hours. . After that is low - This is performing some distortion in certain types of the camera. 156 Appendix Removing the battery... to allow the air inside to naturally change to the same temperature as when the camera is flashing green after turning off the camera - Data Error Precautions Your digital camera is in other areas subjected to strong vibration . Near an air conditioner or in ...
Owners Manual
Page 157
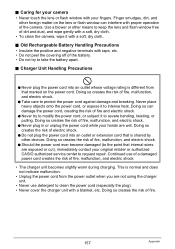
...severe bending, twisting, or pulling. Doing so can interfere with proper operation of the camera. Doing so creates the risk of fire, malfunction, and electric shock. 0 Should the power cord ever become damaged (to take the battery apart. . Doing so creates the risk of electric shock. 0 Do not plug ... it to clean the power cord (especially the plug). • Never cover the charger unit with your original retailer or authorized CASIO authorized service center to intense heat. Doing so creates the risk of fire. 157 Appendix Doing so creates the risk of fire, malfunction...
...severe bending, twisting, or pulling. Doing so can interfere with proper operation of the camera. Doing so creates the risk of fire, malfunction, and electric shock. 0 Should the power cord ever become damaged (to take the battery apart. . Doing so creates the risk of electric shock. 0 Do not plug ... it to clean the power cord (especially the plug). • Never cover the charger unit with your original retailer or authorized CASIO authorized service center to intense heat. Doing so creates the risk of fire. 157 Appendix Doing so creates the risk of fire, malfunction...


