

Owners Manual
Page 3
This is forbidden. Feel free to contact us if you or any other reason. • Note that the camera is forbidden under copyright laws. • CASIO COMPUTER CO., LTD. shall not be held liable for any damages or lost profits, or claims by third parties arising out of the use ... a few test shots Before shooting your own personal use of Photo Transport or YouTube Uploader for any damages, lost profits suffered by loss of memory contents due to malfunction, repair, or any damages or lost profits caused by you notice anything that is questionable, erroneous, etc. • Any ...
This is forbidden. Feel free to contact us if you or any other reason. • Note that the camera is forbidden under copyright laws. • CASIO COMPUTER CO., LTD. shall not be held liable for any damages or lost profits, or claims by third parties arising out of the use ... a few test shots Before shooting your own personal use of Photo Transport or YouTube Uploader for any damages, lost profits suffered by loss of memory contents due to malfunction, repair, or any damages or lost profits caused by you notice anything that is questionable, erroneous, etc. • Any ...

Owners Manual
Page 4
... 13 What is a digital camera 13 What you can do with your CASIO camera 14 First, charge the battery prior to use 15 ❚ To charge the battery 15 ❚ To load the battery 16 Configuring Basic Settings the First Time You Turn On the Camera 18 Preparing a Memory Card 19 ❚ Supported Memory Cards 19 ❚...
... 13 What is a digital camera 13 What you can do with your CASIO camera 14 First, charge the battery prior to use 15 ❚ To charge the battery 15 ❚ To load the battery 16 Configuring Basic Settings the First Time You Turn On the Camera 18 Preparing a Memory Card 19 ❚ Supported Memory Cards 19 ❚...

Owners Manual
Page 5
.... 69 ❚ Shooting with Face Detection Face Detection) . . . 72 ❚ Reducing the Effects of Camera and Subject Movement . . . . (Anti Shake) . . . 73 ❚ Specifying the Auto Focus .... . . 74 ❚ Changing the Focus Frame Shape Focus Frame) . . . 74 ❚ Turning Digital Zoom On or Off Digital Zoom) . . . 75 ❚ Assigning Functions to the [4] and [6] Keys L/R Key) . . .... 77 ❚ Using Icon Help Icon Help) . . . 77 ❚ Configuring Power On Default Settings Memory) . . . 78 Image Quality Settings Quality) . . 79 ❚ Specifying Snapshot Size Size) . ...
.... 69 ❚ Shooting with Face Detection Face Detection) . . . 72 ❚ Reducing the Effects of Camera and Subject Movement . . . . (Anti Shake) . . . 73 ❚ Specifying the Auto Focus .... . . 74 ❚ Changing the Focus Frame Shape Focus Frame) . . . 74 ❚ Turning Digital Zoom On or Off Digital Zoom) . . . 75 ❚ Assigning Functions to the [4] and [6] Keys L/R Key) . . .... 77 ❚ Using Icon Help Icon Help) . . . 77 ❚ Configuring Power On Default Settings Memory) . . . 78 Image Quality Settings Quality) . . 79 ❚ Specifying Snapshot Size Size) . ...

Owners Manual
Page 6
...Movies on a TV Screen 92 ❚❙ Other Playback Functions (PLAY) 94 Playing a Slideshow on the Camera Slideshow) . . 94 ❚ Saving Music from Your Computer to Camera Memory 95 Laying Out Snapshots with Layout Print Layout Print) . . 97 Creating a Snapshot of Movie Frames MOTION PRINT...) . . 98 Editing a Movie on the Camera Movie Editing) . . 99 Optimizing Image Brightness Lighting) . 101 Using ...
...Movies on a TV Screen 92 ❚❙ Other Playback Functions (PLAY) 94 Playing a Slideshow on the Camera Slideshow) . . 94 ❚ Saving Music from Your Computer to Camera Memory 95 Laying Out Snapshots with Layout Print Layout Print) . . 97 Creating a Snapshot of Movie Frames MOTION PRINT...) . . 98 Editing a Movie on the Camera Movie Editing) . . 99 Optimizing Image Brightness Lighting) . 101 Using ...
Owners Manual
Page 7
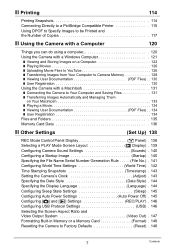
...YouTube 126 ❚ Transferring Images from Your Computer to Camera Memory 128 ❚ Viewing User Documentation PDF Files) . . 130 ❚ User Registration 130 Using the Camera with a Macintosh 131 ❚ Connecting the Camera to Your Computer and Saving Files 131 ❚ ... ❚ User Registration 134 Files and Folders 135 Memory Card Data 136 ❚❙ Other Settings (Set Up) 138 REC Mode Control Panel Display R Panel) . 138 Selecting a PLAY Mode Screen Layout P Display) . 139 Configuring Camera Sound Settings Sounds) . 140 Configuring a Startup Image...
...YouTube 126 ❚ Transferring Images from Your Computer to Camera Memory 128 ❚ Viewing User Documentation PDF Files) . . 130 ❚ User Registration 130 Using the Camera with a Macintosh 131 ❚ Connecting the Camera to Your Computer and Saving Files 131 ❚ ... ❚ User Registration 134 Files and Folders 135 Memory Card Data 136 ❚❙ Other Settings (Set Up) 138 REC Mode Control Panel Display R Panel) . 138 Selecting a PLAY Mode Screen Layout P Display) . 139 Configuring Camera Sound Settings Sounds) . 140 Configuring a Startup Image...

Owners Manual
Page 8
... Power Supply 159 ❚ Charging 159 ❚ To replace the battery 159 ❚ Battery Precautions 160 ❚ Using the Camera in another Country 160 Using a Memory Card 161 ❚ To replace the memory card 161 Computer System Requirements for Bundled Software 163 Reset Initial Default Settings 164 When things don't go right 167...
... Power Supply 159 ❚ Charging 159 ❚ To replace the battery 159 ❚ Battery Precautions 160 ❚ Using the Camera in another Country 160 Using a Memory Card 161 ❚ To replace the memory card 161 Computer System Requirements for Bundled Software 163 Reset Initial Default Settings 164 When things don't go right 167...

Owners Manual
Page 9
Charger Unit 12 1+- Contacts 2[CHARGE] Lamp 3AC jack 3 9 General Guide The numbers in parentheses indicate the pages where each item is explained. . Camera Front 123 4 Back 8 9 bk bl bm bn bo [ ] [ ] [ ] 76 5 [ ] [SET] bt bs br bq bp 1Zoom controller 8[p] (PLAY) button (pages 22, 45, 90, 91) (pages ..., 29, 33, 149) bq[BS] button (page 53) br[MENU] button (page 62) bs[SET] button (page 29) btMonitor screen (pages 10, 149) Bottom ckBattery/memory card slots (pages 16, 19, 159, 161) clTripod hole Use this hole when attaching to a tripod. cmSpeaker cm cl ck .
Charger Unit 12 1+- Contacts 2[CHARGE] Lamp 3AC jack 3 9 General Guide The numbers in parentheses indicate the pages where each item is explained. . Camera Front 123 4 Back 8 9 bk bl bm bn bo [ ] [ ] [ ] 76 5 [ ] [SET] bt bs br bq bp 1Zoom controller 8[p] (PLAY) button (pages 22, 45, 90, 91) (pages ..., 29, 33, 149) bq[BS] button (page 53) br[MENU] button (page 62) bs[SET] button (page 29) btMonitor screen (pages 10, 149) Bottom ckBattery/memory card slots (pages 16, 19, 159, 161) clTripod hole Use this hole when attaching to a tripod. cmSpeaker cm cl ck .

Owners Manual
Page 10
Monitor Screen Contents The monitor screen uses various indicators, icons, and values to keep you informed of the camera's status. • The sample screens in various modes. Snapshot Recording Panel : On 12 34 56789bkbl bm cs cr cq bn bo bp bq br...quality (page 80) 4Self-timer (page 68) 5Recording mode (page 22) 6Image deterioration indicator (page 46) 7Metering mode (page 83) 8Remaining movie memory capacity (page 48) 9Remaining snapshot memory capacity (page 174) bkSnapshot image size (page 30) blSnapshot image quality (page 79) bmFlash (page 33) bnAF Area (page 35) boISO sensitivity...
Monitor Screen Contents The monitor screen uses various indicators, icons, and values to keep you informed of the camera's status. • The sample screens in various modes. Snapshot Recording Panel : On 12 34 56789bkbl bm cs cr cq bn bo bp bq br...quality (page 80) 4Self-timer (page 68) 5Recording mode (page 22) 6Image deterioration indicator (page 46) 7Metering mode (page 83) 8Remaining movie memory capacity (page 48) 9Remaining snapshot memory capacity (page 174) bkSnapshot image size (page 30) blSnapshot image quality (page 79) bmFlash (page 33) bnAF Area (page 35) boISO sensitivity...

Owners Manual
Page 11
easy Mode 9 bk co bm 4 bt cp . Movie Recording Panel : On 12 3 4 8 1Focus mode (page 64) 2White balance setting (page 82) 3Recording mode (page 48) 4Remaining movie memory capacity 5 (page 48) 5Movie recording time (page 48) 6Exposure compensation (page 81) 7Battery level indicator (page 17) 8Histogram (page 149) 76 Panel : Off 12 3 4 5 8 7 6 11
easy Mode 9 bk co bm 4 bt cp . Movie Recording Panel : On 12 3 4 8 1Focus mode (page 64) 2White balance setting (page 82) 3Recording mode (page 48) 4Remaining movie memory capacity 5 (page 48) 5Movie recording time (page 48) 6Exposure compensation (page 81) 7Battery level indicator (page 17) 8Histogram (page 149) 76 Panel : Off 12 3 4 5 8 7 6 11
Owners Manual
Page 13
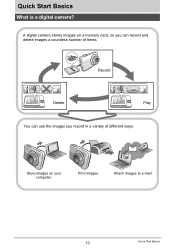
Quick Start Basics What is a digital camera? A digital camera stores images on your computer. Record Delete Play You can record and delete images a countless number of different ways. Print images. Store images on a memory card, so you can use the images you record in a variety of times. Attach images to e-mail. 13 Quick Start Basics
Quick Start Basics What is a digital camera? A digital camera stores images on your computer. Record Delete Play You can record and delete images a countless number of different ways. Print images. Store images on a memory card, so you can use the images you record in a variety of times. Attach images to e-mail. 13 Quick Start Basics

Owners Manual
Page 17
...indicator may change when you switch between the REC mode and PLAY mode. • Leaving the camera for about two days with no power supplied while the battery is dead will appear the next time... 1 Checking Remaining Battery Power As battery power is consumed, a battery indicator on the camera after restoring power. Battery Power Conservation Tips • When you do not need to use the flash, select...Auto Power Off and the Sleep features to protect against the camera, slide it closed. • For information about battery life and memory capacity. Charge the battery as soon as shown below.
...indicator may change when you switch between the REC mode and PLAY mode. • Leaving the camera for about two days with no power supplied while the battery is dead will appear the next time... 1 Checking Remaining Battery Power As battery power is consumed, a battery indicator on the camera after restoring power. Battery Power Conservation Tips • When you do not need to use the flash, select...Auto Power Off and the Sleep features to protect against the camera, slide it closed. • For information about battery life and memory capacity. Charge the battery as soon as shown below.

Owners Manual
Page 19
... are saved to purchase a commercially available memory card for the first time can be reset to turn off the camera and then open the battery cover. Load a memory card. Preparing a Memory Card Though the camera has built-in memory. • For information about memory card capacities, see page 174. Press ...they are subject to change. • Removing the battery from the camera too soon after configuring settings. SDHC Memory Card Use one of the above types of memory card. * This model does not support use of the camera), slide it into place. 1 2 Front Front Back 19 Quick...
... are saved to purchase a commercially available memory card for the first time can be reset to turn off the camera and then open the battery cover. Load a memory card. Preparing a Memory Card Though the camera has built-in memory. • For information about memory card capacities, see page 174. Press ...they are subject to change. • Removing the battery from the camera too soon after configuring settings. SDHC Memory Card Use one of the above types of memory card. * This model does not support use of the camera), slide it into place. 1 2 Front Front Back 19 Quick...

Owners Manual
Page 20
... any foreign object ever get into the card slot, immediately turn off the camera, remove the battery, and contact your retailer or nearest CASIO authorized service center. Formatting a memory card on a computer can result in the camera can slow down or if you do not need to format a new... memory card before using it closed. • For information about how to replace the memory card, see page 161. 2...
... any foreign object ever get into the card slot, immediately turn off the camera, remove the battery, and contact your retailer or nearest CASIO authorized service center. Formatting a memory card on a computer can result in the camera can slow down or if you do not need to format a new... memory card before using it closed. • For information about how to replace the memory card, see page 161. 2...

Owners Manual
Page 22
Snapshot mode icon Monitor screen Shutter button [r] (REC) Remaining Snapshot Memory Capacity (page 174) 2. You can zoom the image, if you want. Make sure R is on the camera. Press [r] (REC) to turn on the display. Zoom controller w Wide Angle z Telephoto 22 Quick Start Basics To shoot a snapshot 1. If it isn't, see page 53. Point the camera at the subject.
Snapshot mode icon Monitor screen Shutter button [r] (REC) Remaining Snapshot Memory Capacity (page 174) 2. You can zoom the image, if you want. Make sure R is on the camera. Press [r] (REC) to turn on the display. Zoom controller w Wide Angle z Telephoto 22 Quick Start Basics To shoot a snapshot 1. If it isn't, see page 53. Point the camera at the subject.

Owners Manual
Page 26
...is included (page 174). • You also can clear the information to view only the snapshot (page 149). • You can zoom in on the camera's monitor screen. • For information about how to play back movies, see page 86. 1. Press [p] (PLAY) to enter the PLAY mode. [p] (...PLAY) • This will display one of the snapshots currently stored in memory. • Information about the displayed snapshot also is recommended that you zoom the image and check its details after recording it. 2. Viewing Snapshots Use the...
...is included (page 174). • You also can clear the information to view only the snapshot (page 149). • You can zoom in on the camera's monitor screen. • For information about how to play back movies, see page 86. 1. Press [p] (PLAY) to enter the PLAY mode. [p] (...PLAY) • This will display one of the snapshots currently stored in memory. • Information about the displayed snapshot also is recommended that you zoom the image and check its details after recording it. 2. Viewing Snapshots Use the...

Owners Manual
Page 27
Deleting Images If memory becomes full, you can delete images you want to delete is displayed. 3. To delete all files. Use [4] and [6] to scroll through the files until the ...
Deleting Images If memory becomes full, you can delete images you want to delete is displayed. 3. To delete all files. Use [4] and [6] to scroll through the files until the ...
Owners Manual
Page 28
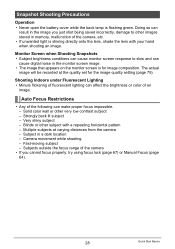
.... - Multiple subjects at the quality set for image composition. Subjects outside the focus range of the following can cause digital noise in memory, malfunction of the camera, etc. • If unwanted light is flashing green. Blinds or other very low contrast subject - Snapshot Shooting Precautions...affect the brightness or color of fluorescent lighting can result in a dark location - Strongly back lit subject - Very shiny subject - Camera movement while shooting - Solid color wall or other subject with your hand when shooting an image. Subject in the image you cannot ...
.... - Multiple subjects at the quality set for image composition. Subjects outside the focus range of the following can cause digital noise in memory, malfunction of the camera, etc. • If unwanted light is flashing green. Blinds or other very low contrast subject - Snapshot Shooting Precautions...affect the brightness or color of fluorescent lighting can result in a dark location - Strongly back lit subject - Very shiny subject - Camera movement while shooting - Solid color wall or other subject with your hand when shooting an image. Subject in the image you cannot ...

Owners Manual
Page 31
... about movie image size, see page 107. 31 Snapshot Tutorial Small Number of Pixels More detail, but takes up less memory. Large Number of Pixels Less detail, but takes up more memory. . Best when you plan to send images by e-mail, etc. • For information about resizing existing snapshots, see page 80... contains, and is expressed as A3 size). About image sizes The size of images that larger images have more pixels, so they take up more memory space.
... about movie image size, see page 107. 31 Snapshot Tutorial Small Number of Pixels More detail, but takes up less memory. Large Number of Pixels Less detail, but takes up more memory. . Best when you plan to send images by e-mail, etc. • For information about resizing existing snapshots, see page 80... contains, and is expressed as A3 size). About image sizes The size of images that larger images have more pixels, so they take up more memory space.

Owners Manual
Page 32
...[4] and [6] to select the top Control Panel option (Image Size). 3. Use [8] and [2] to select an image size and then press [SET]. Your camera can record images that are compatible with an aspect ratio of 3:2, which matches the standard aspect ratio of print paper. • The letters "HDTV" stand... for images cropped (page 107) from the original Good detail Best when preserving memory capacity is relatively more important than the usual 4:3 aspect ratio of television screens of 16:9, which is better when attaching images to e-mail. ...
...[4] and [6] to select the top Control Panel option (Image Size). 3. Use [8] and [2] to select an image size and then press [SET]. Your camera can record images that are compatible with an aspect ratio of 3:2, which matches the standard aspect ratio of print paper. • The letters "HDTV" stand... for images cropped (page 107) from the original Good detail Best when preserving memory capacity is relatively more important than the usual 4:3 aspect ratio of television screens of 16:9, which is better when attaching images to e-mail. ...

Owners Manual
Page 37
Releasing the shutter button stops shooting. 37 Snapshot Tutorial Using Continuous Shutter (CS) Your camera has three continuous shutter modes. In the REC mode, press [SET]. 2. Press the shutter button to select the fifth Control Panel option from the top (... (1600x1200 pixels) fixed Flash On * To turn off a continuous shutter mode, select "Off". 1. Use [8] and [2] to shoot. CS speed Z CS: Normal Speed CS Depends on memory card capacity VCS: High 4 images per Speed CS second C CS: Flash 3 images per second Maximum CS Shots Recorded Image Size Flash Mode Until...
Releasing the shutter button stops shooting. 37 Snapshot Tutorial Using Continuous Shutter (CS) Your camera has three continuous shutter modes. In the REC mode, press [SET]. 2. Press the shutter button to select the fifth Control Panel option from the top (... (1600x1200 pixels) fixed Flash On * To turn off a continuous shutter mode, select "Off". 1. Use [8] and [2] to shoot. CS speed Z CS: Normal Speed CS Depends on memory card capacity VCS: High 4 images per Speed CS second C CS: Flash 3 images per second Maximum CS Shots Recorded Image Size Flash Mode Until...


