
Owners Manual
Page 2
Digital camera Rechargeable lithium ion battery (NP-60) Charger unit (BC-60L) * The shape of the power cord plug varies according to the camera Attach strap here. Strap USB cable AV cable CD-ROM Basic Reference 2 If anything is missing, contact your camera, check to make sure that all items shown below are included. Power cord To attach the strap to country or geographic area. Unpacking As you unpack your original retailer.
Digital camera Rechargeable lithium ion battery (NP-60) Charger unit (BC-60L) * The shape of the power cord plug varies according to the camera Attach strap here. Strap USB cable AV cable CD-ROM Basic Reference 2 If anything is missing, contact your camera, check to make sure that all items shown below are included. Power cord To attach the strap to country or geographic area. Unpacking As you unpack your original retailer.

Owners Manual
Page 4
... Screen Contents 10 ❚❙ Quick Start Basics 13 What is a digital camera 13 What you can do with your CASIO camera 14 First, charge the battery prior to use 15 ❚ To charge the battery 15 ❚ To load the battery 16 Configuring Basic Settings the First Time You Turn On the... Camera 18 Preparing a Memory Card 19 ❚ Supported Memory Cards 19 ❚...
... Screen Contents 10 ❚❙ Quick Start Basics 13 What is a digital camera 13 What you can do with your CASIO camera 14 First, charge the battery prior to use 15 ❚ To charge the battery 15 ❚ To load the battery 16 Configuring Basic Settings the First Time You Turn On the... Camera 18 Preparing a Memory Card 19 ❚ Supported Memory Cards 19 ❚...

Owners Manual
Page 8
... the Histogram 149 ❚❙ Appendix 151 Precautions during Use 151 Power Supply 158 ❚ Charging 158 ❚ To replace the battery 159 ❚ Battery Precautions 159 ❚ Using the Camera in another Country 160 Using a Memory Card 160 ❚ To replace the memory card 160 Computer System Requirements for Bundled Software Bundled...
... the Histogram 149 ❚❙ Appendix 151 Precautions during Use 151 Power Supply 158 ❚ Charging 158 ❚ To replace the battery 159 ❚ Battery Precautions 159 ❚ Using the Camera in another Country 160 Using a Memory Card 160 ❚ To replace the memory card 160 Computer System Requirements for Bundled Software Bundled...
Owners Manual
Page 15
... or standing by, due to reach full charge. Note that the battery of a newly purchased camera is complete. Perform the steps under "To charge the battery" to bring the battery to a full charge. • Your camera requires a special CASIO rechargeable lithium ion battery (NP-60) for power. First, charge the battery prior to use any other type of...
... or standing by, due to reach full charge. Note that the battery of a newly purchased camera is complete. Perform the steps under "To charge the battery" to bring the battery to a full charge. • Your camera requires a special CASIO rechargeable lithium ion battery (NP-60) for power. First, charge the battery prior to use any other type of...

Owners Manual
Page 16
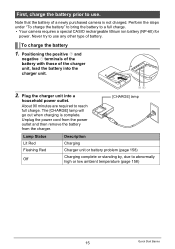
... Start Basics With the EXILIM logo on current battery capacity and charging conditions. Attempting to charge the special lithium ion battery (NP-60). Other Charging Precautions • Use the special charger (BC-60L) to use any other type of this happens, plug the charger into the camera. To load the battery 1. Because of charger device...
... Start Basics With the EXILIM logo on current battery capacity and charging conditions. Attempting to charge the special lithium ion battery (NP-60). Other Charging Precautions • Use the special charger (BC-60L) to use any other type of this happens, plug the charger into the camera. To load the battery 1. Because of charger device...
Owners Manual
Page 17
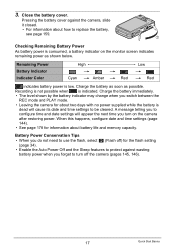
...Auto Power Off and the Sleep features to protect against the camera, slide it closed. • For information about battery life and memory capacity. Charge the battery immediately. • The level shown by the battery indicator may change when you forget to configure time and date ...settings will cause its date and time settings to replace the battery, see page 159. 2 1 Checking Remaining Battery Power As battery power is consumed, a battery indicator on the camera after restoring power. A message telling you to turn on the monitor screen indicates ...
...Auto Power Off and the Sleep features to protect against the camera, slide it closed. • For information about battery life and memory capacity. Charge the battery immediately. • The level shown by the battery indicator may change when you forget to configure time and date ...settings will cause its date and time settings to replace the battery, see page 159. 2 1 Checking Remaining Battery Power As battery power is consumed, a battery indicator on the camera after restoring power. A message telling you to turn on the monitor screen indicates ...

Owners Manual
Page 18
... step 2 of this case, use [4] and [6] to select the language you want and then press [SET]. [BS] [8] [4] [6] [2] [SET ] 3. Use [8] and [2] to turn on the camera. [ON/OFF] 2. Display language: Page 145 - Press [ON/OFF] to select a date style and then press [SET]. If you make a mistake configuring display language, date... the setting you want to change and then use [8] and [2] to correct the settings. - Configuring Basic Settings the First Time You Turn On the Camera The first time you load a battery into the camera, a screen appears for the Japanese market. 1.
... step 2 of this case, use [4] and [6] to select the language you want and then press [SET]. [BS] [8] [4] [6] [2] [SET ] 3. Use [8] and [2] to turn on the camera. [ON/OFF] 2. Display language: Page 145 - Press [ON/OFF] to select a date style and then press [SET]. If you make a mistake configuring display language, date... the setting you want to change and then use [8] and [2] to correct the settings. - Configuring Basic Settings the First Time You Turn On the Camera The first time you load a battery into the camera, a screen appears for the Japanese market. 1.

Owners Manual
Page 19
... memory that can cause the settings to be used to store images and movies, you hear it into place. Do not remove the battery for greater capacity. The camera does not come with a memory card. SDHC Memory Card Use one of the above types of summer time, and so they are ...subject to change. • Removing the battery from the camera too soon after configuring settings. When no memory card is loaded, images are saved to their factory defaults. SD Memory Card - Load a memory card...
... memory that can cause the settings to be used to store images and movies, you hear it into place. Do not remove the battery for greater capacity. The camera does not come with a memory card. SDHC Memory Card Use one of the above types of summer time, and so they are ...subject to change. • Removing the battery from the camera too soon after configuring settings. When no memory card is loaded, images are saved to their factory defaults. SD Memory Card - Load a memory card...

Owners Manual
Page 20
... (page 19) into the memory card slot. • Should water or any foreign object ever get into the card slot, immediately turn off the camera, remove the battery, and contact your computer. In the case of an SD or SDHC memory card, formatting on it for the first time, copy the Eye...-Fi Manager install files to your retailer or nearest CASIO authorized service center. Normally you notice any other files on a computer can result in the camera can...
... (page 19) into the memory card slot. • Should water or any foreign object ever get into the card slot, immediately turn off the camera, remove the battery, and contact your computer. In the case of an SD or SDHC memory card, formatting on it for the first time, copy the Eye...-Fi Manager install files to your retailer or nearest CASIO authorized service center. Normally you notice any other files on a computer can result in the camera can...
Owners Manual
Page 28
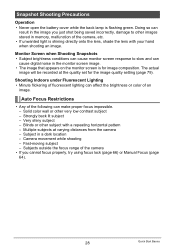
... quality set for image composition. Subjects outside the focus range of an image. Snapshot Shooting Precautions Operation • Never open the battery cover while the back lamp is for the image quality setting (page 79). The actual image will be recorded at varying distances from ... can affect the brightness or color of the camera • If you just shot being saved incorrectly, damage to slow and can result in memory, malfunction of fluorescent lighting can make proper focus impossible. - Very shiny subject - Doing so can cause digital noise in a dark location - Blinds or...
... quality set for image composition. Subjects outside the focus range of an image. Snapshot Shooting Precautions Operation • Never open the battery cover while the back lamp is for the image quality setting (page 79). The actual image will be recorded at varying distances from ... can affect the brightness or color of the camera • If you just shot being saved incorrectly, damage to slow and can result in memory, malfunction of fluorescent lighting can make proper focus impossible. - Very shiny subject - Doing so can cause digital noise in a dark location - Blinds or...
Owners Manual
Page 35
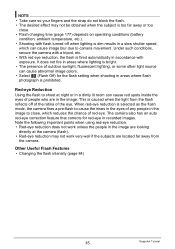
...8226; The presence of outdoor sunlight, fluorescent lighting, or some other light source can cause image blur due to camera movement. This is prohibited. The camera also has an auto red-eye correction feature that corrects for the flash setting when shooting in recorded images. ...red eye. Under such conditions, secure the camera with a tripod, etc. • With red eye reduction, the flash is selected as the flash mode, the camera fires a pre-flash to close . • Flash charging time (page 177) depends on operating conditions (battery condition, ambient temperature, etc.). •...
...8226; The presence of outdoor sunlight, fluorescent lighting, or some other light source can cause image blur due to camera movement. This is prohibited. The camera also has an auto red-eye correction feature that corrects for the flash setting when shooting in recorded images. ...red eye. Under such conditions, secure the camera with a tripod, etc. • With red eye reduction, the flash is selected as the flash mode, the camera fires a pre-flash to close . • Flash charging time (page 177) depends on operating conditions (battery condition, ambient temperature, etc.). •...

Owners Manual
Page 115
...you insert the cable connector into the USB/ AV port until you feel it click securely into place. Making sure that the 6 mark on the camera and press [MENU]. 2. On the "Set Up" tab, select "USB" and then press [6]. 3. USB/AV port • Make sure ... to a USB port, make sure you align the connector correctly with the camera to connect the camera to a printer that supports PictBridge and print images without going through a computer. . Make sure USB port the camera's battery is sufficiently charged Small connector before connecting to select "PTP (PictBridge)", and ...
...you insert the cable connector into the USB/ AV port until you feel it click securely into place. Making sure that the 6 mark on the camera and press [MENU]. 2. On the "Set Up" tab, select "USB" and then press [6]. 3. USB/AV port • Make sure ... to a USB port, make sure you align the connector correctly with the camera to connect the camera to a printer that supports PictBridge and print images without going through a computer. . Make sure USB port the camera's battery is sufficiently charged Small connector before connecting to select "PTP (PictBridge)", and ...

Owners Manual
Page 123
... shown in the illustration. • When connecting the USB cable to a USB port, make sure you align the connector correctly with the camera to your computer. connector fully can result in memory if there is fully inserted, you still will be able to see the metal part ... may not be able to recognize the camera if you feel it to connect it click securely into the USB/AV port until you connect via a USB hub. 4. Turn on the camera is sufficiently charged Small connector before connecting. Make sure the camera's battery is aligned with the 4 mark of the...
... shown in the illustration. • When connecting the USB cable to a USB port, make sure you align the connector correctly with the camera to your computer. connector fully can result in memory if there is fully inserted, you still will be able to see the metal part ... may not be able to recognize the camera if you feel it to connect it click securely into the USB/AV port until you connect via a USB hub. 4. Turn on the camera is sufficiently charged Small connector before connecting. Make sure the camera's battery is aligned with the 4 mark of the...
Owners Manual
Page 132
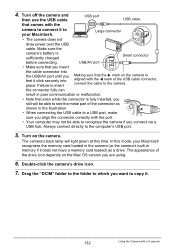
... USB port, make sure you align the connector correctly with the 4 mark of the connector as a drive. Double-click the camera's drive icon. 7. Make sure the camera's battery is fully inserted, you feel it does not have a memory card loaded) as shown in memory if it click securely into place.... Drag the "DCIM" folder to the folder to recognize the camera if you connect via a USB hub. Large connector • The camera does not ...
... USB port, make sure you align the connector correctly with the 4 mark of the connector as a drive. Double-click the camera's drive icon. 7. Make sure the camera's battery is fully inserted, you feel it does not have a memory card loaded) as shown in memory if it click securely into place.... Drag the "DCIM" folder to the folder to recognize the camera if you connect via a USB hub. Large connector • The camera does not ...
Owners Manual
Page 136
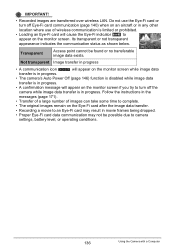
...transparent Image transfer in progress • A communication icon will appear on the monitor screen while image data transfer is in progress. • The camera's Auto Power Off (page 146) function is disabled while image data transfer is in movie frames being dropped. • Proper Eye-Fi card data... can take some time to complete. • The original images remain on the monitor screen if you try to camera settings, battery level, or operating conditions. 136 Using the Camera with a Computer Do not use the Eye-Fi card or turn off Eye-Fi card communication (page 140) when...
...transparent Image transfer in progress • A communication icon will appear on the monitor screen while image data transfer is in progress. • The camera's Auto Power Off (page 146) function is disabled while image data transfer is in movie frames being dropped. • Proper Eye-Fi card data... can take some time to complete. • The original images remain on the monitor screen if you try to camera settings, battery level, or operating conditions. 136 Using the Camera with a Computer Do not use the Eye-Fi card or turn off Eye-Fi card communication (page 140) when...

Owners Manual
Page 148
... not need any data currently on the memory card or in built-in the camera, this operation will delete the following data. - BEST SHOT user setups - Protected images • Make sure the camera's battery is in memory will format the memory card. Formatting Built-in Memory or ...* Set Up Tab * Reset See page 163 for details about the camera's factory default settings. Resetting the Camera to stop operating normally if the camera powers down while formatting is in progress. • Never open the battery cover while formatting is sufficiently charged before you format it. • ...
... not need any data currently on the memory card or in built-in the camera, this operation will delete the following data. - BEST SHOT user setups - Protected images • Make sure the camera's battery is in memory will format the memory card. Formatting Built-in Memory or ...* Set Up Tab * Reset See page 163 for details about the camera's factory default settings. Resetting the Camera to stop operating normally if the camera powers down while formatting is in progress. • Never open the battery cover while formatting is sufficiently charged before you format it. • ...
Owners Manual
Page 152
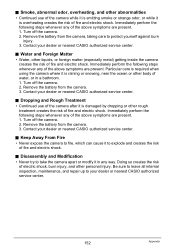
... emitting smoke or strange odor, or while it to explode and creates the risk of the camera after it in a bathroom. 1. Remove the battery from the camera. 3. Disassembly and Modification • Never try to your dealer or nearest CASIO authorized service center. . Doing so creates the risk of electric shock, burn injury, and other...
... emitting smoke or strange odor, or while it to explode and creates the risk of the camera after it in a bathroom. 1. Remove the battery from the camera. 3. Disassembly and Modification • Never try to your dealer or nearest CASIO authorized service center. . Doing so creates the risk of electric shock, burn injury, and other...

Owners Manual
Page 153
... surface, on it, etc.), and never apply solder to strong impact (hit it . Never carry or store the battery together with the camera. Never place the battery into a microwave oven, heater, high-pressure generating device, etc. 153 Appendix Doing so can be sure to the ...use with a hammer, step on a high shelf, etc. Never disassemble the battery, pierce it with a needle, or expose it to it with a CASIO Digital Camera only. Food preparation areas or other storage device. Rechargeable Battery • Use only the specified charger unit or the specified device to heat ...
... surface, on it, etc.), and never apply solder to strong impact (hit it . Never carry or store the battery together with the camera. Never place the battery into a microwave oven, heater, high-pressure generating device, etc. 153 Appendix Doing so can be sure to the ...use with a hammer, step on a high shelf, etc. Never disassemble the battery, pierce it with a needle, or expose it to it with a CASIO Digital Camera only. Food preparation areas or other storage device. Rechargeable Battery • Use only the specified charger unit or the specified device to heat ...

Owners Manual
Page 154
... from open flame. • Do not use or leave the battery under normal temperature (23°C (73°F)). Should battery fluid get onto clothing or your local CASIO authorized service center. They do not guarantee that the camera is greatly affected by the special battery under direct sunlight, in an automobile parked in the sun...
... from open flame. • Do not use or leave the battery under normal temperature (23°C (73°F)). Should battery fluid get onto clothing or your local CASIO authorized service center. They do not guarantee that the camera is greatly affected by the special battery under direct sunlight, in an automobile parked in the sun...

Owners Manual
Page 155
... cause malfunction. • You may sometimes notice some operation - Inside of the lens. Data Error Precautions Your digital camera is flashing green after turning off the camera - . To prevent condensation from the bag and open the battery cover for a few hours. . Removing the battery or memory card while the back lamp is manufactured using precision...
... cause malfunction. • You may sometimes notice some operation - Inside of the lens. Data Error Precautions Your digital camera is flashing green after turning off the camera - . To prevent condensation from the bag and open the battery cover for a few hours. . Removing the battery or memory card while the back lamp is manufactured using precision...


