
Owners Manual
Page 4
...; Auto Focus Restrictions 30 ❚❙ Snapshot Tutorial 31 Using the Control Panel 31 ❚ Specifying Control Panel Items 32 Changing the Image Size Size) . . 32 Using Flash Flash) . . 35 Selecting a Focus Mode Focus) . . 37 Specifying the Auto Focus Area AF Area) . . 40 Specifying ISO Sensitivity ISO) . . 42 Using the Self-timer Self-timer) . . 43 Using Face Detection Face Detection) . . 44 Correcting Image Brightness EV Shift) . . 45 Changing the Control Panel Date/Time Style 46 Shooting with Zoom 46 ❚ Optical Zoom and Digital Zoom Switch Point...
...; Auto Focus Restrictions 30 ❚❙ Snapshot Tutorial 31 Using the Control Panel 31 ❚ Specifying Control Panel Items 32 Changing the Image Size Size) . . 32 Using Flash Flash) . . 35 Selecting a Focus Mode Focus) . . 37 Specifying the Auto Focus Area AF Area) . . 40 Specifying ISO Sensitivity ISO) . . 42 Using the Self-timer Self-timer) . . 43 Using Face Detection Face Detection) . . 44 Correcting Image Brightness EV Shift) . . 45 Changing the Control Panel Date/Time Style 46 Shooting with Zoom 46 ❚ Optical Zoom and Digital Zoom Switch Point...

Owners Manual
Page 7
...❚ Viewing User Documentation PDF Files) . . 135 ❚ User Registration 135 Using an Eye-Fi Wireless SD Memory Card to Transfer Images . (Eye-Fi) . 135 Files and Folders 137 Memory Card Data 138 ❚❙ Other Settings (Set Up) 140 Adjusting Monitor Screen Brightness Screen) . 140 Turning off Eye-Fi Card Communication Eye-Fi) . 140 Configuring Camera Sound Settings Sounds) . 141 Configuring a Startup Image Startup) . 141 Specifying the File Name Serial Number Generation Rule . . . . . (File No.) . 142 Configuring World Time Settings World Time) . 142 Time Stamping...
...❚ Viewing User Documentation PDF Files) . . 135 ❚ User Registration 135 Using an Eye-Fi Wireless SD Memory Card to Transfer Images . (Eye-Fi) . 135 Files and Folders 137 Memory Card Data 138 ❚❙ Other Settings (Set Up) 140 Adjusting Monitor Screen Brightness Screen) . 140 Turning off Eye-Fi Card Communication Eye-Fi) . 140 Configuring Camera Sound Settings Sounds) . 141 Configuring a Startup Image Startup) . 141 Specifying the File Name Serial Number Generation Rule . . . . . (File No.) . 142 Configuring World Time Settings World Time) . 142 Time Stamping...

Owners Manual
Page 17
... the Japanese market. • Camera models sold in this manual in the language you select may not support display language selection. 1. Note that a version of the procedure below if you purchased a camera intended for configuring the display language, date, and time settings. Use [8] and [2] to turn on the camera. [ON/OFF] (Power) 2. IMPORTANT! • A screen for language selection will cause the wrong date and time data to select the setting you want and then...
... the Japanese market. • Camera models sold in this manual in the language you select may not support display language selection. 1. Note that a version of the procedure below if you purchased a camera intended for configuring the display language, date, and time settings. Use [8] and [2] to turn on the camera. [ON/OFF] (Power) 2. IMPORTANT! • A screen for language selection will cause the wrong date and time data to select the setting you want and then...
Owners Manual
Page 28
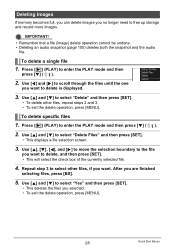
... exit the delete operation, press [MENU]. Use [8] and [2] to enter the PLAY mode and then press [2] ( ). 2. Press [p] (PLAY) to free up storage and record more images. Use [4] and [6] to scroll through the files until the one you want to delete is displayed. 3. Use [8] and [2] to select "Yes" and then press [SET]. • This deletes the files you are finished selecting files, press [BS]. 5. To delete a single file 1. IMPORTANT! • Remember that a file (image) delete operation cannot...
... exit the delete operation, press [MENU]. Use [8] and [2] to enter the PLAY mode and then press [2] ( ). 2. Press [p] (PLAY) to free up storage and record more images. Use [4] and [6] to scroll through the files until the one you want to delete is displayed. 3. Use [8] and [2] to select "Yes" and then press [SET]. • This deletes the files you are finished selecting files, press [BS]. 5. To delete a single file 1. IMPORTANT! • Remember that a file (image) delete operation cannot...

Owners Manual
Page 53
Voice Recording Playback Controls Fast forward/fast reverse Play/pause Jump to marker Volume adjustment Monitor screen on/off Playback end [4] [6] [SET] While playback is displayed in place of an image for a Voice Recording file. 2. Press [SET] to resume playback. About audio data • Audio files can use [4] and [6] to display the Voice Recording file you want to turn off immediately (page 149). In the PLAY mode, use [8] (DISP) during audio recording to toggle the monitor screen on and...
Voice Recording Playback Controls Fast forward/fast reverse Play/pause Jump to marker Volume adjustment Monitor screen on/off Playback end [4] [6] [SET] While playback is displayed in place of an image for a Voice Recording file. 2. Press [SET] to resume playback. About audio data • Audio files can use [4] and [6] to display the Voice Recording file you want to turn off immediately (page 149). In the PLAY mode, use [8] (DISP) during audio recording to toggle the monitor screen on and...
Owners Manual
Page 57
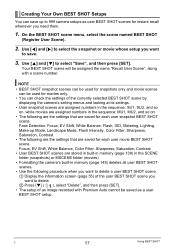
... are saved for each user snapshot BEST SHOT scene. C 57 Using BEST SHOT Face Detection, Focus, EV Shift, White Balance, Flash, ISO, Metering, Lighting, Make-up to select "Save", and then press [SET]. Creating Your Own BEST SHOT Setups You can check the settings of an image recorded with Premium Auto cannot be assigned the name "Recall User Scene", along with a scene number. On the BEST SHOT scene menu, select the scene named BEST SHOT (Register User...
... are saved for each user snapshot BEST SHOT scene. C 57 Using BEST SHOT Face Detection, Focus, EV Shift, White Balance, Flash, ISO, Metering, Lighting, Make-up to select "Save", and then press [SET]. Creating Your Own BEST SHOT Setups You can check the settings of an image recorded with Premium Auto cannot be assigned the name "Recall User Scene", along with a scene number. On the BEST SHOT scene menu, select the scene named BEST SHOT (Register User...
Owners Manual
Page 64
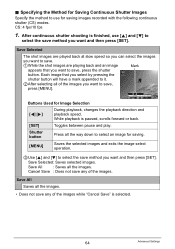
... playback, changes the playback direction and playback speed. Specifying the Method for saving images recorded with the following continuous shutter (CS) modes. Save Selected: Saves selected images. Save All Saves all the images. Each image that you select by pressing the shutter button will have a mark appended to it. 2After selecting all the way down to save. 1While the shot images are playing back and an image Mark appears that you want and then press [SET]. Save All : Saves...
... playback, changes the playback direction and playback speed. Specifying the Method for saving images recorded with the following continuous shutter (CS) modes. Save Selected: Saves selected images. Save All Saves all the images. Each image that you select by pressing the shutter button will have a mark appended to it. 2After selecting all the way down to save. 1While the shot images are playing back and an image Mark appears that you want and then press [SET]. Save All : Saves...

Owners Manual
Page 73
... is performed using normal Auto Focus before the image is recorded. NOTE • Quick Shutter is disabled when the zoom factor is greater. Recording is performed using a high-speed focus operation that is much faster than Auto Focus. Shooting with Quick Shutter (Quick Shutter) Procedure [r] (REC) * [MENU] * REC Tab * Quick Shutter When Quick Shutter is turned on Quick Shutter • Some images may be shot without waiting for Auto Focus. This will continue to ensure proper focus. Turns off , images will record the image using Auto Focus at this time. 73 Advanced Settings
... is performed using normal Auto Focus before the image is recorded. NOTE • Quick Shutter is disabled when the zoom factor is greater. Recording is performed using a high-speed focus operation that is much faster than Auto Focus. Shooting with Quick Shutter (Quick Shutter) Procedure [r] (REC) * [MENU] * REC Tab * Quick Shutter When Quick Shutter is turned on Quick Shutter • Some images may be shot without waiting for Auto Focus. This will continue to ensure proper focus. Turns off , images will record the image using Auto Focus at this time. 73 Advanced Settings
Owners Manual
Page 92
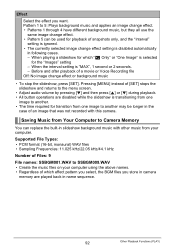
..., but they all use the same image change effect. • Pattern 5 can be longer in the case of [SET] stops the slideshow and returns to the menu screen. • Adjust audio volume by pressing [2] and then press [8] or [2] during playback. • All button operations are played back in name sequence. 92 Other Playback Functions (PLAY) Supported File Types: • PCM format (16-bit, monaural) WAV files • Sampling Frequencies...
..., but they all use the same image change effect. • Pattern 5 can be longer in the case of [SET] stops the slideshow and returns to the menu screen. • Adjust audio volume by pressing [2] and then press [8] or [2] during playback. • All button operations are played back in name sequence. 92 Other Playback Functions (PLAY) Supported File Types: • PCM format (16-bit, monaural) WAV files • Sampling Frequencies...
Owners Manual
Page 103
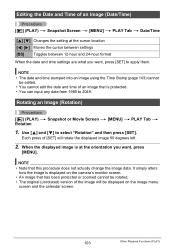
... [p] (PLAY) * Snapshot or Movie Screen * [MENU] * PLAY Tab * Rotation 1. When the displayed image is displayed on the image menu screen and the calendar screen. 103 Other Playback Functions (PLAY) Use [8] and [2] to 2049. Each press of an image that is protected. • You can input any date from 1980 to select "Rotation" and then press [SET]. NOTE • The date and time stamped into an image using the Time Stamp (page 143) cannot be displayed on the camera's monitor screen...
... [p] (PLAY) * Snapshot or Movie Screen * [MENU] * PLAY Tab * Rotation 1. When the displayed image is displayed on the image menu screen and the calendar screen. 103 Other Playback Functions (PLAY) Use [8] and [2] to 2049. Each press of an image that is protected. • You can input any date from 1980 to select "Rotation" and then press [SET]. NOTE • The date and time stamped into an image using the Time Stamp (page 143) cannot be displayed on the camera's monitor screen...
Owners Manual
Page 106
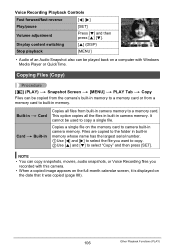
Copies a single file on the date that it was copied (page 88). 106 Other Playback Functions (PLAY) Copying Files (Copy) Procedure [p] (PLAY) * Snapshot Screen * [MENU] * PLAY Tab * Copy Files can be played back on a computer with this camera. • When a copied image appears on the full-month calendar screen, it is displayed on the memory card to copy a single file. Built-in * Card Card * Built-in Copies all the files in built-in memory to a memory card or from a memory card to select "Copy" and then press...
Copies a single file on the date that it was copied (page 88). 106 Other Playback Functions (PLAY) Copying Files (Copy) Procedure [p] (PLAY) * Snapshot Screen * [MENU] * PLAY Tab * Copy Files can be played back on a computer with this camera. • When a copied image appears on the full-month calendar screen, it is displayed on the memory card to copy a single file. Built-in * Card Card * Built-in Copies all the files in built-in memory to a memory card or from a memory card to select "Copy" and then press...
Owners Manual
Page 130
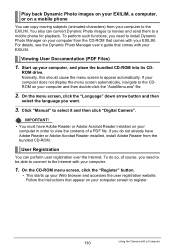
.... 3. ROM drive. Follow the instructions that appear on your computer in order to a mobile phone for playback. To perform such functions, you do so, of a PDF file. Normally, this should cause the menu screen to select it and then click "Digital Camera". On the menu screen, click the "Language" down arrow button and then select the language you need to install Dynamic Photo Manager on your computer...
.... 3. ROM drive. Follow the instructions that appear on your computer in order to a mobile phone for playback. To perform such functions, you do so, of a PDF file. Normally, this should cause the menu screen to select it and then click "Digital Camera". On the menu screen, click the "Language" down arrow button and then select the language you need to install Dynamic Photo Manager on your computer...

Owners Manual
Page 146
... the PLAY mode. • Change this setting to anything besides "Disable" before connecting to a computer or other device - Disabling File Deletion (Ü Disabled) Procedure [MENU] * Set Up Tab * Ü Disabled The camera will not start the image delete operation when you press [r] (REC) in the REC mode or [p] (PLAY) in the PLAY mode.) • Auto Power Off is connected to a TV for "Ü Disabled". ) while 146 Other Settings (Set Up) Configuring Auto Power Settings (Auto Power Off) Procedure [MENU] * Set Up Tab * Auto Power Off Auto Power Off turns off...
... the PLAY mode. • Change this setting to anything besides "Disable" before connecting to a computer or other device - Disabling File Deletion (Ü Disabled) Procedure [MENU] * Set Up Tab * Ü Disabled The camera will not start the image delete operation when you press [r] (REC) in the REC mode or [p] (PLAY) in the PLAY mode.) • Auto Power Off is connected to a TV for "Ü Disabled". ) while 146 Other Settings (Set Up) Configuring Auto Power Settings (Auto Power Off) Procedure [MENU] * Set Up Tab * Auto Power Off Auto Power Off turns off...

Owners Manual
Page 148
... data. - BEST SHOT user setups - Protected images • Make sure the camera's battery is sufficiently charged before you do not need any data currently on the memory card or in built-in memory. The settings below are not reset. Formatting may stop operating normally. Startup screen • Formatting a memory card will delete the following data. - World Time settings, clock settings, date style, screen language, video output 148 Other Settings (Set Up) It will format built-in memory if no memory card is loaded. • The format operation will format the memory card...
... data. - BEST SHOT user setups - Protected images • Make sure the camera's battery is sufficiently charged before you do not need any data currently on the memory card or in built-in memory. The settings below are not reset. Formatting may stop operating normally. Startup screen • Formatting a memory card will delete the following data. - World Time settings, clock settings, date style, screen language, video output 148 Other Settings (Set Up) It will format built-in memory if no memory card is loaded. • The format operation will format the memory card...
Owners Manual
Page 166
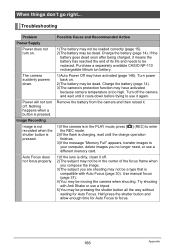
...... Troubleshooting Problem Power Supply Power does not turn off the camera and wait until the charge operation finishes. 3)If the message "Memory Full" appears, transfer images to your computer, delete images you no longer need, or use a different memory card. 1)If the lens is compatible with Anti Shake or use it again. Image Recording Image is not recorded when the shutter button is pressed. Auto Focus does not focus properly. If the battery goes dead soon after being charged, it cools down . Turn power...
...... Troubleshooting Problem Power Supply Power does not turn off the camera and wait until the charge operation finishes. 3)If the message "Memory Full" appears, transfer images to your computer, delete images you no longer need, or use a different memory card. 1)If the lens is compatible with Anti Shake or use it again. Image Recording Image is not recorded when the shutter button is pressed. Auto Focus does not focus properly. If the battery goes dead soon after being charged, it cools down . Turn power...

Owners Manual
Page 167
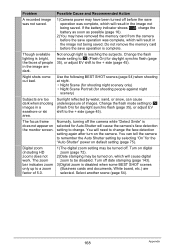
... is a CCD phenomenon known as the flash mode, change to shoot in a dark location with the Lighting feature can use lights for non-flash shots. Camera powers down during Selftimer countdown. Charge the battery (page 14). Shooting a very brightly lit subject can increase digital noise and make sure the subject is digital noise in the monitor screen image. The image may have not focused the image. Use Auto Focus for a dark subject, which can cause...
... is a CCD phenomenon known as the flash mode, change to shoot in a dark location with the Lighting feature can use lights for non-flash shots. Camera powers down during Selftimer countdown. Charge the battery (page 14). Shooting a very brightly lit subject can increase digital noise and make sure the subject is digital noise in the monitor screen image. The image may have not focused the image. Use Auto Focus for a dark subject, which can cause...
Owners Manual
Page 168
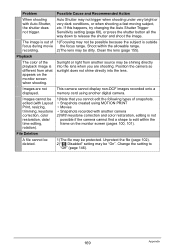
... not remove the memory card before the save operation is reaching the subjects. The focus frame does not appear on default setting (page 75). You can cause underexposure of images. Turn off date stamping (page 143). 3)Digital zoom is bright, the faces of 5.0. 1)The digital zoom setting may be disabled. Night shots come out bad. Though available lighting is disabled when some BEST SHOT scenes (Business cards and documents, White board, etc.) are dark. Digital zoom...
... not remove the memory card before the save operation is reaching the subjects. The focus frame does not appear on default setting (page 75). You can cause underexposure of images. Turn off date stamping (page 143). 3)Digital zoom is bright, the faces of 5.0. 1)The digital zoom setting may be disabled. Night shots come out bad. Though available lighting is disabled when some BEST SHOT scenes (Business cards and documents, White board, etc.) are dark. Digital zoom...
Owners Manual
Page 169
... correction, color restoration, date/ time editing, rotation). 1)Note that you are not displayed. This camera cannot display non-DCF images recorded onto a memory card using MOTION PRINT • Movies • Snapshots recorded with Auto Shutter, the shutter does not trigger. The image is out of snapshots. • Snapshots created using another digital camera. Clean the lens (page 155). File Deletion A file cannot be deleted. 1)The file may be protected. Change the setting to release the shutter and shoot the image. Sunlight or light from...
... correction, color restoration, date/ time editing, rotation). 1)Note that you are not displayed. This camera cannot display non-DCF images recorded onto a memory card using MOTION PRINT • Movies • Snapshots recorded with Auto Shutter, the shutter does not trigger. The image is out of snapshots. • Snapshots created using another digital camera. Clean the lens (page 155). File Deletion A file cannot be deleted. 1)The file may be protected. Change the setting to release the shutter and shoot the image. Sunlight or light from...

Owners Manual
Page 170
... battery. If the language selection screen does not re-appear when you turn power back on , it on the display are being stored along with image data. Check all connections. 2)The wrong USB communication protocol is selected. Always connect directly to initialize the camera's setup (page 148). If the same message appears after purchasing the camera or the camera may not be a problem with the camera's memory data. Change the display language setting (page 145). Language...
... battery. If the language selection screen does not re-appear when you turn power back on , it on the display are being stored along with image data. Check all connections. 2)The wrong USB communication protocol is selected. Always connect directly to initialize the camera's setup (page 148). If the same message appears after purchasing the camera or the camera may not be a problem with the camera's memory data. Change the display language setting (page 145). Language...

Owners Manual
Page 172
... shoot a subject. You are not compatible with images you recorded and/or files saved by editing operations. The Camera Shake unit may be created. Delete files you no longer need (page 28). Folder cannot be malfunctioning. Image compression could not be saved because battery is turned off power? An error occurred while printing. • The printer is low. Files could not be inserted into a background image. Check connections! Battery power is being transferred. LENS ERROR LENS ERROR 2 Load paper! This message...
... shoot a subject. You are not compatible with images you recorded and/or files saved by editing operations. The Camera Shake unit may be created. Delete files you no longer need (page 28). Folder cannot be malfunctioning. Image compression could not be saved because battery is turned off power? An error occurred while printing. • The printer is low. Files could not be inserted into a background image. Check connections! Battery power is being transferred. LENS ERROR LENS ERROR 2 Load paper! This message...


