Owners Manual
Page 4
... Image Size 68 ■ Specifying Image Quality 69 ■ Turning Off the AF Assist Lamp 70 ■ Snapshot Shooting Precautions 71 ■ Auto Focus Restrictions 72 Shooting with Zoom 73 Using Flash 76 Using the Self-Timer 80 Using Continuous Shutter 82 ■ Selecting the Continuous Shutter Mode 83 ■ Recording with Normal-speed Continuous Shutter, High-speed Continuous Shutter, and Flash Continuous Shutter 83 ■ Recording with Zoom Continuous Shutter 84 ■ Continuous Shutter Precautions 85 Adding Audio to a Snapshot 86 Manually Configuring...
... Image Size 68 ■ Specifying Image Quality 69 ■ Turning Off the AF Assist Lamp 70 ■ Snapshot Shooting Precautions 71 ■ Auto Focus Restrictions 72 Shooting with Zoom 73 Using Flash 76 Using the Self-Timer 80 Using Continuous Shutter 82 ■ Selecting the Continuous Shutter Mode 83 ■ Recording with Normal-speed Continuous Shutter, High-speed Continuous Shutter, and Flash Continuous Shutter 83 ■ Recording with Zoom Continuous Shutter 84 ■ Continuous Shutter Precautions 85 Adding Audio to a Snapshot 86 Manually Configuring...
Owners Manual
Page 7
... World Time Settings 213 Changing the Display Language 215 Changing the USB Port Protocol 216 [ ] (REC) and [ ] (PLAY) Button Settings 217 Formatting Built-in Memory 218 PRINTING 219 Types of Printing 219 Using Professional Print Service 220 Using Your Printer to Print Images 220 Using DPOF to Specify Images to be Printed and the Number of Copies 224 ■ Date Stamping 226 Supported Protocols 227 USING THE CAMERA WITH A COMPUTER 229 What you can do 229 Using the Camera with a Windows Computer . . 230 ■ Viewing...
... World Time Settings 213 Changing the Display Language 215 Changing the USB Port Protocol 216 [ ] (REC) and [ ] (PLAY) Button Settings 217 Formatting Built-in Memory 218 PRINTING 219 Types of Printing 219 Using Professional Print Service 220 Using Your Printer to Print Images 220 Using DPOF to Specify Images to be Printed and the Number of Copies 224 ■ Date Stamping 226 Supported Protocols 227 USING THE CAMERA WITH A COMPUTER 229 What you can do 229 Using the Camera with a Windows Computer . . 230 ■ Viewing...
Owners Manual
Page 22
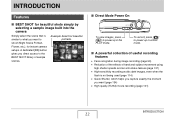
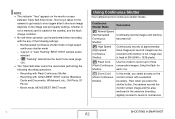
...; Direct Mode Power On To view images, press [ ] to power up in the PLAY mode. Example: Select for instant camera setups. To record, press [ ] to the BEST SHOT library of hand and subject movement using high shutter speeds and an anti-shake feature (page 137) • High-sensitivity recording avoids dark images, even when the flash is similar to what you want (page 134) • High quality (H.264) movie recording...
...; Direct Mode Power On To view images, press [ ] to power up in the PLAY mode. Example: Select for instant camera setups. To record, press [ ] to the BEST SHOT library of hand and subject movement using high shutter speeds and an anti-shake feature (page 137) • High-sensitivity recording avoids dark images, even when the flash is similar to what you want (page 134) • High quality (H.264) movie recording...
Owners Manual
Page 45
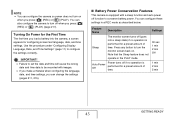
...) or [ ] (PLAY) (page 217). Power turns off (goes into the camera, a screen appears for a preset amount of time. IMPORTANT! • Failure to set the date and time will cause the wrong date and time data to conserve battery power. Settings 30 sec 1 min 2 min Off 1 min 2 min 5 min GETTING READY 45 You can also configure the camera to turn off function to be recorded with images. • If you make a mistake when...
...) or [ ] (PLAY) (page 217). Power turns off (goes into the camera, a screen appears for a preset amount of time. IMPORTANT! • Failure to set the date and time will cause the wrong date and time data to conserve battery power. Settings 30 sec 1 min 2 min Off 1 min 2 min 5 min GETTING READY 45 You can also configure the camera to turn off function to be recorded with images. • If you make a mistake when...
Owners Manual
Page 47
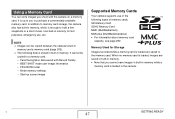
...Mode memory settings - Memory Used for test purposes, emergency use of memory cards. SD Memory Card SDHC Memory Card MMC (MultiMediaCard) MMCplus (MultiMediaCardplus) • For information about memory card capacity, see page 282. It is up screen image Supported Memory Cards Your camera supports use , etc. C GETTING READY 47 Using a Memory Card You can be copied to purchase a commercially available memory card. Face Recognition data saved with the camera on a memory card. FAVORITE folder - Start-up to you cannot save images in built-in memory while a memory card...
...Mode memory settings - Memory Used for test purposes, emergency use of memory cards. SD Memory Card SDHC Memory Card MMC (MultiMediaCard) MMCplus (MultiMediaCardplus) • For information about memory card capacity, see page 282. It is up screen image Supported Memory Cards Your camera supports use , etc. C GETTING READY 47 Using a Memory Card You can be copied to purchase a commercially available memory card. Face Recognition data saved with the camera on a memory card. FAVORITE folder - Start-up to you cannot save images in built-in memory while a memory card...
Owners Manual
Page 82
... when recording with Flash Continuous Shutter - Recording with a selection boundary. Flash Cont. (Flash Continuous Shutter) Use this mode, you press the shutter button, the camera records the monitor screen image and the area enclosed in the camera, and the flash charge condition. • No self-timer operation can be recorded until memory becomes full. C SHOOTING A SNAPSHOT 82 NOTE • The indicator "1sec" appears on the image size and quality settings, whether or not a memory card is loaded in the selection boundary, digitally zoomed to...
... when recording with Flash Continuous Shutter - Recording with a selection boundary. Flash Cont. (Flash Continuous Shutter) Use this mode, you press the shutter button, the camera records the monitor screen image and the area enclosed in the camera, and the flash charge condition. • No self-timer operation can be recorded until memory becomes full. C SHOOTING A SNAPSHOT 82 NOTE • The indicator "1sec" appears on the image size and quality settings, whether or not a memory card is loaded in the selection boundary, digitally zoomed to...
Owners Manual
Page 127
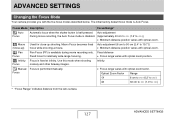
... initial factory default focus mode is performed manually. Use this mode when shooting Focus scenery and other faraway images. Optical Zoom Factor Range 1X 6 cm to (0.2' to ) 3X 30 cm to (1.0' to 19.7")) (Close-up shooting. Focus Mode Description Focus Range* Auto Focus Automatic focus when the shutter button is disabled. (Approximately 40 cm to (1.3' to )) • Minimum distance position varies with optical zoom factor. Macro Focus becomes fixed Auto adjustment (6 cm to 50 cm (2.4" to ) * "Focus Range" indicates...
... initial factory default focus mode is performed manually. Use this mode when shooting Focus scenery and other faraway images. Optical Zoom Factor Range 1X 6 cm to (0.2' to ) 3X 30 cm to (1.0' to 19.7")) (Close-up shooting. Focus Mode Description Focus Range* Auto Focus Automatic focus when the shutter button is disabled. (Approximately 40 cm to (1.3' to )) • Minimum distance position varies with optical zoom factor. Macro Focus becomes fixed Auto adjustment (6 cm to 50 cm (2.4" to ) * "Focus Range" indicates...
Owners Manual
Page 136
... shutter button to tell you view the results on the monitor screen. IMPORTANT! • While Manual Focus is within the boundary will return to step 1 if you perform an optical zoom operation (page 73) while shooting with Key Customize (page 154) are used to the [W] and [X] keys with manual focus, a value will be replaced by the actual focus range values. 2. At this button: [W] [X] • The monitor screen...
... shutter button to tell you view the results on the monitor screen. IMPORTANT! • While Manual Focus is within the boundary will return to step 1 if you perform an optical zoom operation (page 73) while shooting with Key Customize (page 154) are used to the [W] and [X] keys with manual focus, a value will be replaced by the actual focus range values. 2. At this button: [W] [X] • The monitor screen...
Owners Manual
Page 171
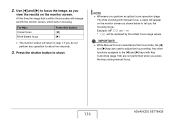
...] button. • Press the USB cradle's [USB] button. The camera's monitor screen will not turn on the camera for "Power On" or "Power On/Off" (page 217). • All icons and indicators that appear on the monitor screen also appear on . 5. IMPORTANT! • When connecting to a TV to display images, be sure to start displaying images, set the TV volume control at maximum volume. You can use [DISP] to turn on the TV screen. 3. Press [ ] (PLAY) to change the display...
...] button. • Press the USB cradle's [USB] button. The camera's monitor screen will not turn on the camera for "Power On" or "Power On/Off" (page 217). • All icons and indicators that appear on the monitor screen also appear on . 5. IMPORTANT! • When connecting to a TV to display images, be sure to start displaying images, set the TV volume control at maximum volume. You can use [DISP] to turn on the TV screen. 3. Press [ ] (PLAY) to change the display...
Owners Manual
Page 179
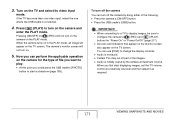
Press [SET] to correct. 2. IMPORTANT! • The image produced by cropping a 3:2 or 16:9 image will have an aspect ratio of 4:3. • The recording date of the extracted image will be stored as a separate file. 1. In the PLAY mode, use [W] and [X] to scroll through images and display the snapshot you want to extract the displayed part and save it was recorded at any time before you press [SET], press [MENU]. This displays screen that...
Press [SET] to correct. 2. IMPORTANT! • The image produced by cropping a 3:2 or 16:9 image will have an aspect ratio of 4:3. • The recording date of the extracted image will be stored as a separate file. 1. In the PLAY mode, use [W] and [X] to scroll through images and display the snapshot you want to extract the displayed part and save it was recorded at any time before you press [SET], press [MENU]. This displays screen that...
Owners Manual
Page 199
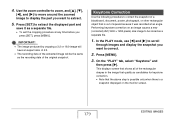
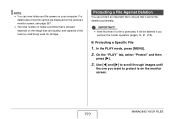
... the format operation (pages 14, 51, 218). ■ Protecting a Specific File 1. Use [W] and [X] to scroll through images until the one you want to ensure that it will be deleted accidentally. In the PLAY mode, press [MENU]. 2. For details about how file names are displayed on the camera's monitor screen, see page 267. • The total number of the memory card being used for storage. Protecting a File Against Deletion You can view folder and file names...
... the format operation (pages 14, 51, 218). ■ Protecting a Specific File 1. Use [W] and [X] to scroll through images until the one you want to ensure that it will be deleted accidentally. In the PLAY mode, press [MENU]. 2. For details about how file names are displayed on the camera's monitor screen, see page 267. • The total number of the memory card being used for storage. Protecting a File Against Deletion You can view folder and file names...
Owners Manual
Page 203
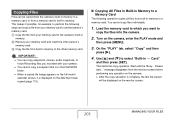
... be displayed on the date that is in the FAVORITE folder. • When a copied file image appears on the full-month calendar screen, it is complete, the last file copied will be copied from the camera's built-in memory to a memory card, or from a memory card to built-in memory. Please wait..." Use [S] and [T] to a memory card. This starts the copy operation. You cannot copy files individually. 1. On the "PLAY" tab, select "Copy" and then press [X]. 4. message disappears...
... be displayed on the date that is in the FAVORITE folder. • When a copied file image appears on the full-month calendar screen, it is complete, the last file copied will be copied from the camera's built-in memory to a memory card, or from a memory card to built-in memory. Please wait..." Use [S] and [T] to a memory card. This starts the copy operation. You cannot copy files individually. 1. On the "PLAY" tab, select "Copy" and then press [X]. 4. message disappears...
Owners Manual
Page 218
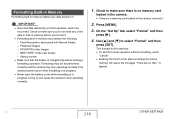
... the PLAY mode after formatting the built-in it . 2. Formatting may stop operating normally. 1. Check to make sure you format it. • Formatting built-in memory also deletes the following. - Press [MENU]. 3. Face Recognition data saved with Record Family - BEST SHOT mode user setups - FAVORITE folder images - C 218 OTHER SETTINGS Check to appear. Use [S] and [T] to stop operating normally if the camera powers down while formatting is in progress. • Never open the battery cover while formatting is a memory card loaded...
... the PLAY mode after formatting the built-in it . 2. Formatting may stop operating normally. 1. Check to make sure you format it. • Formatting built-in memory also deletes the following. - Press [MENU]. 3. Face Recognition data saved with Record Family - BEST SHOT mode user setups - FAVORITE folder images - C 218 OTHER SETTINGS Check to appear. Use [S] and [T] to stop operating normally if the camera powers down while formatting is in progress. • Never open the battery cover while formatting is a memory card loaded...

Owners Manual
Page 230
... certain computer models, connecting through a USB hub, and other system conditions can slow down data transfer and even cause operational problems. Using the Camera with a Windows Computer Install the required software in accordance with what version of images on the computer Vista/XP/ 2000 Photo Loader with a Macintosh" on page 251. Note that supports only USB 1.1 protocol, higher speed data transfer becomes possible when USB 2.0 Hi-Speed is not installed on a computer...
... certain computer models, connecting through a USB hub, and other system conditions can slow down data transfer and even cause operational problems. Using the Camera with a Windows Computer Install the required software in accordance with what version of images on the computer Vista/XP/ 2000 Photo Loader with a Macintosh" on page 251. Note that supports only USB 1.1 protocol, higher speed data transfer becomes possible when USB 2.0 Hi-Speed is not installed on a computer...

Owners Manual
Page 234
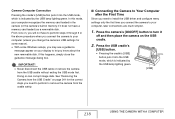
... 2. 2) Use the USB cradle to connect the camera and computer (page 235). 3) View and copy the images you do, the computer will display the menu screen. 234 USING THE CAMERA WITH A COMPUTER Set the bundled CD-ROM into the CD-ROM drive of Windows your computer is running Windows 98SE or 98, install the USB driver (page 234). Viewing and Storing Images on a Computer You can view and store images (snapshot and movie files...
... 2. 2) Use the USB cradle to connect the camera and computer (page 235). 3) View and copy the images you do, the computer will display the menu screen. 234 USING THE CAMERA WITH A COMPUTER Set the bundled CD-ROM into the CD-ROM drive of Windows your computer is running Windows 98SE or 98, install the USB driver (page 234). Viewing and Storing Images on a Computer You can view and store images (snapshot and movie files...
Owners Manual
Page 238
... and then place the camera on your display to let you need to your computer recognizes the memory card loaded in the camera (or the camera's built-in the above procedure when you connect the camera to install the USB driver and configure menu settings only the first time you will not have a memory card loaded) as a removable disk. If this mode, your computer (unless you change the camera's USB settings for the correct...
... and then place the camera on your display to let you need to your computer recognizes the memory card loaded in the camera (or the camera's built-in the above procedure when you connect the camera to install the USB driver and configure menu settings only the first time you will not have a memory card loaded) as a removable disk. If this mode, your computer (unless you change the camera's USB settings for the correct...

Owners Manual
Page 258
Open the "Digital Camera" folder and then open the "Manual" folder. • Use the CD-ROM that has "User's Guide included" on its label. 2. If you want to view. 3. Some typical examples are using to read files from a memory card depends on your computer. 258 USING THE CAMERA WITH A COMPUTER Open the file named "camera_xx.pdf". • "xx" is the language code (Example: camera_e.pdf is for English.) Registering as those that you use when the...
Open the "Digital Camera" folder and then open the "Manual" folder. • Use the CD-ROM that has "User's Guide included" on its label. 2. If you want to view. 3. Some typical examples are using to read files from a memory card depends on your computer. 258 USING THE CAMERA WITH A COMPUTER Open the file named "camera_xx.pdf". • "xx" is the language code (Example: camera_e.pdf is for English.) Registering as those that you use when the...
Owners Manual
Page 273
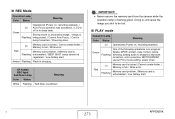
... SHOT setup cannot be lost. ■ PLAY mode Operation Lamp Color Status Meaning Lit Operational (Power on , recording enabled). / Auto Focus operation was successful. / LCD is full. / Write error. IMPORTANT! • Never remove the memory card from the camera while the operation lamp is unformatted. / Low battery alert. Red Flashing Memory card problem. / Memory card is flashing green. Green Flashing One of the following operations is in sleep state. Lit Memory card is locked / Cannot create folder. / Memory is off or in progress: Delete, DPOF, protect, copy, format...
... SHOT setup cannot be lost. ■ PLAY mode Operation Lamp Color Status Meaning Lit Operational (Power on , recording enabled). / Auto Focus operation was successful. / LCD is full. / Write error. IMPORTANT! • Never remove the memory card from the camera while the operation lamp is unformatted. / Low battery alert. Red Flashing Memory card problem. / Memory card is flashing green. Green Flashing One of the following operations is in sleep state. Lit Memory card is locked / Cannot create folder. / Memory is off or in progress: Delete, DPOF, protect, copy, format...
Owners Manual
Page 278
... light from what appears on the display The wrong display language is selected. are in accordance with the type of imagess. • Images created with MOTION PRINT • Movies • Images recorded with another digital camera. I can 't edit images (Layout Print, resizing, trimming, keystone correction, color restoration, rotation, white balance, date/time editing). Position the camera so sunlight does not shine directly into the lens when you are shooting. I can 't transfer images over a USB connection. 1) The USB cable...
... light from what appears on the display The wrong display language is selected. are in accordance with the type of imagess. • Images created with MOTION PRINT • Movies • Images recorded with another digital camera. I can 't edit images (Layout Print, resizing, trimming, keystone correction, color restoration, rotation, white balance, date/time editing). Position the camera so sunlight does not shine directly into the lens when you are shooting. I can 't transfer images over a USB connection. 1) The USB cable...
Owners Manual
Page 279
... you turn power back on the CD-ROM that , configure each setting. For information about how to initialize the camera's setup (page 159). If this is the case, perform the reset operation to re-install the USB driver, see the USB driver's "Read me" file on , contact your retailer or a CASIO service center. If the same message appears after purchasing the camera or the battery may not be a problem...
... you turn power back on the CD-ROM that , configure each setting. For information about how to initialize the camera's setup (page 159). If this is the case, perform the reset operation to re-install the USB driver, see the USB driver's "Read me" file on , contact your retailer or a CASIO service center. If the same message appears after purchasing the camera or the battery may not be a problem...


