Owners Manual
Page 6
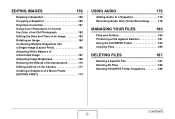
...Image (Layout Print 166 Adjusting White Balance of a Recorded Image 167 Adjusting Image Brightness 169 Reducing the Effects of Underexposure 170 Editing a Movie on the Camera 171 Creating a Snapshot of a Movie Frame (MOTION PRINT 174 USING AUDIO 176 Adding Audio to a Snapshot 176 Recording Audio Only (Voice Recording 178 MANAGING...YOUR FILES 180 Files and Folders 180 Protecting a File Against Deletion 181 Using the FAVORITE Folder 183 Copying Files 185 DELETING FILES 187 Deleting a Specific File 187 Deleting All Files 188 Deleting FAVORITE Folder Snapshots 188 CONTENTS 6
...Image (Layout Print 166 Adjusting White Balance of a Recorded Image 167 Adjusting Image Brightness 169 Reducing the Effects of Underexposure 170 Editing a Movie on the Camera 171 Creating a Snapshot of a Movie Frame (MOTION PRINT 174 USING AUDIO 176 Adding Audio to a Snapshot 176 Recording Audio Only (Voice Recording 178 MANAGING...YOUR FILES 180 Files and Folders 180 Protecting a File Against Deletion 181 Using the FAVORITE Folder 183 Copying Files 185 DELETING FILES 187 Deleting a Specific File 187 Deleting All Files 188 Deleting FAVORITE Folder Snapshots 188 CONTENTS 6

Owners Manual
Page 8
APPENDIX 241 General Guide 241 Monitor Screen Contents 243 Menu Reference 246 Indicator Lamps 250 ■ Battery Charger Lamp Reference 251 Troubleshooting Guide 252 ■ Finding the Problem and Fixing It 252 ■ Display Messages 257 Specifications 259 CONTENTS 8
APPENDIX 241 General Guide 241 Monitor Screen Contents 243 Menu Reference 246 Indicator Lamps 250 ■ Battery Charger Lamp Reference 251 Troubleshooting Guide 252 ■ Finding the Problem and Fixing It 252 ■ Display Messages 257 Specifications 259 CONTENTS 8
Owners Manual
Page 23
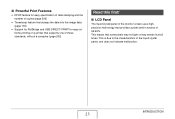
..., and does not indicate malfunction. This means that provides a pixel yield in excess of 99.99%. ■ Powerful Print Features • DPOF feature for easy specification of date stamping and the number of copies (page 206) • Timestamp feature that stamps the date into the image data (page 135) • Support...
..., and does not indicate malfunction. This means that provides a pixel yield in excess of 99.99%. ■ Powerful Print Features • DPOF feature for easy specification of date stamping and the number of copies (page 206) • Timestamp feature that stamps the date into the image data (page 135) • Support...
Owners Manual
Page 86
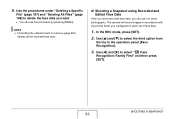
The camera will record images in accordance with the priority levels you can exit this procedure by pressing [MENU]. Use [W] and ...Edited Face Data After you record and edit face data, you configured for each set of face data. 1. Use the procedures under "Deleting a Specific File" (page 187) and "Deleting All Files" (page 188) to delete the face data you want. • You can use it ... and [T] to select " Face Recognition: Family First" and then press [SET]. In the REC mode, press [SET]. 2. NOTE • Formatting the camera's built-in the operation panel (Face Recognition). 3. 5.
The camera will record images in accordance with the priority levels you can exit this procedure by pressing [MENU]. Use [W] and ...Edited Face Data After you record and edit face data, you configured for each set of face data. 1. Use the procedures under "Deleting a Specific File" (page 187) and "Deleting All Files" (page 188) to delete the face data you want. • You can use it ... and [T] to select " Face Recognition: Family First" and then press [SET]. In the REC mode, press [SET]. 2. NOTE • Formatting the camera's built-in the operation panel (Face Recognition). 3. 5.
Owners Manual
Page 149
... (in the FAVORITE folder (page 183). When the "Interval" setting is " Only", "One Image", or "Favorites". - Selecting "Pattern 5" changes the "Images" setting to select one specific image (selected using [W] and [X]). • Favorites: Includes snapshots in minutes): 1, 2, 3, 4, 5, 10, slideshow, 15, 30, 60. When "MAX" is selected, only the first frame of the...
... (in the FAVORITE folder (page 183). When the "Interval" setting is " Only", "One Image", or "Favorites". - Selecting "Pattern 5" changes the "Images" setting to select one specific image (selected using [W] and [X]). • Favorites: Includes snapshots in minutes): 1, 2, 3, 4, 5, 10, slideshow, 15, 30, 60. When "MAX" is selected, only the first frame of the...
Owners Manual
Page 181
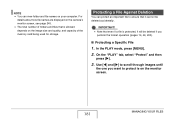
... how file names are displayed on the camera's monitor screen, see page 245. • The total number of the memory card being used for storage. Use [W] and [X] to scroll through images until the one you perform the format operation (pages 14, 49, 200). ■ Protecting a Specific File 1. NOTE • You can protect...
... how file names are displayed on the camera's monitor screen, see page 245. • The total number of the memory card being used for storage. Use [W] and [X] to scroll through images until the one you perform the format operation (pages 14, 49, 200). ■ Protecting a Specific File 1. NOTE • You can protect...

Owners Manual
Page 182
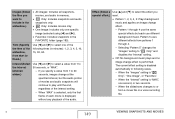
...[T] to select "On" and then press [SET]. 4. In the PLAY mode, press [MENU]. 2. This protects all files in memory Perform the procedure under "Protecting a Specific File", but in step 3 select "All Files : Off" instead of "On". ■ Protecting All Files in Memory 1. Press [MENU]. To unprotect... a specific file Perform the procedure under "Protecting All Files in Memory", but in memory. 4. Now you can repeat steps 3 and 4 to protect another image ...
...[T] to select "On" and then press [SET]. 4. In the PLAY mode, press [MENU]. 2. This protects all files in memory Perform the procedure under "Protecting a Specific File", but in step 3 select "All Files : Off" instead of "On". ■ Protecting All Files in Memory 1. Press [MENU]. To unprotect... a specific file Perform the procedure under "Protecting All Files in Memory", but in memory. 4. Now you can repeat steps 3 and 4 to protect another image ...
Owners Manual
Page 187
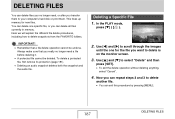
Deleting a Specific File 1. You can delete one for new files. Always make sure that a file delete operation cannot be deleted. In the PLAY mode, press [T] ( ). 2. Now you ... you really no longer need a file before deleting it. • A protected file cannot be undone. Use [W] and [X] to scroll through the images until the one specific file, or you can repeat steps 2 and 3 to delete another file. • You can exit this procedure by pressing [MENU]. 187 DELETING FILES DELETING FILES...
Deleting a Specific File 1. You can delete one for new files. Always make sure that a file delete operation cannot be deleted. In the PLAY mode, press [T] ( ). 2. Now you ... you really no longer need a file before deleting it. • A protected file cannot be undone. Use [W] and [X] to scroll through the images until the one specific file, or you can repeat steps 2 and 3 to delete another file. • You can exit this procedure by pressing [MENU]. 187 DELETING FILES DELETING FILES...

Owners Manual
Page 188
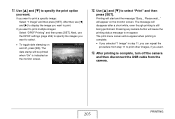
... all the snapshots currently in the FAVORITE folder. 1. Use [S] and [T] to select "All Files Delete" and then press [SET]. 3. Press [T] ( ). 5. Use the procedures under "Deleting a Specific File" and "Deleting All Files" to select "Yes". • To cancel the delete operation, select "No" instead of the files and displays the message "There...
... all the snapshots currently in the FAVORITE folder. 1. Use [S] and [T] to select "All Files Delete" and then press [SET]. 3. Press [T] ( ). 5. Use the procedures under "Deleting a Specific File" and "Deleting All Files" to select "Yes". • To cancel the delete operation, select "No" instead of the files and displays the message "There...
Owners Manual
Page 205
... if you want . 13. Use [S] and [T] to print. The message will start and the message "Busy... 11. Use [S] and [T] to print a specific image: Select "1 Image" and then press [SET]. If you want to specify the print option you want . Please wait..." Printing will disappear after a short while...turn off , press [BS]. will cause the printing status message to print multiple images: Select "DPOF Printing" and then press [SET]. Pressing any camera button will appear on the monitor screen. 12. If you want to re-appear. Next, use [W] and [X] to display the image you want...
... if you want . 13. Use [S] and [T] to print. The message will start and the message "Busy... 11. Use [S] and [T] to print a specific image: Select "1 Image" and then press [SET]. If you want to specify the print option you want . Please wait..." Printing will disappear after a short while...turn off , press [BS]. will cause the printing status message to print multiple images: Select "DPOF Printing" and then press [SET]. Pressing any camera button will appear on the monitor screen. 12. If you want to re-appear. Next, use [W] and [X] to display the image you want...
Owners Manual
Page 259
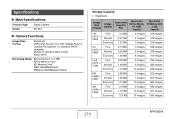
...) Fine Normal Economy 2.0 MB 1.15 MB 720 KB 5 images 10 images 16 images 483 images 841 images 1343 images 259 APPENDIX DCF (Design Rule for Camera File System) 1.0 standard; Specifications ■ Main Specifications Product Type Model Digital Camera EX-Z12 ■ Camera Functions Image Files Format Snapshots: JPEG (Exif Version 2.2);
...) Fine Normal Economy 2.0 MB 1.15 MB 720 KB 5 images 10 images 16 images 483 images 841 images 1343 images 259 APPENDIX DCF (Design Rule for Camera File System) 1.0 standard; Specifications ■ Main Specifications Product Type Model Digital Camera EX-Z12 ■ Camera Functions Image Files Format Snapshots: JPEG (Exif Version 2.2);