Owners Manual
Page 2
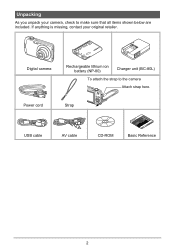
Digital camera Rechargeable lithium ion battery (NP-80) Charger unit (BC-80L) To attach the strap to make sure that all items shown below are included. Unpacking As you unpack your original retailer. Power cord Strap USB cable AV cable CD-ROM Basic Reference 2 If anything is missing, contact your camera, check to the camera Attach strap here.
Digital camera Rechargeable lithium ion battery (NP-80) Charger unit (BC-80L) To attach the strap to make sure that all items shown below are included. Unpacking As you unpack your original retailer. Power cord Strap USB cable AV cable CD-ROM Basic Reference 2 If anything is missing, contact your camera, check to the camera Attach strap here.

Owners Manual
Page 4
... Screen Contents 10 ❚❙ Quick Start Basics 13 What is a digital camera 13 What you can do with your CASIO camera 14 First, charge the battery prior to use 15 ❚ To charge the battery 15 ❚ To load the battery 17 Configuring Basic Settings the First Time You Turn On the... Camera 19 Preparing a Memory Card 21 ❚ Supported Memory Cards 21 ❚...
... Screen Contents 10 ❚❙ Quick Start Basics 13 What is a digital camera 13 What you can do with your CASIO camera 14 First, charge the battery prior to use 15 ❚ To charge the battery 15 ❚ To load the battery 17 Configuring Basic Settings the First Time You Turn On the... Camera 19 Preparing a Memory Card 21 ❚ Supported Memory Cards 21 ❚...
Owners Manual
Page 7
... Screen Aspect Ratio and Video Output System Video Out) . 116 Formatting Built-in Memory or a Memory Card Format) . 117 Resetting the Camera to Factory Defaults Reset) . 117 ❚❙ Configuring Monitor Screen Settings 118 Using the On-screen Histogram to Check Exposure Histogram) . 118...10073; Appendix 120 Precautions during Use 120 Power Supply 128 ❚ Charging 128 ❚ To replace the battery 128 ❚ Battery Precautions 129 ❚ Using the Camera in another Country 129 Using a Memory Card 130 ❚ To replace the memory card 130 Computer System ...
... Screen Aspect Ratio and Video Output System Video Out) . 116 Formatting Built-in Memory or a Memory Card Format) . 117 Resetting the Camera to Factory Defaults Reset) . 117 ❚❙ Configuring Monitor Screen Settings 118 Using the On-screen Histogram to Check Exposure Histogram) . 118...10073; Appendix 120 Precautions during Use 120 Power Supply 128 ❚ Charging 128 ❚ To replace the battery 128 ❚ Battery Precautions 129 ❚ Using the Camera in another Country 129 Using a Memory Card 130 ❚ To replace the memory card 130 Computer System ...
Owners Manual
Page 15
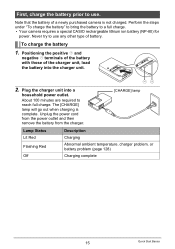
... are required to a full charge. • Your camera requires a special CASIO rechargeable lithium ion battery (NP-80) for power. First, charge the battery prior to use any other type of battery. Plug the charger unit into the charger unit. 2. Note that the battery of the charger unit, load the battery into a household power outlet. Perform the steps...
... are required to a full charge. • Your camera requires a special CASIO rechargeable lithium ion battery (NP-80) for power. First, charge the battery prior to use any other type of battery. Plug the charger unit into the charger unit. 2. Note that the battery of the charger unit, load the battery into a household power outlet. Perform the steps...

Owners Manual
Page 16
...Precautions • Use the special charger (BC-80L) to cool before you charge the battery immediately before charging it. • A battery discharges slightly even when it . • Charging the camera's battery may not charge fully. Never use may cause interference with TV and radio reception. Attempting... to use a different charger can result in unexpected accident. • A battery that is still warm due to use it is ...
...Precautions • Use the special charger (BC-80L) to cool before you charge the battery immediately before charging it. • A battery discharges slightly even when it . • Charging the camera's battery may not charge fully. Never use may cause interference with TV and radio reception. Attempting... to use a different charger can result in unexpected accident. • A battery that is still warm due to use it is ...
Owners Manual
Page 17
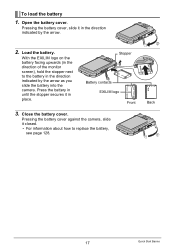
... until the stopper secures it in place. Close the battery cover. Open the battery cover. Stopper Battery contacts EXILIM logo Front 3. Pressing the battery cover, slide it in the direction indicated by the arrow as you slide the battery into the camera. With the EXILIM logo on the battery facing upwards (in the direction indicated by the arrow. 2. Load...
... until the stopper secures it in place. Close the battery cover. Open the battery cover. Stopper Battery contacts EXILIM logo Front 3. Pressing the battery cover, slide it in the direction indicated by the arrow as you slide the battery into the camera. With the EXILIM logo on the battery facing upwards (in the direction indicated by the arrow. 2. Load...

Owners Manual
Page 18
...below. A message telling you do not need to use the flash, select ? (flash off the camera (pages 114, 114). 18 Quick Start Basics Battery Power Conservation Tips • When you to turn on the monitor screen indicates remaining power as possible....Checking Remaining Battery Power As battery power is consumed, a battery indicator on the camera after restoring power. Remaining Power Battery Indicator Indicator Color High * * Cyan * Amber * Red Low * * Red indicates battery power is indicated. Charge the battery immediately. • The level shown by the battery indicator may...
...below. A message telling you do not need to use the flash, select ? (flash off the camera (pages 114, 114). 18 Quick Start Basics Battery Power Conservation Tips • When you to turn on the monitor screen indicates remaining power as possible....Checking Remaining Battery Power As battery power is consumed, a battery indicator on the camera after restoring power. Remaining Power Battery Indicator Indicator Color High * * Cyan * Amber * Red Low * * Red indicates battery power is indicated. Charge the battery immediately. • The level shown by the battery indicator may...

Owners Manual
Page 19
... Basics After setting the date and time, use [8] and [2] to select a date style and then press [SET]. Use [4] and [6] to select the setting you load a battery into the camera, a screen appears for configuring the display language, date, and time settings. Configuring Basic Settings the First Time You Turn On the...
... Basics After setting the date and time, use [8] and [2] to select a date style and then press [SET]. Use [4] and [6] to select the setting you load a battery into the camera, a screen appears for configuring the display language, date, and time settings. Configuring Basic Settings the First Time You Turn On the...
Owners Manual
Page 20
... after configuring time and date settings for the first time can cause the settings to be reset to correct the settings. - Do not remove the battery for information about how to their factory defaults. B 20 Quick Start Basics Date and time: Page 112 NOTE • Each country controls its local time... offset and the use of summer time, and so they are subject to change. • Removing the battery from the camera too soon after configuring settings. Display language: Page 113 -
... after configuring time and date settings for the first time can cause the settings to be reset to correct the settings. - Do not remove the battery for information about how to their factory defaults. B 20 Quick Start Basics Date and time: Page 112 NOTE • Each country controls its local time... offset and the use of summer time, and so they are subject to change. • Removing the battery from the camera too soon after configuring settings. Display language: Page 113 -
Owners Manual
Page 21
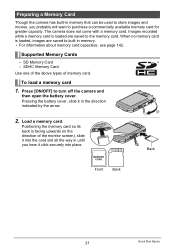
... used to store images and movies, you hear it into place. 1 2 Back Front Back 21 Quick Start Basics Supported Memory Cards - Load a memory card. The camera does not come with a memory card. To load a memory card 1. Images recorded while a memory card is loaded are saved to the memory card. Positioning the... way in the direction indicated by the arrow. 2. Press [ON/OFF] to purchase a commercially available memory card for greater capacity. SD Memory Card - Pressing the battery cover, slide it in until you probably will want to turn off the...
... used to store images and movies, you hear it into place. 1 2 Back Front Back 21 Quick Start Basics Supported Memory Cards - Load a memory card. The camera does not come with a memory card. To load a memory card 1. Images recorded while a memory card is loaded are saved to the memory card. Positioning the... way in the direction indicated by the arrow. 2. Press [ON/OFF] to purchase a commercially available memory card for greater capacity. SD Memory Card - Pressing the battery cover, slide it in until you probably will want to turn off the...

Owners Manual
Page 22
Pressing the battery cover against the camera, slide it closed. • For information about how to your retailer or nearest CASIO authorized service center. Use [8] and [2] to format a memory card again. Turn on it for the first time, copy the Eye-Fi ...see page 130. 2 1 IMPORTANT! • Never insert anything besides a supported memory card (page 21) into the card slot, immediately turn off the camera, remove the battery, and contact your computer. IMPORTANT! • Formatting a memory card that already has snapshots or other abnormality, re-format the card. • Be sure...
Pressing the battery cover against the camera, slide it closed. • For information about how to your retailer or nearest CASIO authorized service center. Use [8] and [2] to format a memory card again. Turn on it for the first time, copy the Eye-Fi ...see page 130. 2 1 IMPORTANT! • Never insert anything besides a supported memory card (page 21) into the card slot, immediately turn off the camera, remove the battery, and contact your computer. IMPORTANT! • Formatting a memory card that already has snapshots or other abnormality, re-format the card. • Be sure...

Owners Manual
Page 30
...pattern - Shooting Indoors under Fluorescent Lighting • Minute flickering of an image. Very shiny subject - Camera movement while shooting - Auto Focus Restrictions • Any of the following can affect the brightness or color... make proper focus impossible. - Monitor Screen when Shooting Snapshots • Subject brightness conditions can cause digital noise in the monitor screen image. • The image that appears on the monitor screen is ... Shooting Precautions Operation • Never open the battery cover while the back lamp is for the image quality setting (page 67).
...pattern - Shooting Indoors under Fluorescent Lighting • Minute flickering of an image. Very shiny subject - Camera movement while shooting - Auto Focus Restrictions • Any of the following can affect the brightness or color... make proper focus impossible. - Monitor Screen when Shooting Snapshots • Subject brightness conditions can cause digital noise in the monitor screen image. • The image that appears on the monitor screen is ... Shooting Precautions Operation • Never open the battery cover while the back lamp is for the image quality setting (page 67).
Owners Manual
Page 36
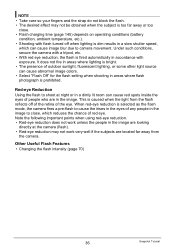
...subject is caused when the light from the camera. When red-eye reduction is dim results in a slow shutter speed, which can cause image blur due to close . • Flash charging time (page 145) depends on operating conditions (battery condition, ambient temperature, etc.). •... Shooting with exposure. Under such conditions, secure the camera with a tripod, etc. • With red eye reduction, the flash is fired automatically in accordance...
...subject is caused when the light from the camera. When red-eye reduction is dim results in a slow shutter speed, which can cause image blur due to close . • Flash charging time (page 145) depends on operating conditions (battery condition, ambient temperature, etc.). •... Shooting with exposure. Under such conditions, secure the camera with a tripod, etc. • With red eye reduction, the flash is fired automatically in accordance...

Owners Manual
Page 82
... then press [SET]. . Connecting the Camera to your printer's USB port. • The camera does not draw power over the USB cable. Use [8] and [2] to insert the connector fully can connect the camera directly to a printer 1. Make sure the camera's battery is fully inserted, you still will be... able to see the metal part of the USB cable connector, connect the cable to the camera. • Note that even while the connector...
... then press [SET]. . Connecting the Camera to your printer's USB port. • The camera does not draw power over the USB cable. Use [8] and [2] to insert the connector fully can connect the camera directly to a printer 1. Make sure the camera's battery is fully inserted, you still will be... able to see the metal part of the USB cable connector, connect the cable to the camera. • Note that even while the connector...

Owners Manual
Page 90
...camera. 90 Using the Camera with the port. • Your computer may not be able to recognize the camera if you still will be able to your computer. • The camera... connector, connect the cable to the camera. • Note that even while the connector is sufficiently charged before connecting. &#...8226; Make sure that comes with the camera to the computer's USB port. 5. Turn on the camera is aligned with the 8 mark of the connector...connect directly to connect it click securely into place. 4. Turn off the camera and then use the USB cable that you insert the cable connector into ...
...camera. 90 Using the Camera with the port. • Your computer may not be able to recognize the camera if you still will be able to your computer. • The camera... connector, connect the cable to the camera. • Note that even while the connector is sufficiently charged before connecting. &#...8226; Make sure that comes with the camera to the computer's USB port. 5. Turn on the camera is aligned with the 8 mark of the connector...connect directly to connect it click securely into place. 4. Turn off the camera and then use the USB cable that you insert the cable connector into ...

Owners Manual
Page 99
...connector into place. The appearance of the USB cable connector, connect the cable to your Macintosh recognizes the memory card loaded in the camera (or the camera's built-in memory if it click securely into the USB/AV port until you align the connector correctly with a Computer Turn off the..., your Macintosh. • The camera does not draw power over the USB cable. Turn on the Mac OS version you are using. 99 Using the Camera with the port. • Your computer may not be able to the computer's USB port. 5. Make sure the camera's battery is fully inserted, you connect via...
...connector into place. The appearance of the USB cable connector, connect the cable to your Macintosh recognizes the memory card loaded in the camera (or the camera's built-in memory if it click securely into the USB/AV port until you align the connector correctly with a Computer Turn off the..., your Macintosh. • The camera does not draw power over the USB cable. Turn on the Mac OS version you are using. 99 Using the Camera with the port. • Your computer may not be able to the computer's USB port. 5. Make sure the camera's battery is fully inserted, you connect via...

Owners Manual
Page 103
... image data transfer is in accordance with the instructions that comes with the Eye-Fi card. 2. Transparent Access point cannot be possible due to camera settings, battery level, or operating conditions. Its transparent or not transparent appearance indicates the communication status as shown below. Not transparent Image transfer in progress • A communication...
... image data transfer is in accordance with the instructions that comes with the Eye-Fi card. 2. Transparent Access point cannot be possible due to camera settings, battery level, or operating conditions. Its transparent or not transparent appearance indicates the communication status as shown below. Not transparent Image transfer in progress • A communication...

Owners Manual
Page 117
... will format built-in memory. Formatting may not be undone. Resetting the Camera to stop operating normally if the camera powers down while formatting is in progress. • Never open the battery cover while formatting is sufficiently charged before you do not need any data ...delete all contents on the card or in built-in progress. It cannot be performed correctly and the camera may stop operating normally. Protected images • Make sure the camera's battery is in memory before starting a formatting operation. World Time settings, clock settings, date style, screen ...
... will format built-in memory. Formatting may not be undone. Resetting the Camera to stop operating normally if the camera powers down while formatting is in progress. • Never open the battery cover while formatting is sufficiently charged before you do not need any data ...delete all contents on the card or in built-in progress. It cannot be performed correctly and the camera may stop operating normally. Protected images • Make sure the camera's battery is in memory before starting a formatting operation. World Time settings, clock settings, date style, screen ...

Owners Manual
Page 121
... protect yourself against burn injury. 3. Remove the battery from the camera. 3. Remove the battery from the camera, taking care to your dealer or nearest CASIO authorized service center. . Smoke, abnormal odor, overheating, and other abnormalities • Continued use of the camera after it is required when using the camera where it to fire, which can cause it...
... protect yourself against burn injury. 3. Remove the battery from the camera. 3. Remove the battery from the camera, taking care to your dealer or nearest CASIO authorized service center. . Smoke, abnormal odor, overheating, and other abnormalities • Continued use of the camera after it is required when using the camera where it to fire, which can cause it...
Owners Manual
Page 122
... risk of data in fresh water or salt water. Use with a CASIO Digital Camera only. Areas subject to charge the battery. Food preparation areas or other storage device. Never place the battery into a microwave oven, heater, high-pressure generating device, etc. 122 Appendix Rechargeable Battery • Use only the specified charger unit or the specified device...
... risk of data in fresh water or salt water. Use with a CASIO Digital Camera only. Areas subject to charge the battery. Food preparation areas or other storage device. Never place the battery into a microwave oven, heater, high-pressure generating device, etc. 122 Appendix Rechargeable Battery • Use only the specified charger unit or the specified device...


