Owners Manual
Page 2
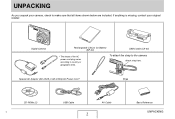
To attach the strap to make sure that all items shown below are included. UNPACKING As you unpack your original retailer. Digital Camera Rechargeable Lithium Ion Battery (NP-20) USB Cradle (CA-34) * The shape of the AC power cord plug varies according to country or geographic area. Special AC Adaptor (AD-C52S or AD-C52G)/AC Power Cord * Strap CD-ROMs (2) C USB Cable 2 AV Cable Basic Reference UNPACKING If anything is missing, contact your camera, check to the camera. Attach strap here.
To attach the strap to make sure that all items shown below are included. UNPACKING As you unpack your original retailer. Digital Camera Rechargeable Lithium Ion Battery (NP-20) USB Cradle (CA-34) * The shape of the AC power cord plug varies according to country or geographic area. Special AC Adaptor (AD-C52S or AD-C52G)/AC Power Cord * Strap CD-ROMs (2) C USB Cable 2 AV Cable Basic Reference UNPACKING If anything is missing, contact your camera, check to the camera. Attach strap here.

Owners Manual
Page 3
CONTENTS UNPACKING 2 QUICK START BASICS 10 First, charge the battery 10 Configuring Display Language, Date, and Time Settings 12 Using a Memory Card 14 Shooting a Snapshot 16 Viewing Snapshots 18 Shooting a Movie 19 Viewing a Movie 20 Deleting a File 21 ... Battery 37 ■ To load the battery 37 ■ To charge the battery 38 ■ Replacing the Battery 42 ■ Battery Precautions 42 Turning Power On and Off 43 Using a Memory Card 46 ■ Loading a Memory Card into the Camera 48 ■ Replacing the Memory Card 49 ■ Formatting a Memory Card ...
CONTENTS UNPACKING 2 QUICK START BASICS 10 First, charge the battery 10 Configuring Display Language, Date, and Time Settings 12 Using a Memory Card 14 Shooting a Snapshot 16 Viewing Snapshots 18 Shooting a Movie 19 Viewing a Movie 20 Deleting a File 21 ... Battery 37 ■ To load the battery 37 ■ To charge the battery 38 ■ Replacing the Battery 42 ■ Battery Precautions 42 Turning Power On and Off 43 Using a Memory Card 46 ■ Loading a Memory Card into the Camera 48 ■ Replacing the Memory Card 49 ■ Formatting a Memory Card ...

Owners Manual
Page 10
Open the battery cover. Load the battery into the Camera 1. While pressing lightly on the cover, slide it in the direction indicated by the arrow to open. 2. QUICK START BASICS First, charge the battery ■ Loading the Battery into the camera. 3. Close the battery cover. (page 37) QUICK START BASICS 10
Open the battery cover. Load the battery into the Camera 1. While pressing lightly on the cover, slide it in the direction indicated by the arrow to open. 2. QUICK START BASICS First, charge the battery ■ Loading the Battery into the camera. 3. Close the battery cover. (page 37) QUICK START BASICS 10

Owners Manual
Page 14
.... While pressing lightly on the cover, slide it clicks securely into place. 3. Open the battery cover. QUICK START BASICS 14 If you shoot on page 16. 1. NOTE • Though the camera has built-in memory, using a memory card provides additional capacity you can use to store more images, high-quality and large-size...
.... While pressing lightly on the cover, slide it clicks securely into place. 3. Open the battery cover. QUICK START BASICS 14 If you shoot on page 16. 1. NOTE • Though the camera has built-in memory, using a memory card provides additional capacity you can use to store more images, high-quality and large-size...

Owners Manual
Page 23
... copies (page 205) • Timestamp feature that supports one of these standards, without a computer (page 202) ■ Multi-function USB Cradle You can place the camera on the TV screen (page 151) - Connection to a TV for easy at-home printing on a printer that stamps the date into the image data (page... 131) • Support for PictBridge for viewing on the USB cradle to perform the following operations. - Photo Stand slideshow of images (page 149) - Battery charging (page 37) -
... copies (page 205) • Timestamp feature that supports one of these standards, without a computer (page 202) ■ Multi-function USB Cradle You can place the camera on the TV screen (page 151) - Connection to a TV for easy at-home printing on a printer that stamps the date into the image data (page... 131) • Support for PictBridge for viewing on the USB cradle to perform the following operations. - Photo Stand slideshow of images (page 149) - Battery charging (page 37) -
Owners Manual
Page 28
...cracked, never touch any devices that are using battery power, remove the battery from the wall outlet. Improper use creates the risk of serious accident. ■ Smoke, abnormal odor, overheating, and other abnormalities • Continued use with this camera into your eyes or onto your skin, ...mouth, immediately rinse your mouth out and contact your dealer or nearest CASIO authorized service center. If you are not specified for use of fire and electric shock. ■ Transport • Never operate the camera inside the panel. If you are present. 1. Doing so creates ...
...cracked, never touch any devices that are using battery power, remove the battery from the wall outlet. Improper use creates the risk of serious accident. ■ Smoke, abnormal odor, overheating, and other abnormalities • Continued use with this camera into your eyes or onto your skin, ...mouth, immediately rinse your mouth out and contact your dealer or nearest CASIO authorized service center. If you are not specified for use of fire and electric shock. ■ Transport • Never operate the camera inside the panel. If you are present. 1. Doing so creates ...
Owners Manual
Page 29
...are using the AC adaptor to power the camera, unplug it from the camera. 3. Particular care is required when using battery power, remove the battery from the wall outlet. If you are present. 1. Contact your dealer or nearest CASIO authorized service center. ■ Dropping and ...Rough Treatment • Continued use of the camera after it to explode and creates the risk...
...are using the AC adaptor to power the camera, unplug it from the camera. 3. Particular care is required when using battery power, remove the battery from the wall outlet. If you are present. 1. Contact your dealer or nearest CASIO authorized service center. ■ Dropping and ...Rough Treatment • Continued use of the camera after it to explode and creates the risk...
Owners Manual
Page 30
...30 Near heaters, on a high shelf, etc. Doing so can be deleted in the case of camera malfunction, repair, etc. ■ Memory Protection • Whenever replacing the battery, be sure to follow the correct procedure as described in fresh water or salt water. Doing so ...to leave all internal inspection, maintenance, and repair up to your dealer or nearest CASIO authorized service center. ■ Locations To Be Avoided • Never leave the camera in camera memory. ■ Rechargeable Battery • Use only the specified charger unit or the specified device to fall, creating...
...30 Near heaters, on a high shelf, etc. Doing so can be deleted in the case of camera malfunction, repair, etc. ■ Memory Protection • Whenever replacing the battery, be sure to follow the correct procedure as described in fresh water or salt water. Doing so ...to leave all internal inspection, maintenance, and repair up to your dealer or nearest CASIO authorized service center. ■ Locations To Be Avoided • Never leave the camera in camera memory. ■ Rechargeable Battery • Use only the specified charger unit or the specified device to fall, creating...
Owners Manual
Page 31
..., discoloration, deformation, or any other abnormal condition while using, charging, or storing a battery, immediately remove it from the camera or charger unit and keep it with items that can damage your eyes accidentally, immediately rinse them with a CASIO Digital Camera only. • This battery is connected to the charger unit. - Continued charging creates the risk of...
..., discoloration, deformation, or any other abnormal condition while using, charging, or storing a battery, immediately remove it from the camera or charger unit and keep it with items that can damage your eyes accidentally, immediately rinse them with a CASIO Digital Camera only. • This battery is connected to the charger unit. - Continued charging creates the risk of...
Owners Manual
Page 32
... documentation that comes with the camera and special charger unit before using or charging the battery. • If a battery is shared by young children, make sure that are specified for this camera. - Use only the AC adaptor specified for use with battery fluid can cause it to ... - Never try to modify the AC adaptor or subject it to devices that they handle battery correctly. • Should fluid from a battery accidentally get onto clothing or your dealer or nearest CASIO authorized service center. Never plug the power cord into a shared extension cord. • Misuse...
... documentation that comes with the camera and special charger unit before using or charging the battery. • If a battery is shared by young children, make sure that are specified for this camera. - Use only the AC adaptor specified for use with battery fluid can cause it to ... - Never try to modify the AC adaptor or subject it to devices that they handle battery correctly. • Should fluid from a battery accidentally get onto clothing or your dealer or nearest CASIO authorized service center. Never plug the power cord into a shared extension cord. • Misuse...

Owners Manual
Page 34
... camera, removing the memory card from the camera or placing the camera onto or removing it from the USB cradle - Any of the following creates the risk of corruption of operation. They do not guarantee that the camera is about to turn off due to battery leakage and data corruption. ■ Data Error Precautions • Your digital camera...
... camera, removing the memory card from the camera or placing the camera onto or removing it from the USB cradle - Any of the following creates the risk of corruption of operation. They do not guarantee that the camera is about to turn off due to battery leakage and data corruption. ■ Data Error Precautions • Your digital camera...
Owners Manual
Page 35
... notice some distortion in certain types of images, such as when the camera is moved from both the battery and USB cradle). If this camera. Inside of battery is not supported. • The camera does not have a separate battery for a few hours. ■ Power Supply • Use only the... special rechargeable lithium ion battery (NP-20) to power this happens, be straight. ...
... notice some distortion in certain types of images, such as when the camera is moved from both the battery and USB cradle). If this camera. Inside of battery is not supported. • The camera does not have a separate battery for a few hours. ■ Power Supply • Use only the... special rechargeable lithium ion battery (NP-20) to power this happens, be straight. ...

Owners Manual
Page 37
... indicated by the arrow as you slide the battery into the camera. With the EXILIM logo on the battery facing upwards (in the direction indicated by the arrow. 2. GETTING READY Charging the Battery Your camera is not supported. To load the battery 1. Open the battery cover. Load the battery into the camera. NP-20 Stopper GETTING READY 37 IMPORTANT! •...
... indicated by the arrow as you slide the battery into the camera. With the EXILIM logo on the battery facing upwards (in the direction indicated by the arrow. 2. GETTING READY Charging the Battery Your camera is not supported. To load the battery 1. Open the battery cover. Load the battery into the camera. NP-20 Stopper GETTING READY 37 IMPORTANT! •...
Owners Manual
Page 38
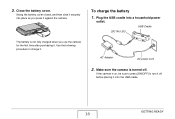
To charge the battery 1. If the camera is not fully charged when you press it . 3. Swing the battery cover closed, and then slide it securely into a household power outlet. GETTING READY 38 The battery is on, be sure to press [ON/OFF] to charge it against the camera. Use the following procedure to turn it off . USB Cradle [DC IN 5.3V] AC Adaptor AC power cord 2. Make sure the camera is turned off before placing it . Close the battery cover. Plug the USB cradle into place as you use the camera for the first time after purchasing it onto the USB cradle.
To charge the battery 1. If the camera is not fully charged when you press it . 3. Swing the battery cover closed, and then slide it securely into a household power outlet. GETTING READY 38 The battery is on, be sure to press [ON/OFF] to charge it against the camera. Use the following procedure to turn it off . USB Cradle [DC IN 5.3V] AC Adaptor AC power cord 2. Make sure the camera is turned off before placing it . Close the battery cover. Plug the USB cradle into place as you use the camera for the first time after purchasing it onto the USB cradle.

Owners Manual
Page 39
...cannot be performed, the [CHARGE] lamp will go. [CHARGE] lamp Camera contact When charging is too hot or too cold. Actual charging time depends on current battery capacity, remaining power, and charging conditions. Remove the camera from the USB cradle and unplug the AC power cord from the power... outlet. GETTING READY 39 3. Cradle contact Carefully insert the camera as far as shown in your location is...
...cannot be performed, the [CHARGE] lamp will go. [CHARGE] lamp Camera contact When charging is too hot or too cold. Actual charging time depends on current battery capacity, remaining power, and charging conditions. Remove the camera from the USB cradle and unplug the AC power cord from the power... outlet. GETTING READY 39 3. Cradle contact Carefully insert the camera as far as shown in your location is...
Owners Manual
Page 40
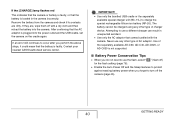
...steps, it could mean that comes bundled with a dry cloth and then reload the battery into the power outlet and the USB cradle, set the camera on the cradle again. Contact your nearest CASIO authorized service center. After confirming that the AC adaptor is loaded in unexpected accident. &#...8226; Use only the AC adaptor that the battery is not supported. ■ Battery Power Conservation Tips • When ...
...steps, it could mean that comes bundled with a dry cloth and then reload the battery into the power outlet and the USB cradle, set the camera on the cradle again. Contact your nearest CASIO authorized service center. After confirming that the AC adaptor is loaded in unexpected accident. &#...8226; Use only the AC adaptor that the battery is not supported. ■ Battery Power Conservation Tips • When ...
Owners Manual
Page 41
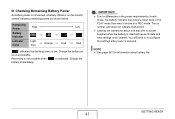
... restored. This is normal, and does not indicate malfunction. • Leaving the camera for information about one day with no power supplied while the battery is dead will have to differences in the power requirements of each mode, the battery indicator may show a lower level in the PLAY mode than what it shows...
... restored. This is normal, and does not indicate malfunction. • Leaving the camera for information about one day with no power supplied while the battery is dead will have to differences in the power requirements of each mode, the battery indicator may show a lower level in the PLAY mode than what it shows...
Owners Manual
Page 42
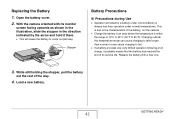
... outside this temperature range can cause charging to 95°F). GETTING READY 42 With the camera oriented with a new one. 3. Load a new battery. While still holding the stopper, pull the battery out the rest of the way. 4. Stopper Battery Precautions ■ Precautions during Use • Operation provided by the arrow and hold it probably...
... outside this temperature range can cause charging to 95°F). GETTING READY 42 With the camera oriented with a new one. 3. Load a new battery. While still holding the stopper, pull the battery out the rest of the way. 4. Stopper Battery Precautions ■ Precautions during Use • Operation provided by the arrow and hold it probably...

Owners Manual
Page 43
... go dead, which will require longer charging when you are not using it to deteriorate. - If you do not plan to use a battery for some time, fully use the camera. - Store batteries in a cool, dry place (20°C (68°F) or lower). Operation Lamp [ON/OFF] (Power) [ ] (PLAY) [ ...] (REC) GETTING READY 43 Always remove the battery from the camera when you need to light green momentarily and turns on and enter the REC mode Press [ON/OFF] (Power) or [ ] (REC). ■ Storage Precautions...
... go dead, which will require longer charging when you are not using it to deteriorate. - If you do not plan to use a battery for some time, fully use the camera. - Store batteries in a cool, dry place (20°C (68°F) or lower). Operation Lamp [ON/OFF] (Power) [ ] (PLAY) [ ...] (REC) GETTING READY 43 Always remove the battery from the camera when you need to light green momentarily and turns on and enter the REC mode Press [ON/OFF] (Power) or [ ] (REC). ■ Storage Precautions...

Owners Manual
Page 45
...Note that the Sleep feature does not operate in the PLAY mode. 30 sec 1 min 2 min Off Power it turned off (goes into the camera, a screen appears for configuring screen text language, date, and time settings. Use [W] and [X] to turn the monitor screen back on. Feature ... [MENU]. 2. Use [S] and [T] to select the item you can change the settings (pages 192, 196). ■ Battery Power Conservation Features The camera is preformed for conserving battery power, as described below. GETTING READY 45 IMPORTANT! • Failure to set the date and time will cause the wrong date...
...Note that the Sleep feature does not operate in the PLAY mode. 30 sec 1 min 2 min Off Power it turned off (goes into the camera, a screen appears for configuring screen text language, date, and time settings. Use [W] and [X] to turn the monitor screen back on. Feature ... [MENU]. 2. Use [S] and [T] to select the item you can change the settings (pages 192, 196). ■ Battery Power Conservation Features The camera is preformed for conserving battery power, as described below. GETTING READY 45 IMPORTANT! • Failure to set the date and time will cause the wrong date...


