Owners Manual
Page 2
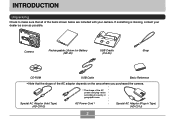
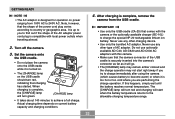
... * The shape of the items shown below are included with your dealer as soon as possible. If something is missing, contact your camera. Camera Rechargeable Lithium Ion Battery (NP-20) USB Cradle (CA-25) Strap CD-ROM USB Cable Basic Reference • Note that all of the AC power cord plug varies according... to make sure that the shape of the AC adaptor depends on the area where you purchased the camera. AC Power Cord * Special AC...
... * The shape of the items shown below are included with your dealer as soon as possible. If something is missing, contact your camera. Camera Rechargeable Lithium Ion Battery (NP-20) USB Cradle (CA-25) Strap CD-ROM USB Cable Basic Reference • Note that all of the AC power cord plug varies according... to make sure that the shape of the AC adaptor depends on the area where you purchased the camera. AC Power Cord * Special AC...
Owners Manual
Page 3
... image 18 To view a recorded image 19 To delete an image 19 20 GETTING READY About This Manual 20 General Guide 21 Camera 21 USB Cradle 23 Monitor Screen Contents 24 Changing the Contents of the Monitor Screen 26 Attaching the Strap 28 Power Requirements 29 Loading and Removing...clock settings 45 48 BASIC IMAGE RECORDING Recording an Image 48 Specifying the Recording Mode 48 Aiming the Camera 49 Recording an Image 50 Using Zoom 54 Optical Zoom 54 Digital Zoom 56 Using the Flash 58 Flash Unit Status 59 Changing the Flash Intensity Setting 60 Using Flash...
... image 18 To view a recorded image 19 To delete an image 19 20 GETTING READY About This Manual 20 General Guide 21 Camera 21 USB Cradle 23 Monitor Screen Contents 24 Changing the Contents of the Monitor Screen 26 Attaching the Strap 28 Power Requirements 29 Loading and Removing...clock settings 45 48 BASIC IMAGE RECORDING Recording an Image 48 Specifying the Recording Mode 48 Aiming the Camera 49 Recording an Image 50 Using Zoom 54 Optical Zoom 54 Digital Zoom 56 Using the Flash 58 Flash Unit Status 59 Changing the Flash Intensity Setting 60 Using Flash...
Owners Manual
Page 10
...-screen histogram lets you adjust exposure as you wait for the camera to Auto Focus. • Support for SD memory cards and MMC (MultiMedia Cards) for memory expansion (page 145) • Bundled with a USB Cradle (pages 31, 118, 155, 159) The bundled USB cradle can also have a specific image appear, or a movie or audio file...
...-screen histogram lets you adjust exposure as you wait for the camera to Auto Focus. • Support for SD memory cards and MMC (MultiMedia Cards) for memory expansion (page 145) • Bundled with a USB Cradle (pages 31, 118, 155, 159) The bundled USB cradle can also have a specific image appear, or a movie or audio file...
Owners Manual
Page 14
Removing the battery or memory card, or setting the camera onto the USB cradle while the camera is being performed - Removing the battery, removing the memory card, or placing the camera onto the USB cradle while the operation lamp is still flashing green after you first record a number of test ...14 In areas subject to temperature extremes - Inside of data in the following areas. - Before using precision digital components. Disconnecting the USB cable, removing the camera from the USB cradle, or disconnecting the AC adaptor from 0°C to 40°C (32°F to appear on the ...
Removing the battery or memory card, or setting the camera onto the USB cradle while the camera is being performed - Removing the battery, removing the memory card, or placing the camera onto the USB cradle while the operation lamp is still flashing green after you first record a number of test ...14 In areas subject to temperature extremes - Inside of data in the following areas. - Before using precision digital components. Disconnecting the USB cable, removing the camera from the USB cradle, or disconnecting the AC adaptor from 0°C to 40°C (32°F to appear on the ...
Owners Manual
Page 16
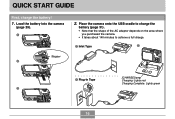
Place the camera onto the USB cradle to charge the battery (page 31). • Note that the shape of the AC adaptor depends on the area where you purchased the camera. • It takes about 140 minutes to achieve a full charge. 1 Inlet Type 2 Stopper 2 1 Plug-in Type [CHARGE] lamp Charging: Lights red Charging Complete: Lights green 3 16 Load the battery into the camera (page 29). 1 2. QUICK START GUIDE QUICK START GUIDE First, charge the battery! 1.
Place the camera onto the USB cradle to charge the battery (page 31). • Note that the shape of the AC adaptor depends on the area where you purchased the camera. • It takes about 140 minutes to achieve a full charge. 1 Inlet Type 2 Stopper 2 1 Plug-in Type [CHARGE] lamp Charging: Lights red Charging Complete: Lights green 3 16 Load the battery into the camera (page 29). 1 2. QUICK START GUIDE QUICK START GUIDE First, charge the battery! 1.
Owners Manual
Page 23
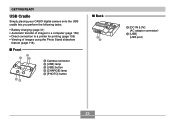
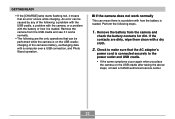
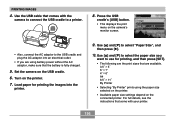
GETTING READY USB Cradle Simply placing your CASIO digital camera onto the USB cradle lets you perform the following tasks. • Battery charging (page 31) • Automatic transfer of images to a computer (page 159) • Direct connection to a printer for printing (page 155) • Viewing of images using the Photo Stand slideshow feature (page 118). I Front 2 13 54 1 Camera connector 2 [USB] lamp 3 [USB] button 4 [CHARGE] lamp 5 [PHOTO] button I Back 6 7 6 [DC IN 5.3V] (AC adaptor connector) 7 [USB] (USB port) 23
GETTING READY USB Cradle Simply placing your CASIO digital camera onto the USB cradle lets you perform the following tasks. • Battery charging (page 31) • Automatic transfer of images to a computer (page 159) • Direct connection to a printer for printing (page 155) • Viewing of images using the Photo Stand slideshow feature (page 118). I Front 2 13 54 1 Camera connector 2 [USB] lamp 3 [USB] button 4 [CHARGE] lamp 5 [PHOTO] button I Back 6 7 6 [DC IN 5.3V] (AC adaptor connector) 7 [USB] (USB port) 23
Owners Manual
Page 31
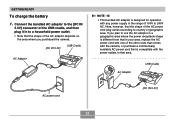
... power outlets in your area, replace the AC power cord with one of 100V to country or geographic area. If you purchased the camera. [DC IN 5.3V] USB Cradle AC Adaptor NOTE • The bundled AC adaptor is designed for operation with any power supply in the range of the other ones... that comes with the camera, or purchase a commercially available AC power cord that is different from that in that the shape of the AC power cord plug varies according to 240V AC. USB Cradle AC Adaptor AC power cord [DC IN 5.3V] 31 Note, however...
... power outlets in your area, replace the AC power cord with one of 100V to country or geographic area. If you purchased the camera. [DC IN 5.3V] USB Cradle AC Adaptor NOTE • The bundled AC adaptor is designed for operation with any power supply in the range of the other ones... that comes with the camera, or purchase a commercially available AC power cord that is different from that in that the shape of the AC power cord plug varies according to 240V AC. USB Cradle AC Adaptor AC power cord [DC IN 5.3V] 31 Note, however...
Owners Manual
Page 32
...started. Never use any other charging device. • Use only the bundled AC adaptor. Set the camera onto the USB cradle. • Do not place the camera onto the USB cradle while it is complete, remove the camera from 100V AC to country or geographic area. After charging is turned on. • The [... or too cold where you to find out if the shape of AC adaptor. Turn off the camera. 3. If this camera. • Make sure that the shape of the USB cradle is securely inserted into the camera's connector as far as it is complete, the [CHARGE] lamp will go. • The [CHARGE...
...started. Never use any other charging device. • Use only the bundled AC adaptor. Set the camera onto the USB cradle. • Do not place the camera onto the USB cradle while it is complete, remove the camera from 100V AC to country or geographic area. After charging is turned on. • The [... or too cold where you to find out if the shape of AC adaptor. Turn off the camera. 3. If this camera. • Make sure that the shape of the USB cradle is securely inserted into the camera's connector as far as it is complete, the [CHARGE] lamp will go. • The [CHARGE...
Owners Manual
Page 33
...is a problem with the battery or how it means that an error occurs while charging. Perform the following : a problem with the USB cradle, a problem with the camera, or a problem with how the battery is loaded. GETTING READY • If the [CHARGE] lamp starts flashing red, it is loaded.... and USB cradle. • If the same symptoms occur again when you place the camera on the USB cradle: charging of the following steps. 1. If the contacts are the only operations that the AC adaptor's power cord is on the USB cradle after taking the above steps, contact a CASIO authorized service ...
...is a problem with the battery or how it means that an error occurs while charging. Perform the following : a problem with the USB cradle, a problem with the camera, or a problem with how the battery is loaded. GETTING READY • If the [CHARGE] lamp starts flashing red, it is loaded.... and USB cradle. • If the same symptoms occur again when you place the camera on the USB cradle: charging of the following steps. 1. If the contacts are the only operations that the AC adaptor's power cord is on the USB cradle after taking the above steps, contact a CASIO authorized service ...
Owners Manual
Page 36
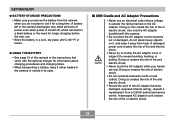
...I Battery Handling Precautions G SAFETY PRECAUTIONS Be sure to charge the special NP-20 rechargeable lithium ion battery. Do not immerse the battery in this camera. - GETTING READY Power Supply Precautions Note the following precautions when handling or using the battery creates the risk of overheating, fire, and explosion.... - Never use the battery to power any other than this manual refers to the CASIO NP-20 Rechargeable Lithium Ion Battery. • Use only the USB cradle (CA-25) that can conduct electricity (necklaces, pencil lead, etc.) -
...I Battery Handling Precautions G SAFETY PRECAUTIONS Be sure to charge the special NP-20 rechargeable lithium ion battery. Do not immerse the battery in this camera. - GETTING READY Power Supply Precautions Note the following precautions when handling or using the battery creates the risk of overheating, fire, and explosion.... - Never use the battery to power any other than this manual refers to the CASIO NP-20 Rechargeable Lithium Ion Battery. • Use only the USB cradle (CA-25) that can conduct electricity (necklaces, pencil lead, etc.) -
Owners Manual
Page 37
Should battery fluid get onto clothing or your eyes. Never use with this CASIO digital camera only. • Use only the USB cradle that comes with the camera or the specified optional charger to be used by young children, make sure that a responsible adult makes them with clean tap ... your skin, immediately rinse it off with the optional charger before using , charging, or storing a battery, immediately remove it from the camera or charger, and keep it away from the battery accidentally get into your eyes accidentally, immediately rinse them aware of the precautions and proper...
Should battery fluid get onto clothing or your eyes. Never use with this CASIO digital camera only. • Use only the USB cradle that comes with the camera or the specified optional charger to be used by young children, make sure that a responsible adult makes them with clean tap ... your skin, immediately rinse it off with the optional charger before using , charging, or storing a battery, immediately remove it from the camera or charger, and keep it away from the battery accidentally get into your eyes accidentally, immediately rinse them aware of the precautions and proper...
Owners Manual
Page 38
A damaged AC adaptor cord creates the risk of fire or electric shock. Doing so can lead to use it away from a CASIO authorized service center. Doing so creates the risk of electric shock. • Do not overload extension cords or wall outlets. Doing so creates the ... shock. 38 Doing so creates the risk of fire and electric shock. • Should the cord of this camera. • Do not allow the AC adaptor cord to severe bending, twisting, or pulling. I USB Cradle and AC Adaptor Precautions Caution! • Never use . • Store the battery in a cool, dry place (...
A damaged AC adaptor cord creates the risk of fire or electric shock. Doing so can lead to use it away from a CASIO authorized service center. Doing so creates the risk of electric shock. • Do not overload extension cords or wall outlets. Doing so creates the ... shock. 38 Doing so creates the risk of fire and electric shock. • Should the cord of this camera. • Do not allow the AC adaptor cord to severe bending, twisting, or pulling. I USB Cradle and AC Adaptor Precautions Caution! • Never use . • Store the battery in a cool, dry place (...
Owners Manual
Page 39
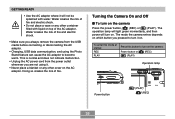
... depends on which button you are not using the Photo Stand feature can cause the AC adaptor to turn on the camera Press the power button, [ ] (REC) or [ ] (PLAY). The operation lamp will light green momentarily, and then power will not be splashed with liquid on top ... a vase or any other container filled with water. This is normal and does not indicate malfunction. • Unplug the AC power cord from the USB cradle before connecting or disconnecting the AC adaptor. • Charging, USB data communication, and using it. • Never place a blanket or any other cover on the...
... depends on which button you are not using the Photo Stand feature can cause the AC adaptor to turn on the camera Press the power button, [ ] (REC) or [ ] (PLAY). The operation lamp will light green momentarily, and then power will not be splashed with liquid on top ... a vase or any other container filled with water. This is normal and does not indicate malfunction. • Unplug the AC power cord from the USB cradle before connecting or disconnecting the AC adaptor. • Charging, USB data communication, and using it. • Never place a blanket or any other cover on the...
Owners Manual
Page 41
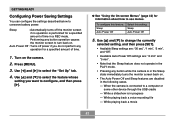
... select the feature whose setting you do not perform any button operation causes the monitor screen to a computer or some other device through the USB cradle - Sleep : Automatically turns off power if you want to use menus. To configure this feature: Sleep Auto Power Off Select this setting: Sleep ...Auto Power Off 5. When the camera is in the Sleep state immediately turns the monitor screen back on. • The Auto Power Off and Sleep features are : "2 min" and "5 min...
... select the feature whose setting you do not perform any button operation causes the monitor screen to a computer or some other device through the USB cradle - Sleep : Automatically turns off power if you want to use menus. To configure this feature: Sleep Auto Power Off Select this setting: Sleep ...Auto Power Off 5. When the camera is in the Sleep state immediately turns the monitor screen back on. • The Auto Power Off and Sleep features are : "2 min" and "5 min...
Owners Manual
Page 45
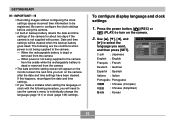
... (page 138) settings. The following procedure, you will need to use the camera's menu to turn on the camera. 2. Be sure to the camera. - When power is not being supplied to the camera from the cradle while the rechargeable battery is not being supplied to configure the clock settings before ...using the camera. • A built-in backup battery retains the date and time settings of the camera for about two days if the camera is dead or removed...
... (page 138) settings. The following procedure, you will need to use the camera's menu to turn on the camera. 2. Be sure to the camera. - When power is not being supplied to the camera from the cradle while the rechargeable battery is not being supplied to configure the clock settings before ...using the camera. • A built-in backup battery retains the date and time settings of the camera for about two days if the camera is dead or removed...

Owners Manual
Page 53
... eye. I Recording Precautions • Never open the battery cover or place the camera onto the USB cradle while the operation lamp is selected for the ISO sensitivity setting (page 99), the camera increases sensitivity and uses a slower shutter speed. Polished metal or other horizontally repeating ...types of this, you need to guard against this, use your free hand to work well if the camera is selected for some digital noise (graininess) to the memory card. • Fluorescent lighting actually flickers at a frequency that are varying distances from the light. Venetian ...
... eye. I Recording Precautions • Never open the battery cover or place the camera onto the USB cradle while the operation lamp is selected for the ISO sensitivity setting (page 99), the camera increases sensitivity and uses a slower shutter speed. Polished metal or other horizontally repeating ...types of this, you need to guard against this, use your free hand to work well if the camera is selected for some digital noise (graininess) to the memory card. • Fluorescent lighting actually flickers at a frequency that are varying distances from the light. Venetian ...
Owners Manual
Page 118
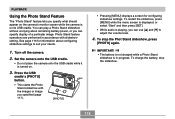
Turn off the camera. 2. To restart the slideshow, press [MENU] while the menu screen is displayed, or select "Start" and then press [SET]. • While audio is playing, you can specify display of a particular image. Press the USB cradle's [PHOTO] button. • This starts the Photo Stand...772;] to suit your needs. 1. See page 116 for configuring slideshow settings. Set the camera onto the USB cradle. • Do not place the camera onto the USB cradle while it is turned on its USB cradle. IMPORTANT! • The battery is not charged while a Photo Stand slideshow is in ...
Turn off the camera. 2. To restart the slideshow, press [MENU] while the menu screen is displayed, or select "Start" and then press [SET]. • While audio is playing, you can specify display of a particular image. Press the USB cradle's [PHOTO] button. • This starts the Photo Stand...772;] to suit your needs. 1. See page 116 for configuring slideshow settings. Set the camera onto the USB cradle. • Do not place the camera onto the USB cradle while it is turned on its USB cradle. IMPORTANT! • The battery is not charged while a Photo Stand slideshow is in ...
Owners Manual
Page 130
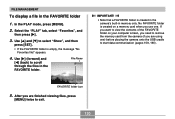
...Select the " PLAY" tab, select " Favorites" , and then press [̈]. 3. File Name IMPORTANT! • Note that a FAVORITE folder is created in the camera's built-in the FAVORITE folder 1. Use [̆] and [̄] to start data communication (pages 159, 165). No FAVORITE folder is empty, the message "No Favorites... display a file in memory only. If you want to view the contents of the FAVORITE folder on a memory card when you use one ) before placing the camera onto the USB cradle to select " Show" , and then press [SET]. • If the FAVORITE folder is created on your computer...
...Select the " PLAY" tab, select " Favorites" , and then press [̈]. 3. File Name IMPORTANT! • Note that a FAVORITE folder is created in the camera's built-in the FAVORITE folder 1. Use [̆] and [̄] to start data communication (pages 159, 165). No FAVORITE folder is empty, the message "No Favorites... display a file in memory only. If you want to view the contents of the FAVORITE folder on a memory card when you use one ) before placing the camera onto the USB cradle to select " Show" , and then press [SET]. • If the FAVORITE folder is created on your computer...

Owners Manual
Page 137
... place of the following conditions exists. - After all the settings are the way you want to select the scene you stop it ), and then the camera will sound for about one of [DISP] if you want, press [SET]. IMPORTANT! • Note that the alarm does not sound if the alarm time... - NOTE • When an alarm time is reached while the camera is in progress 137 While a USB data communication operation is turned off, the alarm will turn on the USB cradle when an alarm sounds, you can stop it by pressing the USB cradle [USB] button or [PHOTO] button, or any button. Use...
... place of the following conditions exists. - After all the settings are the way you want to select the scene you stop it ), and then the camera will sound for about one of [DISP] if you want, press [SET]. IMPORTANT! • Note that the alarm does not sound if the alarm time... - NOTE • When an alarm time is reached while the camera is in progress 137 While a USB data communication operation is turned off, the alarm will turn on the USB cradle when an alarm sounds, you can stop it by pressing the USB cradle [USB] button or [PHOTO] button, or any button. Use...
Owners Manual
Page 156
... 11˝ By Printer • Selecting "By Printer" prints using battery power without the AC adaptor, make sure that come with the camera to connect the USB cradle to select " Paper Size" , and then press [̈]. 10. For full details, see the instructions that the battery is fully charged.... 5. Press the USB cradle's [USB] button. • This displays the print menu on the camera's monitor screen. • Also, connect the AC adaptor to the USB cradle and plug the AC adaptor into the printer. 9. PRINTING IMAGES 4. Turn on...
... 11˝ By Printer • Selecting "By Printer" prints using battery power without the AC adaptor, make sure that come with the camera to connect the USB cradle to select " Paper Size" , and then press [̈]. 10. For full details, see the instructions that the battery is fully charged.... 5. Press the USB cradle's [USB] button. • This displays the print menu on the camera's monitor screen. • Also, connect the AC adaptor to the USB cradle and plug the AC adaptor into the printer. 9. PRINTING IMAGES 4. Turn on...

