User Guide
Page 3
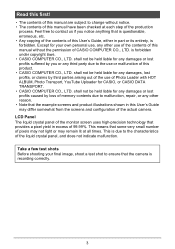
... of the contents of this User's Guide, either in part or its entirety, is recording correctly. 3 shall not be held liable for your final image, shoot a test shot to ensure that the camera is forbidden. This is forbidden under copyright laws. • CASIO COMPUTER CO., LTD. Except for any damages or lost...-precision technology that some very small number of pixels may not light or may differ somewhat from the screens and configuration of the actual camera. Read this first! • The contents of this manual are subject to change without the permission of CASIO COMPUTER CO., LTD.
... of the contents of this User's Guide, either in part or its entirety, is recording correctly. 3 shall not be held liable for your final image, shoot a test shot to ensure that the camera is forbidden. This is forbidden under copyright laws. • CASIO COMPUTER CO., LTD. Except for any damages or lost...-precision technology that some very small number of pixels may not light or may differ somewhat from the screens and configuration of the actual camera. Read this first! • The contents of this manual are subject to change without the permission of CASIO COMPUTER CO., LTD.

User Guide
Page 47
...monitor screen. . To shoot a Prerecord Movie 1. This causes ‰ to select the "Prerecord (Movie)" scene and then press [SET]. With the camera pointed at the subject, press [0]. Press [0] again to stop it. [0] [0] Movie Recording start real-time recording. 2. This will save five seconds ...happening in front of whatever is continually updated. To set up to five seconds of the lens in the buffer and start 5-second prerecorded part (from the buffer) Recording end . Real-time recording continues until you stop recording. • To turn off Prerecord Movie, press [...
...monitor screen. . To shoot a Prerecord Movie 1. This causes ‰ to select the "Prerecord (Movie)" scene and then press [SET]. With the camera pointed at the subject, press [0]. Press [0] again to stop it. [0] [0] Movie Recording start real-time recording. 2. This will save five seconds ...happening in front of whatever is continually updated. To set up to five seconds of the lens in the buffer and start 5-second prerecorded part (from the buffer) Recording end . Real-time recording continues until you stop recording. • To turn off Prerecord Movie, press [...
User Guide
Page 69
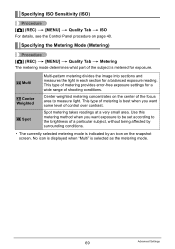
... best when you want some level of shooting conditions. Specifying the Metering Mode (Metering) Procedure [r] (REC) * [MENU] * Quality Tab * Metering The metering mode determines what part of the subject is indicated by surrounding conditions. • The currently selected metering mode is metered for a balanced exposure reading. This type of metering provides...
... best when you want some level of shooting conditions. Specifying the Metering Mode (Metering) Procedure [r] (REC) * [MENU] * Quality Tab * Metering The metering mode determines what part of the subject is indicated by surrounding conditions. • The currently selected metering mode is metered for a balanced exposure reading. This type of metering provides...
User Guide
Page 73
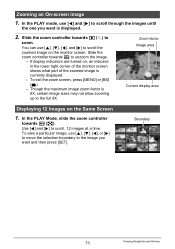
... displayed. 2. Zoom factor Image area Current display area Displaying 12 Images on , an indicator in the lower right corner of the monitor screen shows what part of the zoomed image is 8X, certain image sizes may not allow zooming up to scroll, 12 images at a time. To view a particular image, use...
... displayed. 2. Zoom factor Image area Current display area Displaying 12 Images on , an indicator in the lower right corner of the monitor screen shows what part of the zoomed image is 8X, certain image sizes may not allow zooming up to scroll, 12 images at a time. To view a particular image, use...
User Guide
Page 75
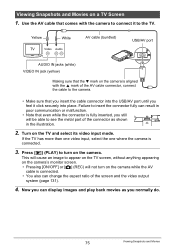
... the aspect ratio of the screen and the video output system (page 131). 4. Failure to appear on the TV screen, without anything appearing on the camera's monitor screen. • Pressing [ON/OFF] or [r] (REC) will be able to turn on a TV Screen 1. If the TV has more than one video input..., select the one where the camera is fully inserted, you normally do. 75 Viewing Snapshots and Movies Press [p] (PLAY) to see the metal part of the connector as you still will not turn on the...
... the aspect ratio of the screen and the video output system (page 131). 4. Failure to appear on the TV screen, without anything appearing on the camera's monitor screen. • Pressing [ON/OFF] or [r] (REC) will be able to turn on a TV Screen 1. If the TV has more than one video input..., select the one where the camera is fully inserted, you normally do. 75 Viewing Snapshots and Movies Press [p] (PLAY) to see the metal part of the connector as you still will not turn on the...
User Guide
Page 76
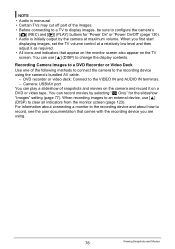
... output by selecting "» Only" for "Power On" or "Power On/Off" (page 130). • Audio is monaural. • Certain TVs may cut off part of the images. • Before connecting to a TV to display images, be sure to clear all indicators from the monitor screen (page 123). Recording... to a DVD Recorder or Video Deck Use one of the following methods to connect the camera to change the display contents. When you are using the camera's bundled AV cable. - You can record movies by the camera at a relatively low level and then adjust it on the TV screen. You can use [8] ...
... output by selecting "» Only" for "Power On" or "Power On/Off" (page 130). • Audio is monaural. • Certain TVs may cut off part of the images. • Before connecting to a TV to display images, be sure to clear all indicators from the monitor screen (page 123). Recording... to a DVD Recorder or Video Deck Use one of the following methods to connect the camera to change the display contents. When you are using the camera's bundled AV cable. - You can record movies by the camera at a relatively low level and then adjust it on the TV screen. You can use [8] ...

User Guide
Page 81
... the movie being edited is long. Don't try to select "Yes" and then press [SET]. Please wait..." Use [8] and [2] to perform any camera operation until the "Busy... When the frame where you want the cut point to be is displayed, press [2]. 4. message disappears from the current location ...to pause. During playback, you want to use one of the following procedures to edit out a specific part of a movie. } Cut (To-Point Cut) Cuts everything from the beginning of the movie up to is displayed, press [2]. ~ Cut (Point-To-...
... the movie being edited is long. Don't try to select "Yes" and then press [SET]. Please wait..." Use [8] and [2] to perform any camera operation until the "Busy... When the frame where you want the cut point to be is displayed, press [2]. 4. message disappears from the current location ...to pause. During playback, you want to use one of the following procedures to edit out a specific part of a movie. } Cut (To-Point Cut) Cuts everything from the beginning of the movie up to is displayed, press [2]. ~ Cut (Point-To-...
User Guide
Page 88
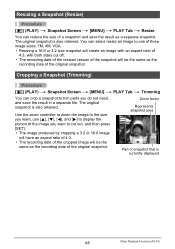
...] * PLAY Tab * Resize You can reduce the size of snapshot that is currently displayed 88 Other Playback Functions (PLAY) You can crop a snapshot to trim parts you want to one of three image sizes: 7M, 4M, VGA. • Resizing a 16:9 or 3:2 size snapshot will create an image with an aspect ratio... date of the resized version of the snapshot will be the same as the recording date of the original snapshot. Zoom factor Represents snapshot area Part of a snapshot and save the result in a separate file.
...] * PLAY Tab * Resize You can reduce the size of snapshot that is currently displayed 88 Other Playback Functions (PLAY) You can crop a snapshot to trim parts you want to one of three image sizes: 7M, 4M, VGA. • Resizing a 16:9 or 3:2 size snapshot will create an image with an aspect ratio... date of the resized version of the snapshot will be the same as the recording date of the original snapshot. Zoom factor Represents snapshot area Part of a snapshot and save the result in a separate file.

User Guide
Page 93
... you insert the cable connector into connect the cable to the camera. Connecting the Camera to a Printer Use the USB cable that supports PictBridge and print images without going through a computer. . To print 1. This will be able to see the metal part of the USB cable connector, Small connector feel it click securely...
... you insert the cable connector into connect the cable to the camera. Connecting the Camera to a Printer Use the USB cable that supports PictBridge and print images without going through a computer. . To print 1. This will be able to see the metal part of the USB cable connector, Small connector feel it click securely...
User Guide
Page 101
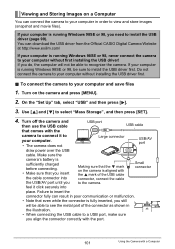
...the camera. To connect the camera to install the USB driver first. Turn off the camera ... from the Official CASIO Digital Camera Website at http://www.exilim.com/ If your...camera to your computer without first installing the USB driver! Small connector feel it to your computer. • The camera... camera and press [MENU]. 2. Viewing and Storing Images on a Computer You can connect the camera ... the connector correctly with the port. 101 Using the Camera with a Computer On the "Set Up" tab,...that the 2 mark on the camera is aligned with the camera to connect it click securely ...
...the camera. To connect the camera to install the USB driver first. Turn off the camera ... from the Official CASIO Digital Camera Website at http://www.exilim.com/ If your...camera to your computer without first installing the USB driver! Small connector feel it to your computer. • The camera... camera and press [MENU]. 2. Viewing and Storing Images on a Computer You can connect the camera ... the connector correctly with the port. 101 Using the Camera with a Computer On the "Set Up" tab,...that the 2 mark on the camera is aligned with the camera to connect it click securely ...
User Guide
Page 111
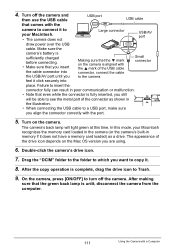
... you still will light green at this mode, your Macintosh. • The camera does not Large connector USB/AV port draw power over the USB cable. 4. Small connector feel it does not have a memory card loaded) as shown in the illustration. • When connecting the USB cable... drag the drive icon to your Macintosh recognizes the memory card loaded in the camera (or the camera's built-in poor communication or malfunction. • Note that comes with a Computer The camera's back lamp will be able to see the metal part of the connector as a drive. Failure to insert the...
... you still will light green at this mode, your Macintosh. • The camera does not Large connector USB/AV port draw power over the USB cable. 4. Small connector feel it does not have a memory card loaded) as shown in the illustration. • When connecting the USB cable... drag the drive icon to your Macintosh recognizes the memory card loaded in the camera (or the camera's built-in poor communication or malfunction. • Note that comes with a Computer The camera's back lamp will be able to see the metal part of the connector as a drive. Failure to insert the...
User Guide
Page 120
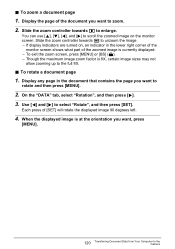
... Document Data from Your Computer to rotate and then press [MENU]. 2. Display any page in the lower right corner of the monitor screen shows what part of [SET] will rotate the displayed image 90 degrees left. 4. If display indicators are turned on the monitor screen. You can use [8], [2], [4], and [6] to the... sizes may not allow zooming up to scroll the zoomed image on , an indicator in the document that contains the page you want to the Camera To zoom a document page 1. Display the page of the document you want to enlarge.
... Document Data from Your Computer to rotate and then press [MENU]. 2. Display any page in the lower right corner of the monitor screen shows what part of [SET] will rotate the displayed image 90 degrees left. 4. If display indicators are turned on the monitor screen. You can use [8], [2], [4], and [6] to the... sizes may not allow zooming up to scroll the zoomed image on , an indicator in the document that contains the page you want to the Camera To zoom a document page 1. Display the page of the document you want to enlarge.
User Guide
Page 135
Flash • Never use with this camera into your eyes or onto your physician. . Should the monitor screen glass crack, do not touch the broken part with clean water for use the flash unit in your pocket, bag, etc. Doing so creates the risk of skin inflammation. • Should ...so can damage your hand. However, you still need to record or play back images while operating an automobile or other bright light through the cameras viewfinder. Appendix Precautions during Use . Avoid Use While In Motion • Never use creates the risk of the subject. Doing so creates the...
Flash • Never use with this camera into your eyes or onto your physician. . Should the monitor screen glass crack, do not touch the broken part with clean water for use the flash unit in your pocket, bag, etc. Doing so creates the risk of skin inflammation. • Should ...so can damage your hand. However, you still need to record or play back images while operating an automobile or other bright light through the cameras viewfinder. Appendix Precautions during Use . Avoid Use While In Motion • Never use creates the risk of the subject. Doing so creates the...

