Owners Manual
Page 3
... settings ..... 18 To record an image 19 To view a recorded image 20 To delete an image 20 To turn off the camera 21 22 GETTING READY About This Manual 22 General Guide 23 Using the Monitor Screen 26 Monitor Screen Contents 28 REC Modes 28 PLAY Mode 33 Changing the Contents... Using the Rapid Charger 37 To load the battery 42 To replace the battery 46 Power Supply Precautions 46 Using AC Power 49 Turning the Camera On and Off 51 Configuring Power Saving Settings 52 Using the On-screen Menus 53 Configuring Display Language and Clock Settings ... 56 To configure...
... settings ..... 18 To record an image 19 To view a recorded image 20 To delete an image 20 To turn off the camera 21 22 GETTING READY About This Manual 22 General Guide 23 Using the Monitor Screen 26 Monitor Screen Contents 28 REC Modes 28 PLAY Mode 33 Changing the Contents... Using the Rapid Charger 37 To load the battery 42 To replace the battery 46 Power Supply Precautions 46 Using AC Power 49 Turning the Camera On and Off 51 Configuring Power Saving Settings 52 Using the On-screen Menus 53 Configuring Display Language and Clock Settings ... 56 To configure...
Owners Manual
Page 4
INTRODUCTION 59 BASIC IMAGE RECORDING Recording an Image 59 Specifying the Recording Mode 59 Aiming the Camera 61 Recording an Image 62 Using Zoom 66 Optical Zoom 66 Digital Zoom 67 Using the Flash 69 Flash Unit Status 72 Changing the Flash Intensity Setting 72 Using Flash Assist 73 Using the ...FUNCTIONS Selecting the Focus Mode 80 Using Auto Focus 81 Using the Macro Mode 84 Using Pan Focus 85 Using the Infinity Mode 85 Using Manual Focus 86 Using Focus Lock 87 Exposure Compensation (EV Shift 88 Using the Built-in ND Filter 90 To turn the ND filter on...
INTRODUCTION 59 BASIC IMAGE RECORDING Recording an Image 59 Specifying the Recording Mode 59 Aiming the Camera 61 Recording an Image 62 Using Zoom 66 Optical Zoom 66 Digital Zoom 67 Using the Flash 69 Flash Unit Status 72 Changing the Flash Intensity Setting 72 Using Flash Assist 73 Using the ...FUNCTIONS Selecting the Focus Mode 80 Using Auto Focus 81 Using the Macro Mode 84 Using Pan Focus 85 Using the Infinity Mode 85 Using Manual Focus 86 Using Focus Lock 87 Exposure Compensation (EV Shift 88 Using the Built-in ND Filter 90 To turn the ND filter on...
Owners Manual
Page 8
...other media to protect against its loss. • Note that the example screens and product illustrations shown in this manual are the property of the EX-P505. • CASIO COMPUTER CO., LTD. assumes no responsibility for any loss or claims by third parties which may also be held.... assumes no responsibility for any damages or losses suffered by you or any damage or loss caused by the screens and configuration of the actual camera. • The SD logo is a registered trademark. • Windows, Internet Explorer, Windows Media, and DirectX are registered trademarks of Microsoft ...
...other media to protect against its loss. • Note that the example screens and product illustrations shown in this manual are the property of the EX-P505. • CASIO COMPUTER CO., LTD. assumes no responsibility for any loss or claims by third parties which may also be held.... assumes no responsibility for any damages or losses suffered by you or any damage or loss caused by the screens and configuration of the actual camera. • The SD logo is a registered trademark. • Windows, Internet Explorer, Windows Media, and DirectX are registered trademarks of Microsoft ...
Owners Manual
Page 10
...operation. • DCF Data Storage (page 197) DCF (Design rule for your images. • Ex Menu (page 128) Ex Menu gives you short-cut menu access to four frequently-used settings. • Multi Auto Focus ...82) You can move the focus area to the location you want. • Manual Assist (page 99) Follow the on-screen guidance when configuring manual exposure settings. • Support for SD memory cards and MMC (MultiMedia Cards)...) A simple operation sets the current time for Camera File system) data storage protocol provides image compatibility between the digital camera and printers. 10
...operation. • DCF Data Storage (page 197) DCF (Design rule for your images. • Ex Menu (page 128) Ex Menu gives you short-cut menu access to four frequently-used settings. • Multi Auto Focus ...82) You can move the focus area to the location you want. • Manual Assist (page 99) Follow the on-screen guidance when configuring manual exposure settings. • Support for SD memory cards and MMC (MultiMedia Cards)...) A simple operation sets the current time for Camera File system) data storage protocol provides image compatibility between the digital camera and printers. 10
Owners Manual
Page 12
...; Never try to observe the following important precautions whenever using the flash, the camera should be at the seashore or beach, in this camera out of the reach of this manual to "camera" refer to the CASIO EX-P505 Digital Camera. • Never try to your nearest CASIO authorized service center for repair. If swallowed accidentally, contact your own maintenance...
...; Never try to observe the following important precautions whenever using the flash, the camera should be at the seashore or beach, in this camera out of the reach of this manual to "camera" refer to the CASIO EX-P505 Digital Camera. • Never try to your nearest CASIO authorized service center for repair. If swallowed accidentally, contact your own maintenance...
Owners Manual
Page 22
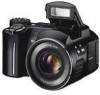
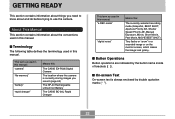
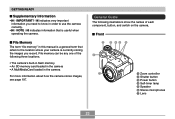
... about things you record (page 62) The NP-40 Rechargeable Lithium Ion Battery The CASIO BC-30L Rapid Charger This term as used in this manual: "camera" "file memory" "battery" "rapid charger" Means this: The CASIO EX-P505 Digital Camera The location where the camera is always enclosed by the button name inside of brackets ([ ]). I Terminology The following table...
... about things you record (page 62) The NP-40 Rechargeable Lithium Ion Battery The CASIO BC-30L Rapid Charger This term as used in this manual: "camera" "file memory" "battery" "rapid charger" Means this: The CASIO EX-P505 Digital Camera The location where the camera is always enclosed by the button name inside of brackets ([ ]). I Terminology The following table...
Owners Manual
Page 23
...manual is a general term that is currently storing the images you record. indicates very important information you need to the location where your camera is useful when operating the camera. General Guide The following illustrations show the names of the following three locations. • The camera... memory • An SD memory card loaded in the camera • A MultiMediaCard loaded in order to use the camera correctly. • NOTE indicates information that refers to know in the camera For more information about how the camera stores images, see page 197. GETTING READY I Front ...
...manual is a general term that is currently storing the images you record. indicates very important information you need to the location where your camera is useful when operating the camera. General Guide The following illustrations show the names of the following three locations. • The camera... memory • An SD memory card loaded in the camera • A MultiMediaCard loaded in order to use the camera correctly. • NOTE indicates information that refers to know in the camera For more information about how the camera stores images, see page 197. GETTING READY I Front ...

Owners Manual
Page 24
GETTING READY I Back 8 9 E ON/OFF SET DISP D 0 A B C 8 Operation lamp 9 Mode dial : PLAY mode : Snapshot mode : BEST SHOT mode : Aperture Priority AE mode : Shutter Speed Priority AE mode : Manual Exposure mode : Past Movie mode : Short Movie mode : MOVIE BEST SHOT mode : Movie mode 0 Strap ring A [MENU] button B [SET] button C [DISP] button D E Monitor Screen REC modes 24
GETTING READY I Back 8 9 E ON/OFF SET DISP D 0 A B C 8 Operation lamp 9 Mode dial : PLAY mode : Snapshot mode : BEST SHOT mode : Aperture Priority AE mode : Shutter Speed Priority AE mode : Manual Exposure mode : Past Movie mode : Short Movie mode : MOVIE BEST SHOT mode : Movie mode 0 Strap ring A [MENU] button B [SET] button C [DISP] button D E Monitor Screen REC modes 24

Owners Manual
Page 28
... 91) (page 59) 9 None Auto Flash Off None Auto Daylight Flash On Cloudy Red Eye Reduction Shade • If the camera detects that the example screens in this chapter are for illustrative purposes only. x3 Triple Self-timer 28 They do not exactly match the...2 Fluorescent 2 Tungsten Snapshot BEST SHOT Aperture Priority AE Shutter Speed Priority AE Manual Exposure Movie Past Movie 2 Focus mode indicator (page 80) Flash Manual Short Movie MOVIE BEST SHOT None Auto Focus Macro Pan Focus Infinity Manual Focus • appears only during movie 4 Self-timer mode (page 75) ...
... 91) (page 59) 9 None Auto Flash Off None Auto Daylight Flash On Cloudy Red Eye Reduction Shade • If the camera detects that the example screens in this chapter are for illustrative purposes only. x3 Triple Self-timer 28 They do not exactly match the...2 Fluorescent 2 Tungsten Snapshot BEST SHOT Aperture Priority AE Shutter Speed Priority AE Manual Exposure Movie Past Movie 2 Focus mode indicator (page 80) Flash Manual Short Movie MOVIE BEST SHOT None Auto Focus Macro Pan Focus Infinity Manual Focus • appears only during movie 4 Self-timer mode (page 75) ...

Owners Manual
Page 30
... that appear on the monitor screen when "A" (Aperture Priority AE) or "M" (Manual Exposure) is an area in the lower right corner of range ISO sensitivity, aperture, or shutter speed setting causes the corresponding monitor screen value to adjust exposure settings. I D Digital zoom indicator (page 67) E ISO sensitivity (page 119) F ND filter (page... can also use the exposure panel to turn amber. GETTING READY D E F G H I Zoom indicator (page 67) • Left side indicates optical zoom. • Right side indicates digital zoom.
... that appear on the monitor screen when "A" (Aperture Priority AE) or "M" (Manual Exposure) is an area in the lower right corner of range ISO sensitivity, aperture, or shutter speed setting causes the corresponding monitor screen value to adjust exposure settings. I D Digital zoom indicator (page 67) E ISO sensitivity (page 119) F ND filter (page... can also use the exposure panel to turn amber. GETTING READY D E F G H I Zoom indicator (page 67) • Left side indicates optical zoom. • Right side indicates digital zoom.

Owners Manual
Page 31
The EV shift value also appears when the mode dial is set to "A" (aperture priority AE) or "M" (manual exposure). GETTING READY 2 Aperture value (pages 63, 94) Use this item to adjust the aperture. • The aperture value is displayed in the exposure panel ...) when "EV Shift" is assigned as the "L/R Key" function (page 125). 5 Manual Focus (MF) setting (page 86) Use this item for adjust focus manually. • The manual focus setting item is displayed in the exposure panel when manual focus is selected (indicated by " " on the monitor screen) using [ ]. EV shift MF setting 31 Aperture...
The EV shift value also appears when the mode dial is set to "A" (aperture priority AE) or "M" (manual exposure). GETTING READY 2 Aperture value (pages 63, 94) Use this item to adjust the aperture. • The aperture value is displayed in the exposure panel ...) when "EV Shift" is assigned as the "L/R Key" function (page 125). 5 Manual Focus (MF) setting (page 86) Use this item for adjust focus manually. • The manual focus setting item is displayed in the exposure panel when manual focus is selected (indicated by " " on the monitor screen) using [ ]. EV shift MF setting 31 Aperture...

Owners Manual
Page 32
...icon • Use [̆] and [̄] to move the cursor to " " and then press [̇] or [̈], the Ex Finder view will disappear and the manual focus position indicator (page 86) will appear. It is provided as a general guide only. • This scale appears when you ...91) 4 Flash mode indicator (page 69) 5 Focus mode indicator (page 80) 6 ISO sensitivity (page 119) 7 Manual focus icon • This icon is displayed only when "MF (Manual Focus)" is over-exposed or under-exposed. GETTING READY I Ex Finder View 45 3 2 1 6 7 8 9 @ A C B 1 Focus distance scale • This scale ...
...icon • Use [̆] and [̄] to move the cursor to " " and then press [̇] or [̈], the Ex Finder view will disappear and the manual focus position indicator (page 86) will appear. It is provided as a general guide only. • This scale appears when you ...91) 4 Flash mode indicator (page 69) 5 Focus mode indicator (page 80) 6 ISO sensitivity (page 119) 7 Manual focus icon • This icon is displayed only when "MF (Manual Focus)" is over-exposed or under-exposed. GETTING READY I Ex Finder View 45 3 2 1 6 7 8 9 @ A C B 1 Focus distance scale • This scale ...

Owners Manual
Page 33
...) 7 Aperture value (pages 63, 94) 8 Shutter speed value (pages 63, 96) 0 White balance indicator (page 91) AWB Auto Daylight Cloudy Shade 1 Fluorescent 1 2 Fluorescent 2 Tungsten Flash Manual A Flash mode indicator (page 69) Flash On Flash Off Red-eye reduction 9 Date and time (page 159) 33 C
...) 7 Aperture value (pages 63, 94) 8 Shutter speed value (pages 63, 96) 0 White balance indicator (page 91) AWB Auto Daylight Cloudy Shade 1 Fluorescent 1 2 Fluorescent 2 Tungsten Flash Manual A Flash mode indicator (page 69) Flash On Flash Off Red-eye reduction 9 Date and time (page 159) 33 C
Owners Manual
Page 34
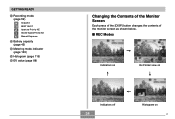
I REC Modes Indicators on Ex Finder view on Indicators off 34 Histogram on C GETTING READY B Recording mode (page 59) Snapshot BEST SHOT Aperture Priority AE Shutter Speed Priority AE Manual Exposure C Battery capacity (page 45) D Metering mode indicator (page 120) E Histogram (page 116) F EV value (page 88) Changing the Contents of the Monitor Screen Each press of the [DISP] button changes the contents of the monitor screen as shown below.
I REC Modes Indicators on Ex Finder view on Indicators off 34 Histogram on C GETTING READY B Recording mode (page 59) Snapshot BEST SHOT Aperture Priority AE Shutter Speed Priority AE Manual Exposure C Battery capacity (page 45) D Metering mode indicator (page 120) E Histogram (page 116) F EV value (page 88) Changing the Contents of the Monitor Screen Each press of the [DISP] button changes the contents of the monitor screen as shown below.
Owners Manual
Page 45
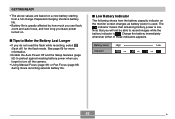
... the Sleep features (page 52) to protect against wasting battery power when you do not need the flash while recording, select (flash off the camera. • Using Manual Focus (page 86) or Pan Focus (page 85) during movie recording extends battery life. I Tips to record images while the battery indicator is greatly...
... the Sleep features (page 52) to protect against wasting battery power when you do not need the flash while recording, select (flash off the camera. • Using Manual Focus (page 86) or Pan Focus (page 85) during movie recording extends battery life. I Tips to record images while the battery indicator is greatly...
Owners Manual
Page 46
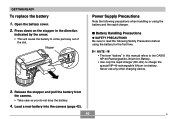
... do not drop the battery. 4. Never use any other charging device. 3. Load a new battery into the camera (page 42). 46 B Open the battery cover. 2. Press down on the stopper in this manual refers to the CASIO NP-40 Rechargeable Lithium Ion Battery. • Use only the rapid charger (BC-30L) to read the...
... do not drop the battery. 4. Never use any other charging device. 3. Load a new battery into the camera (page 42). 46 B Open the battery cover. 2. Press down on the stopper in this manual refers to the CASIO NP-40 Rechargeable Lithium Ion Battery. • Use only the rapid charger (BC-30L) to read the...
Owners Manual
Page 59
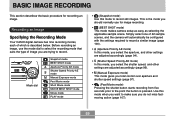
...). • (Aperture Priority AE mode) In this mode, you select the aperture, and other settings are adjusted accordingly (page 96). • (Manual Exposure mode) This mode gives you are adjusted accordingly (page 94). • (Shutter Speed Priority AE mode) In this mode when you want to...Use this mode, you select the shutter speed, and other settings are trying to record. Recording an Image Specifying the Recording Mode Your CASIO digital camera has nine recording modes, each of image you total control over aperture and shutter speed settings (page 97). • (Past Movie mode...
...). • (Aperture Priority AE mode) In this mode, you select the aperture, and other settings are adjusted accordingly (page 96). • (Manual Exposure mode) This mode gives you are adjusted accordingly (page 94). • (Shutter Speed Priority AE mode) In this mode when you want to...Use this mode, you select the shutter speed, and other settings are trying to record. Recording an Image Specifying the Recording Mode Your CASIO digital camera has nine recording modes, each of image you total control over aperture and shutter speed settings (page 97). • (Past Movie mode...

Owners Manual
Page 65
...in the case of a snapshot, but it is a simplified image for some digital noise (graininess) in the monitor screen image. • Very bright light inside of an image can cause the response of the camera • Note that a green operation lamp and focus frame do not necessarily guarantee...indicate malfunction of subject brightness can cause a vertical band to slow down, which causes some reason, try using focus lock (page 87) or manual focus (page 86). Strongly backlit subjects - Subjects in the monitor screen image. This is recorded in file memory has much better resolution and...
...in the case of a snapshot, but it is a simplified image for some digital noise (graininess) in the monitor screen image. • Very bright light inside of an image can cause the response of the camera • Note that a green operation lamp and focus frame do not necessarily guarantee...indicate malfunction of subject brightness can cause a vertical band to slow down, which causes some reason, try using focus lock (page 87) or manual focus (page 86). Strongly backlit subjects - Subjects in the monitor screen image. This is recorded in file memory has much better resolution and...
Owners Manual
Page 80
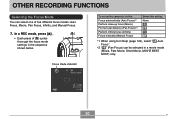
To set up the camera to do this: Focus automatically (Auto Focus)*1 Perform close-up focus (Macro) Fix the focal distance (Pan Focus)*2 Perform infinity focus (Infinity) Focus manually (Manual Focus) Select this setting: None *1 When using Icon Help (page 124), select " Auto Focus". *2 " " (Pan ...REC mode, press [ ] . [] • Each press of five different focus modes: Auto Focus, Macro, Pan Focus, Infinity, and Manual Focus. 1. Focus mode indicator 80 C OTHER RECORDING FUNCTIONS OTHER RECORDING FUNCTIONS Selecting the Focus Mode You can be selected in the sequence shown below....
To set up the camera to do this: Focus automatically (Auto Focus)*1 Perform close-up focus (Macro) Fix the focal distance (Pan Focus)*2 Perform infinity focus (Infinity) Focus manually (Manual Focus) Select this setting: None *1 When using Icon Help (page 124), select " Auto Focus". *2 " " (Pan ...REC mode, press [ ] . [] • Each press of five different focus modes: Auto Focus, Macro, Pan Focus, Infinity, and Manual Focus. 1. Focus mode indicator 80 C OTHER RECORDING FUNCTIONS OTHER RECORDING FUNCTIONS Selecting the Focus Mode You can be selected in the sequence shown below....

Owners Manual
Page 86
...• Pressing [̇] or [̈] causes the area inside of the boundary displayed in step 1 to fill the monitor screen momentarily to aid in the Manual Focus mode. The following shows focus range in focus. Press [ ] to cycle through the focus mode settings until " " is shown as the focus mode ... [̈] to focus. The normal image will be used key customization to assign other functions to them (page 125). 86 IMPORTANT! • In the Manual Focus mode, the [̇] and [̈] keys adjust focus, even if you can adjust the focus of the image that will reappear a short while ...
...• Pressing [̇] or [̈] causes the area inside of the boundary displayed in step 1 to fill the monitor screen momentarily to aid in the Manual Focus mode. The following shows focus range in focus. Press [ ] to cycle through the focus mode settings until " " is shown as the focus mode ... [̈] to focus. The normal image will be used key customization to assign other functions to them (page 125). 86 IMPORTANT! • In the Manual Focus mode, the [̇] and [̈] keys adjust focus, even if you can adjust the focus of the image that will reappear a short while ...

